How to use each menu
Notebooks
Notebooks is a web browser–based source editing tool (Web IDE) that provides convenience for writing code.
Supported notebook images
The following notebook images are supported. If the required ML framework is not available, you can use a custom Docker image.
The image registry endpoint is mlops.kr-central-2.kcr.dev/kc-kubeflow-registry/(image-name).
- For example, to pull the image kc-jupyter-pytorch-full:natl.py311.cu130.1a, use
mlops.kr-central-2.kcr.dev/kc-kubeflow-registry/kc-jupyter-pytorch-full:natl.py311.cu130.1a.
Supported notebook information
| Image name | Python version | Framework (version) | GPU support |
|---|---|---|---|
| kc-kubeflow-registry/kc-jupyter-scipy:natl.py311.cpu.1a | python 3.11.11 | - | X |
| kc-kubeflow-registry/kc-jupyter-scipy:natl.py311.cu130.1a | python 3.11.11 | - | O |
| kc-kubeflow-registry/kc-jupyter-tensorflow:natl.py311.cpu.1a | python 3.11.11 | tensorflow(2.21.0) | X |
| kc-kubeflow-registry/kc-jupyter-tensorflow:natl.py311.cu130.1a | python 3.11.11 | tensorflow(2.21.0) | O |
| kc-kubeflow-registry/kc-jupyter-tensorflow:natl.py312.cu128.1b | python 3.12.3 | tensorflow(2.17.0) | O |
| kc-kubeflow-registry/kc-jupyter-pytorch:natl.py311.cpu.1a | python 3.11.11 | pytorch(2.5.1) | X |
| kc-kubeflow-registry/kc-jupyter-pytorch:natl.py311.cu130.1a | python 3.11.11 | pytorch(2.10.0.dev20251202) | O |
| kc-kubeflow-registry/kc-jupyter-pytorch:natl.py311.cu130.1b | python 3.11.11 | pytorch(2.9.1) | O |
| kc-kubeflow-registry/kc-jupyter-tensorflow-full:natl.py311.cpu.1a | python 3.11.11 | tensorflow(2.21.0) | X |
| kc-kubeflow-registry/kc-jupyter-tensorflow-full:natl.py311.cu130.1a | python 3.11.11 | tensorflow(2.21.0) | O |
| kc-kubeflow-registry/kc-jupyter-tensorflow-full:natl.py312.cu128.1b | python 3.12.3 | tensorflow(2.17.0) | O |
| kc-kubeflow-registry/kc-jupyter-pytorch-full:natl.py311.cpu.1a | python 3.11.11 | pytorch(2.5.1) | X |
| kc-kubeflow-registry/kc-jupyter-pytorch-full:natl.py311.cu130.1a | python 3.11.11 | pytorch(2.10.0.dev20251202) | O |
| kc-kubeflow-registry/kc-jupyter-pytorch-full:natl.py311.cu130.1b | python 3.11.11 | pytorch(2.9.1) | O |
| kc-kubeflow-registry/kc-jupyter-pyspark-tensorflow:natl.py311.cpu.1a | python 3.11.11 | tensorflow(2.21.0) | X |
| kc-kubeflow-registry/kc-jupyter-pyspark-tensorflow:natl.py311.cu130.1a | python 3.11.11 | tensorflow(2.21.0) | O |
| kc-kubeflow-registry/kc-jupyter-pyspark-tensorflow:natl.py312.cu128.1b | python 3.12.3 | tensorflow(2.17.0) | O |
| kc-kubeflow-registry/kc-jupyter-pyspark-pytorch:natl.py311.cpu.1a | python 3.11.11 | pytorch(2.5.1) | X |
| kc-kubeflow-registry/kc-jupyter-pyspark-pytorch:natl.py311.cu130.1a | python 3.11.11 | pytorch(2.10.0.dev20251202) | O |
| kc-kubeflow-registry/kc-jupyter-pyspark-pytorch:natl.py311.cu130.1b | python 3.11.11 | pytorch(2.9.1) | O |
| kc-kubeflow-registry/kc-codeserver-pytorch:natl.py311.cpu.1a | python 3.11.11 | pytorch(2.5.1) | X |
| kc-kubeflow-registry/kc-codeserver-pytorch:natl.py311.cu130.1a | python 3.11.11 | pytorch(2.10.0.dev20251202) | O |
| kc-kubeflow-registry/kc-codeserver-pytorch:natl.py311.cu130.1b | python 3.11.11 | pytorch(2.9.1) | O |
| kc-kubeflow-registry/kc-codeserver-tensorflow:natl.py311.cpu.1a | python 3.11.11 | tensorflow(2.21.0) | X |
| kc-kubeflow-registry/kc-codeserver-tensorflow:natl.py311.cu130.1a | python 3.11.11 | tensorflow(2.21.0) | O |
| kc-kubeflow-registry/kc-codeserver-tensorflow:natl.py312.cu128.1b | python 3.12.3 | tensorflow(2.17.0) | O |
| kc-kubeflow-registry/kc-jupyter-llm-dev-kit:natl.py311.cu130.1a | python 3.11.11 | pytorch(2.10.0.dev20251202) | O |
| kc-kubeflow-registry/kc-jupyter-llm-dev-kit:natl.py311.cu130.1b | python 3.11.11 | pytorch(2.9.1) | O |
If you select Custom Image, you can specify an image using a Docker Hub or public registry URL.
- If the image is not based on Jupyter Lab, the notebook may not be created properly.
ARG BASE_IMG=<mlops.kr-central-2.kcr.dev/kc-kubeflow-registry/kc-jupyter-pytorch-full:natl.py311.cu130.1a>
FROM $BASE_IMG

ARG PYTHON_VER=38
ARG FRAMEWORK_TYPE=38

ENV DEBIAN_FRONTEND=noninteractive

USER $NB_UID

#
# *** YOUR CUSTOM DOCKER CODE HERE ***
#

COPY --chown=jovyan:users requirements.txt /tmp/requirements.txt

RUN python3 -m pip install --upgrade pip --quiet \
    && python3 -m pip install -r /tmp/requirements.txt --no-cache-dir \
    && rm -f /tmp/requirements.txt
# INSTALLABLE PYTHON PACKAGES IN requirements.txt
    ## *** YOUR INSTALLABLE PACKAGES ***
    ## ex) tensorflow==2.5.2
BASE_IMG: Refer to Supported notebook images.
Create notebook instance
Create a notebook instance with the desired specifications to build a computing environment required for running ML code and processing data.
-
Access the login page of the National AI computing resource support portal and move to the Kubeflow page.
-
Select the Notebooks tab located on the left.
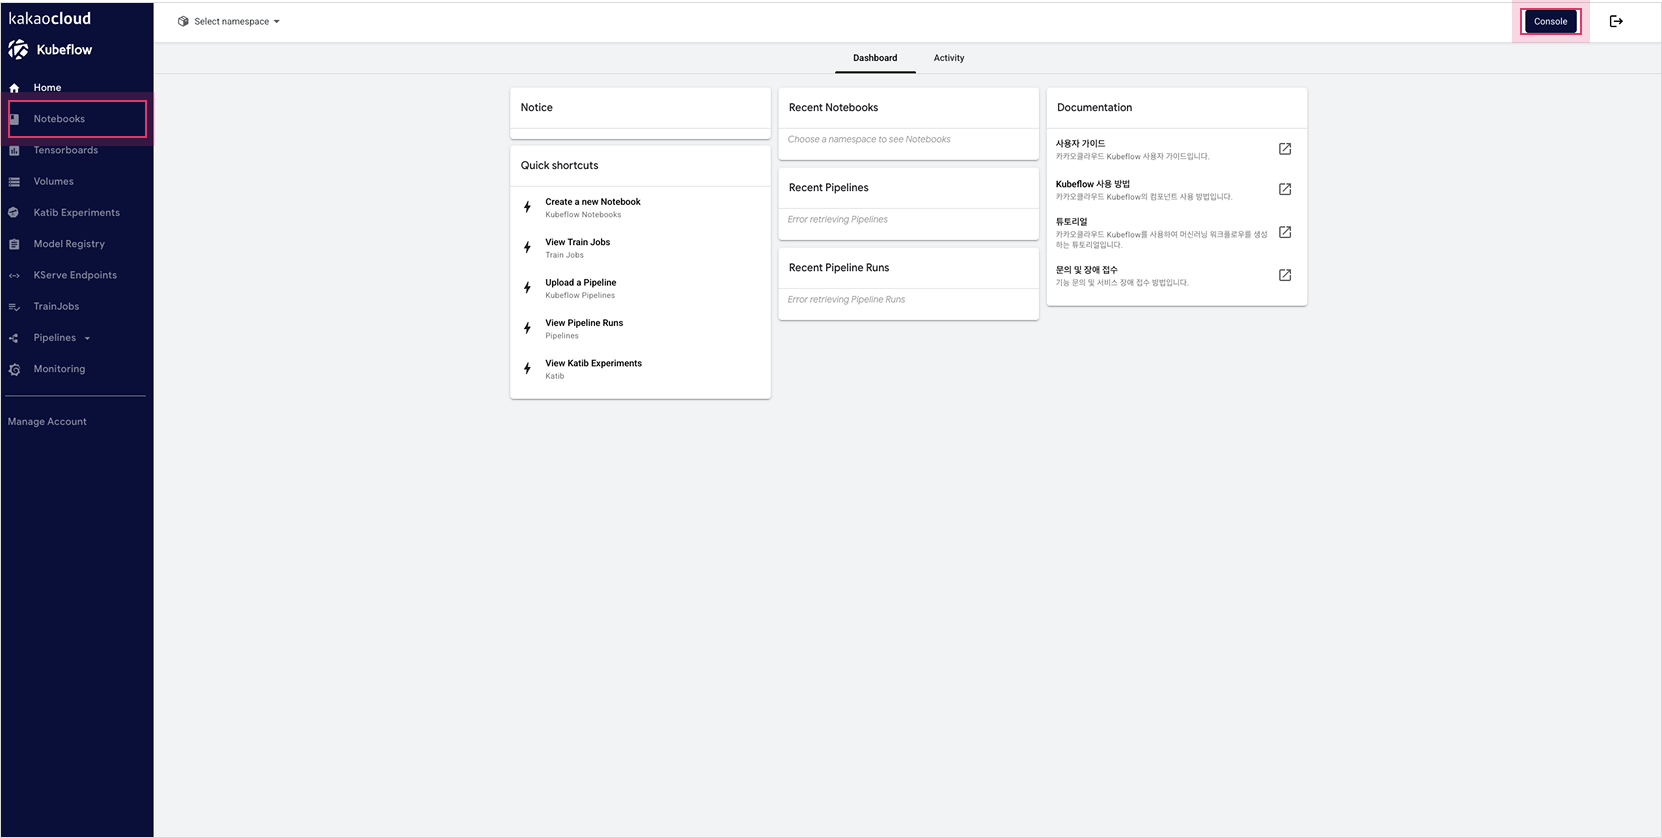 Access the Notebooks tab from the dashboard
 -
Click the [New Notebook] button located at the top right.
-
On the New Notebook screen, enter the required information and click the [LAUNCH] button to create the notebook instance.
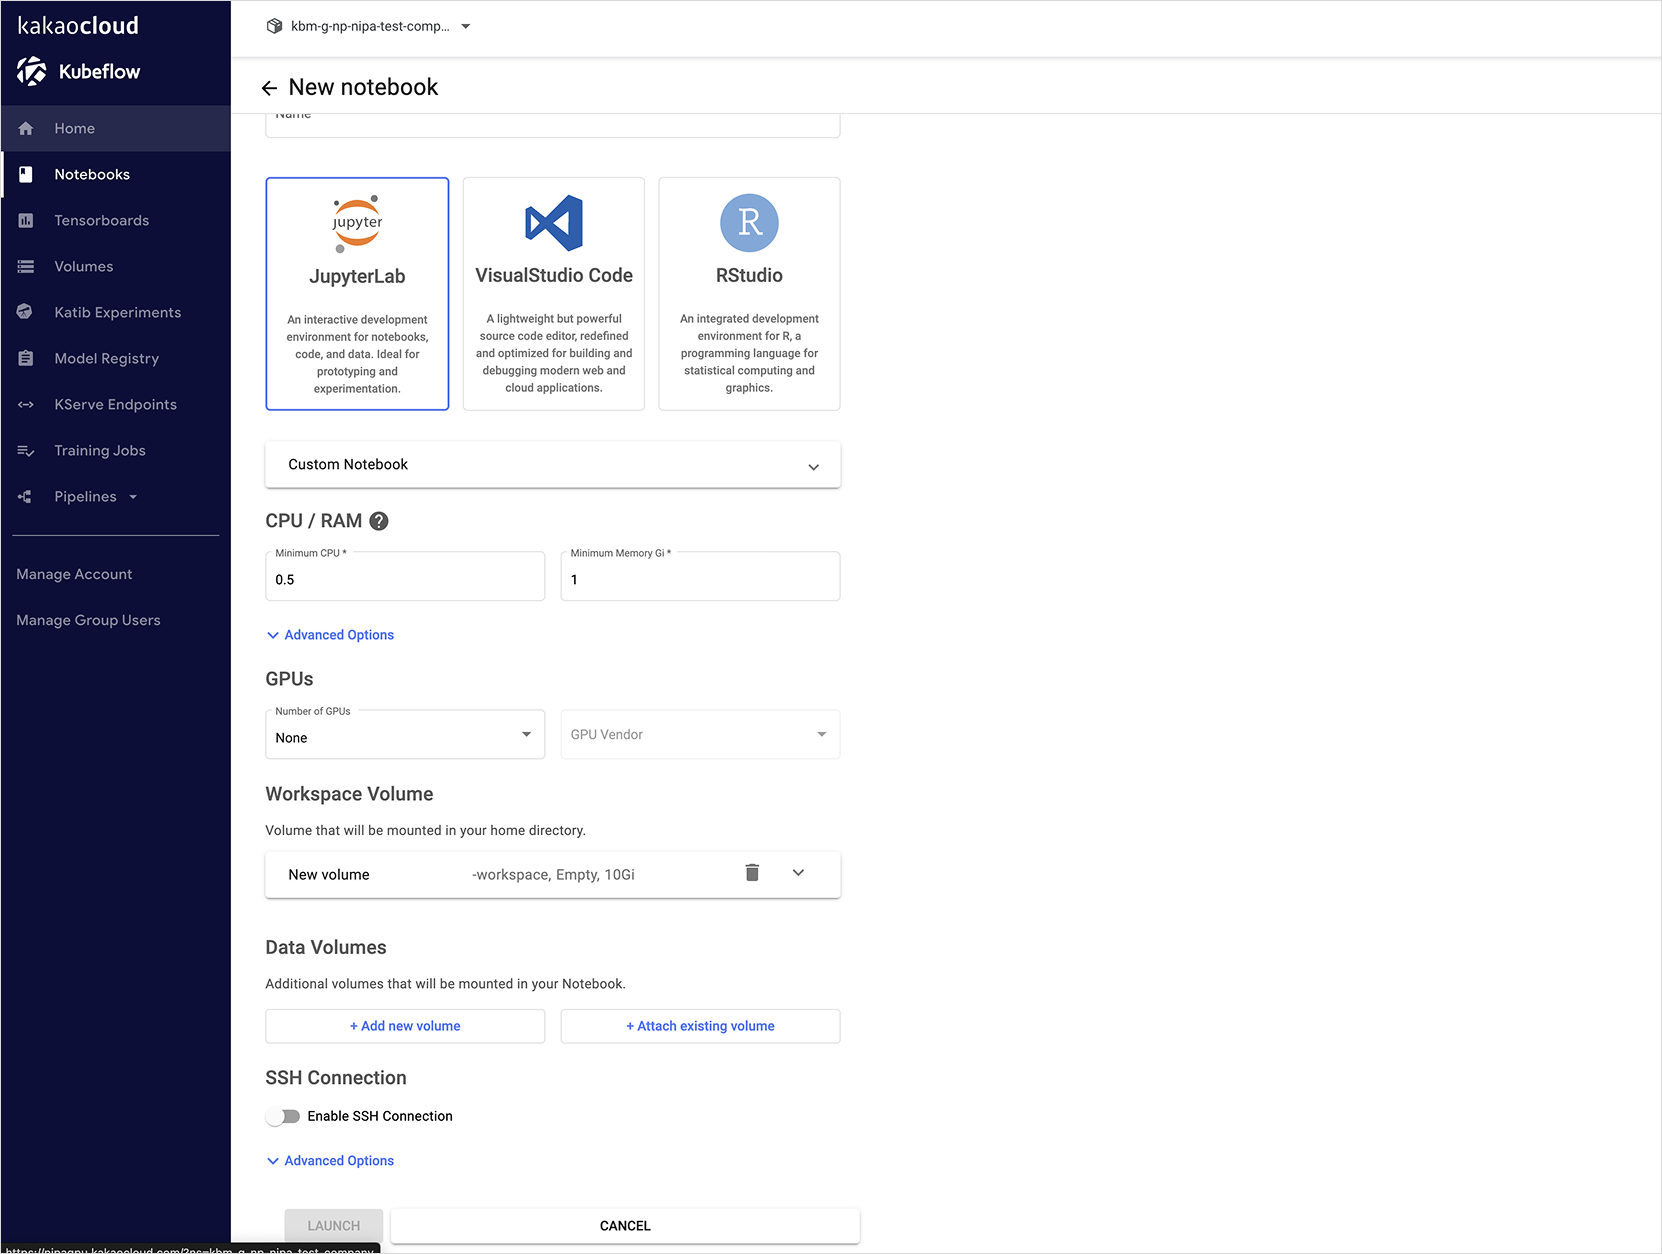 Create notebook
Item Category Description Name Name Used to identify the notebook instance on the dashboard Namespace Kubernetes namespace where the notebook instance is created Docker Image Custom Image If Custom Image is selected, you can specify an image using Docker Hub or a public registry URL Image Select one of JupyterLab/VisualStudio Code/RStudio, then select the image to installCPU / RAM Requested CPUs 2
- Number of CPU cores, specifies the amount of CPU resources used by the notebook instanceRequested memory in Gi 4
- Memory resource unit (GiB), specifies the amount of memory resources used by the notebook instanceGPU Number of GPUs Optional
- Number of GPUs, specifies the amount of GPU resources used by the notebook instanceWorkspace Volume New Volume(default) Create and add a new volume to be mounted to the directory (Storage class types) Add existing volume Select and add an existing volume to be mounted to the directory Data Volumes Add new volume Create and add a new volume to be mounted inside the notebook instance Add existing volume Select and add an existing volume to be mounted inside the notebook instance Enable SSH Connection Enable when SSH access to the notebook is required
- SSH connection guide
Access notebook instance
-
Access the login page of the National AI computing resource support portal and move to the Kubeflow page.
-
Select the Notebooks tab located on the left.
-
In the list of created Notebooks, click the [CONNECT] button for the notebook you want to access.
-
When you click the [CONNECT] button, a new tab opens and the Jupyter Notebook interface for the notebook instance is displayed.
- You can open notebooks, write code, or run machine learning models.
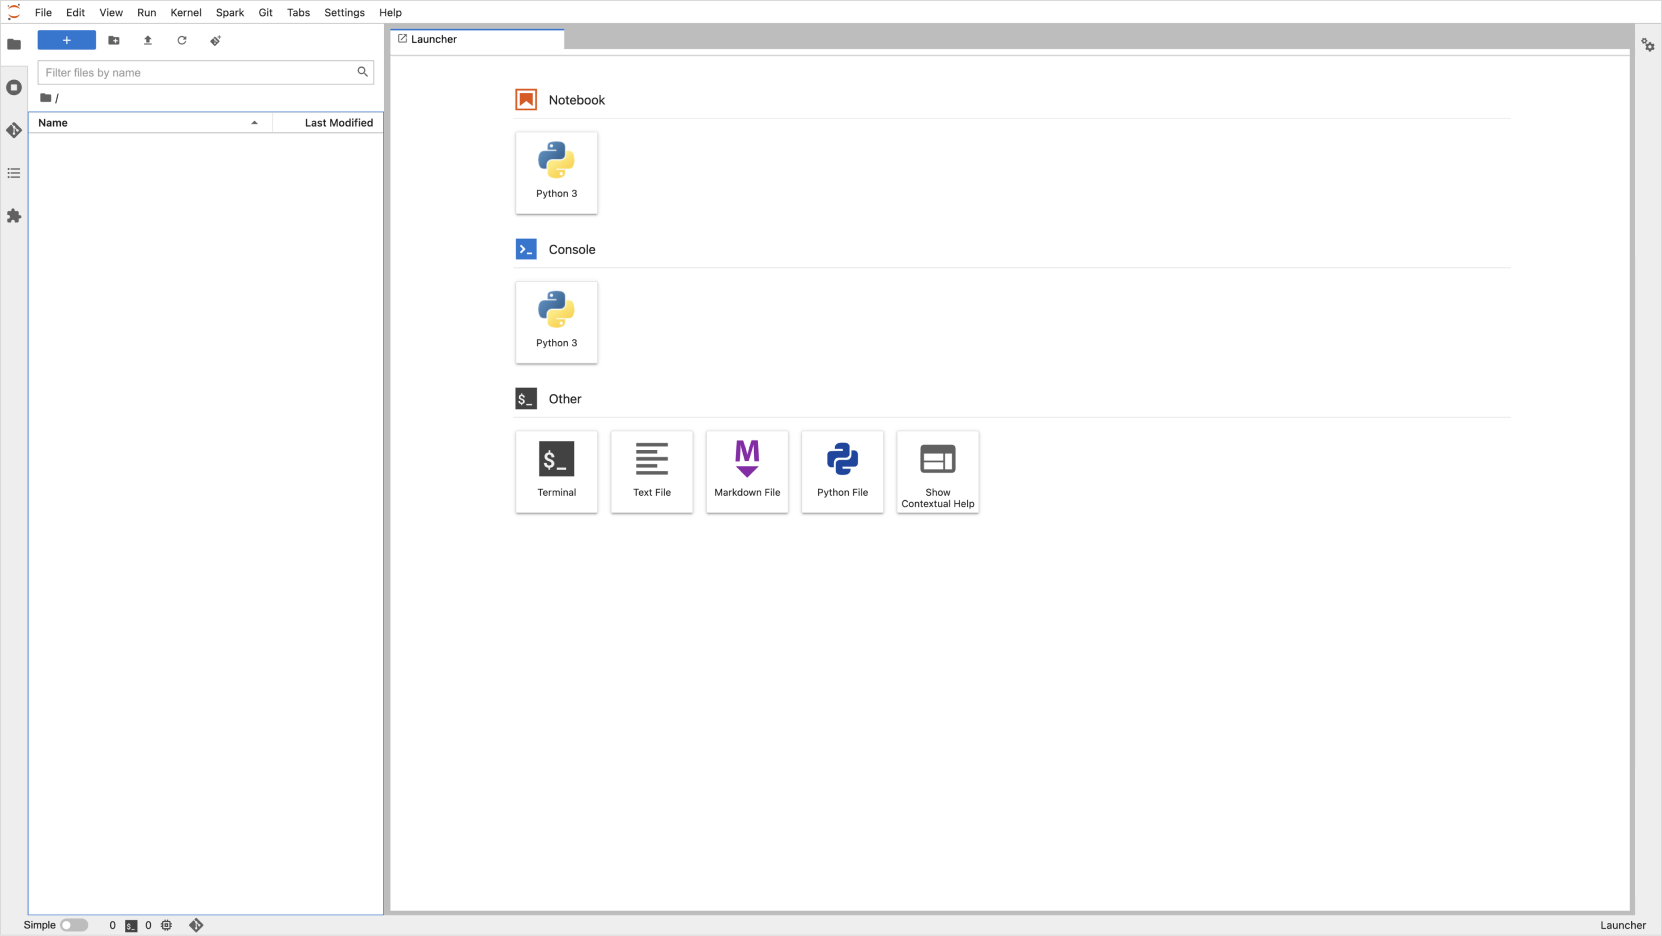 Jupyter Notebook interface
 -
You can use the notebook instance through the Terminal.
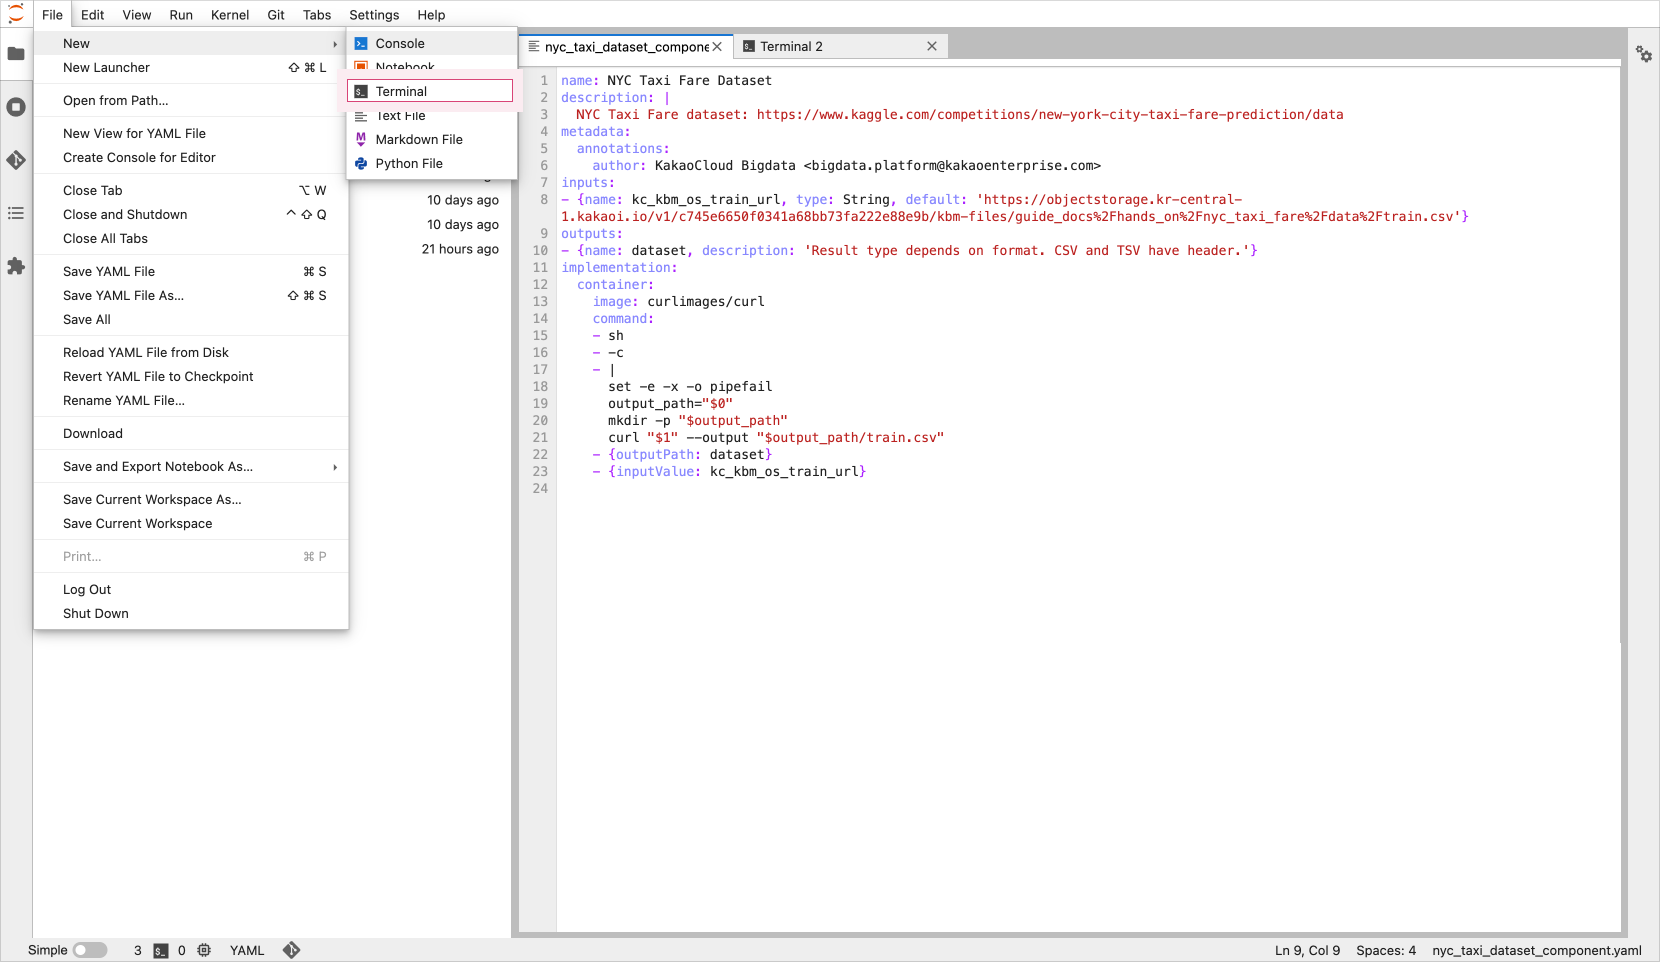 Click terminal
Stop notebook instance
Stop a notebook instance mainly for resource savings, security, cost reduction, and environment management. If a notebook instance continues running, resources cannot be allocated to other tasks, and security issues and increased costs may occur.
No charges are incurred for stopped notebook instances.
-
Access the login page of the National AI computing resource support portal and move to the Kubeflow page.
-
Select the Notebooks tab located on the left.
-
In the Notebooks list, click the ◼ (Stop) button in the row of the notebook you want to stop.
- When the stop confirmation modal appears, click the [STOP] button.
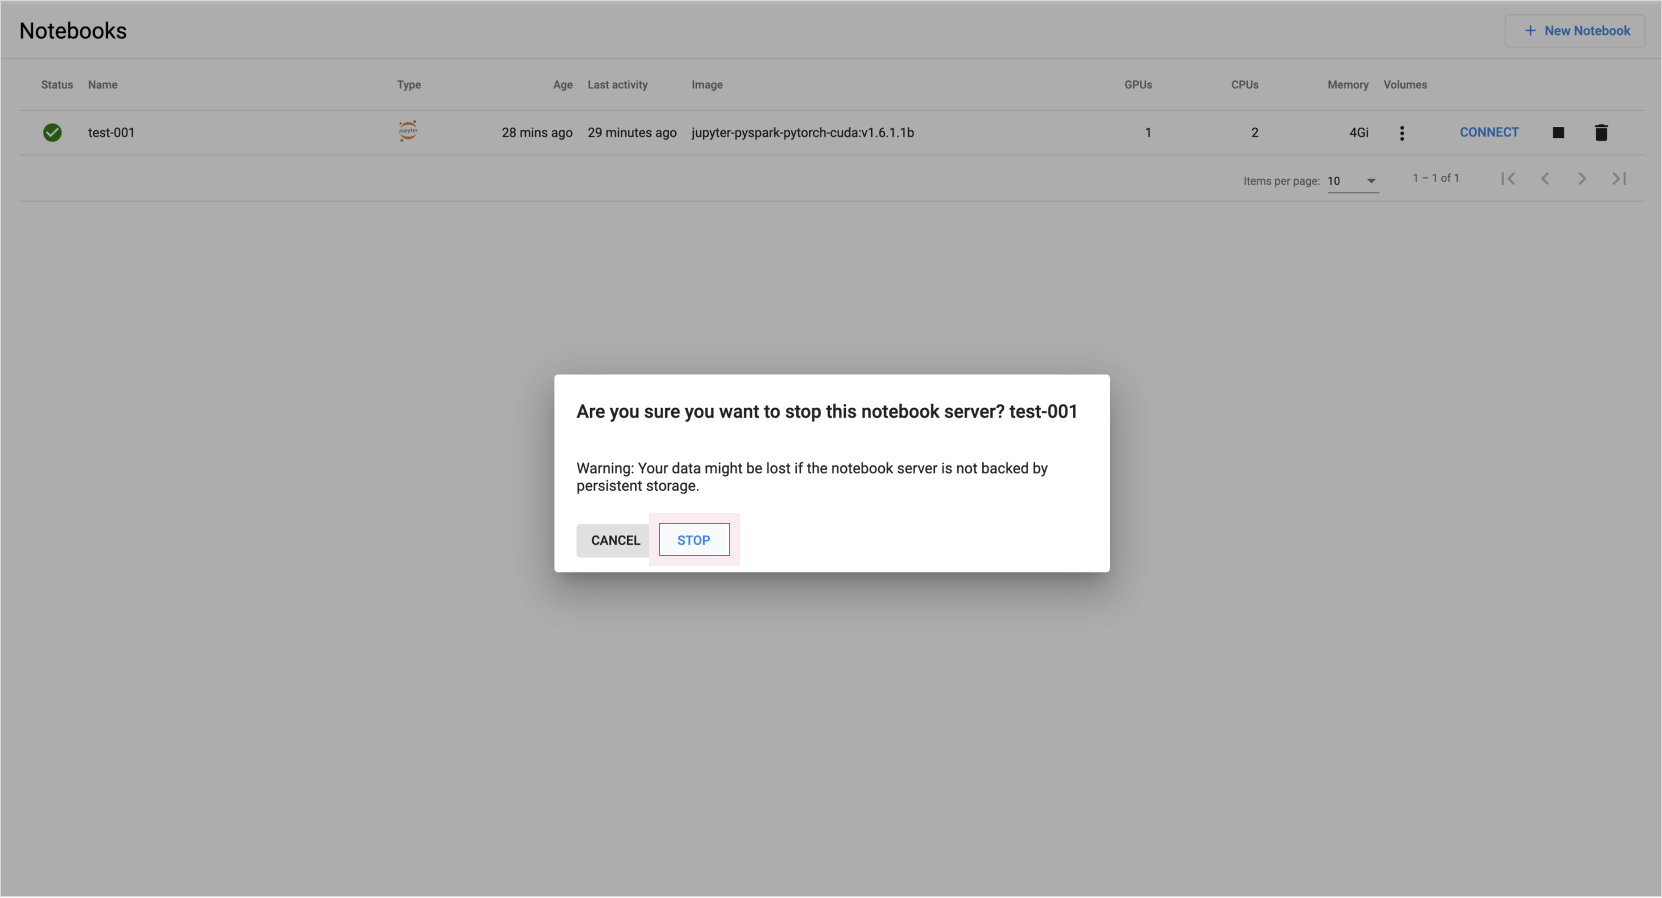 Confirm notebook stop
 -
In the Notebooks list, check that the status (Status) of the stopped notebook is correctly set to stopped.
 Verify notebook stop
Delete notebook instance
Delete a notebook instance mainly for resource reclamation, security, cost reduction, and environment management. When a notebook instance is deleted, the associated resources are reclaimed and can be allocated to other tasks. For more details, refer to the Kubeflow > Notebook official documentation.
Deleted notebook instance names cannot be reused in the future.
-
Access the login page of the National AI computing resource support portal and move to the Kubeflow page.
-
Select the Notebooks tab located on the left.
-
In the Notebooks list, click the delete (trash) button in the row of the notebook you want to delete.
- When the delete confirmation modal appears, click the [DELETE] button.
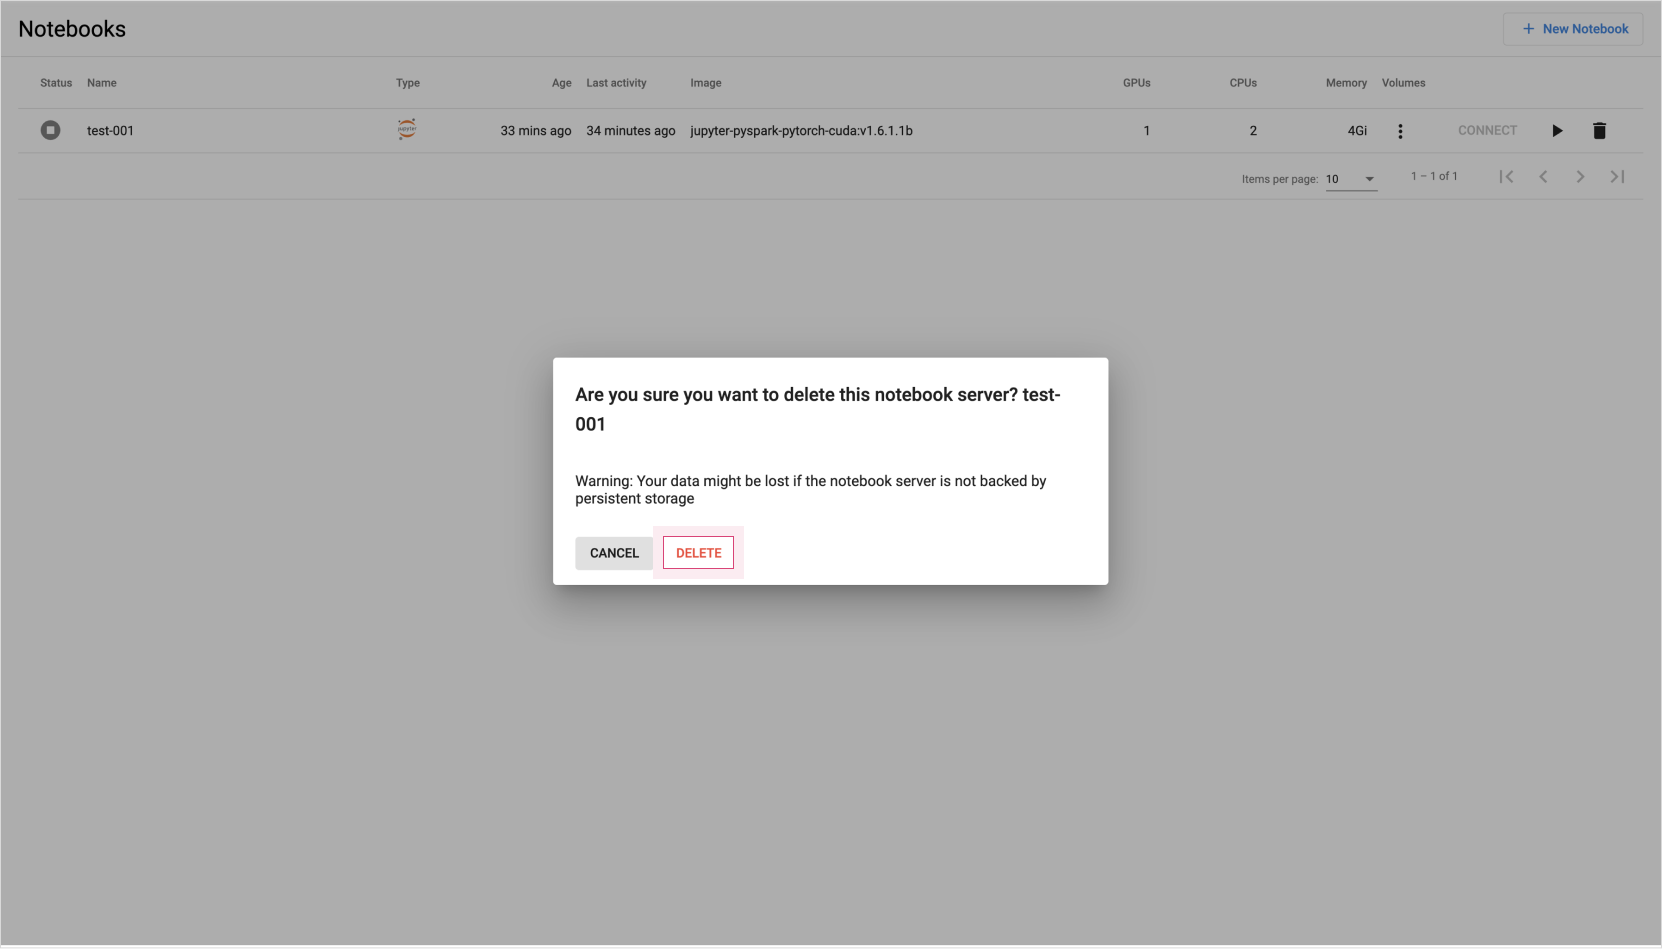 Notebook delete notice
 -
In the Notebooks list, verify that the deleted notebook no longer exists.
 Verify notebook deletion
Upload files to notebook
-
Upload files through the browser.
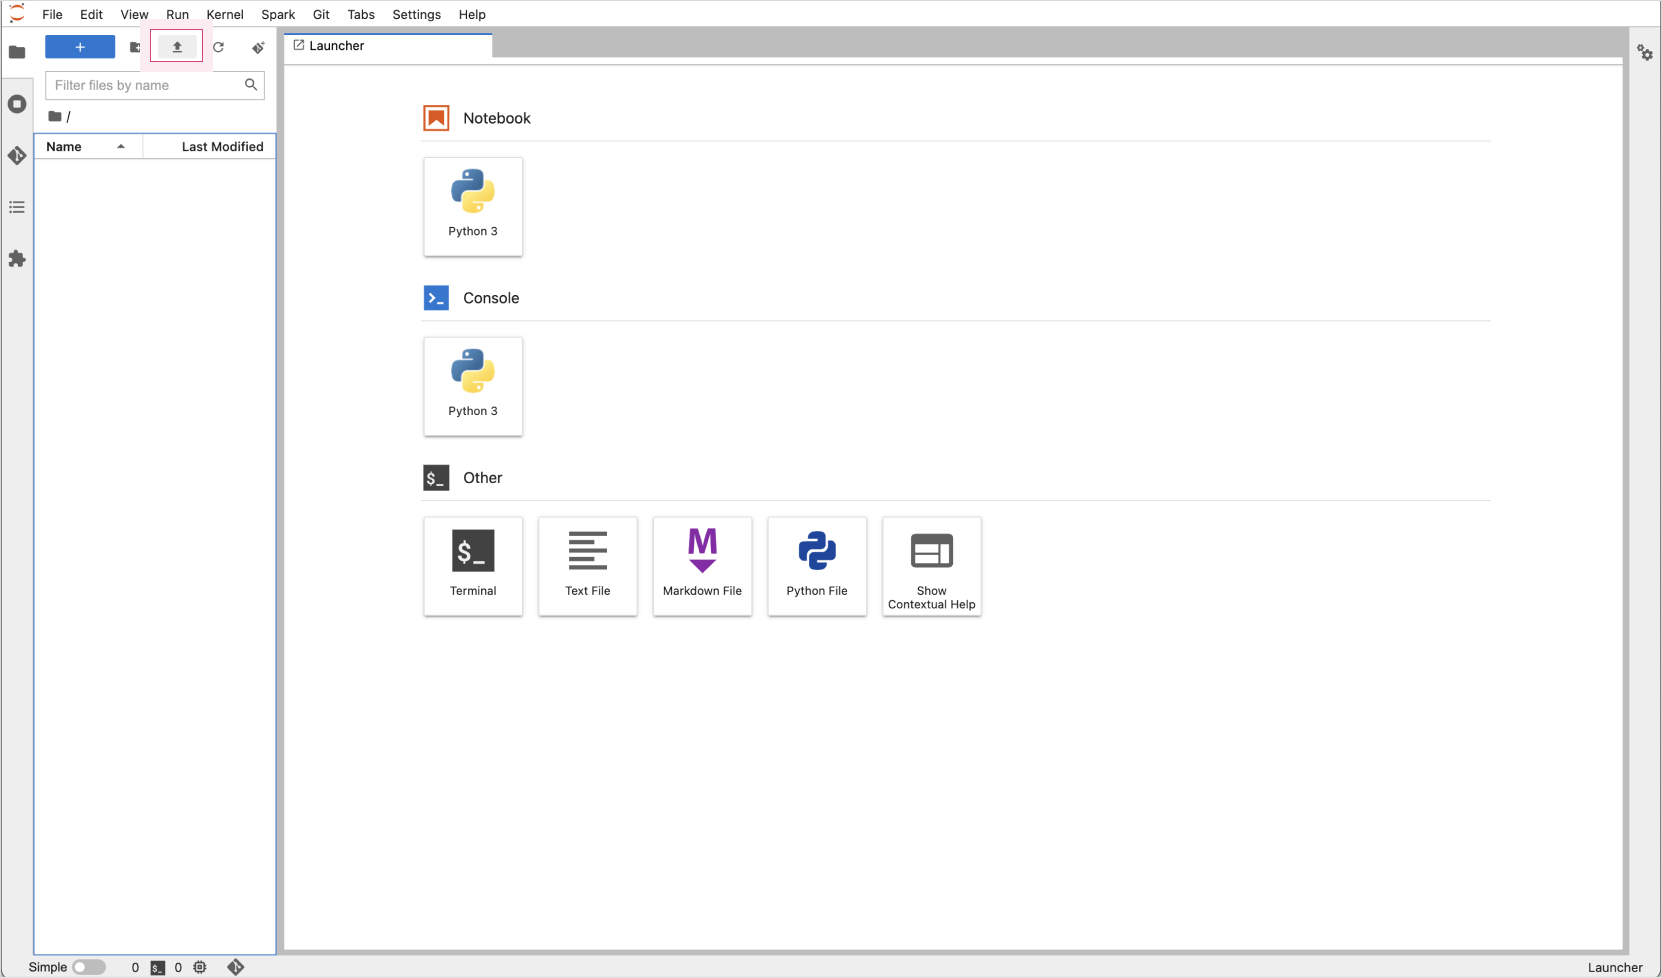 Upload files via the Jupyter Notebook console file browser
 -
After the upload is complete, you can view the contents of the uploaded file in the right pane.
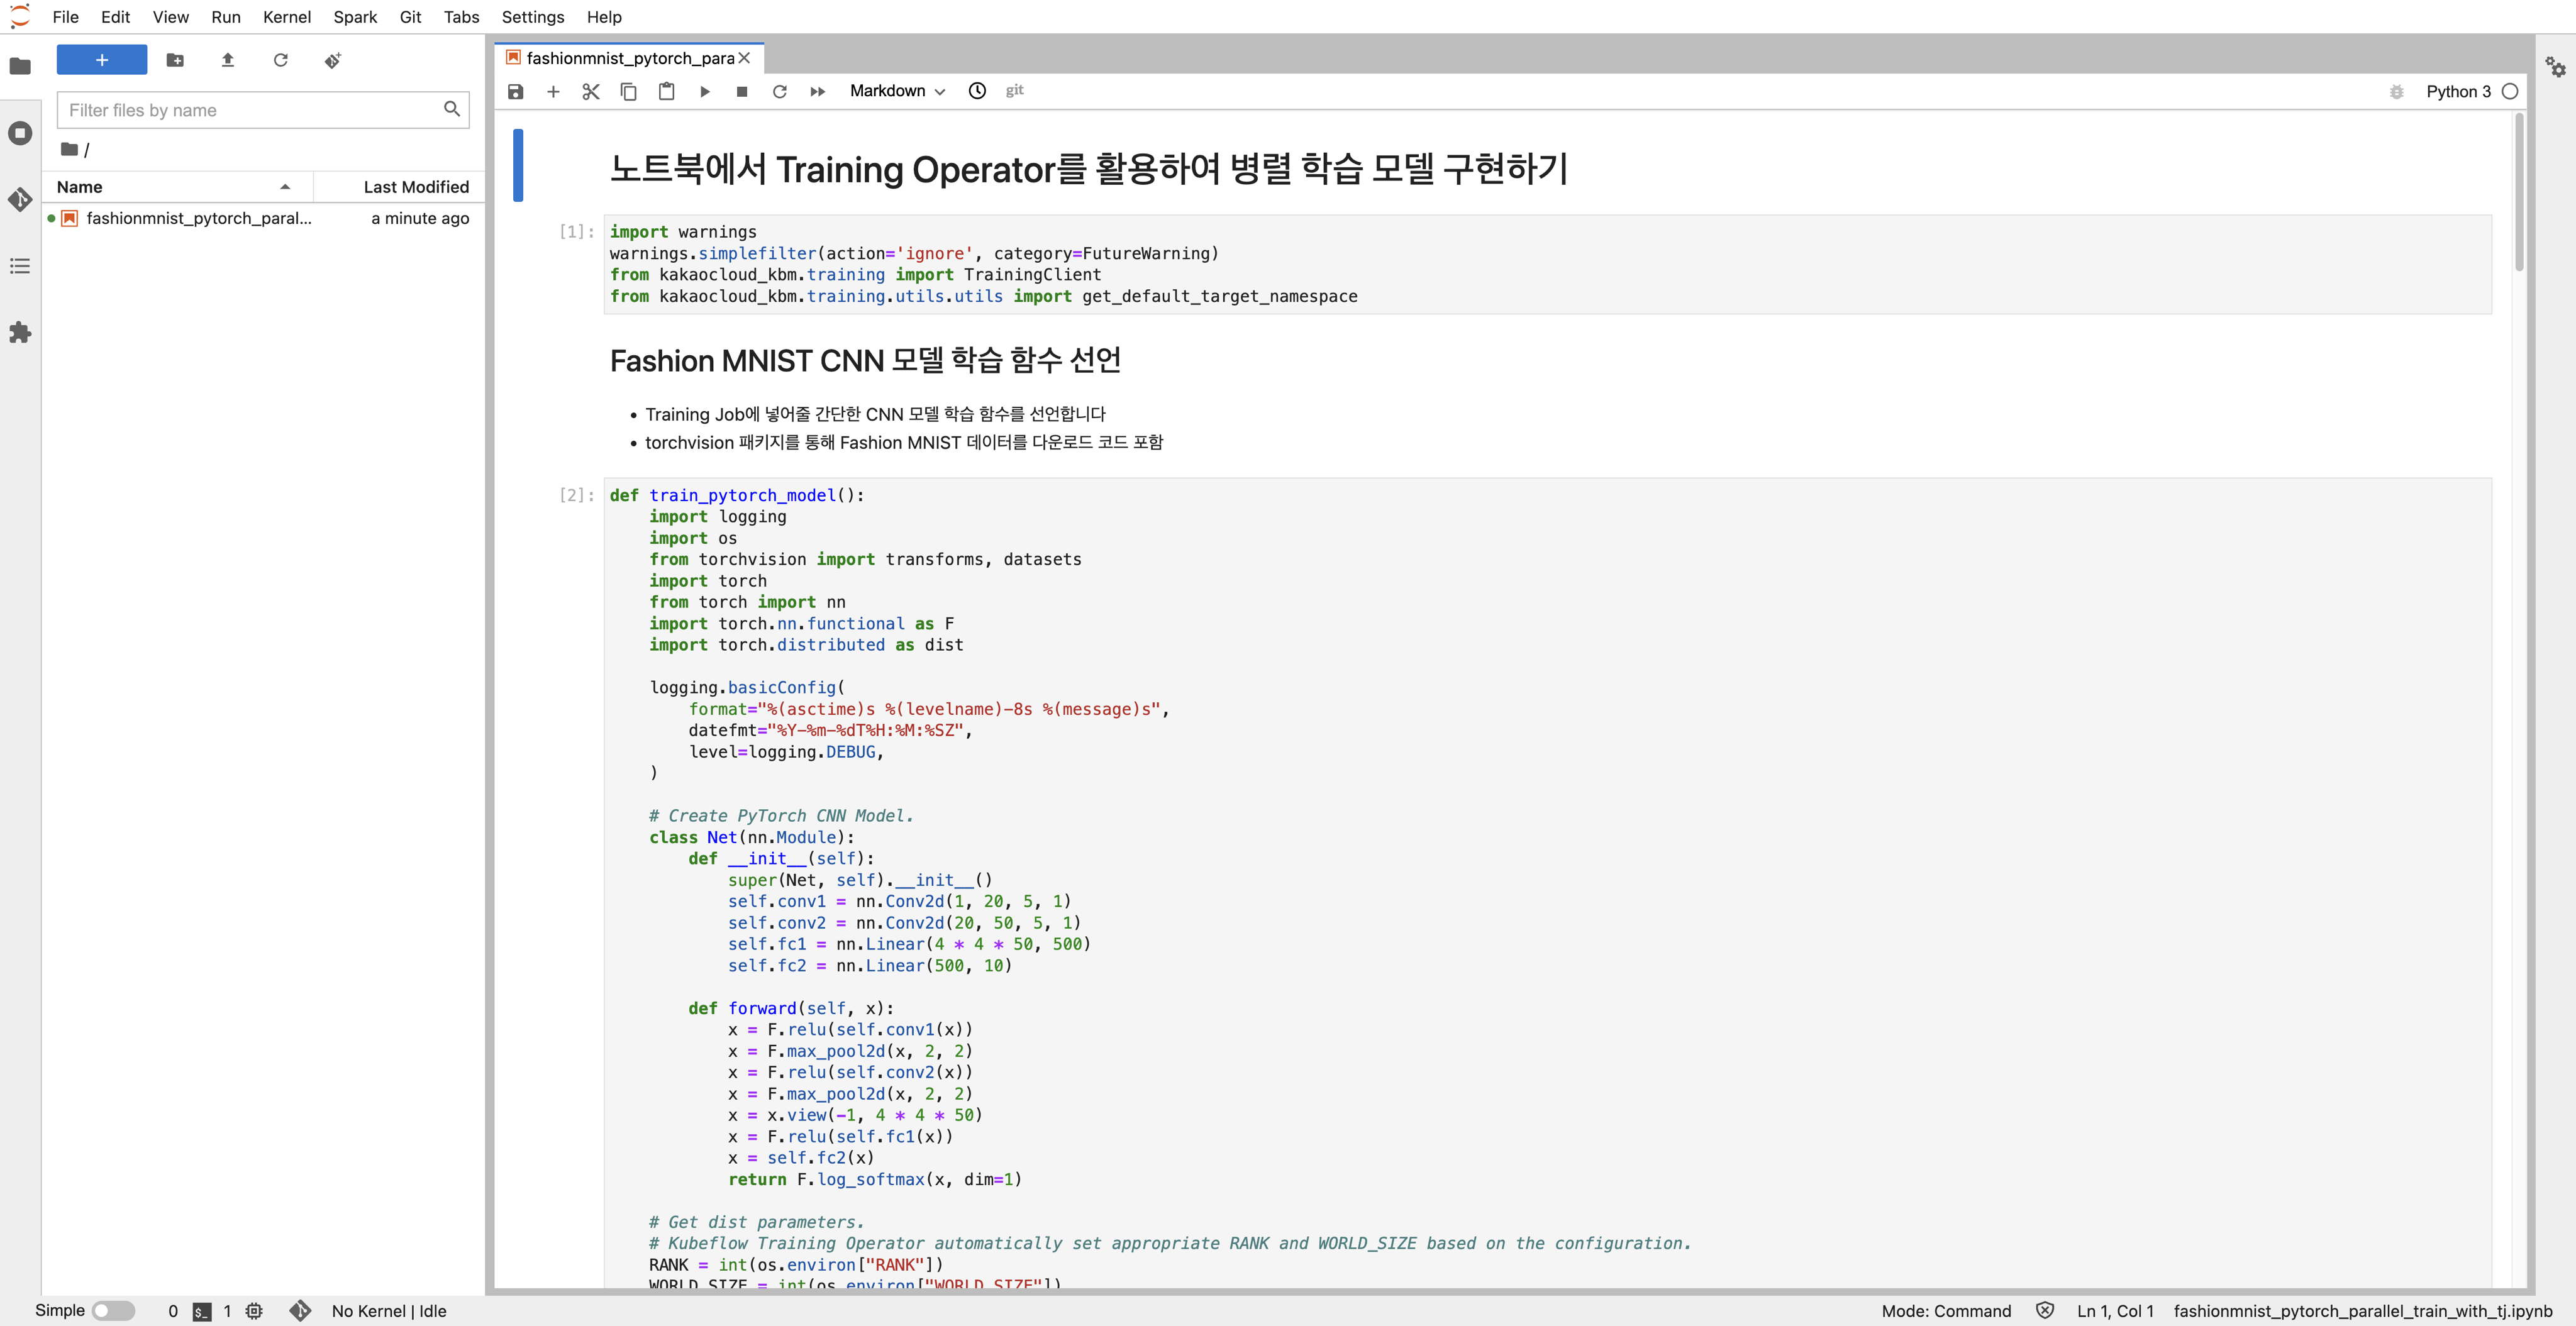 Example file upload completed
Download files from notebook
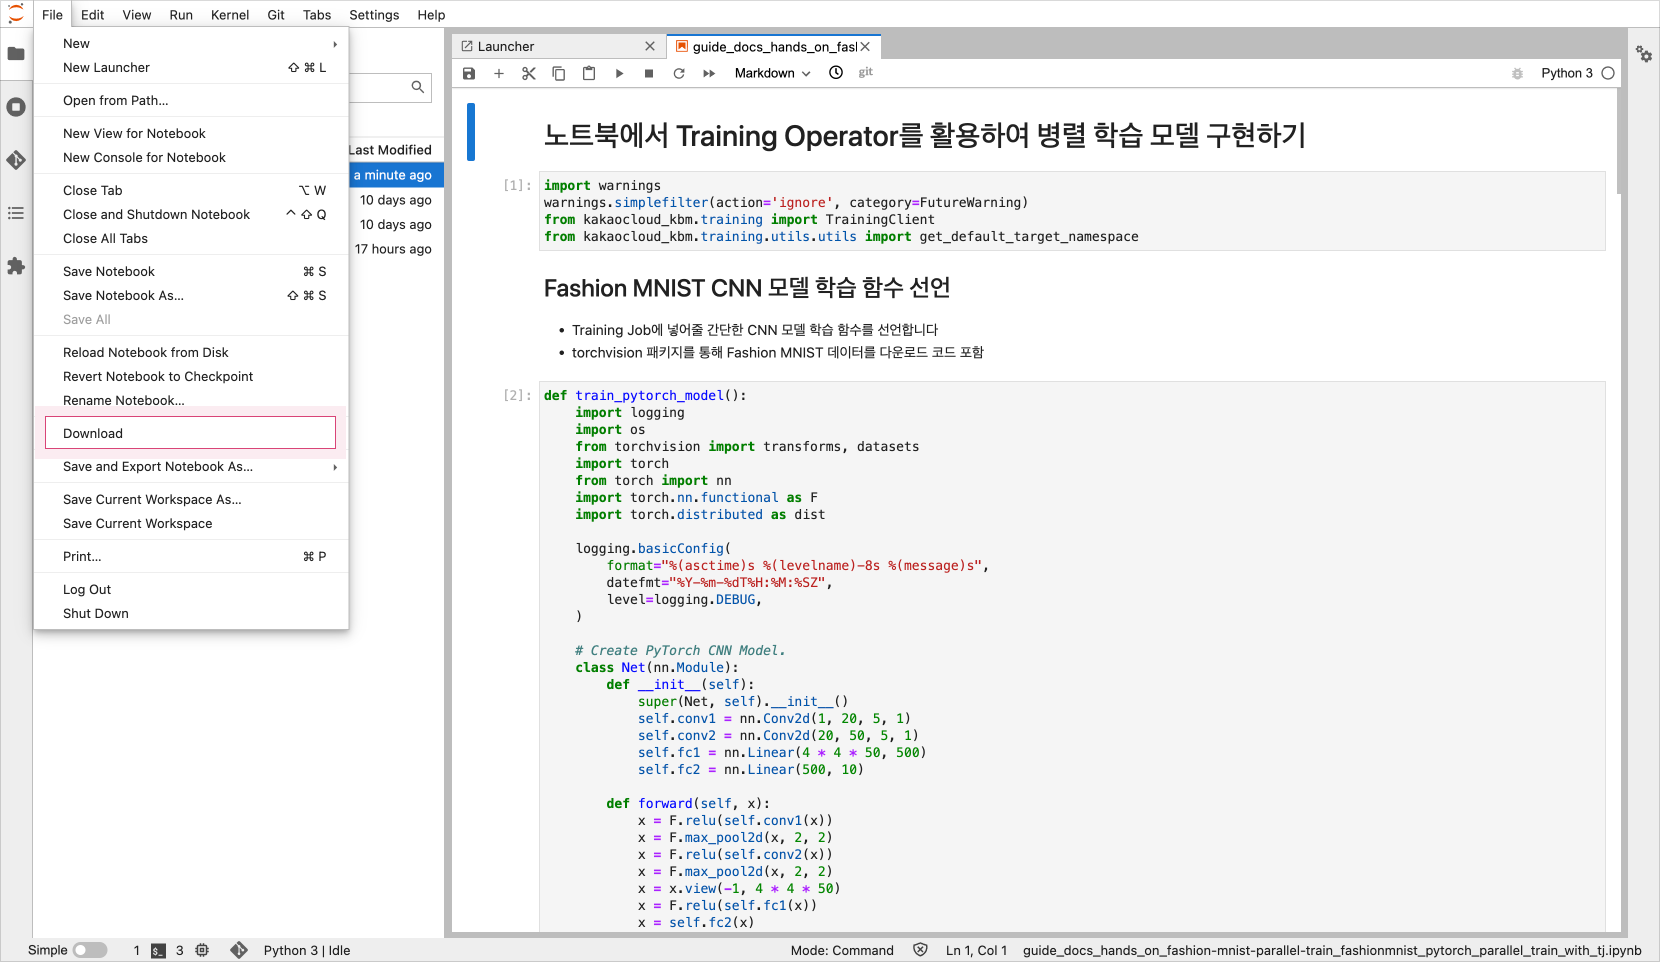
Click the [Download] button from the [File] tab at the top to download files.
Tensorboards
Tensorboard is a tool for visualizing the results of Notebooks or Pipelines. For basic usage, select the storage where the logs to be used by Tensorboard are stored, then enter the mounted path value to read and visualize the data.
Create tensorboard
-
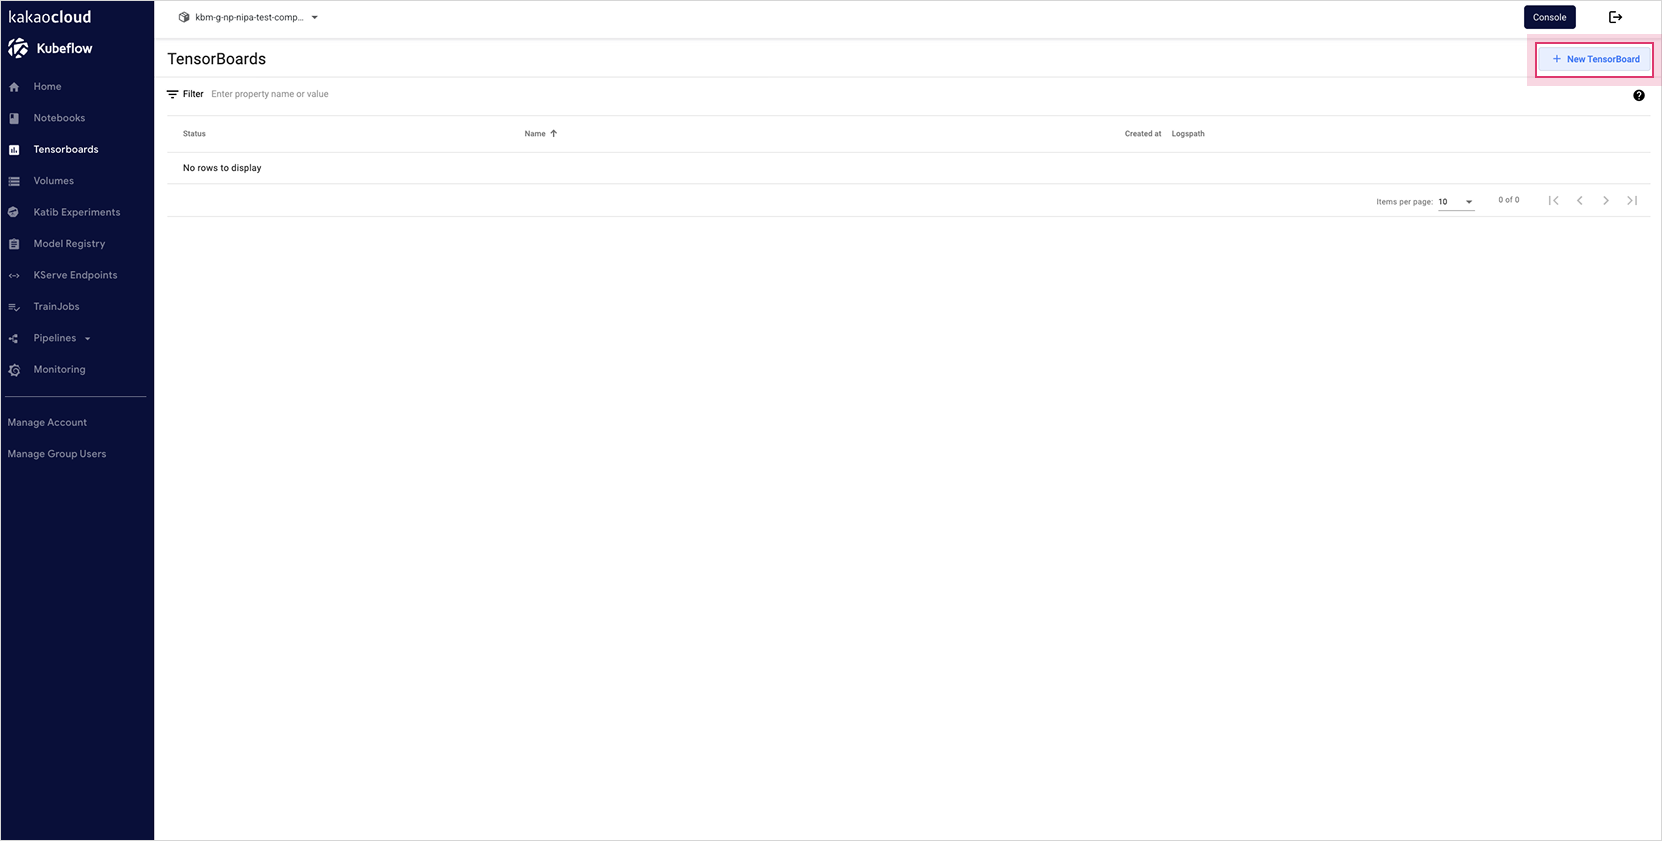
Click the [New TensorBoard] button in the TensorBoards tab.
-
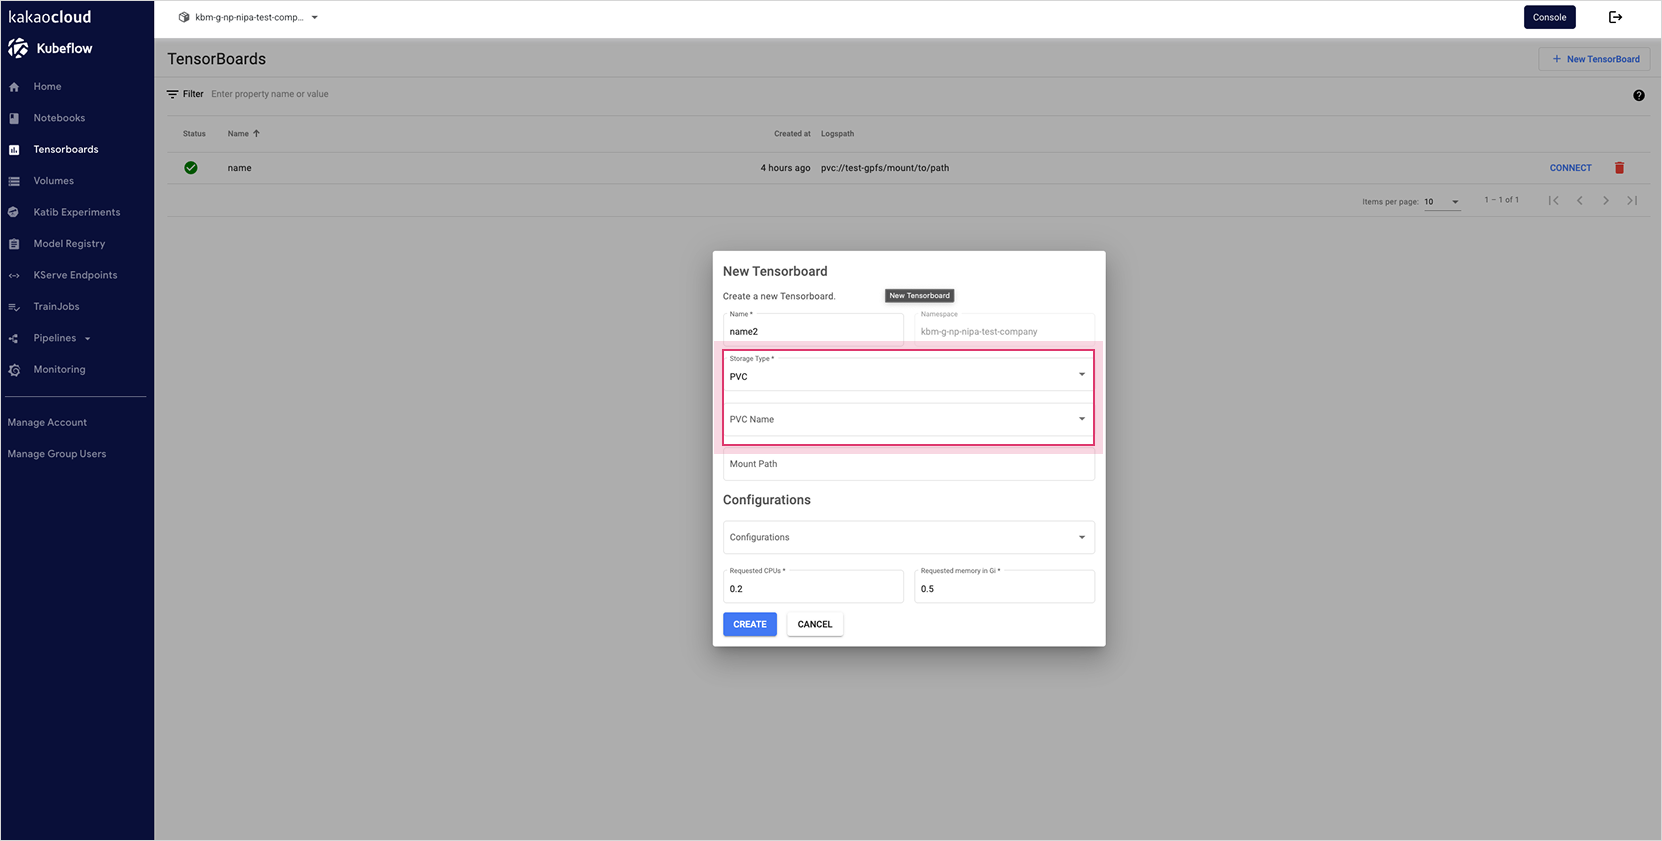
Enter the Tensorboard name and select the storage (PVC) where the logs are stored.
-
After selecting the PVC menu, choose the bucket that contains the files to review from the General bucket tab, enter the mount path value, and click the [Create] button.
Volumes
Create volume
Volume is the space where actual data is stored. Both input and output data can be stored in Volumes.
Created Volumes can be used as persistent volumes required when creating Notebooks and Tensorboards.
-
Move to the Volumes tab on the dashboard and click the [New Volume] button at the top.
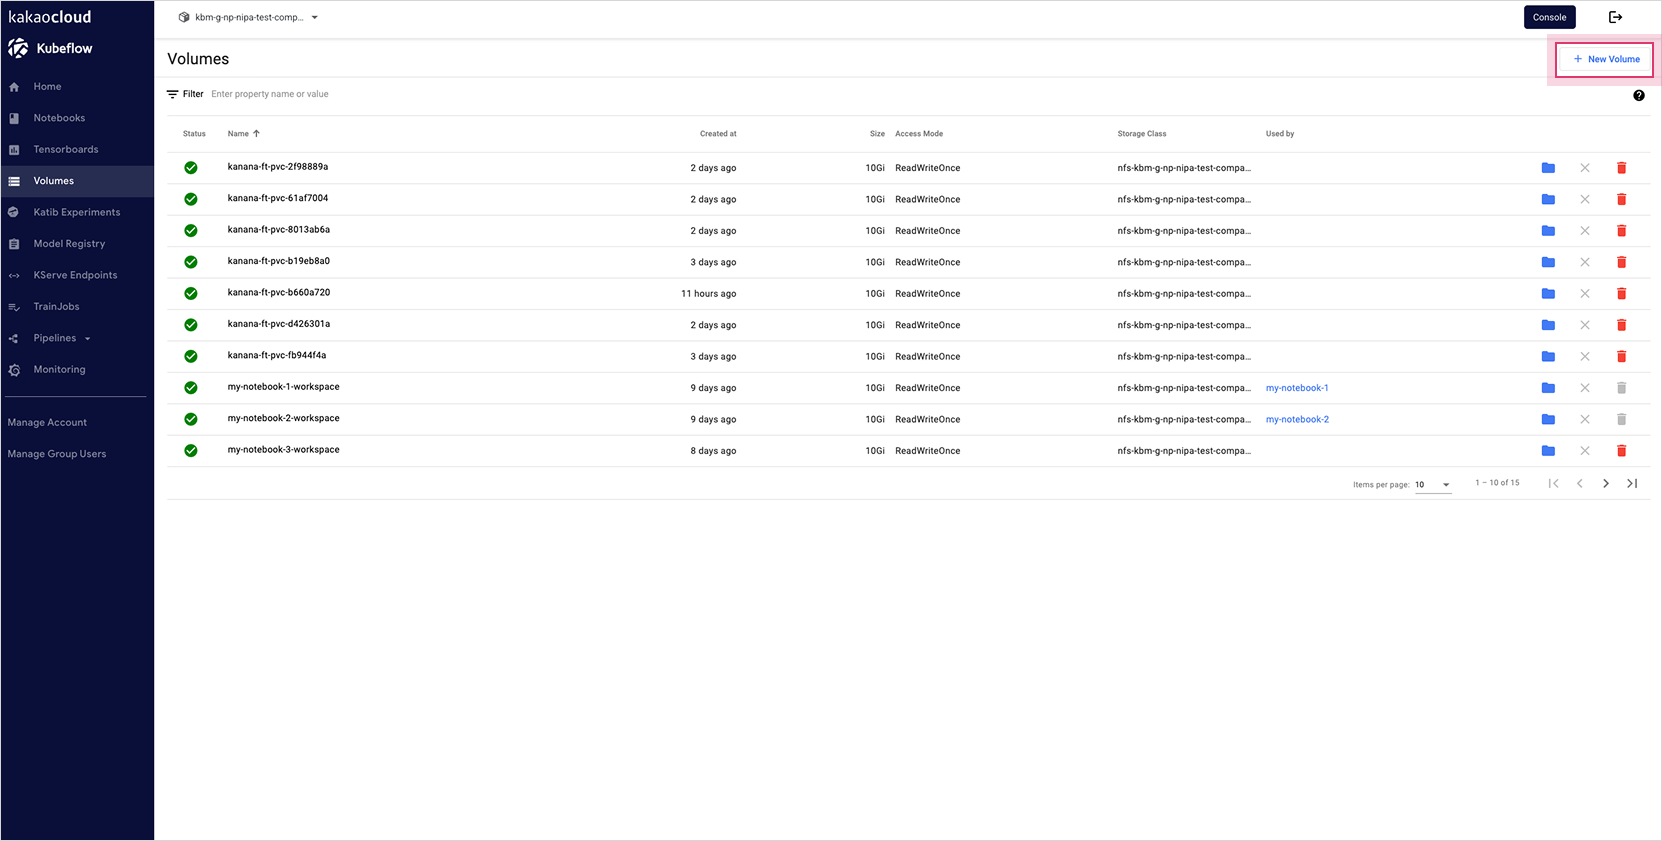 Volume dashboard screen
 -
On the New Volume screen, enter the required information, select the Storage Class to use, and click the [Create] button to create the volume.
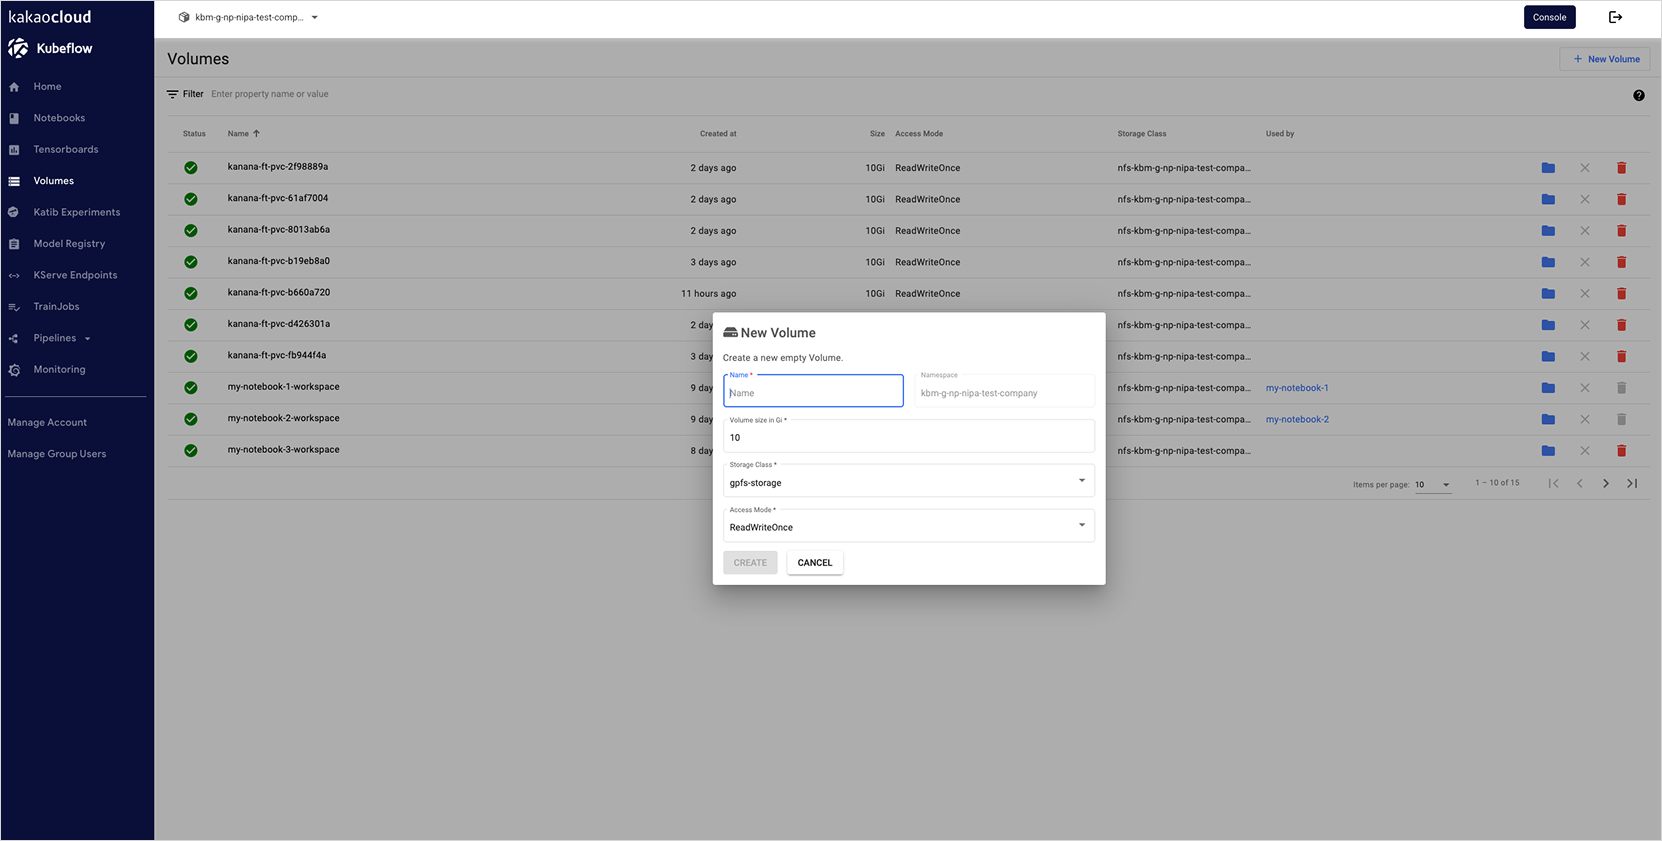
Storage class types
Select the Storage Class according to data importance and retention requirements.
- gpfs (For AI training and data): A high-performance parallel file system that provides the fastest I/O speed.
- local-pv (For temporary data storage): Uses the local disk of a physical server, providing fast speed, but data may be lost or become inaccessible when the notebook restarts or the server changes.
Experiments
Experiment is a type of specification (definition) that defines which model to run with which input data, and provides AutoML and KFP methods.
Experiments (AutoML)
AutoML is a tool that automates repeated experiments to improve prediction accuracy and performance of machine learning models, and provides AutoML functionality using Katib.
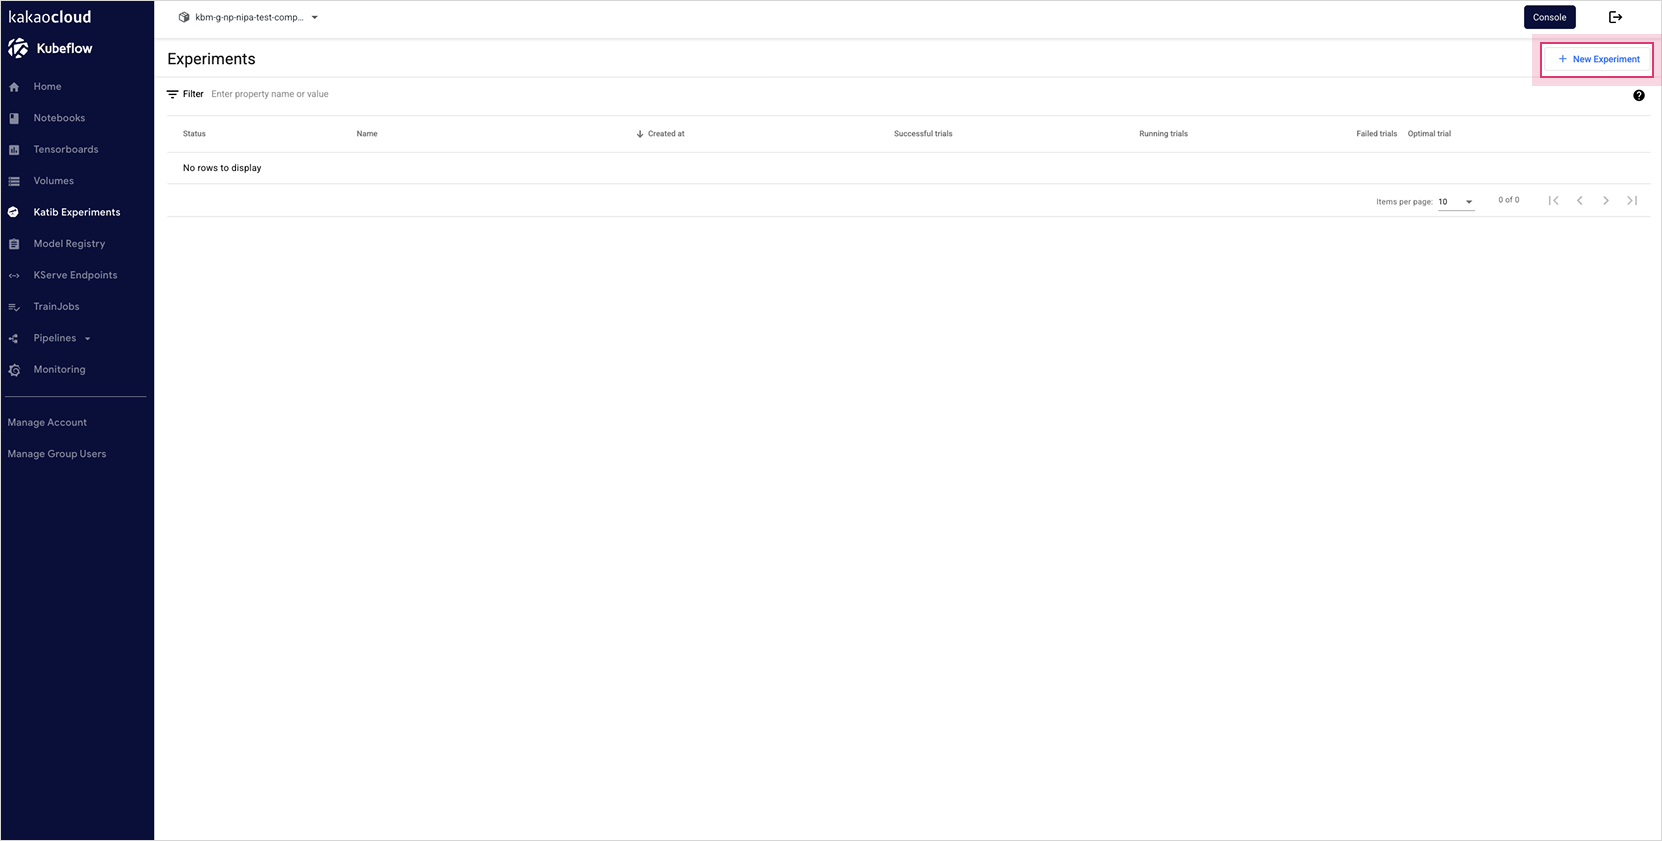 Experiments (AutoML) dashboard screen
Pipelines
Create pipeline
Pipelines is a feature that allows you to write a series of processes—such as specifying datasets, training models, and evaluating models—in code and execute them sequentially or in parallel at once.
In other words, it provides a visual console to handle and manage machine learning workflows such as preprocessing, training, and serving.
For detailed instructions on pipeline creation, refer to the Kubeflow > Kubeflow Pipeline > Quick Start documentation.
-
From the dashboard, move to the Pipelines tab and click the [Upload pipeline] button.
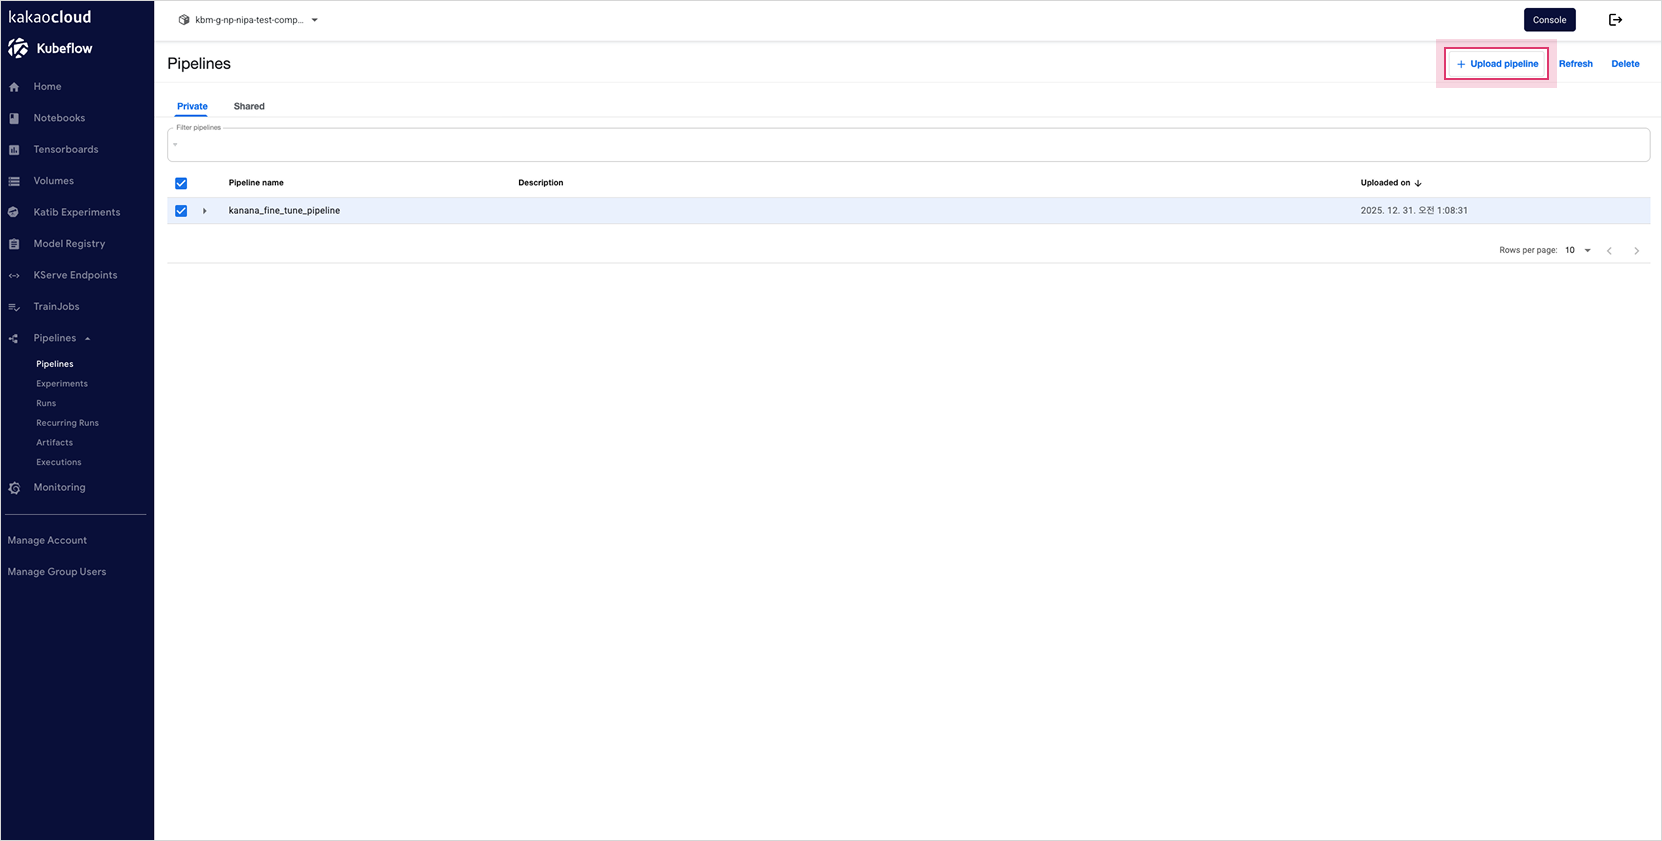 Access the Pipelines tab from the dashboard
 -
Upload the pipeline manifest file or import a Package URL, then click the [Create] button to create the pipeline.
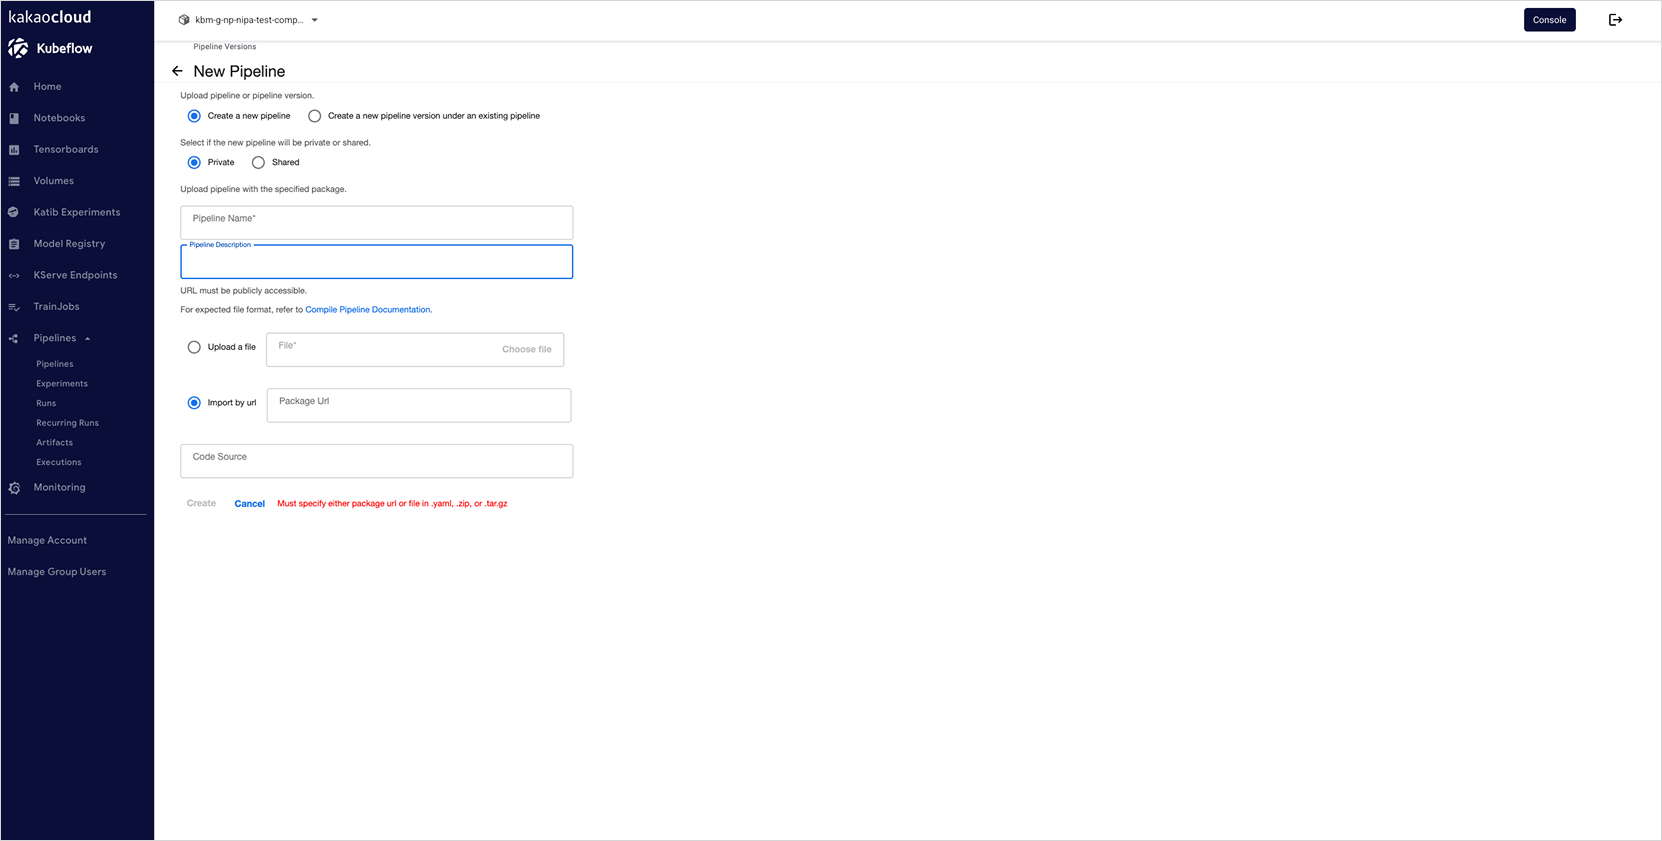 Create pipeline
Delete pipeline
- From the dashboard, select the Pipelines tab.
- In the list view, select the pipeline to delete, then click the [Delete] button at the top right to delete it.