Create and manage Kubeflow
Before you start
Kubeflow runs on Kubernetes. Therefore, before using Kubeflow, you must first have a cluster created through KakaoCloud's Kubernetes Engine service, along with KakaoCloud File Storage configured on the same network and subnet as the cluster.
To perform these tasks, you need IAM permissions of 'Project Member' or higher. Additionally, the 'Kubeflow Admin' role is required for creating Kubeflow. For details, refer to IAM roles > Project roles.
If the cluster's network is a private subnet, the nodes in the private subnet cannot access the internet. NAT communication is required for those nodes to communicate externally.
You can use a NAT instance for this. See Use NAT instance for more information.
Create Kubernetes cluster
In the KakaoCloud console, go to the Kubernetes Engine menu to create a Kubernetes-based cluster. If you already have a cluster, you may start from Create node pool.
Recommended combinations
| Kubeflow version | Kubernetes cluster version |
|---|---|
| 1.10 | 1.29, 1.30, 1.31 |
| 1.8 | 1.28, 1.29 |
- Clusters already used with Kubeflow cannot be reused during Kubeflow creation. A new cluster must be used.
- For detailed steps on creating a cluster, refer to Create cluster.
- If the VPC does not have an internet gateway, Kubeflow cannot be installed successfully.
Create node pool
Create the required node pools for Kubeflow (both mandatory and optional).
-
Go to KakaoCloud console > Container Pack > Kubernetes Engine.
-
Select the Cluster menu, and navigate to the detail page of the cluster to be linked with Kubeflow.
-
Go to the Node pool tab and select [Create node pool].
-
On the node pool creation page, fill in the required information and select [Create].
(To use Kubeflow, the cluster must have both an Ingress node pool and a Worker node pool pre-created.)Minimum specifications for Kubeflow cluster node pools
Type Required Specification Ingress node pool Required - Instance type: t1i.small or higher
- Volume: 50GB or more
- Node count: at least 1
- Auto scaling: DisabledWorker node pool Required - Instance type: vCPU ≥ 2, memory ≥ 3GiB
- Volume: at least 100GB
- Node count: at least 5
- Auto scaling: DisabledCPU node pool Optional - Instance type: t1i.small or higher
- Volume: at least 100GB
- Auto scaling: DisabledGPU node pool Optional - Instance type: A100 (p2i instance family)
- Volume: at least 100GB
- Auto scaling: Disabled
- If you do not assign both CPU/GPU node pools, Kubeflow components may not function properly.
- If you install the
ingress-nginxcontroller manually before creating Kubeflow, errors may occur.
If previously installed, remove theingress-nginxresources before proceeding with Kubeflow creation. - If the pod scheduling setting of the created node pool is set to
Block, Kubeflow cannot be created.
Also, changing this toBlockafter Kubeflow creation may cause issues. Always set it toAllow.
Create File Storage instance
Kubeflow allows you to assign File Storage per namespace in addition to the default one. Here's how to create a File Storage instance:
You can only use File Storage instances that are on the same network and subnet as the cluster used to create Kubeflow.
-
Go to KakaoCloud console > Storage > File Storage.
-
Select the Instance menu, then select [Create instance].
-
Refer to the table below, fill in the fields, and select [Create].
Category Field Description Network configuration Network Select the same network as the cluster used to create Kubeflow Subnet Select the same subnet as the cluster used to create Kubeflow Access control Allow access from all private IPs in the configured network
Create Kubeflow
-
Go to the KakaoCloud console and navigate to the Kubeflow menu.
-
Select the Kubeflow menu, then select the [Create Kubeflow] button.
-
Enter the required information and select the [Create] button.
Field Category Description Kubeflow name Enter 4–20 characters using lowercase letters and hyphens ( -) only.
- Must start with a lowercase letter, cannot contain consecutive hyphens or end with a hyphen.
- Cannot be duplicated within the same project.Kubeflow configuration Kubeflow version Select a Kubeflow version. Kubeflow service type Select based on the Kubeflow version.
Refer to Service types and supported components.Cluster connection Select a Kubernetes Engine cluster to link with Kubeflow.
- Refer to Before you start if no cluster exists.
- Clusters already used for Kubeflow cannot be reused.Cluster configuration Ingress node pool (required) Select the Ingress node pool from the chosen cluster. Worker node pool (required) Select the Worker node pool from the chosen cluster. CPU node pool (optional) Select a CPU node pool from the cluster. GPU node pool (optional) Select a GPU node pool from the cluster.
- GPU MIG: Set MIG instance specs for the selected pool.
- GPU MIG(Default): Set default MIG specs for future node additions.
Refer to Configure MIG instance.Default File Storage Select a File Storage configured on the same network and subnet as the cluster. Object Storage (MinIO) ID Auto-generated. (MinIO) ID/password Auto-generated MinIO ID/PW. (Object Storage) Bucket Creates a bucket named kubeflow-{kubeflow id}.
Check the bucket in the Object Storage menu (View bucket list).Owner settings Email Enter a valid email address (requires IAM 'Project Member' or higher). Namespace name Enter a namespace name. Namespace File Storage Must be on the same network as the cluster.
May overlap with the default File Storage.Database (MySQL) MySQL Select a MySQL instance in the same VPC.
Refer to Create instance group.(MySQL) MySQL user ID MySQL admin or user with database creation permissions. (MySQL) Password Password of the MySQL user. (Internal DB) Port Enter a numeric port. (Internal DB) Password Enter a password. Domain connection (optional) Enter a valid domain.
- VisualStudio Code and RStudio may not function without domain connection.
- Ingress node pool cannot be shared with other pools.
- Kubeflow name, Ingress/Worker node pools cannot be changed after creation.
- To scale node pools, refer to Manage node pool scaling.
Configure MIG instance
MIG (Multi Instance GPU) allows multiple users to run separate workloads on the same GPU without interference.
- KakaoCloud Kubeflow requires maximum utilization of each MIG instance.
- If using 2+ GPU cards, MIG settings apply as [number of MIG instances × number of GPU cards].
- If no setting or default is selected, the smallest configuration applies.
- Some combinations may be restricted by vendor policy. Refer to MIG instance exceptions.
Default specifications
| Instance family | Description |
|---|---|
| A100 | 7 instances with 1g.10gb configuration |
MIG instance exceptions
| Instance family | Description |
|---|---|
| A100 | Cannot use 3g.40gb and 4g.40gb simultaneously due to vendor policy. |
Manage Kubeflow
Kubeflow utilizes Kubernetes cluster management to simplify and streamline machine learning workflows. Here's how to manage Kubeflow instances.
View Kubeflow list
-
Go to the KakaoCloud console and select the Kubeflow menu.
-
The menu displays the list of created Kubeflow instances.
Field Description Filter Filter/search by name or status. Name User-defined Kubeflow name. Status Creating,Active,Failed,Expired,Terminating,Terminated.
Refer to Lifecycle and status.Service type Selected service type (e.g., Essential+HPT+Serving API). Version Version of Kubeflow. GPU enabled GPU activation status (Enabled/Disabled). Profiles Number of profiles: user and group (kbm-g namespace). Created at Timestamp of creation. Uptime Operational duration of the instance. More options - Delete (for Activestatus only)
- Modify CPU/GPU node pools
Deleted Kubeflow instances are displayed for 1 day only. Cluster usage fees continue after deletion unless the cluster is also deleted.
View Kubeflow details
You can check detailed information about Kubeflow, including groups, users, components, and monitoring data.
-
In the KakaoCloud console, navigate to the Kubeflow menu.
-
In the Kubeflow menu, select the Kubeflow instance for which you want to view information.
-
On the Kubeflow detail screen, view the relevant information.
Category Description Status - Creating,Active,Failed,Expired,Terminating,Terminated
- For detailed explanations of each status value, refer to Kubeflow lifecycle and statusesNumber of nodes Total number of instances used in the cluster configuration connected to Kubeflow GPU [MIG instance] button: Select to view the GPU MIG instance configuration specified during Kubeflow creation in JSONformat
- Not displayed if GPU node pool is not usedQuick launch [View dashboard] button: Select either the Private Dashboard or Public Dashboard button to go to the Kubeflow dashboard
Kubeflow tab information
- Details
- Groups
- Users
- Components
- GPU status
- Monitoring
- Action log
You can view details such as Kubeflow ID, creation time, and the connected cluster.
| Category | Item | Description |
|---|---|---|
| Kubeflow information | Kubeflow ID | Unique ID of the Kubeflow instance |
| Version | Version - 1.8 / 1.10 | |
| Service type | Type of service - Essential+HPT+Serving API - For details on supported versions, refer to Kubeflow service types and component support | |
| Creator | User account that created the Kubeflow instance | |
| Creation time | Time of creation (uptime) - Displays the time when the creation request was responded to (operational time of Kubeflow) | |
| Connected cluster | Cluster name | Name of the cluster connected to Kubeflow |
| Default file storage | File storage configured in the connected cluster - Used for data storage and sharing | |
| VPC | VPC where the connected cluster for Kubeflow is deployed | |
| Subnet | Subnet where the connected cluster for Kubeflow is deployed | |
| DB | DB settings configured during Kubeflow creation (MySQL, Kubeflow internal DB) | |
| Ingress node pool | Ingress node pool information of the connected cluster | |
| Worker node pool | Worker node pool information of the connected cluster | |
| CPU node pool | CPU node pool information of the connected cluster | |
| GPU node pool | GPU node pool information of the connected cluster |
You can view the group name, status, and quota information registered in Kubeflow.
| Category | Description |
|---|---|
| Filter | Search by selecting group name and status |
| Group name | Name of the created group (namespace name) |
| Status | Status of the group - Active, Pending, Failed - If Pending persists for more than 10 minutes or changes to Failed, contact Helpdesk > Technical support |
| File storage | File storage information allocated to the group |
| Group quota assigned | Quota information assigned to the group |
| Number of users in group | Number of users registered in the group - Select to display group user settings popup |
| Creation time | Time when the group was created |
| [More] icon | - Edit group: Assign or modify group quota - Add group user: Add users to the group - Group user settings: Check and edit information of registered users or remove users from the group - Delete group: Delete the group |
Group status
| Status | Description | Classification |
|---|---|---|
Pending | Creation/modification/deletion in progress | Yellow |
Active | Group is in a normal state | Green |
Failed | Group status cannot be confirmed | Red |
Add group
Select the [Add group] button to open a popup to add a group.
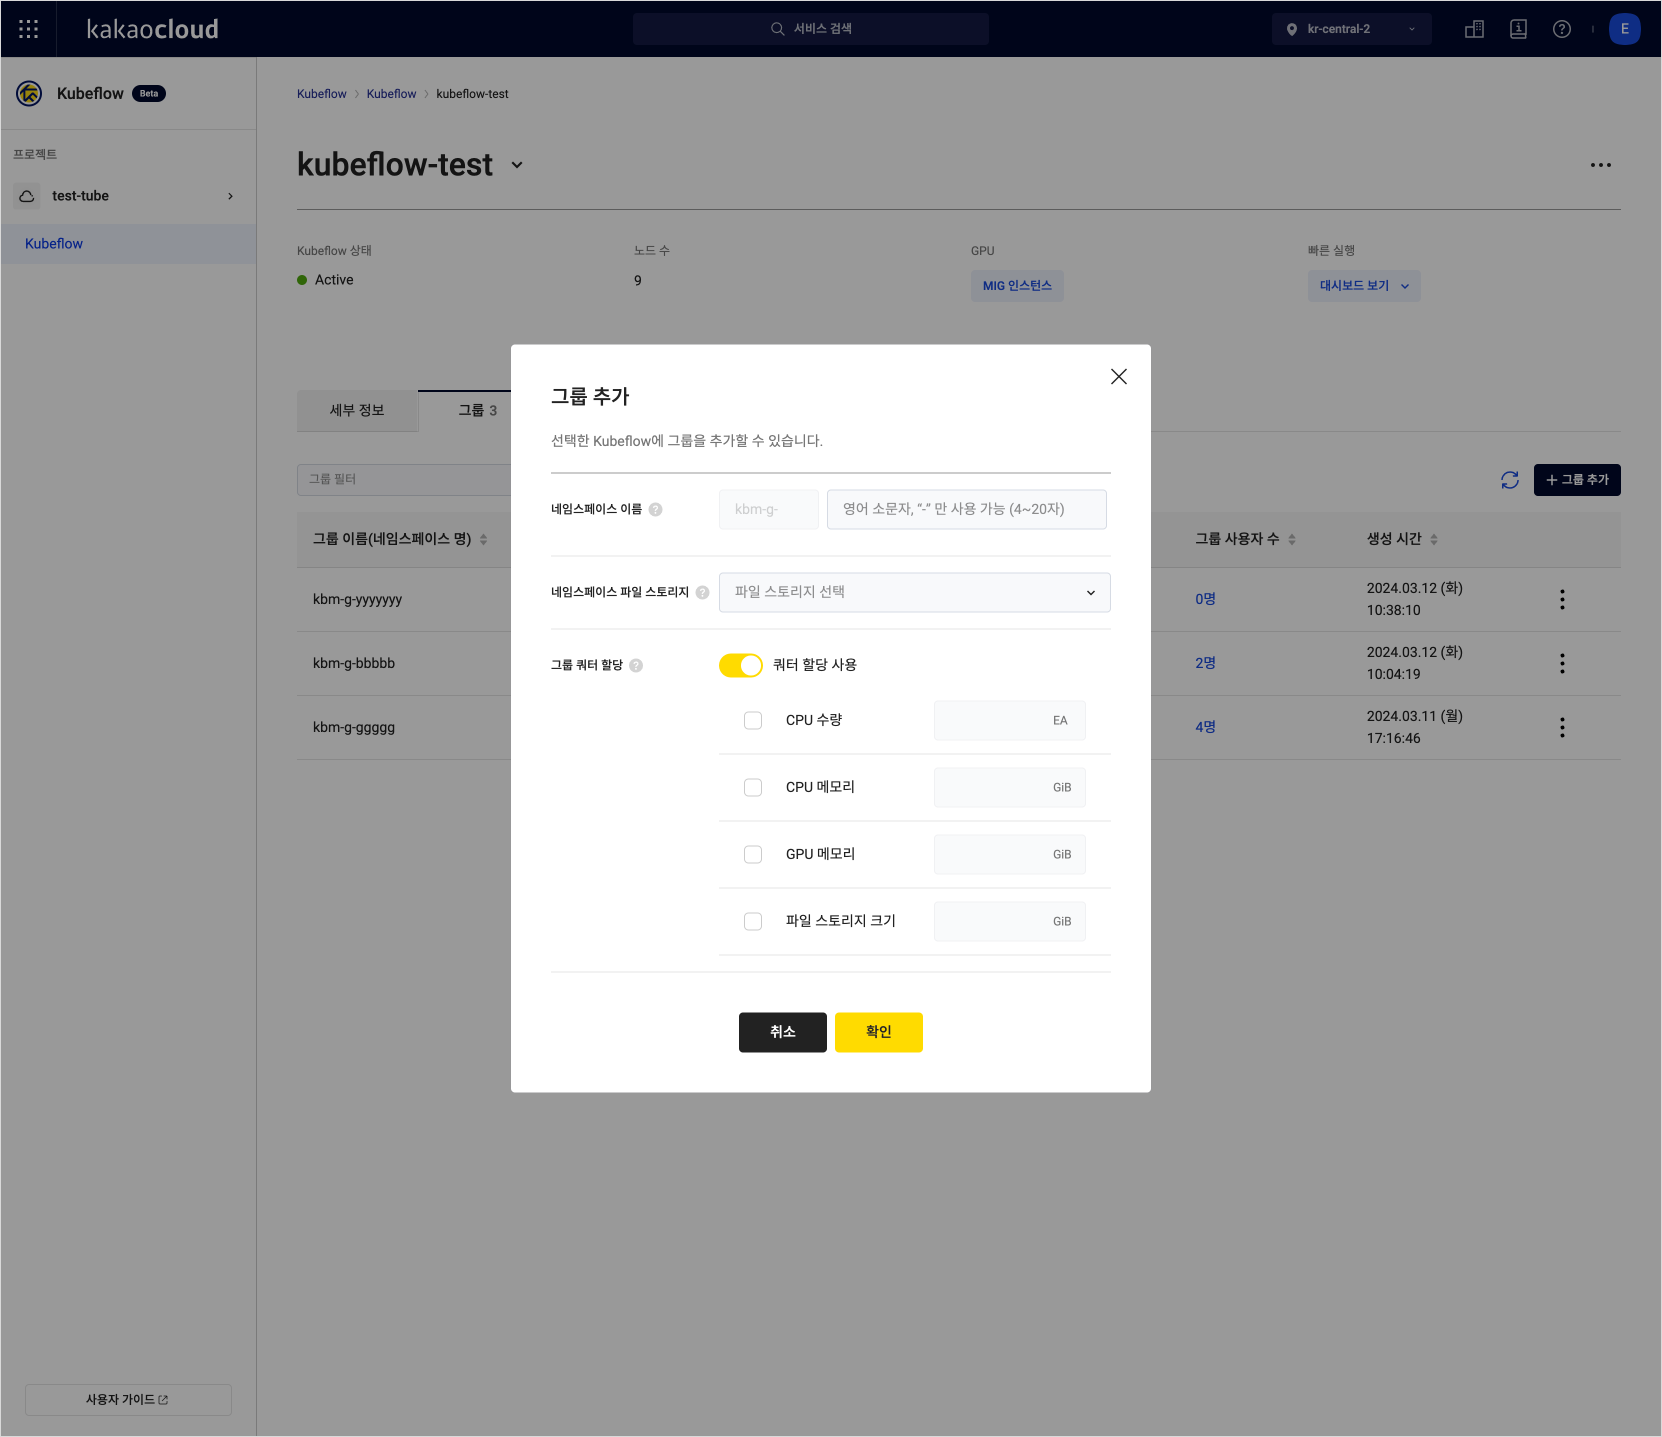
| Field | Description |
|---|---|
| Namespace name | Use lowercase English letters and - only (4 to 20 characters) |
| Namespace file storage | Select file storage configured in the same network and subnet as the created cluster (can overlap with default file storage) |
| Group quota assignment | Quota can be configured based on node pool specifications created within the cluster |
You can view registered user IDs, namespace names, and quota information in Kubeflow.
| Category | Description |
|---|---|
| Filter | Search by user ID, namespace name, and user status |
| User ID | Email address registered when the user was added (dashboard login ID) |
| Namespace name | Displays the owned namespace name if available - Empty if no namespace is assigned |
| User status | Status of the user - Active, Pending, Failed - If Pending persists for more than 10 minutes or changes to Failed, contact Helpdesk > Technical support |
| File storage | File storage information assigned to the user's namespace |
| Quota assigned | Quota information assigned to the user's namespace |
| Number of groups | Number of groups the user belongs to - Select to show group names and roles |
| Created | Date when the user was created |
| Last update date | Date of last modification (e.g., user creation or info update) |
| [More] icon | - Edit user: Create user namespace or edit quota - Delete user: Completely remove the user and their namespace from Kubeflow, also removed from associated groups |
User status
| Status | Description | Classification |
|---|---|---|
Pending | Creation/modification/deletion in progress | Yellow |
Active | User is in a normal state | Green |
Failed | User status cannot be confirmed | Red |
Add user
Select the [Add user] button to open a popup to add a user.
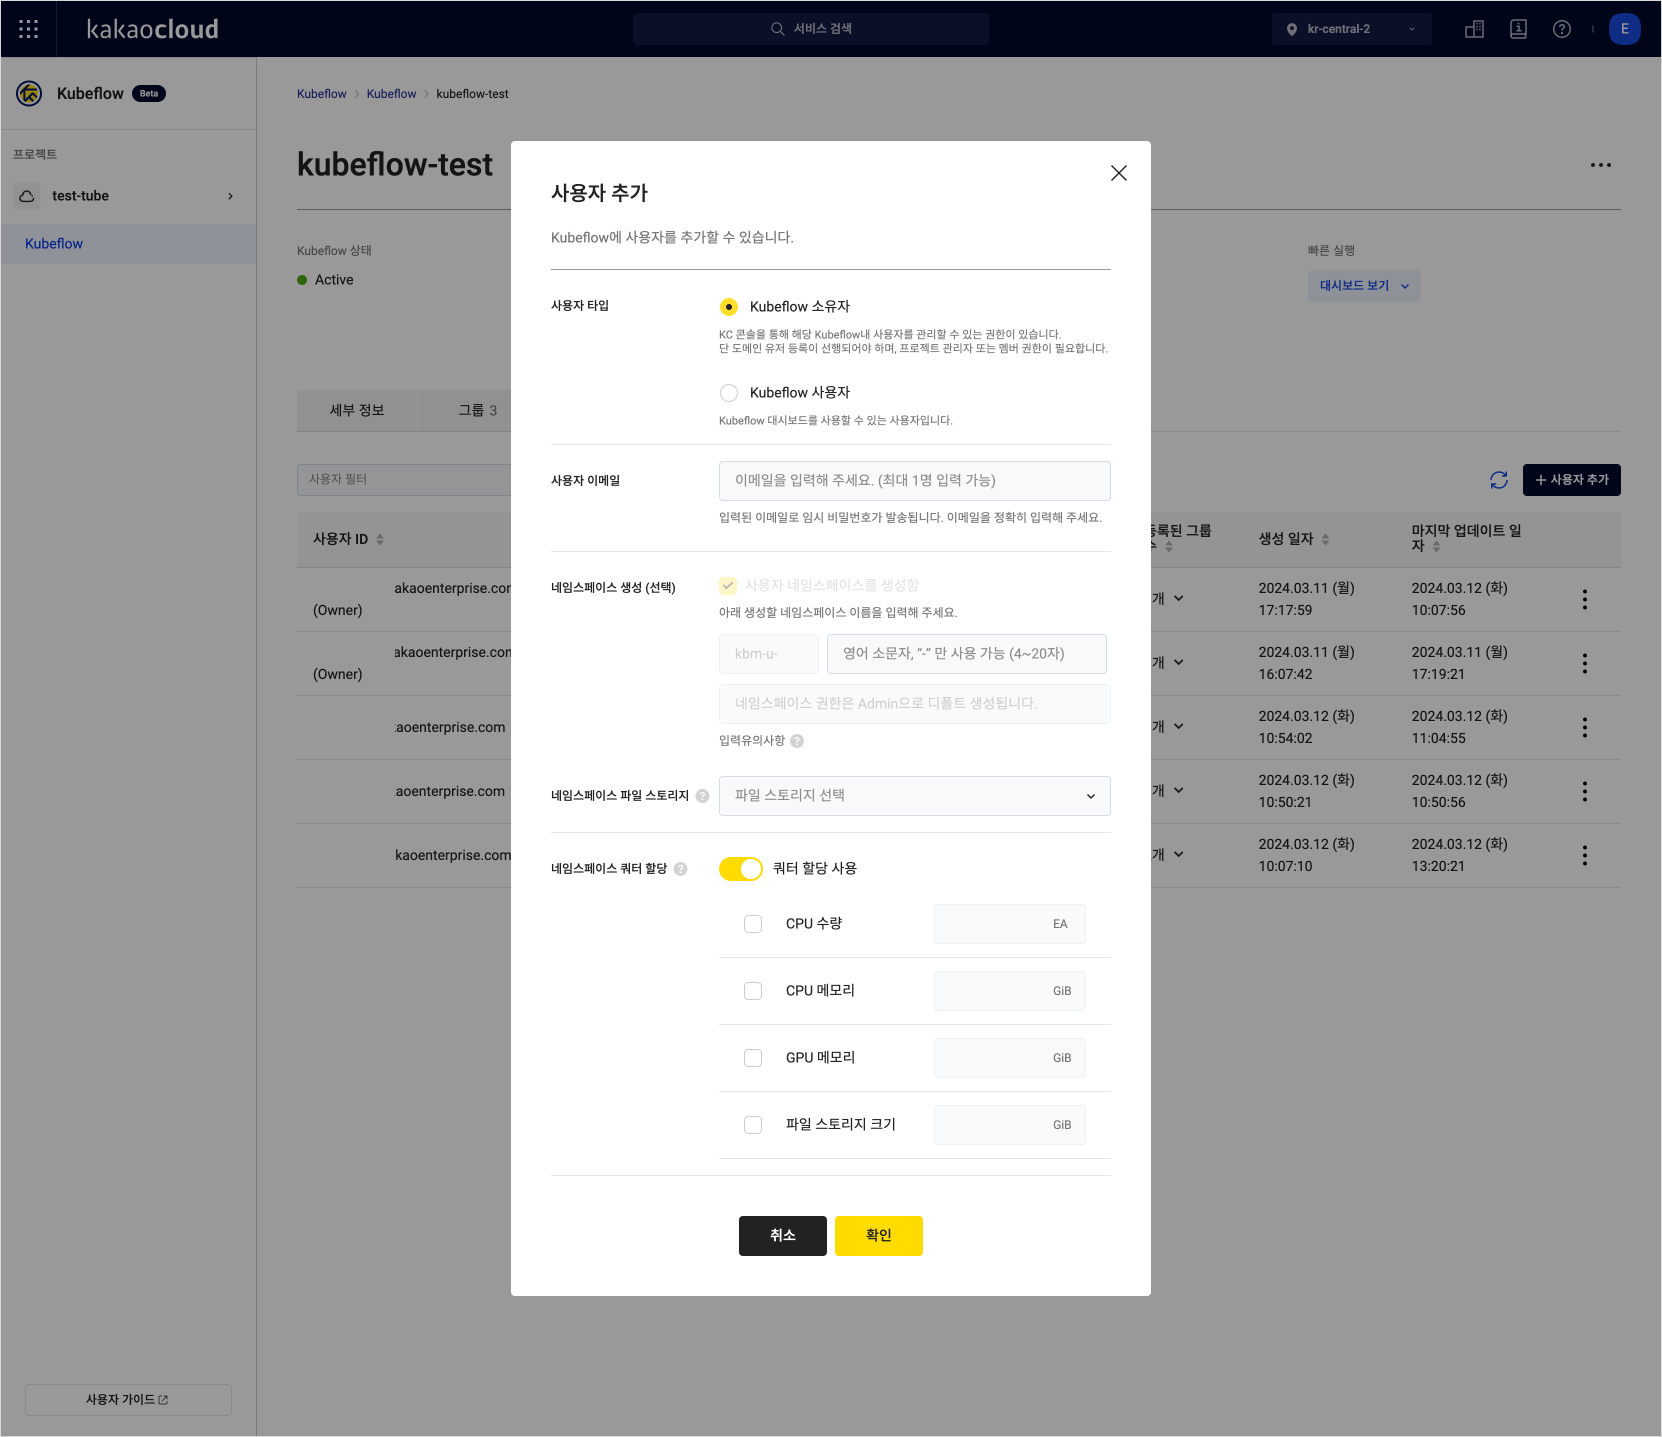
| Field | Description |
|---|---|
| User type | Select between owner or general user |
| User email | Used for dashboard login; a temporary password is sent to this address |
| Create namespace (optional) | Specify namespace name using lowercase English letters and - only (4 to 20 characters) |
| Namespace file storage (when creating a namespace) | Select file storage in the same network and subnet as the created cluster (can overlap with default file storage) |
| Quota assignment | Quota can be configured based on node pool specifications created within the cluster |
You can view pod information for the cluster where Kubeflow is installed.
| Category | Description |
|---|---|
| Pod filter | Select filter attributes or enter search terms to search for pods |
| Name | Application pod information |
| Status | Pod status - Pending, Running, Failed, Succeeded, Unknown |
| Creation time | Time of creation - Based on the response time after creation request |
| IP | IP address used internally in the pod |
Pod status
| Status | Description | Classification |
|---|---|---|
Pending | Pod not scheduled or waiting for scheduling | Yellow |
Running | Pod successfully scheduled and running | Green |
Succeeded | Pod successfully terminated | Gray |
Failed | Pod terminated abnormally | Red |
Unknown | Pod status cannot be confirmed | Gray |
Application pod information
Once Kubeflow is created and its status becomes Active, you can confirm that the following application pods are running correctly in the cluster of KakaoCloud Kubernetes Engine service.
| Category | Namespace | Pod |
|---|---|---|
| Pod | auth | dex |
| Pod | cert-manager | cert-manager cert-manager-cainjector cert-manager-webhook |
| Pod | ingress-nginx | ingress-nginx-controller |
| Pod | istio-system | authservice |
| Pod | istio-system | cluster-local-gateway |
| Pod | istio-system | istio-ingressgateway |
| Pod | istio-system | istiod |
| Pod | knative-eventing | eventing-controller eventing-webhook |
| Pod | knative-serving | activator autoscaler controller webhook |
| Pod | knative-serving | domain-mapping |
| Pod | knative-serving | domainmapping-webhook |
| Pod | knative-serving | net-istio-controller net-istio-webhook |
| Pod | kube-system | metrics-server |
| Pod | kubeflow | admission-webhook-deployment |
| Pod | kubeflow | cache-server |
| Pod | kubeflow | centraldashboard |
| Pod | kubeflow | workflow-controller |
| Pod | kubeflow | mysql |
| Pod | kubeflow | minio |
| Pod | kubeflow | ml-pipeline ml-pipeline-persistenceagent ml-pipeline-scheduledworkflow ml-pipeline-ui ml-pipeline-viewer-crd ml-pipeline-visualizationserver |
| Pod | kubeflow | katib-controller katib-db-manager katib-ui |
| Pod | kubeflow | jupyter-web-app-deployment notebook-controller-deployment |
| Pod | kubeflow | metadata-envoy-deployment metadata-grpc-deployment metadata-writer |
| Pod | kubeflow | metacontroller |
| Pod | kubeflow | profiles-deployment kubeflow-pipelines-profile-controller |
| Pod | kubeflow | kserve-controller-manager kserve-models-web-app |
| Pod | kubeflow | tensorboard-controller-deployment tensorboards-web-app-deployment |
| Pod | kubeflow | training-operator |
| Pod | kubeflow | volumes-web-app-deployment |
| Job | ingress-nginx | ingress-nginx-controller-admission-create ingress-nginx-controller-admission-patch |
| Job | gpu-operator | gpu-mig-setter |
| Job | cert-manager | cert-manager-issuer-injecter |
| Job | ingress-nginx | ingress-nginx-cm-setter |
| Job | kubeflow | user-generator |
| Job | kubeflow | katib-cert-generator |
| Job | istio-system | authservice-pvc-generator |
| Pod | nfs | nfs-subdir-external-provisioner |
| Pod | gpu-overview | gpu-overview-discovery |
| Pod | gpu-operator | gpu-operator gpu-operator-node-overview-discovery-master gpu-operator-node-overview-discovery-worker |
| Pod | nvidia | nvidia-container-toolkit-daemonset nvidia-cuda-validator nvidia-dcgm-exporter nvidia-device-plugin-daemonset nvidia-device-plugin-validator nvidia-mig-manager nvidia-operator-validator |
If using GPU node pools, you can view the GPU MIG instance configuration and usage status.
This tab is not displayed if GPU node pools are not used.
| Category | Description |
|---|---|
| Filter | View sorted GPU usage status by selecting either node pool or GPU MIG instance - When selecting “Node pool”: Choose from all node pools or from those selected during Kubeflow creation - When selecting “GPU MIG instance”: Choose from all GPU MIG instances or from the MIG instances (e.g., 1g. 10gb) configured during Kubeflow creation |
| Total | Check the total count of the selected filter item - Total: Name of the item selected by the filter - In use: Total number of MIG instances currently in use - Maximum available: Total number of MIG instances available based on the MIG instance configuration specified during Kubeflow creation |
| Items | - Node pool: Select to navigate to the detailed view of the node pool - Instance type: Shows the instance type of the node pool - MIG instance ㄴ A100 instance family: 1g. 10gb, 2g. 10gb, 3g. 40gb, 4g. 40gb, 7g. 80gb - In use: Number of currently used MIG instances of the type - Maximum available: Maximum number of usable MIG instances of the type |
| Category | Description |
|---|---|
| Filter | Select node pool, namespace, and pod to view data status |
| Data period | Time range for monitoring metrics - Period: 1 hour (default) / 3 hours / 12 hours / 1 day / 7 days |
| Items | Monitoring to be displayed |
| Auto refresh interval | Set auto-refresh interval - Interval: Do not refresh (default) / 10 seconds / 30 seconds / 1 minute / 5 minutes |
| Manual refresh | Select to refresh the monitoring results |
Monitoring metrics
| Metric name | Description | Unit |
|---|---|---|
| CPU usage | CPU usage | millicores |
| Memory usage | CPU memory usage | bytes |
| Graphic engine active percent | Ratio of time the graphics engine is active | % |
| Tensor core utilization | Ratio of cycles where Tensor (HMMA) pipelines are active | % |
| DRAM active percent | Ratio of active cycles in device memory interface (data send/receive) | % |
| GPU framebuffer memory usage | GPU framebuffer memory usage rate | % |
| GPU framebuffer memory used | GPU framebuffer memory used | MiB |
| GPU framebuffer memory free | Available GPU framebuffer memory | MiB |
| GPU SM clocks | GPU SM clock frequency | MHz |
| GPU temperature | GPU temperature | ℃ |
| GPU power usage | GPU power consumption | W |
You can view events that occur in user namespaces.
| Category | Description |
|---|---|
| Filter | Search by selecting the namespace name |
| Namespace name | Name of the namespace where the event occurred |
| Resource type | Type of object that triggered the event |
| Type | Event type (Normal/Warning) |
| Message | Event message |
| Log time | Time the event occurred |
| View details button | Event details - Message: Event message - Details: Detailed information in JSON format |
Metrics for GPU instance types are only available in Kubeflow detail screen > Monitoring.
- Support for custom dashboards in the KakaoCloud Monitoring service will be added later.
Modify Kubeflow cluster node pools
You can add new node pools or delete existing ones by modifying the CPU/GPU node pools configured during Kubeflow creation.
Node pool modification may fail depending on the cluster status. Nodes with running pods cannot be modified. Please check the cluster status and clean up the nodes before proceeding.
-
Go to the Kubeflow menu in the KakaoCloud console.
-
In the Kubeflow menu, select the Kubeflow instance whose node pool you want to modify.
-
Select the [Modify cluster node pool] button at the top of the page or select the more options icon.
-
In the cluster node pool modification modal, edit the items listed below.
Item Editable Kubeflow name Not editable Ingress / Worker node pool Not editable CPU node pool Editable - Add/delete CPU node pools GPU node pool Editable - Add/delete GPU node pools / Modify MIG configuration
Configure Kubeflow quotas
Quotas define the amount of resources that can be used within a namespace and can be set based on the resources available in the Kubernetes Engine where Kubeflow is installed.
A default of 5 CPU cores and 4 GiB memory is consumed when a namespace is created. For stable operation, you must assign quotas exceeding these values.
Quotas can be configured on the console screens for creating or editing users/groups. (Cannot be configured from the dashboard.)
-
Go to the Kubeflow menu in the KakaoCloud console.
-
In the Kubeflow tab, select the Kubeflow instance you want to use.
-
On the detail screen, go to the users tab.
-
Select the [Add user] button.
-
Check “Enable quota assignment” and specify the desired quota.
You can add or modify quotas by clicking the [More] icon for each user. For group quotas, go to the group tab and follow the same method.
If you increase or decrease (+/-) the quota for an already active namespace, it may affect running resources. Always verify resource usage before making changes.
Quota assignment conditions
-
Quotas are divided into CPU count (cores), CPU memory (GiB), and GPU memory (GiB). The maximum values are based on the sum of all node pools excluding the Worker and Ingress node pools.
(This means that additional node pools are required aside from Worker and Ingress for quota settings.)Quota type Based on maximum value CPU count Total number of CPU cores in all node pools except Worker and Ingress (at least 5 cores) CPU memory Total CPU memory in all node pools except Worker and Ingress (at least 4 GiB) GPU memory Total GPU memory across all GPU node pools File storage size Size of the mapped file storage (can be shared with other users) -
A user namespace or group namespace is required to assign quotas.
-
If the maximum quota value has already been used, no additional quota can be assigned.
Maximum quota calculation method
The maximum quota value is calculated as the total of all resources except Ingress and Worker node pools.
Node pools used multiple times are not double-counted.
Example calculation
| Node pool | Flavor | CPU core | CPU memory | GPU memory | Node count |
|---|---|---|---|---|---|
| ingressNodePool | m2a.large | 2 | 8 | - | 1 |
| workerNodePool | m2a.xlarge | 4 | 16 | - | 6 |
| cpuNotebookNodePool | m2a.2xlarge | 8 | 32 | - | 6 |
| cpuPipelineNodePool | Same as cpuNotebookNodePool | 8 | 32 | - | 6 |
| gpuNotebookNodePool | p2i.6xlarge | 24 | 192 | 40 | 2 |
| gpuPipelineNodePool | p2i.12xlarge | 48 | 384 | 80 | 2 |
Assuming the node pools above were configured during Kubeflow creation, the maximum available quota values are:
- Maximum CPU cores: cpuNotebookNodePool (48) + cpuPipelineNodePool (0) + gpuNotebookNodePool (48) + gpuPipelineNodePool (96) = 192 cores
- Maximum CPU memory: cpuNotebookNodePool (192) + cpuPipelineNodePool (0) + gpuNotebookNodePool (384) + gpuPipelineNodePool (768) = 1344 GiB
- Maximum GPU memory: cpuNotebookNodePool (0) + cpuPipelineNodePool (0) + gpuNotebookNodePool (80) + gpuPipelineNodePool (160) = 240 GiB
Used quota calculation method
-
The used (occupied) quota is the sum of all assigned quotas for users and groups with namespaces in the Kubeflow instance.
-
Namespaces that exist without assigned quotas are not included in the used quota calculation.
Available quota calculation method
-
Available quota is calculated as maximum quota value - used quota value.
-
Resource usage without quota assignment is not counted as used quota.
Connect Kubeflow dashboard via public IP
You can access the Kubeflow dashboard by assigning a public IP.
Assign a public IP to the load balancer
Assign a public IP to the load balancer created by the Kubeflow ingress controller during service creation. Then access the dashboard using the assigned IP address.
When Kubeflow is created, the necessary load balancer listeners and target groups are automatically defined via the ingress controller. No separate creation or modification is required.
-
Go to the Load balancer menu in the KakaoCloud console.
-
In the Load balancer menu, select the load balancer named according to this pattern:
kube_service_{project ID}_{IKE cluster name}_ingress-nginx_ingress-nginx-controller. -
On the load balancer detail page, select the [More] icon.
-
In the public IP connection settings modal, enter the necessary information and select [Save].
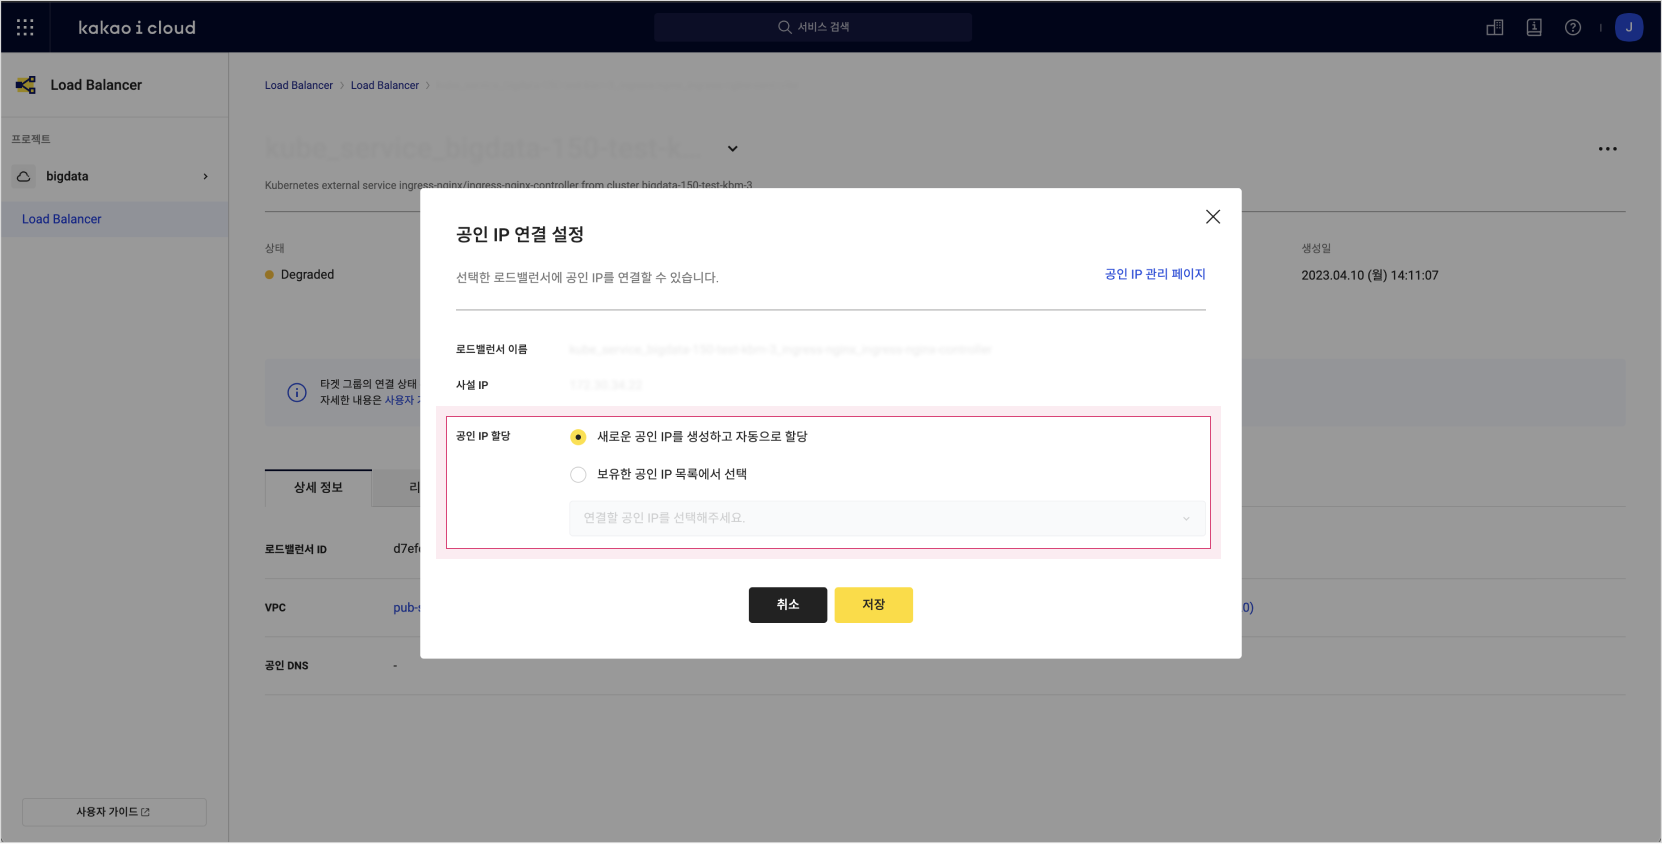
Configure public IP for load balancerItem Description Load balancer name Name of the selected load balancer Private IP Private IP of the selected load balancer Public IP assignment Choose from the options below:
- Automatically assign a new public IP
- Select from existing public IPs: choose a public IP to assign -
After assigning the public IP, go to the Quick launch section in the Kubeflow detail tab and select the connected public IP.
-
Verify that the dashboard is accessible.