Use dashboard
Access Kubeflow dashboard
To build a full MLOps workflow, access to the Kubeflow dashboard web console is required, which supports components such as Notebooks and Pipelines.
Access via load balancer
You can directly access or connect DNS to the public/private IP assigned to the KakaoCloud load balancer service created via the Kubeflow ingress controller during service creation.
For detailed information on public IP connections, refer to Connect Kubeflow dashboard via public IP.
- After connecting a public IP, TLS setup is required. If TLS is not configured, Visual Studio and RStudio may not function properly.
Access via kubectl port-forwarding
You can also connect to the Kubeflow gateway or the Kubeflow Istio gateway using the kubectl CLI via port forwarding.
kubectl port-forward -n istio-system svc/istio-ingressgateway 8080:80
For details on installing the kubectl CLI, refer to kubectl control setup.
Log in
-
Log in using the email address registered during user creation and the temporary password sent to that address.
Kubeflow user login -
After logging in, change your password.
Dashboard
The dashboard provides UI access to authorized components such as Notebooks, Experiments (AutoML), and Experiments (KFP) through login authentication.
- Kubeflow 1.10 version
- Kubeflow 1.8 version
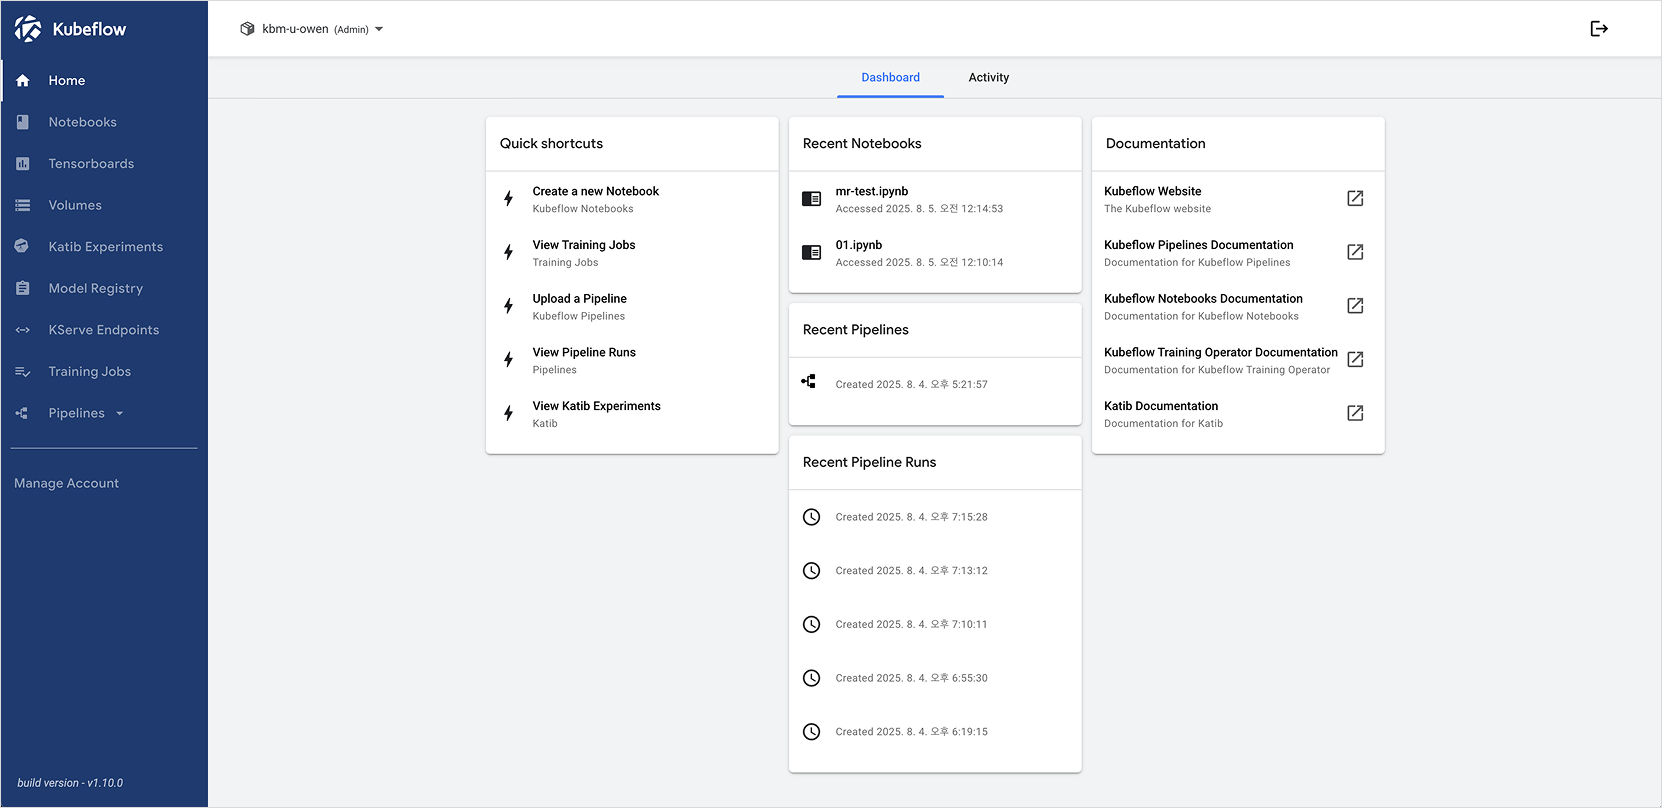 Kubeflow dashboard menu
| Category | Description |
|---|---|
| Notebooks | Manage notebook servers |
| TensorBoards | Manage TensorBoard servers |
| Volumes | Manage cluster volumes |
| Endpoints | Manage Kserve model deployments |
| Training Jobs | Manage training jobs |
| Katib Experiments | Manage automated machine learning with Katib |
| Model Registry | Manage model versions and artifacts |
| Experiments | Manage pipeline experiments |
| Pipelines | Manage pipelines |
| Runs | Manage pipeline runs |
| Recurring Runs | Manage pipeline run scheduling |
| Artifacts | Manage and track input/output files in ML workflows |
| Executions | Manage and track component execution results in ML workflows |
| Manage Account | Manage user dashboard account (reset password, view accessible namespaces, etc.) |
| Manage Group Users | Manage users in group namespaces (visible only with group namespace Admin privileges) |
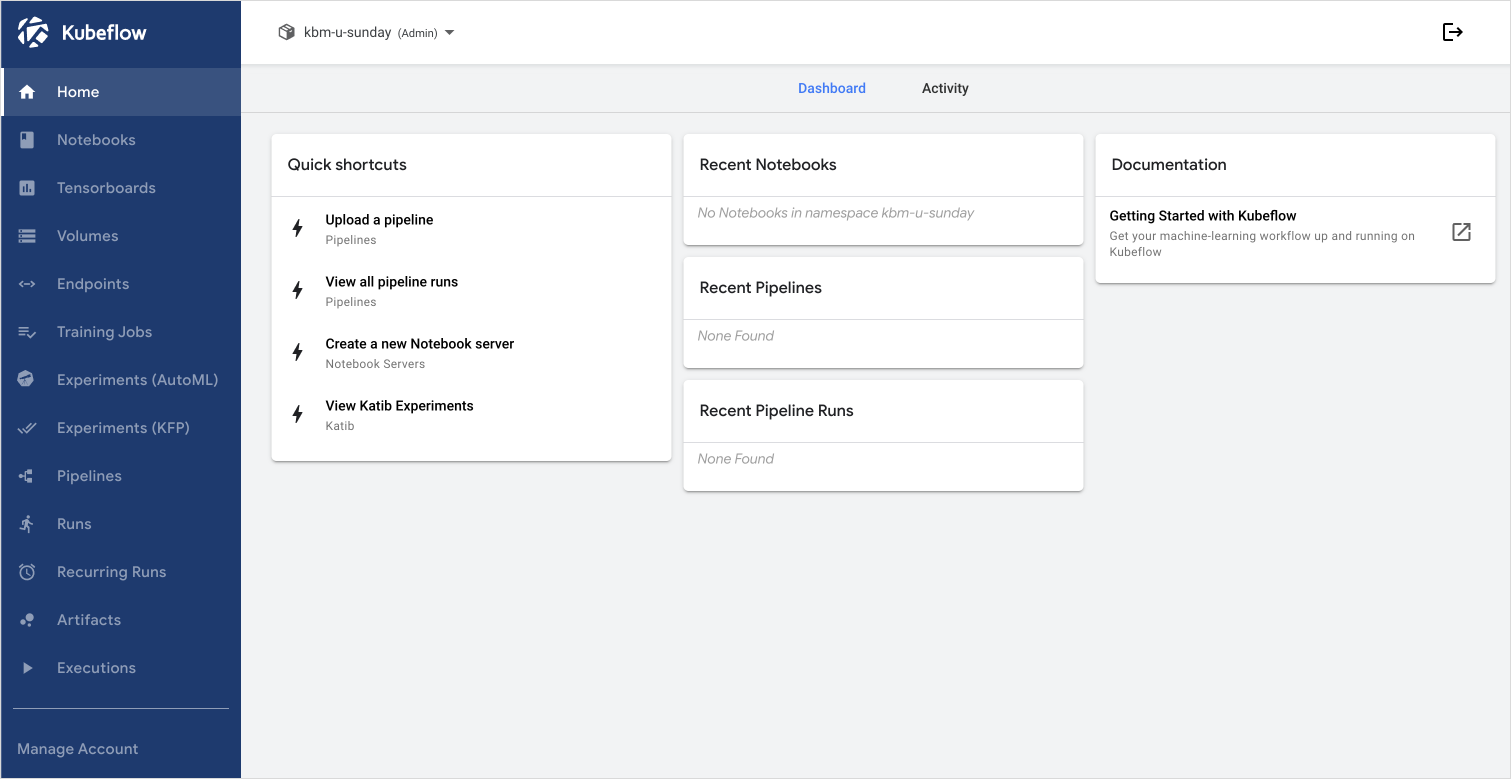
Kubeflow dashboard menu
| Category | Description |
|---|---|
| Notebooks | Manage notebook servers |
| TensorBoards | Manage TensorBoard servers |
| Volumes | Manage cluster volumes |
| Models | Manage Kserve model deployments |
| Training Jobs | Manage training jobs |
| Experiments (AutoML) | Manage automated machine learning with Katib |
| Experiments (KFP) | Manage pipeline experiments |
| Pipelines | Manage pipelines |
| Runs | Manage pipeline runs |
| Recurring Runs | Manage pipeline run scheduling |
| Artifacts | Manage and track input/output files in ML workflows |
| Executions | Manage and track component execution results in ML workflows |
| Manage Account | Manage user dashboard account (reset password, view accessible namespaces, etc.) |
| Manage Group Users | Manage users in group namespaces (visible only with group namespace Admin privileges) |
For detailed documentation, refer to Kubeflow > Central Dashboard official docs.
Manage group users
You can use the Manage Group Users tab to add or manage users in group namespaces.
This tab is only visible to users with Admin rights for the group namespace. If you have Admin rights for two or more group namespaces, you can manage users by namespace.
-
Select the desired group namespace.
-
Go to the Manage Group User tab.
-
Select the [Add Group User] button to add a user, or [Remove User] to remove one.
- Removing a user from a group does not delete the user from Kubeflow. To fully delete the user, refer to the Users tab in Kubeflow tab details.
-
Select the [RESET PASSWORD] button to reset a user's password.
- Only Admins can reset the password of other users with Edit or View permissions.
- If a user with Edit/View permission belongs to multiple groups, the password cannot be reset through the dashboard. Instead, go to the console > edit user.
-
To reset an Admin user's password, go to the console > edit user.
Manage TensorBoard
TensorBoard is a visualization tool used to display the results of a Notebook or Pipeline.
To use it, select the storage containing the logs and enter the mount path to visualize the data.
-
In the TensorBoards tab, select the [New TensorBoard] button.
-
Enter the TensorBoard name and choose the storage where logs are saved (KC Object Storage / PVC).
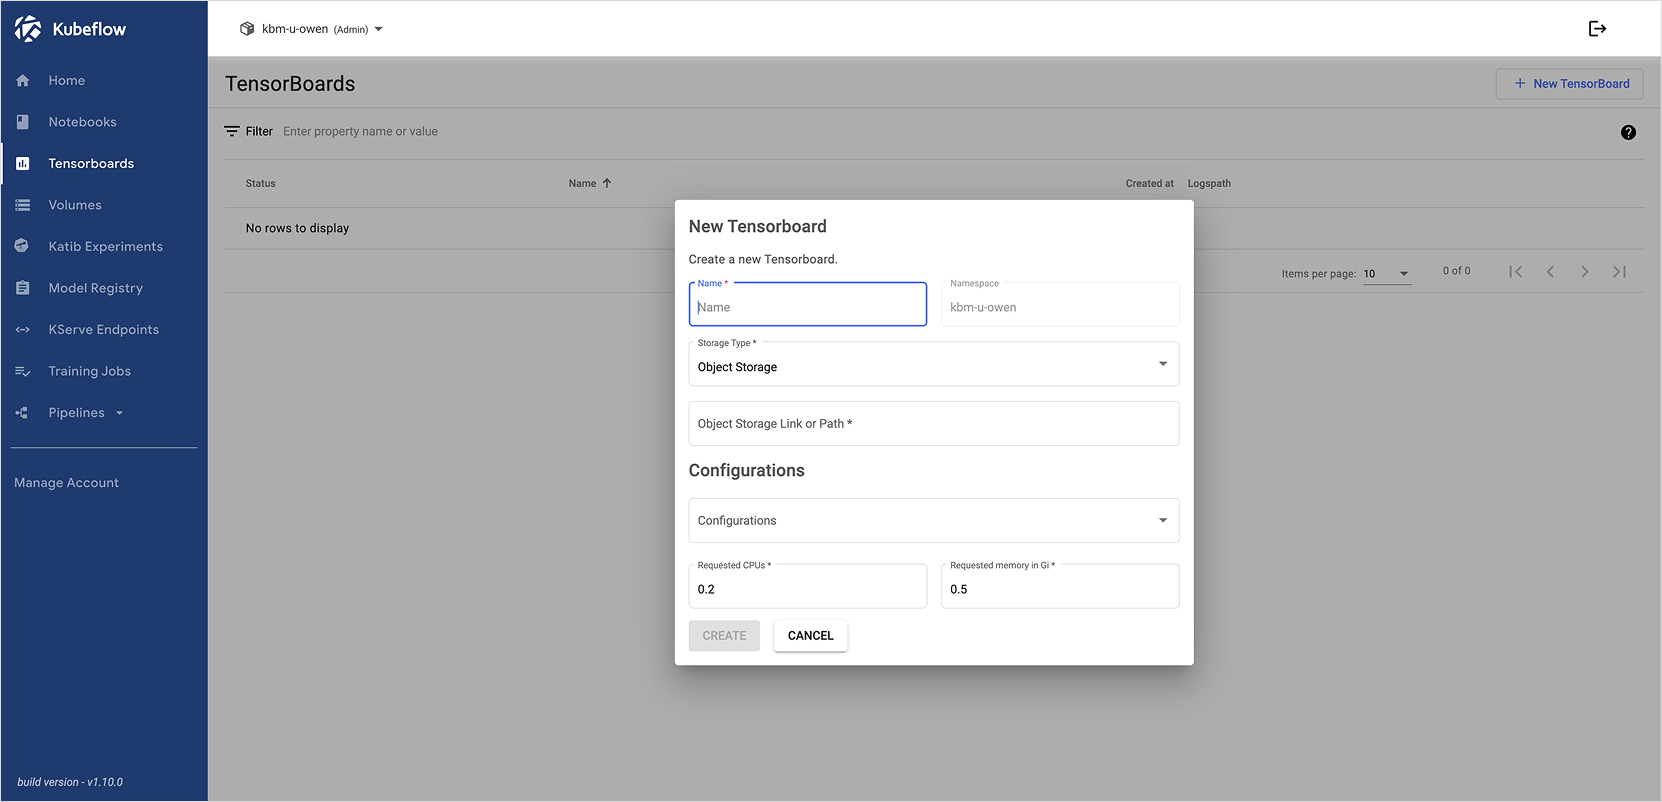
When selecting KakaoCloud Object Storage
-
Go to the Object Storage menu and select the bucket under the General bucket tab.
-
In the Objects tab, select the [More] icon of the file and select file info.
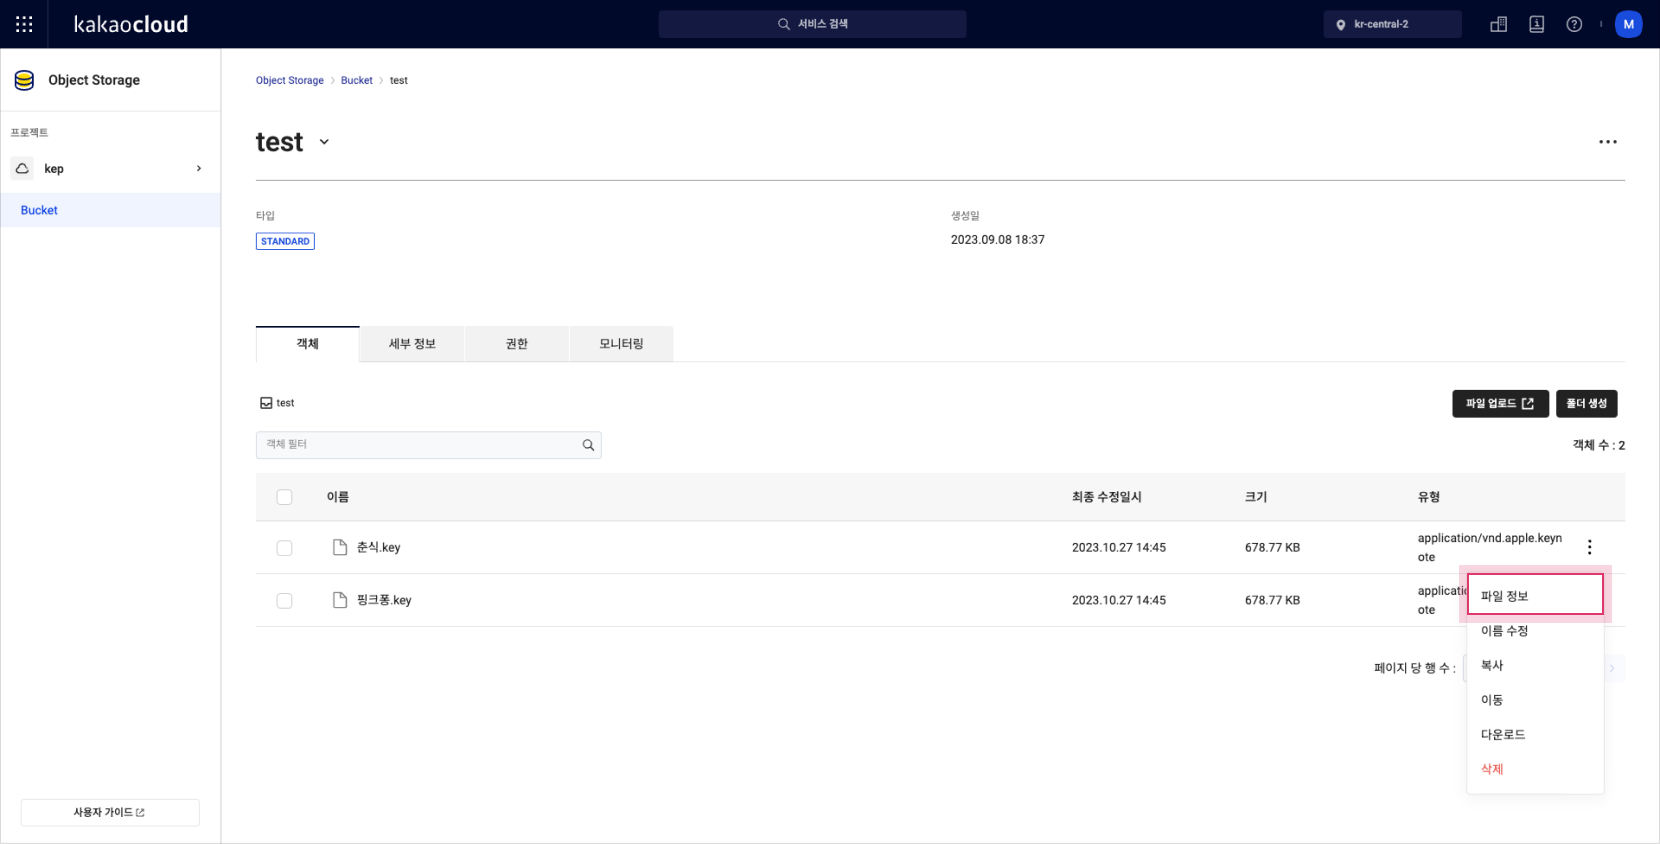
-
Copy the URL from the file info popup.
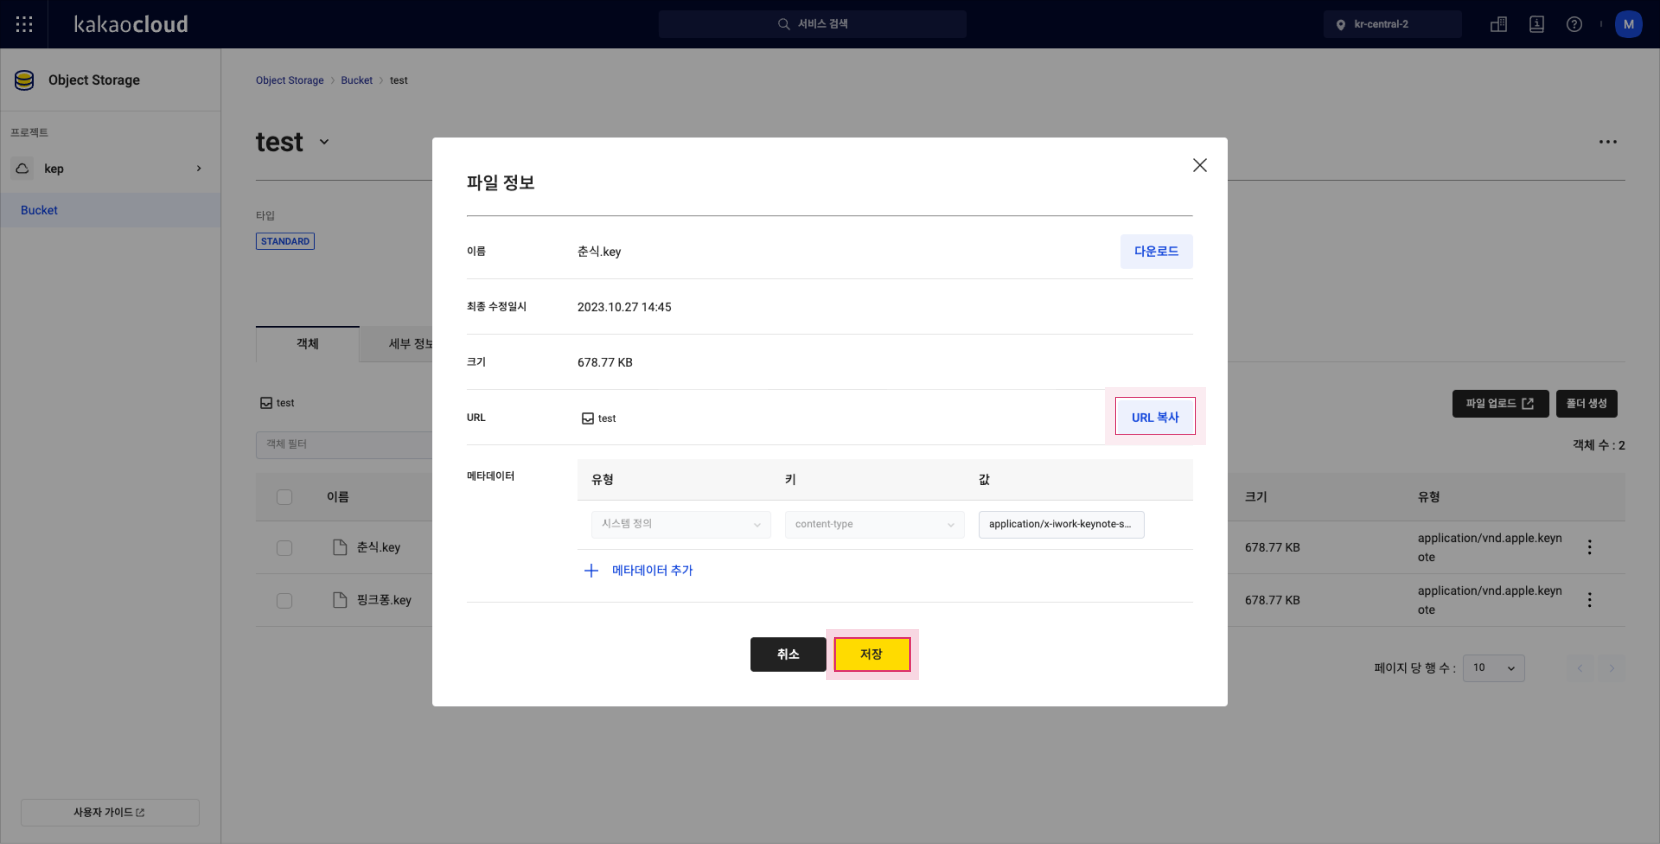
-
Remove the filename from the copied URL.
- Example: If the URL is
https://objectstorage.kr-central-2.kakaocloud.com/v1/073fcf9f6d269789bb/kubeflow/tensorboard/temp/test.log, remove test.log - Or enter the relative path from the bucket root.
Example: If saved in bucket > temp, entertemp; for bucket > temp > temp1, entertemp/temp1
- Example: If the URL is
When selecting PVC
-
Go to the PVC menu and choose the bucket under the General bucket tab.
-
Enter the mount path value.
- After setting the required CPU and memory, select the [Create] button.