Use notebooks
Supported notebook images
Notebook instances in KakaoCloud Kubeflow provide a web-based machine learning development environment.
These notebook instances run based on Docker images, and the following images are currently supported in KakaoCloud Kubeflow.
The image registry endpoint is mlops.kr-central-2.kcr.dev/kc-kubeflow-registry/(image-name).
For example, to pull the jupyter-scipy:v1.8.0.py38.1a image, use:
mlops.kr-central-2.kcr.dev/kc-kubeflow-registry/jupyter-scipy:v1.8.0.py38.1a.
Supported notebook images
- Kubeflow 1.10 Version
- Kubeflow 1.8 Version
| Image | Python Version | Platform | Framework (Version) | GPU Support | HDE Support |
|---|---|---|---|---|---|
| kc-kubeflow-registry/jupyter-scipy:v1.10.0.py310.1a | python 3.10.16 | JupyterLab | scipy(1.15.1) | X | X |
| kc-kubeflow-registry/jupyter-scipy:v1.10.0.py311.1a | python 3.11.9 | JupyterLab | scipy(1.15.1) | X | X |
| kc-kubeflow-registry/jupyter-pytorch-full:v1.10.0.py310.1a | python 3.10.16 | JupyterLab | pytorch(2.5.1) | X | X |
| kc-kubeflow-registry/jupyter-pytorch-full:v1.10.0.py311.1a | python 3.11.9 | JupyterLab | pytorch(2.5.1) | X | X |
| kc-kubeflow-registry/jupyter-pytorch-cuda-full:v1.10.0.py310.1a | python 3.10.16 | JupyterLab | pytorch(2.5.1) | O | X |
| kc-kubeflow-registry/jupyter-pytorch-cuda-full:v1.10.0.py311.1a | python 3.11.9 | JupyterLab | pytorch(2.5.1) | O | X |
| kc-kubeflow-registry/jupyter-tensorflow-full:v1.10.0.py310.1a | python 3.10.16 | JupyterLab | tensorflow(2.17.1) | X | X |
| kc-kubeflow-registry/jupyter-tensorflow-full:v1.10.0.py311.1a | python 3.11.9 | JupyterLab | tensorflow(2.17.1) | X | X |
| kc-kubeflow-registry/jupyter-tensorflow-cuda-full:v1.10.0.py310.1a | python 3.10.16 | JupyterLab | tensorflow(2.17.1) | O | X |
| kc-kubeflow-registry/jupyter-tensorflow-cuda-full:v1.10.0.py311.1a | python 3.11.9 | JupyterLab | tensorflow(2.17.1) | O | X |
| kc-kubeflow-registry/jupyter-pyspark-pytorch:v1.10.0.py310.1a | python 3.10.16 | JupyterLab | pytorch(2.5.1) | X | O |
| kc-kubeflow-registry/jupyter-pyspark-pytorch:v1.10.0.py311.1a | python 3.11.9 | JupyterLab | pytorch(2.5.1) | X | O |
| kc-kubeflow-registry/jupyter-pyspark-pytorch-cuda:v1.10.0.py310.1a | python 3.10.16 | JupyterLab | pytorch(2.5.1) | O | O |
| kc-kubeflow-registry/jupyter-pyspark-pytorch-cuda:v1.10.0.py311.1a | python 3.11.9 | JupyterLab | pytorch(2.5.1) | O | O |
| kc-kubeflow-registry/jupyter-pyspark-tensorflow:v1.10.0.py310.1a | python 3.10.16 | JupyterLab | tensorflow(2.17.1) | X | O |
| kc-kubeflow-registry/jupyter-pyspark-tensorflow:v1.10.0.py311.1a | python 3.11.9 | JupyterLab | tensorflow(2.17.1) | X | O |
| kc-kubeflow-registry/jupyter-pyspark-tensorflow-cuda:v1.10.0.py310.1a | python 3.10.16 | JupyterLab | tensorflow(2.17.1) | O | O |
| kc-kubeflow-registry/jupyter-pyspark-tensorflow-cuda:v1.10.0.py311.1a | python 3.11.9 | JupyterLab | tensorflow(2.17.1) | O | O |
| kc-kubeflow-registry/jupyter-llm-dev-kit:v1.10.0.py310.1a | python 3.10.16 | JupyterLab | pytorch(2.5.1) | O | O |
| kc-kubeflow-registry/codeserver-python:v1.10.0.py310.1a | python 3.10.16 | CodeServer | X | X | |
| kc-kubeflow-registry/codeserver-python:v1.10.0.py311.1a | python 3.11.9 | CodeServer | X | X | |
| kc-kubeflow-registry/rstudio-tidyverse:v1.10.0.kbm.1a | RStudio | X | X |
| Image | Python Version | Platform | Framework (Version) | GPU Support | HDE Support |
|---|---|---|---|---|---|
| kc-kubeflow/jupyter-scipy:v1.8.0.py38.1a | python 3.8.10 | JupyterLab | scipy(1.10.1) | X | X |
| kc-kubeflow/jupyter-scipy:v1.8.0.py311.1a | python 3.11.9 | JupyterLab | scipy(1.11.3) | X | X |
| kc-kubeflow/jupyter-pytorch-full:v1.8.0.py38.1a | python 3.8.10 | JupyterLab | pytorch(2.3.0) | X | X |
| kc-kubeflow/jupyter-pytorch-full:v1.8.0.py311.1a | python 3.11.9 | JupyterLab | pytorch(2.3.0) | X | X |
| kc-kubeflow/jupyter-pytorch-cuda-full:v1.8.0.py38.1a | python 3.8.10 | JupyterLab | pytorch(2.3.0) | O | X |
| kc-kubeflow/jupyter-pytorch-cuda-full:v1.8.0.py311.1a | python 3.11.9 | JupyterLab | pytorch(2.3.0) | O | X |
| kc-kubeflow/jupyter-tensorflow-full:v1.8.0.py38.1a | python 3.8.10 | JupyterLab | tensorflow(2.13.1) | X | X |
| kc-kubeflow/jupyter-tensorflow-full:v1.8.0.py311.1a | python 3.11.9 | JupyterLab | tensorflow(2.15.1) | X | X |
| kc-kubeflow/jupyter-tensorflow-cuda-full:v1.8.0.py38.1a | python 3.8.10 | JupyterLab | tensorflow(2.13.1) | O | X |
| kc-kubeflow/jupyter-tensorflow-cuda-full:v1.8.0.py311.1a | python 3.11.9 | JupyterLab | tensorflow(2.15.1) | O | X |
| kc-kubeflow/jupyter-pyspark-pytorch:v1.8.0.py38.1a | python 3.8.10 | JupyterLab | pytorch(2.3.0) | X | O |
| kc-kubeflow/jupyter-pyspark-pytorch:v1.8.0.py311.1a | python 3.11.9 | JupyterLab | pytorch(2.3.0) | X | O |
| kc-kubeflow/jupyter-pyspark-pytorch-cuda:v1.8.0.py38.1a | python 3.8.10 | JupyterLab | pytorch(2.3.0) | O | O |
| kc-kubeflow/jupyter-pyspark-pytorch-cuda:v1.8.0.py311.1a | python 3.11.9 | JupyterLab | pytorch(2.3.0) | O | O |
| kc-kubeflow/jupyter-pyspark-tensorflow:v1.8.0.py38.1a | python 3.8.10 | JupyterLab | tensorflow(2.13.1) | X | O |
| kc-kubeflow/jupyter-pyspark-tensorflow:v1.8.0.py311.1a | python 3.11.9 | JupyterLab | tensorflow(2.15.1) | X | O |
| kc-kubeflow/jupyter-pyspark-tensorflow-cuda:v1.8.0.py38.1a | python 3.8.10 | JupyterLab | tensorflow(2.13.1) | O | O |
| kc-kubeflow/jupyter-pyspark-tensorflow-cuda:v1.8.0.py311.1a | python 3.11.9 | JupyterLab | tensorflow(2.15.1) | O | O |
| kc-kubeflow/codeserver-python:v1.8.0.py38.1a | python 3.8.10 | CodeServer | X | X | |
| kc-kubeflow/codeserver-python:v1.8.0.py311.1a | python 3.11.9 | CodeServer | X | X |
Create notebook instance
Create a notebook instance with desired specifications to build a computing environment for running machine learning code and processing data.
-
Access the Kubeflow dashboard.
- For more information on accessing the Kubeflow dashboard, refer to the Access Kubeflow dashboard guide.
-
Select the Notebooks tab on the left.
-
Click the [New notebook] button at the top right.
-
On the New notebook screen, enter the required information and click [Launch] to create the notebook instance.
- To create a notebook based on a specific image, refer to the guide below.
Item Category Description Name Name Used to identify the notebook instance in the Kubeflow dashboard Platform type Web development platform for the notebook instance
Types: JupyterLab, VisualStudio Code, RStudio
VisualStudio Code and RStudio may not function correctly if the domain is not connected to KubeflowCustom notebook Image Specify a KakaoCloud-supported Kubeflow notebook image Custom image When checked, allows input of custom image
- Example:bigdata-150.kr-central-2.kcr.dev/kc-kubeflow/jupyter-pytorch-full:v1.0.1.py38Image pull policy Policy for pulling image when the notebook instance starts CPU / RAM Minimum CPU Minimum CPU allocated to the notebook instance
- Displayed as "Requested CPUs" in version 1.6Minimum memory Gi Minimum memory allocated to the notebook instance
- Displayed as "Requested memory in Gi" in version 1.6Maximum CPU Maximum CPU allocated to the notebook instance
- Displayed as "CPU limit" in version 1.6Maximum memory Gi Maximum memory allocated to the notebook instance
- Displayed as "Memory limit in Gi" in version 1.6GPUs Number of GPUs Number of GPU resources used in the notebook instance GPU vendor Available GPU instance types Workspace volume Volume mounted to the notebook instance's Home directory
- Can create a new volume or use an existing oneData volume Register additional volumes to be mounted to the notebook instance
- Can create a new volume or use an existing one, and specify the mount pathConfigurations Register PodDefault resources already defined in the current namespace Affinity / Tolerations Affinity config Specify the node where the notebook instance will run Tolerations group Specify tolerations to apply to the notebook instance
- Available tolerations are defined in the ConfigMap inside the Kubeflow-installed KE clusterMiscellaneous settings Enable shared memory Enable workaround for shared memory required by frameworks like Torch
- Mounts an empty directory volume to/dev/shm
Notebook instance will not be created if Minimum CPU or Memory Gi exceeds the capacity of the node pool selected in Affinity config.
Create CPU-based notebook
Follow the steps below to create a notebook instance based on a CPU image:
-
Access the Kubeflow dashboard, click the Notebooks tab, and then click [New notebook].
-
On the New notebook screen, enter the required information and click [Launch] to create the notebook instance.
Item Category Description Name Name Used to identify the notebook instance in the Kubeflow dashboard Platform type Web development platform for the notebook instance
Types: JupyterLab, VisualStudio Code, RStudioCustom notebook Image Select an image that matches the Kubeflow version Custom image When checked, allows input of custom image
Example:bigdata-150.kr-central-2.kcr.dev/kc-kubeflow/jupyter-pytorch-full:v1.0.1.py38Image pull policy Policy for pulling image when the notebook instance starts CPU / RAM Minimum CPU 2
- Minimum CPU allocated to the notebook instanceMinimum memory Gi 8
- Minimum memory allocated to the notebook instanceMaximum CPU Maximum CPU allocated to the notebook instance Maximum memory Gi Maximum memory allocated to the notebook instance GPUs Number of GPUs None
- No GPU resource usedGPU vendor Available GPU instance types Workspace volume Volume mounted to the notebook instance's Home directory
- Can create a new volume or use an existing oneData volume Register additional volumes to be mounted to the notebook instance
- Can create a new volume or use an existing one, and specify the mount pathConfigurations Register PodDefault resources already defined in the current namespace Affinity / Tolerations Affinity config Select a node created as a CPU instance type
- Specify the node where the notebook instance will runTolerations group None
- Allow specific node taintsMiscellaneous settings Enable shared memory Enable workaround for shared memory required by frameworks like Torch
- Mounts an empty directory volume to/dev/shm
Create GPU-based notebook
Follow the steps below to create a notebook instance based on a GPU image:
-
Access the Kubeflow dashboard, click the Notebooks tab, and then click [New notebook].
-
On the New notebook screen, enter the required information and click [Launch] to create the notebook instance.
Item Category Description Name Name Used to identify the notebook instance in the Kubeflow dashboard Platform type Web development platform for the notebook instance
Types: JupyterLab, VisualStudio Code, RStudioCustom notebook Image Select an image that matches the Kubeflow version Custom image When checked, allows input of custom image
Example:bigdata-150.kr-central-2.kcr.dev/kc-kubeflow/jupyter-pytorch-full:v1.0.1.py38Image pull policy Policy for pulling image when the notebook instance starts CPU / RAM Minimum CPU 2
- Minimum CPU allocated to the notebook instanceMinimum memory Gi 8
- Minimum memory allocated to the notebook instanceMaximum CPU Maximum CPU allocated to the notebook instance Maximum memory Gi Maximum CPU allocated to the notebook instance GPUs Number of GPUs 1
- Number of GPU resources usedGPU vendor NVIDIA MIG - 1g.10gb
- Available GPU instance typesWorkspace volume Volume mounted to the notebook instance's Home directory
- Can create a new volume or use an existing oneData volume Register additional volumes to be mounted to the notebook instance
- Can create a new volume or use an existing one, and specify the mount pathConfigurations Register PodDefault resources already defined in the current namespace Affinity / Tolerations Affinity config Select a node created as a GPU instance type
- Specify the node where the notebook instance will runTolerations group None
- Allow specific node taintsMiscellaneous settings Enable shared memory Enable workaround for shared memory required by frameworks like Torch
- Mounts an empty directory volume to/dev/shm
Access notebook instance
-
Access the Kubeflow dashboard.
- For more information on accessing the Kubeflow dashboard, refer to the Access Kubeflow dashboard guide.
-
Select the Notebooks tab on the left.
-
In the list of created notebooks, click [Connect] for the desired notebook.
-
After clicking [Connect], a new tab will open showing the Jupyter Notebook interface for the selected notebook instance.
- You can write code or run machine learning models in the opened notebook.
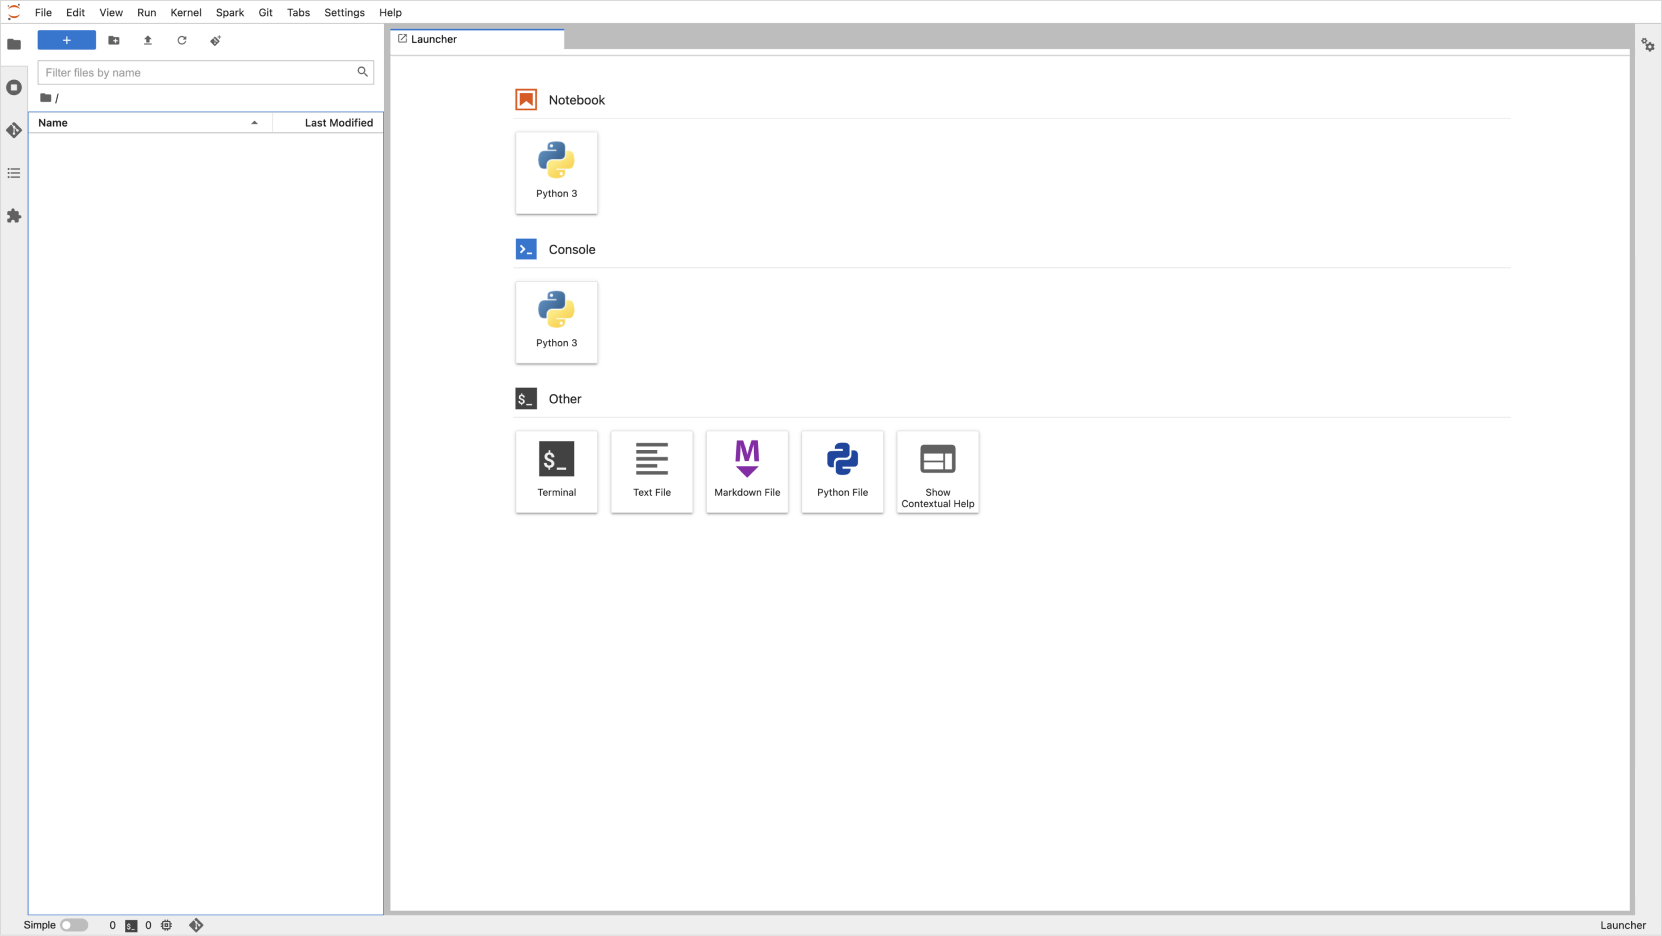
Jupyter Notebook interface
For setting up a Jupyter Notebook environment on Kubeflow and starting data analysis or model training, see the following tutorial.
- Deploy Jupyter Notebooks on Kubeflow: Kubernetes Engine, File Storage, Kubeflow, and Jupyter Notebook integration
Stop notebook instance
Notebook instances are typically stopped to save resources, enhance security, reduce costs, or manage the environment. Leaving a notebook instance running may prevent other tasks from accessing resources and lead to increased costs or security risks.
-
Access the Kubeflow dashboard.
- For more information on accessing the Kubeflow dashboard, refer to the Access Kubeflow dashboard guide.
-
Select the Notebooks tab on the left.
-
In the list of notebooks, click the ◼ (stop) button for the notebook you wish to stop.
- When the stop confirmation modal appears, click [Stop].
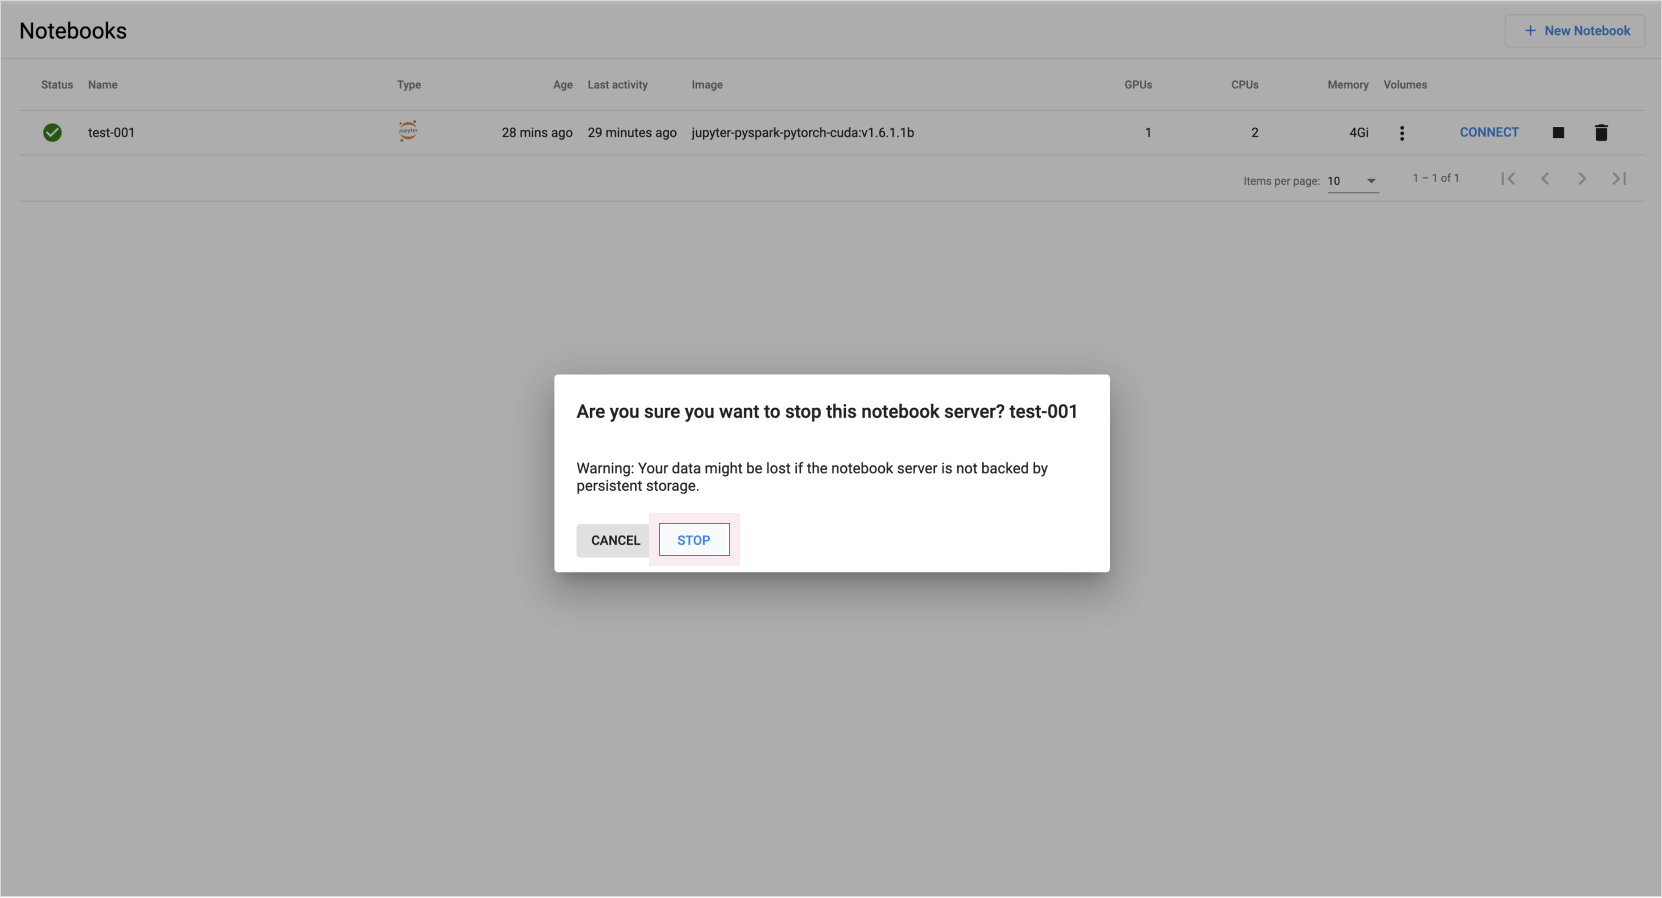
Notebook stop confirmation -
In the list of notebooks, verify that the status of the stopped notebook is correctly reflected.

Notebook stop verification
Delete notebook instance
Notebook instances are typically deleted to reclaim resources, enhance security, reduce costs, or manage the environment. Once deleted, the resources associated with the notebook can be reallocated to other tasks.
-
Access the Kubeflow dashboard.
- For more information on accessing the Kubeflow dashboard, refer to the Access Kubeflow dashboard guide.
-
Select the Notebooks tab on the left.
-
In the list of notebooks, click the delete (trash bin) icon for the notebook you wish to delete.
- When the delete confirmation popup appears, click [Delete].

Notebook delete confirmation -
Confirm that the notebook is no longer listed in the notebook list.

Notebook delete verification
- Deleted notebook instance names cannot be reused.
- If you need to reuse a name, delete the
{notebook-name}_volumePVC from the Kubernetes cluster in the KakaoCloud Kubernetes Engine service before creating it again.
- For more details, refer to the Kubeflow > Notebook official documentation.