Create and connect instance
This guide contains information about GPU and NPU instances.
Video transcoding instance is provided in Virtual Machine. For more details, refer to Virtual Machine > Create and connect instance.
Create instance
Instances are virtualized hardware resources that configure servers of different instance types. Here's how to create an instance in GPU:
-
Go to KakaoCloud console > Beyond Compute Service > GPU.
-
In the Instance menu, select the [Create instance] button.
-
Enter the required information and select the [Create] button.
- Network connection after creating an instance can take up to 10 minutes.
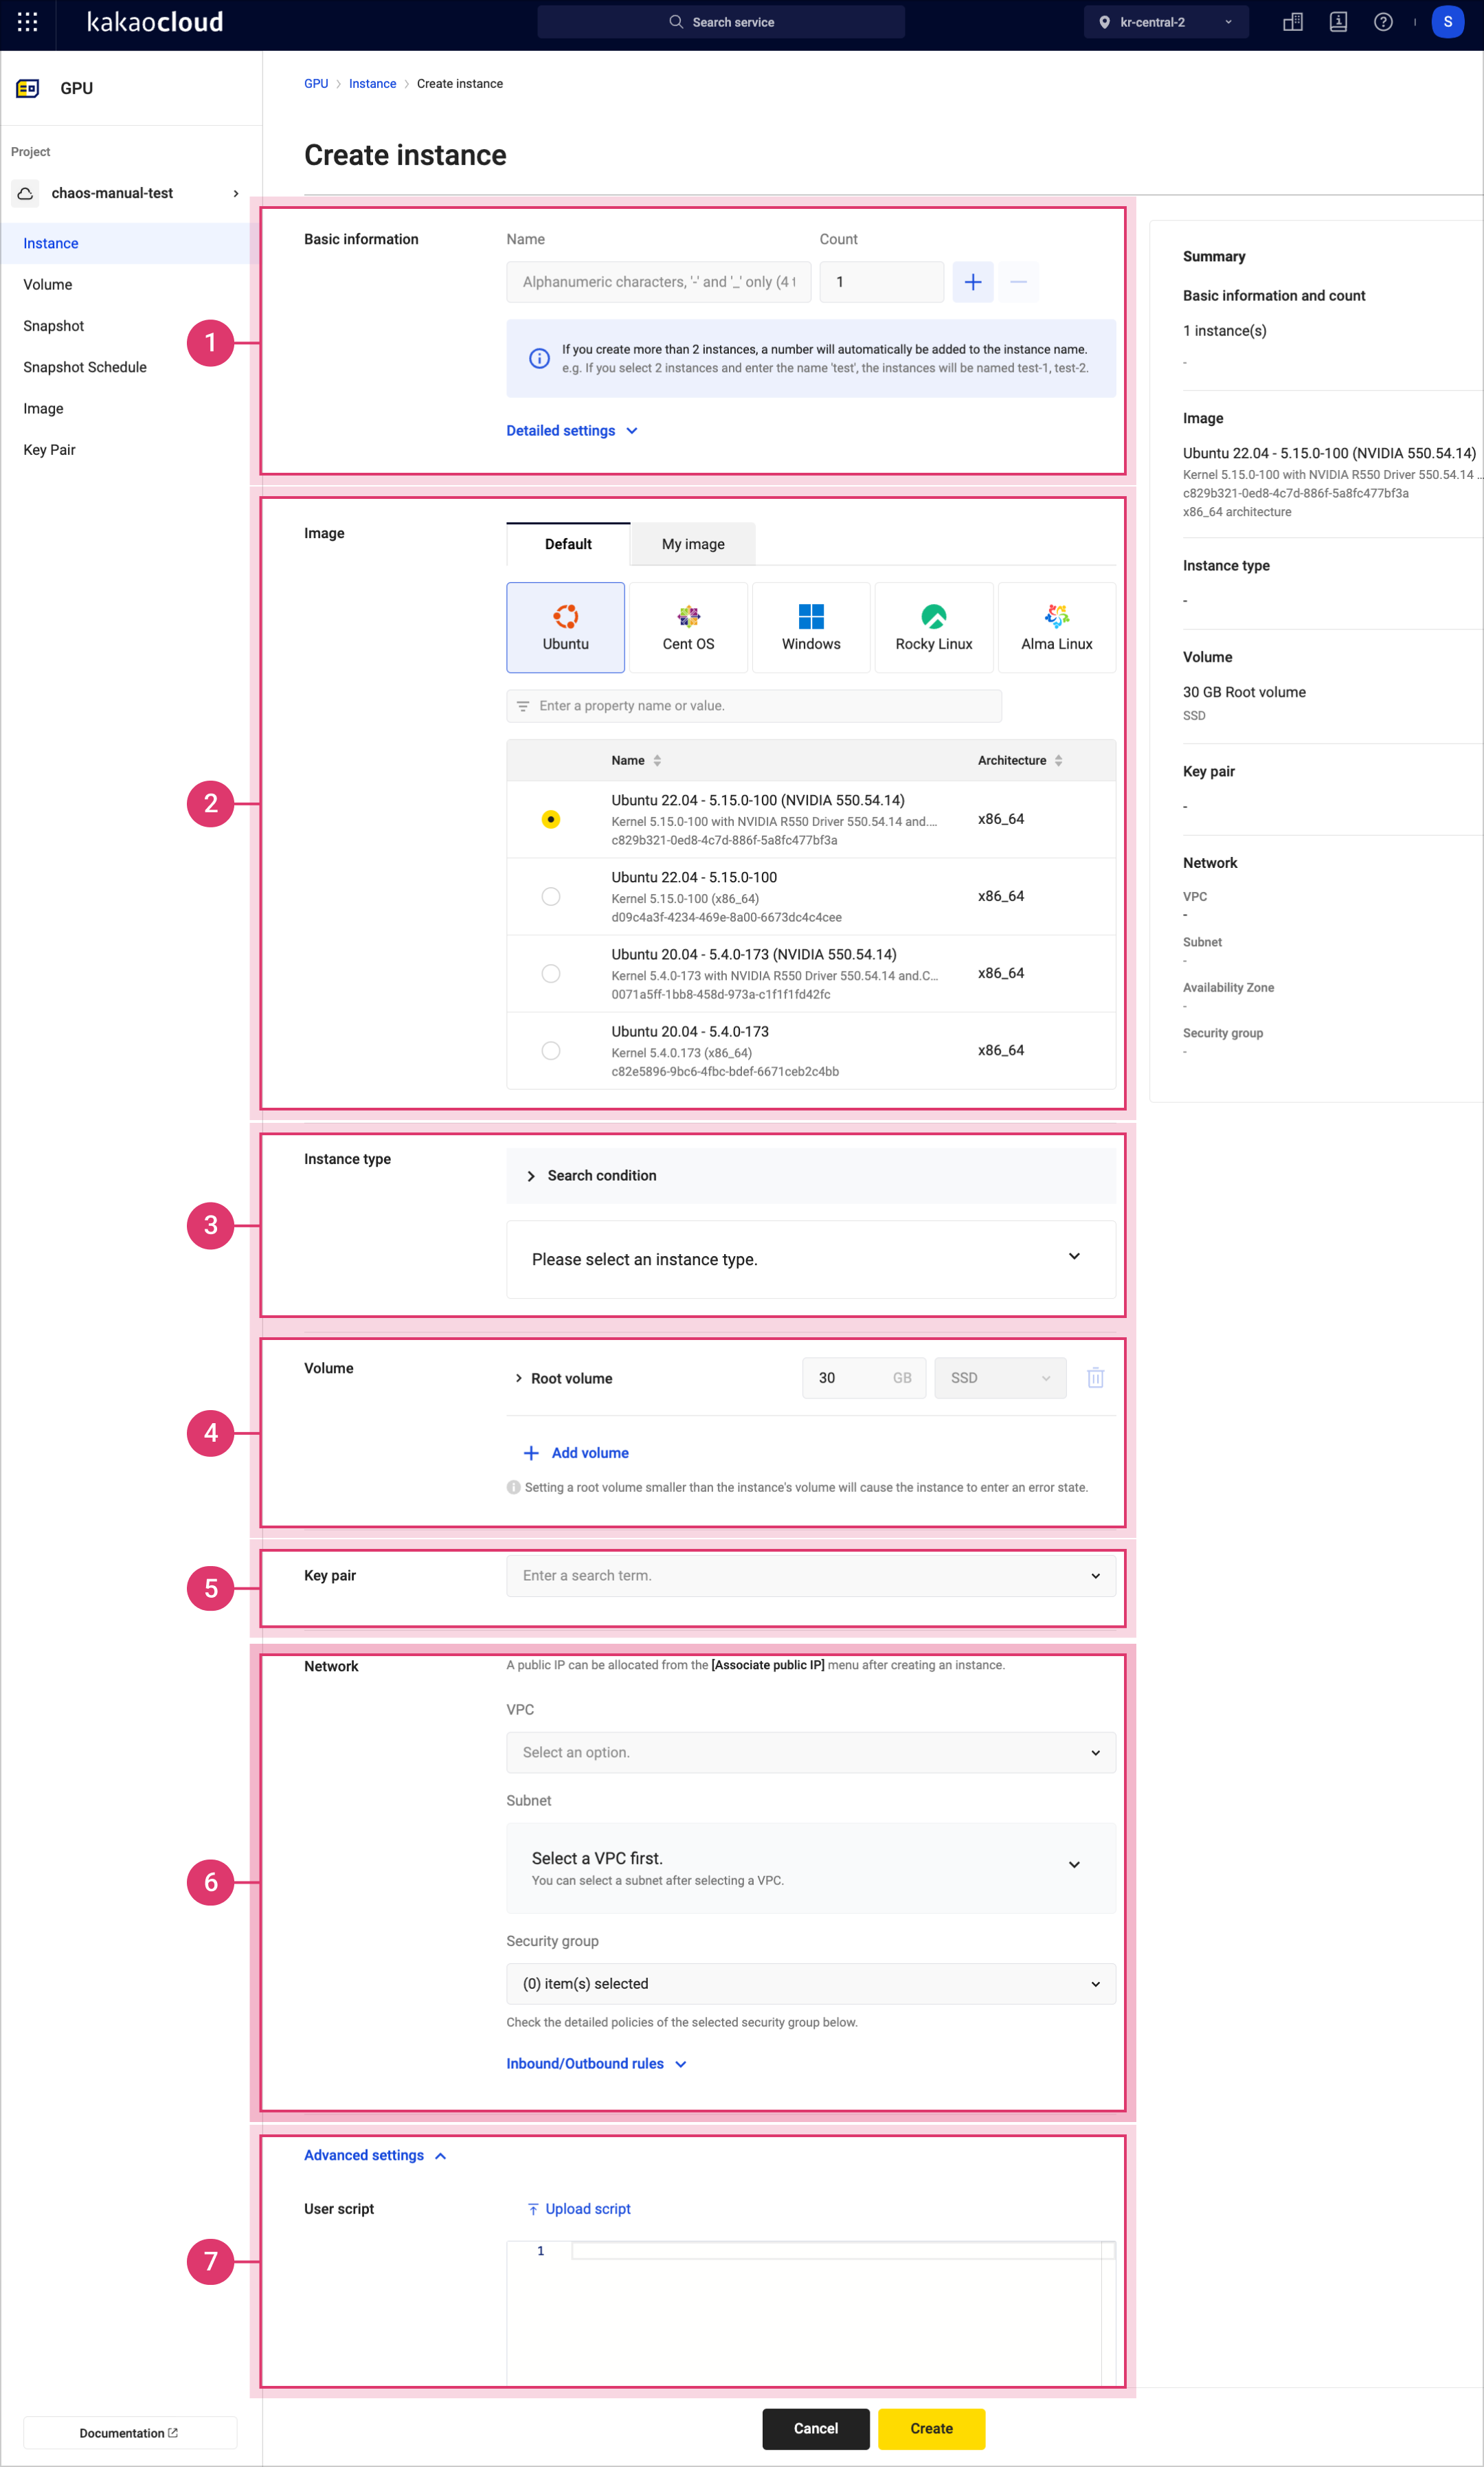 Create instance
Item Description ① Basic information Name: Name of the instance
- Duplicate instance names are allowed within the same project
- When creating multiple instances, the name of the first instance created is used as the base name for the restCount: Number of instances to create
- Up to 10 instances can be created simultaneously
- Creation limit is based on the maximum quota (limit per project)
ᄂ kr-central-1: 100
ᄂ kr-central-2: 500
️⚠️ Shared with the quota for Virtual Machine instances.Description (optional): Description of the instance (up to 100 characters) ② Image Image to use
- Default tab: Images officially provided by KakaoCloud
- My Images tab: Images created by the account (see Manage image for details)③ Instance type Instance specifications
- See Instance Specifications for details④ Volume Volume attached to the instance. Root Volume is displayed by default, with additional custom volumes available as needed.
- Size: Can be created between 1 and 5,120GB
- Type: Currently supportsSSDonly; more types will be supported in the future
- Maximum IOPS: Preset IOPS based on volume size (edit option will be available in the future)
- Delete with instance: Option to delete the volume when the instance is deleted⑤ Key pair Key pair to apply to the instance
- Select Create Key Pair to create and assign a new key pair
⚠️ The private key file for the created key pair cannot be downloaded again; ensure it is stored securely.
⚠️ You cannot connect to the instance without a key pair.⑥ Network VPC: The network where the instance will be configured.
Subnet: Select one of the subnets created in the network.
- If a new VPC and subnet are needed, they must be created in KakaoCloud console > VPC.
- A public IP that can be accessed externally can be assigned after instance creation in Associate Public IP.
Network Interface: The primary network interface of the instance to be created.
- Type: Choose between a new network interface or an existing one.
- IP Allocation Method: When selecting theNew Interfacetype, IP addresses can be randomly assigned within the subnet CIDR block excluding the reserved IP addresses.
Security Group: The security group to be applied to the instance.
Inbound/Outbound Rules
- Inbound tab: Inbound rules applied to the selected security group.
💡 To connect to the instance, inbound ports must be allowed based on the selected image (required):
- Linux-based: Allow TCP port 22.
- Windows: Allow TCP port 3389.
- Windows + MSSQL: Allow TCP ports 3389 and 1433.
- Outbound tab: Outbound rules, allowing all ports for all protocols.⑦ Advanced settings User script: Script to execute user data at instance startup for initial environment setup (runs only on the first start)
- Enter or upload a user data script orcloud-initcommand within 16KB
- Script is copied and executed in/var/lib/cloud/instances
- To check script execution logs, use the following commands:
ᄂ Ubuntu:sudo cat /var/log/syslogorsudo journalctl -u cloud-final.service
ᄂ CentOS:sudo cat /var/log/messagesorsudo journalctl -u cloud-final.service
⚠️ Entering an incorrect user script or an uncompleted script may cause boot failure.
CPU Multithreading: Option to optimize performance by assigning a single thread per CPU core
- Recommended to disable for specific workloads like high-performance computing (HPC).
- If the created instance type is a Bare Metal Server with NVLink configuration (e.g., p2a.baremetal), you need to install Fabric Manager separately to utilize GPU features properly. Therefore, please install Fabric Manager as follows. For more details, refer to NVIDIA Fabric Manager Official Documentation > 2.6 Installation.
- Ubuntu-based Linux:
sudo apt-get install cuda-drivers-fabricmanager-[driver-branch] - RHEL-based Linux:
sudo dnf module install nvidia-driver:[driver-branch]/fm
- Ubuntu-based Linux:
- Volumes for which the Delete when instance is deleted option is not selected will remain as detached volumes and be charged for even if the instance is deleted. In that case, delete the instance directly from the volume list.
- Instances created after January 16, 2023, are assigned hostnames based on the primary network interface's private IP (e.g.,
host-100-100-17-22). - Hostnames are updated during the networking stage to the
host-IPformat. For a short time post-creation, hostnames may appear as instance names.
Connect instance
Metadata must be retrieved to connect to an instance. If the instance's security group does not include the "default security group," define outbound rules for metadata retrieval in the custom security group. Refer to custom security groups for details.
Connect to Linux instance
Linux instances are connected using the SSH command. Check the related explanation by clicking GPU > Instance menu > [More] icon > Use SSH to connect. Set up the security group according to the OS image and prepare the connection with public/private IP.
| OS | Prerequisites |
|---|---|
| Linux/macOS | Install SSH client and use ssh command in the terminal. |
Step 1. Prepare SSH client
Install an SSH client to use SSH commands. Preparation varies by OS:
| OS | Prerequisites |
|---|---|
| Linux/macOS | Install an SSH client and use the ssh command in the terminal |
| Windows | Install OpenSSH client to use the ssh command in the command prompt (cmd) or install a separate SSH client such as PuTTY |
Step 2. Connect via SSH
Use SSH commands to connect to the instance. Enter the path to your private key file, the username, and the address of the instance to establish a connection.
ssh -i {PATH_TO_PRIVATE_KEY} {USERNAME}@{INSTANCE_IP}
| Command | Description |
|---|---|
PATH_TO_PRIVATE_KEY | Path to the private SSH key |
USERNAME | Username for connecting to the instance |
INSTANCE_IP | IP associated with the network interface connected to the instance - Enter either a public or private IP according to the connection environment |
Connect to Windows instance
To connect to a Windows instance, the Windows App application must be installed beforehand. Ensure the security group of the Windows instance is configured to allow RDP connections. Set the TCP/3389 port to allow access from the originating PC's IP address.
Step 1. Prepare RDP client
Install the Windows App application for RDP connections. For macOS, download and install it from the App Store.
Step 2. Connect via RDP
Retrieve the RDP connection details from the KakaoCloud console and use them to register the target Windows instance in the Windows App.
-
Go to KakaoCloud console > Beyond Compute Service > GPU.
-
In the Instance menu, select the instance's [More] icon > Use RDP to connect. Review the detailed information required for the connection in the pop-up window.
Item Description Public IP TCP 22 (default port)
- A public IP must be assigned to connect from the PC to the Windows instance.
- Assign the public IP via [More] icon > Associate public IP.Username Fixed as administrator.Password Select the [Register key pair] button and upload the key pair file set during instance creation to retrieve the password. -
Launch the Windows App. From the left menu, select Devices, select the [+] icon at the top right, and choose Add PC. Enter the details of the Windows instance confirmed earlier as follows, and leave the remaining options as default:
Item Description PC name Public IP address assigned to the Windows instance. Credentials Select Add Credentials and input the Username and Password confirmed in Step 2. -
In the Devices menu, check the Saved PCs section in the center of the screen. The added Windows instance will appear in the list, and you can double-select to connect to the Windows instance.
- It may take a few minutes after instance creation to complete the initial password setup required for the connection.
- Access is only available with the password obtained via the initial key pair file. If the password is changed, the user must update it directly in the operating system. Only the initial password is provided in the KakaoCloud console, and subsequent changes are not reflected.
- KakaoCloud Windows instances support WSL 1.
If instances with the same host name exist in the same network (VPC), network functionality errors may occur. Be cautious when renaming instances or directly changing the host name.