Create and manage snapshots/schedules
Snapshot
Create snapshot
You can create a snapshot of the current state of a volume.
If the volume size has been expanded, you must perform a full backup even if previous snapshots exist. Incremental backups may fail or create unusable snapshots in such cases.
Create snapshot by selecting a volume
-
Go to the KakaoCloud console > Beyond Compute Service > GPU.
-
Select the Volume menu, then select the [More options] icon for the volume to snapshot > Create snapshot.
-
In the Create snapshot popup, enter the information and select [Create].
Category Description Selected volume The volume to snapshot Snapshot type Method for creating the snapshot
- Full: Creates a full backup copy of all data at the time of execution, regardless of changes
e.g., a 50GB volume creates a 50GB snapshot
- Incremental: Backs up only data changed since the last snapshot
e.g., if 1GB of data changed, only 1GB is backed up
Requires a full backup to be completed firstSnapshot name Auto-generated from volume name, or can be entered manually Snapshot description (optional) Description of the snapshot
Create snapshot from the snapshot tab
- Go to the KakaoCloud console > Beyond Compute Service > GPU.
- Select the Snapshot menu, then select Create snapshot at the top right.
- In the Create snapshot popup, enter the information and select [Create].
Even if you have a full backup from a snapshot schedule, you must create a full snapshot manually the first time.
View snapshot list
You can view the list of snapshots you own and check basic information about each.
-
Go to the KakaoCloud console > Beyond Compute Service > GPU.
-
Select the Snapshot menu to view the list.
Category Description Type Type of snapshot created Name Name of the snapshot Status Status of the snapshot Volume ID Unique ID of the source volume Size Size of the snapshot Snapshot schedule - -: Manually created
-Schedule name: Automatically created by policyCreated by User who created the snapshot Created at Timestamp of snapshot creation
- Hover to see elapsed timeMore options Perform actions per item
- Edit snapshot: Edit snapshot name/description
- Restore snapshot: Create a new volume from the snapshot
- Delete snapshot: Delete the snapshot
Restore volume from snapshot
You can restore a volume to a specific point in time by selecting a snapshot.
Restore from the snapshot tab
- Go to the KakaoCloud console > Beyond Compute Service > GPU.
- In the Snapshot menu, select the [More options] icon for the desired snapshot > Restore snapshot.
- In the Restore snapshot popup, select [Restore snapshot].
Restore from the volume tab
- Go to the KakaoCloud console > Beyond Compute Service > GPU.
- In the Volume menu, select a volume containing the snapshot.
- Select the Snapshot menu, then select the [More options] icon for the desired snapshot > Restore snapshot.
- In the Restore snapshot popup, select [Restore snapshot].
Delete snapshot
You can delete snapshots that are no longer needed.
- If a volume has multiple incremental snapshots, only the last incremental snapshot can be deleted.
- If any incremental snapshots exist, the full snapshot for that volume cannot be deleted.
Deleted snapshots cannot be recovered.
- Go to the KakaoCloud console > Beyond Compute Service > GPU.
- In the Snapshot menu, select the [More options] icon for the desired snapshot > Delete snapshot.
- In the Delete snapshot popup, enter the snapshot name and select [Delete].
Create and manage snapshot schedule
This section explains how to automatically create and delete snapshots at specified intervals for volumes in the Virtual Machine service.
Create snapshot schedule
You can create a new snapshot schedule.
-
Go to the KakaoCloud console > Beyond Compute Service > Virtual Machine.
-
Select the Snapshot schedule tab and select Create snapshot schedule in the top-right corner.
-
In the Create snapshot schedule popup, fill in the details and select [Create].
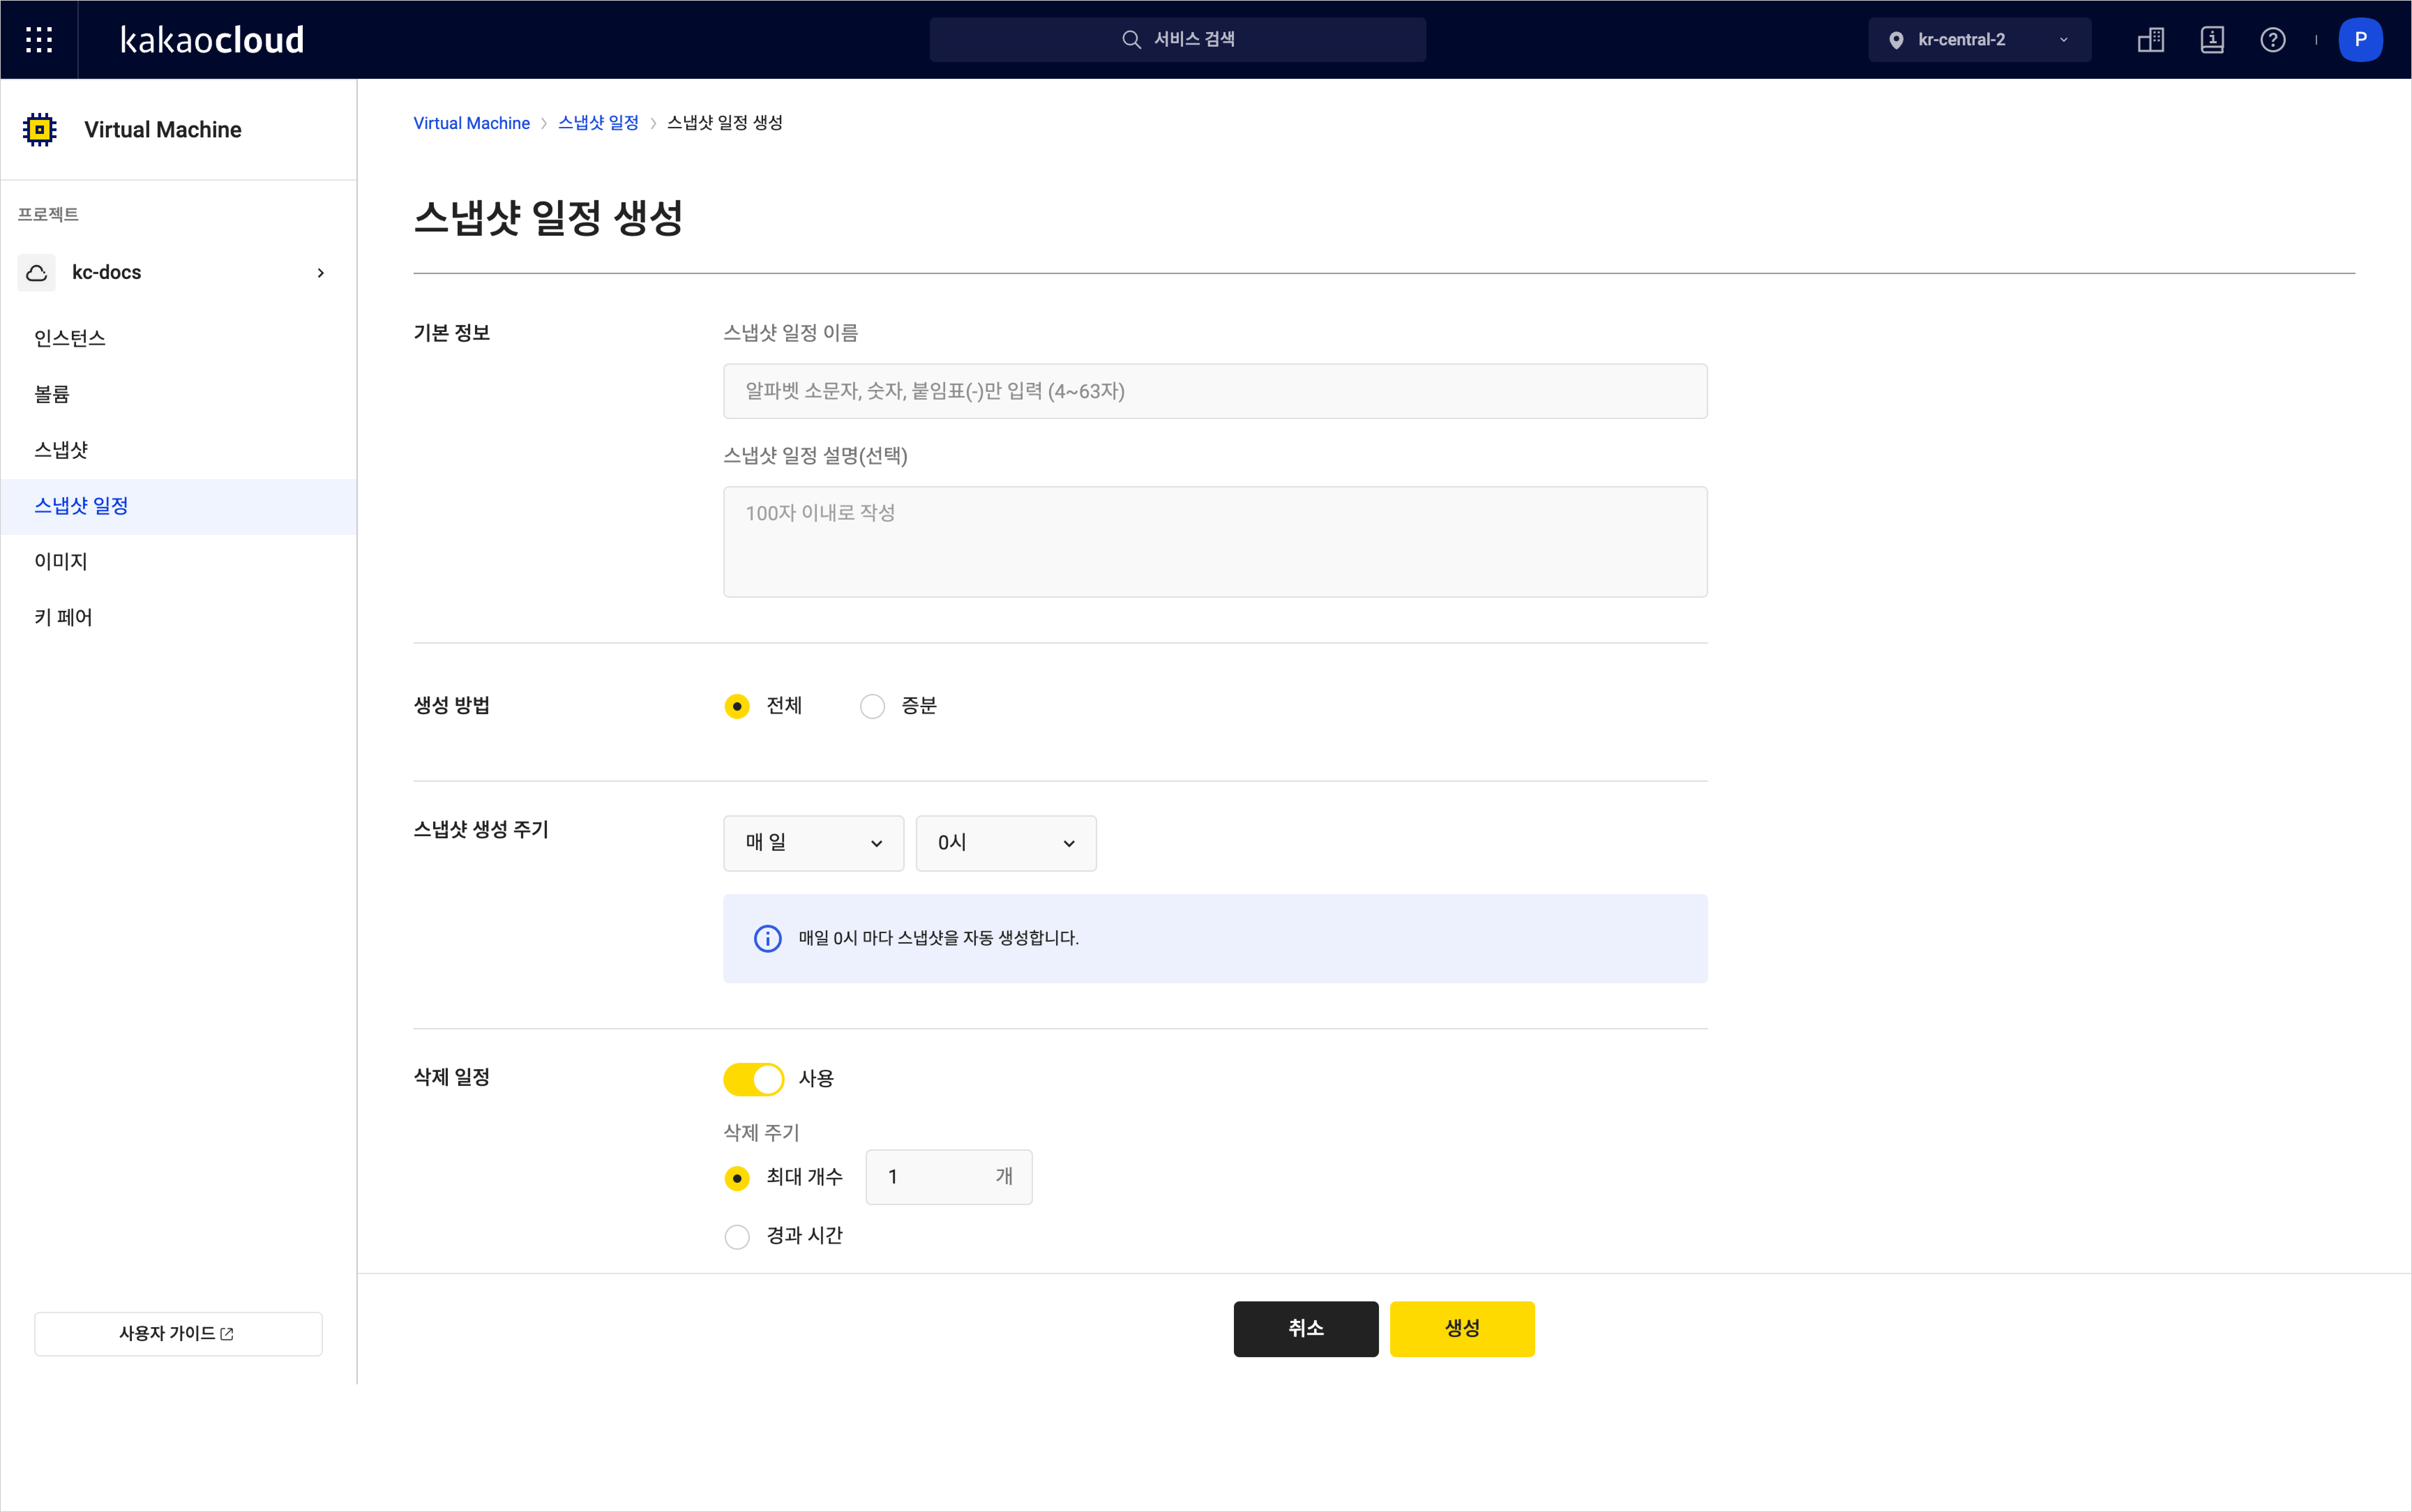 Create snapshot schedule
Category Description Detail Basic info Snapshot schedule name Enter the name for the snapshot schedule Snapshot schedule description (optional) Enter a description for the schedule Method Full Creates a full backup at each interval
- Copies all data regardless of changesIncremental Backs up only data changed since the last snapshot
- Requires an initial full backupSnapshot interval Set the interval for automatic snapshot creation Deletion policy Automatically deletes snapshots created by the schedule based on the specified condition
- Max count: deletes the oldest snapshots when the number exceeds the limit
- Retention time: deletes snapshots once the specified time has elapsed
View snapshot schedule list
You can view your active snapshot schedules and their basic information.
-
Go to the KakaoCloud console > Beyond Compute Service > Virtual Machine.
-
In the Snapshot schedule menu, view the list of running snapshot schedules.
Snapshot schedule listCategory Description Name User-defined name of the snapshot schedule Description Description of the snapshot schedule Frequency Automatic snapshot creation interval as defined by the user Deletion policy Method and cycle for automatic deletion of snapshots created by the schedule Attached volumes List of volumes linked to the snapshot schedule Created at Timestamp of schedule creation
- Hover to see more detailed timeMore options Available actions
- Edit: Modify the snapshot schedule settings
- Attach volume: Attach a volume to the schedule
- Detach volume: Detach a volume from the schedule
- Delete: Delete the snapshot schedule
Attach volume to snapshot schedule
You can attach a snapshot schedule to an active volume.
-
Go to the KakaoCloud console > Beyond Compute Service > Virtual Machine menu.
-
In the Snapshot schedule menu, select the [More] icon for the desired schedule and select Attach volume.
-
In the Attach volume popup, select the volume to attach to the snapshot schedule and select the [Save] button.
Detach snapshot schedule from volume
You can detach a volume from a snapshot schedule.
-
Go to the KakaoCloud console > Beyond Compute Service > Virtual Machine menu.
-
In the Snapshot schedule menu, select the [More] icon for the schedule linked to the volume and select Detach volume.
-
In the Detach volume popup, select the volume to detach and select the [Detach] button.
Delete snapshot schedule
You can delete a snapshot schedule that is no longer needed.
-
Go to the KakaoCloud console > Beyond Compute Service > Virtual Machine menu.
-
In the Snapshot schedule menu, select the [More] icon for the schedule to delete and select Delete snapshot schedule.
-
In the Delete snapshot schedule popup, enter the name of the snapshot schedule and select the [Delete] button.
Restore data using snapshot
You can restore instance data by creating a volume from a snapshot.
Restore data by creating new instance
This method restores data by creating a new instance, attaching the volume, and retrieving the data.
- Snapshot-based data restoration is useful when an instance cannot be booted or accessed via SSH or RDP due to incorrect settings or service failure.
- This document explains how to recover only the backed-up data, not how to restore an OS volume directly as a root volume.
Step 1. Create a snapshot of the instance that requires data recovery (Optional)
💡 If a snapshot already exists, you may skip this step.
-
Stop the instance that requires recovery (an instance that is unbootable or inaccessible). Wait until the instance status becomes
Stopped. -
Refer to Create and manage snapshot/schedule to create a snapshot of the volume containing the data.
Step 2. Create a volume from the snapshot containing the data to be restored (Optional)
💡 If the volume has already been created, skip this step. For instructions, refer to Restore volume from snapshot tab.
Step 3. Create a new instance to restore data
Refer to the Create instance document to create a new instance with the same type and volume size as the one requiring restoration.
Step 4. Attach the volume to the newly created instance
To restore the volume created in Step 2, refer to Attach volume to attach the volume to the new instance.
Step 5. Access the instance and mount the attached volume
- Linux
- Windows
-
Refer to Connect to instance to connect to the new Linux instance created earlier.
-
Check the volumes:
Check device connectionlsblkResultNAME MAJ:MIN RM SIZE RO TYPE MOUNTPOINTS
vda 253:0 0 10G 0 disk
├─vda1 253:1 0 9G 0 part /
├─vda14 253:14 0 4M 0 part
├─vda15 253:15 0 106M 0 part /boot/efi
└─vda16 259:0 0 913M 0 part /boot
vdb 253:16 0 10G 0 disk
├─vdb1 253:17 0 9G 0 part
├─vdb14 253:30 0 4M 0 part
├─vdb15 253:31 0 106M 0 part
└─vdb16 259:1 0 913M 0 part -
Check the file system type of the attached volume using
file -s:Check file system typesudo file -s /dev/vdbResult(ext4)
/dev/vdb: Linux rev 1.0 ext4 filesystem data, UUID=...
(xfs)
/dev/vdb: SGI XFS filesystem data ... -
Verify the integrity of the attached volume using a command suitable for the detected file system:
- Verify integrity (ext4)
- Verify integrity (xfs)
Verify integrity (ext4)sudo fsck -n /dev/vdbResultfsck from util-linux ...
/dev/vdb: clean ...Verify integrity (xfs)sudo xfs_repair -n /dev/vdbResultPhase 1 ...
Phase 7 ... -
Create a directory for mounting:
Create mount directorysudo mkdir -p /mnt/restore -
Mount the volume as read-only to the created directory:
Mount command (ext4)sudo mount -o ro -t ext4 /dev/vdb /mnt/restoreMount command (xfs)sudo mount -o ro -t xfs /dev/vdb /mnt/restore -
Confirm the mount was successful:
Verify mountfindmnt /mnt/restoreResultTARGET SOURCE FSTYPE OPTIONS
/mnt/restore /dev/vdb ext4 ro,relatime
Step 6. Restore necessary data from the mounted volume
-
Create the directory to restore the data to:
Create restore pathsudo mkdir -p /path/to/restore/ -
Copy data using
rsync. Use--checksumif strict integrity is required (may slow down the process for large data):Copy datasudo rsync -avh --checksum /mnt/restore/ /path/to/restore/Resultsending incremental file list ...
total size is 2.15G ... -
Verify the copied data:
Verify copied datals -alh /path/to/restore/Resulttotal 2.1G ...
Step 7. Detach the connected volume
-
Unmount the volume:
Unmountsudo umount /mnt/restore -
Detach the volume from the console using the steps in Detach volume.
You must detach the restored volume from the console after recovery. Leaving it connected may cause data corruption, resource waste, or system conflicts.
-
Refer to Connect to instance to access the new Windows instance with the attached volume.
-
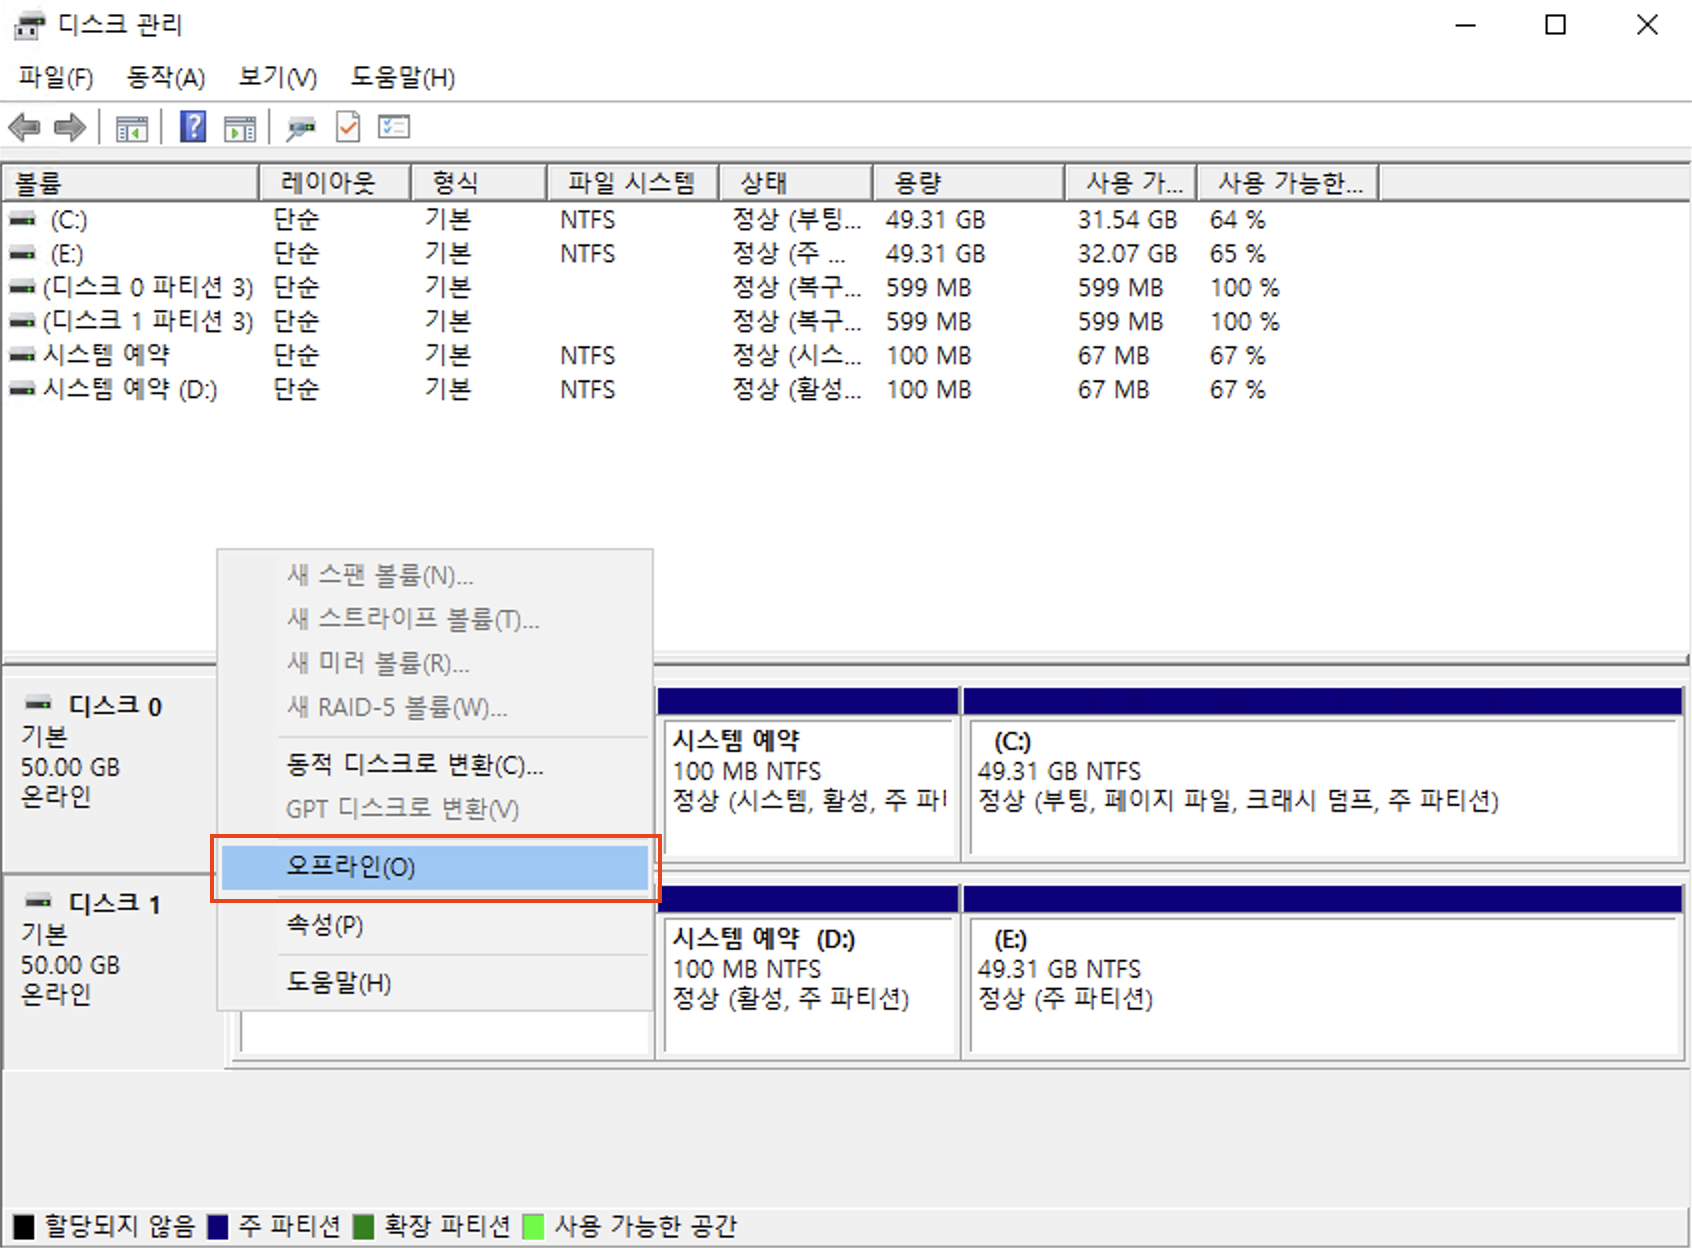
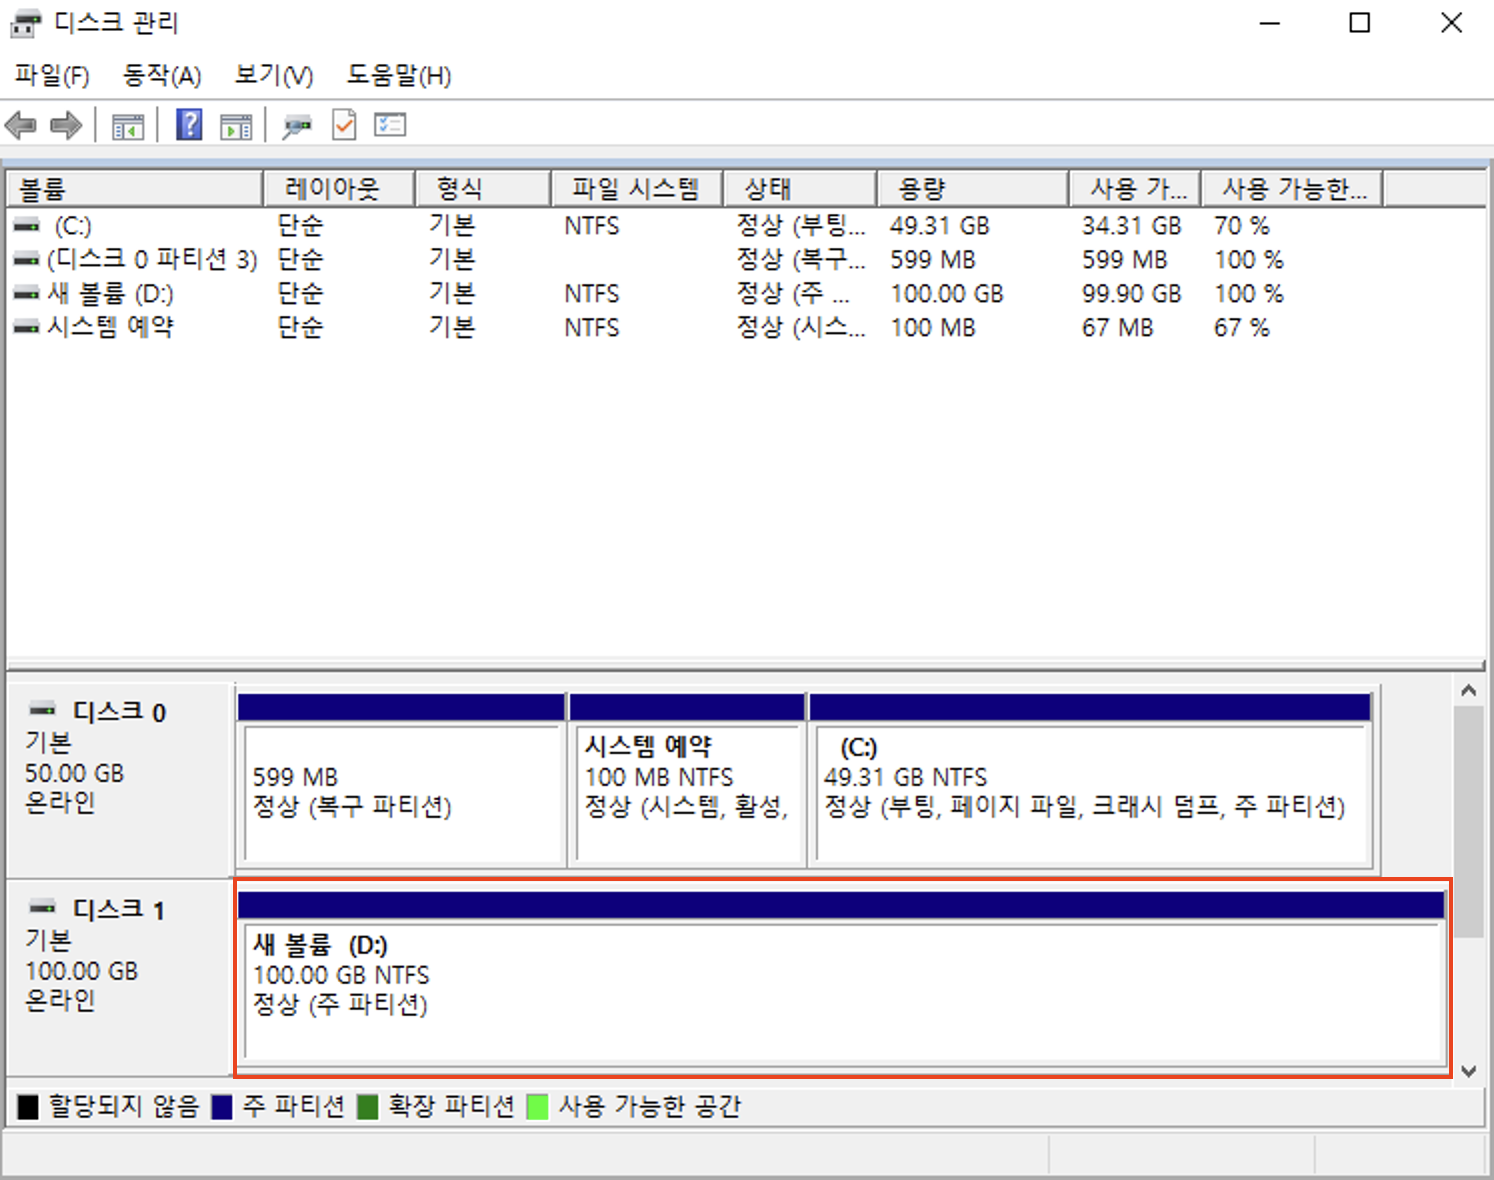
Verify the volume disk:
- Go to Start > Run or press
WIN + R. - In the Run dialog, enter
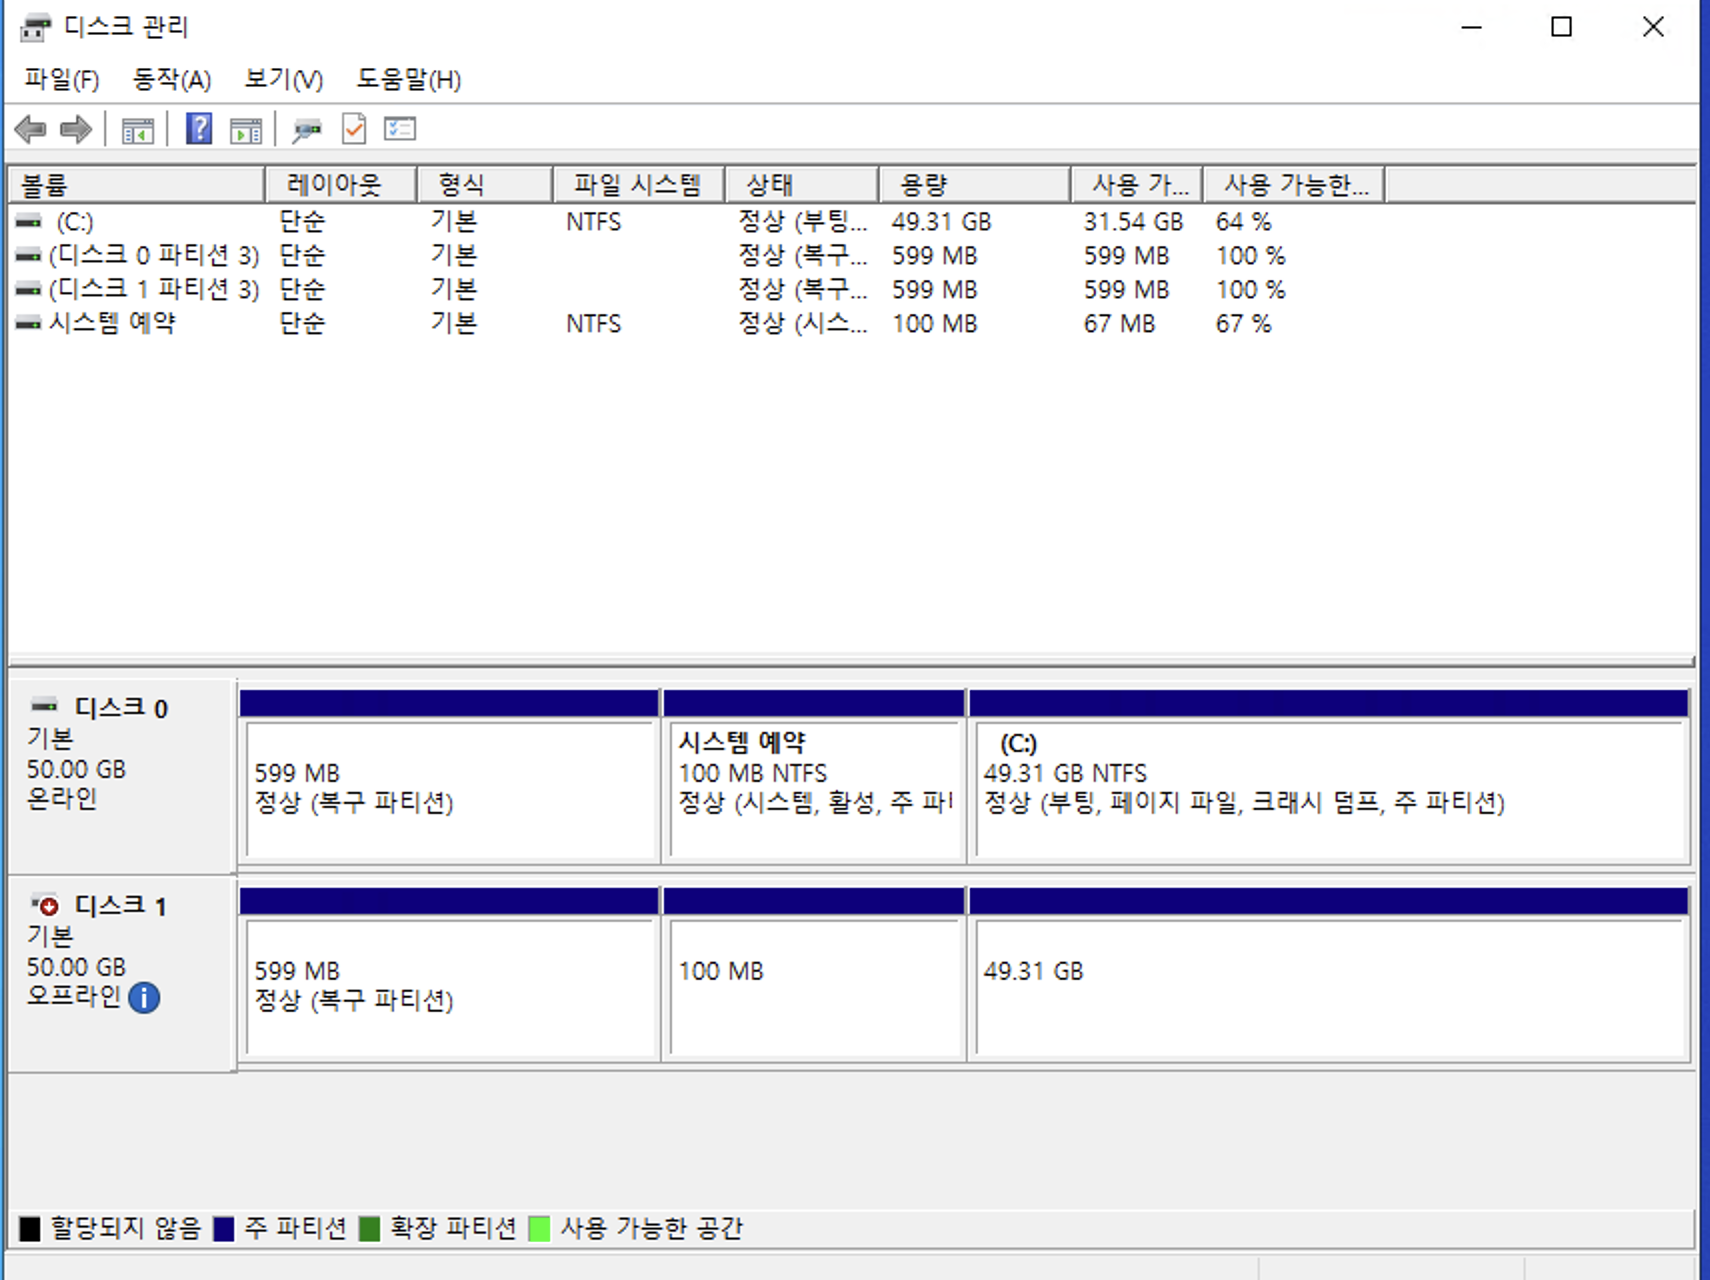
diskmgmt.mscand select OK or press Enter. - In Disk Management, check the attached volume disk.
- The restored volume is expected to have a partition structure similar to the OS volume mounted on the C drive.
- Go to Start > Run or press
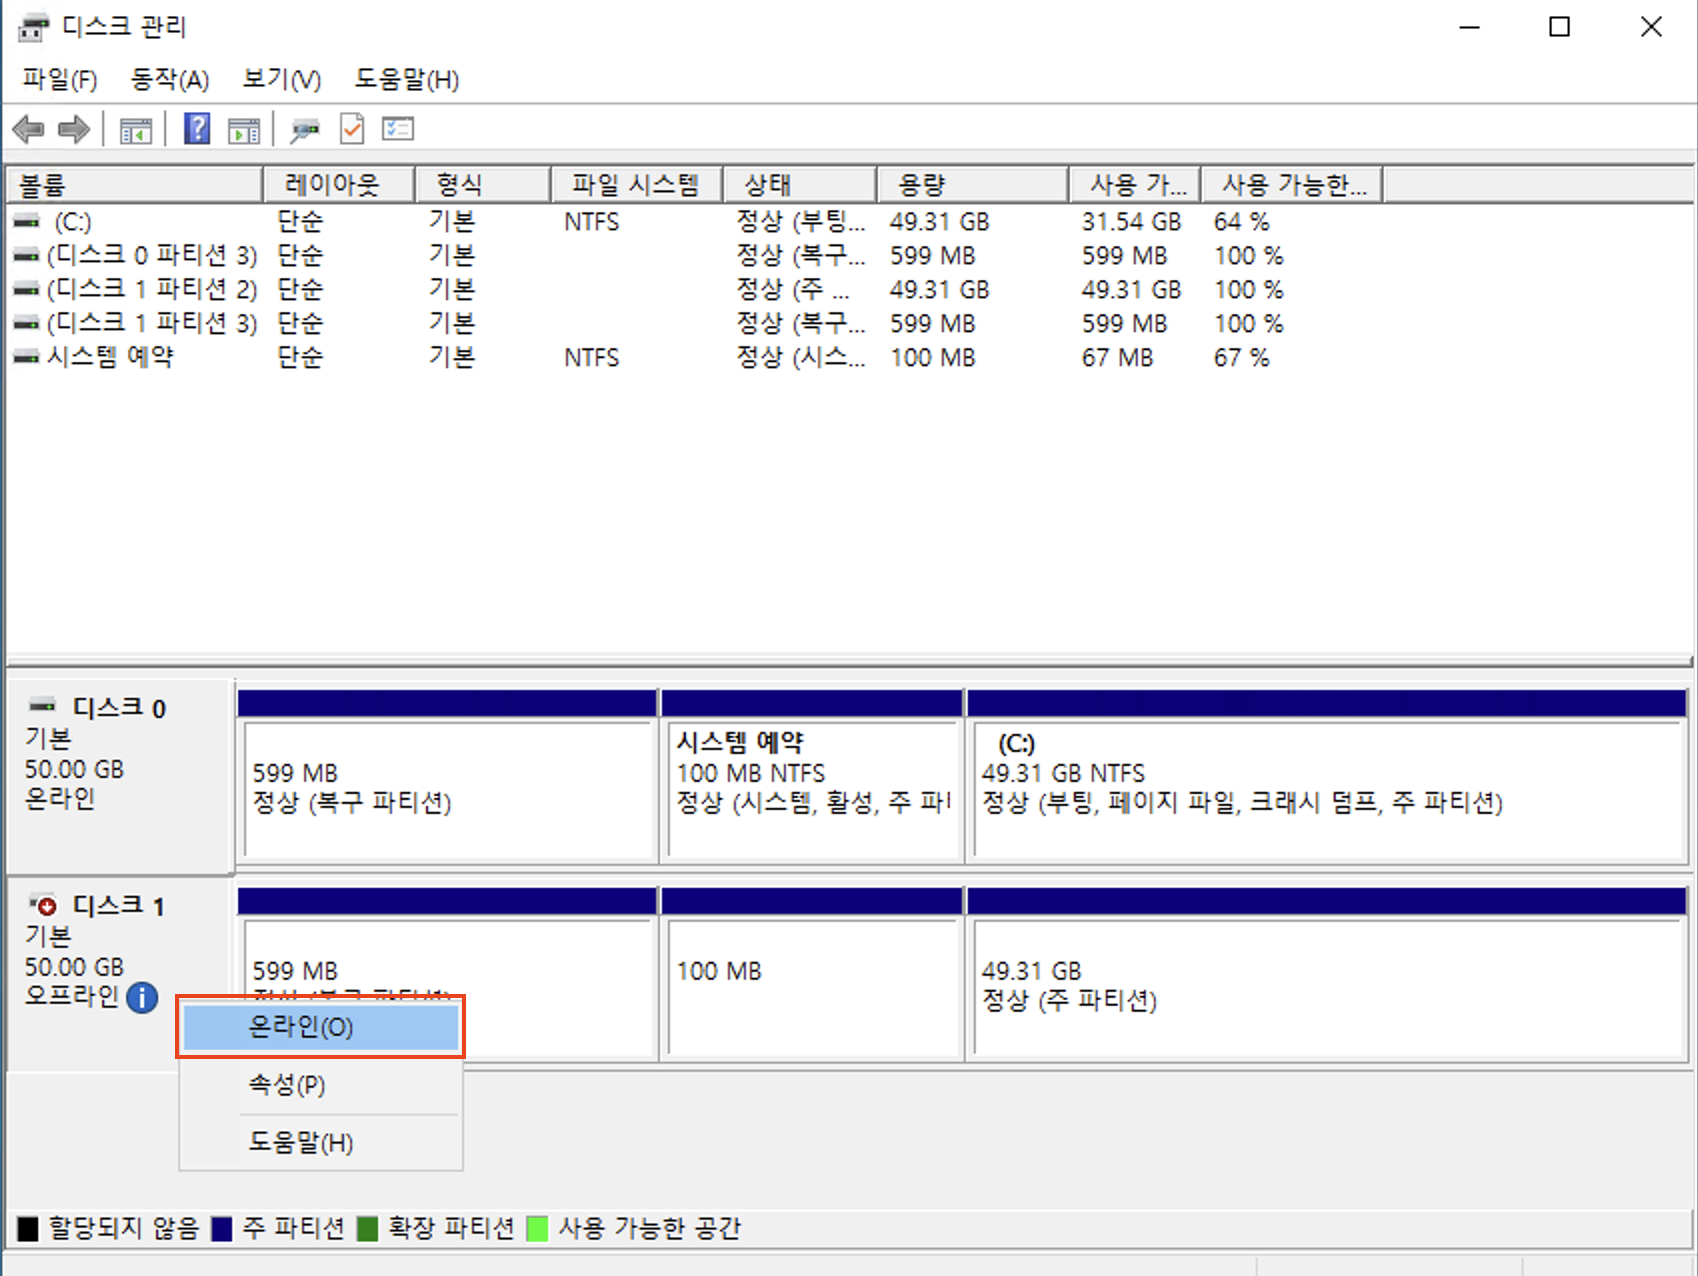
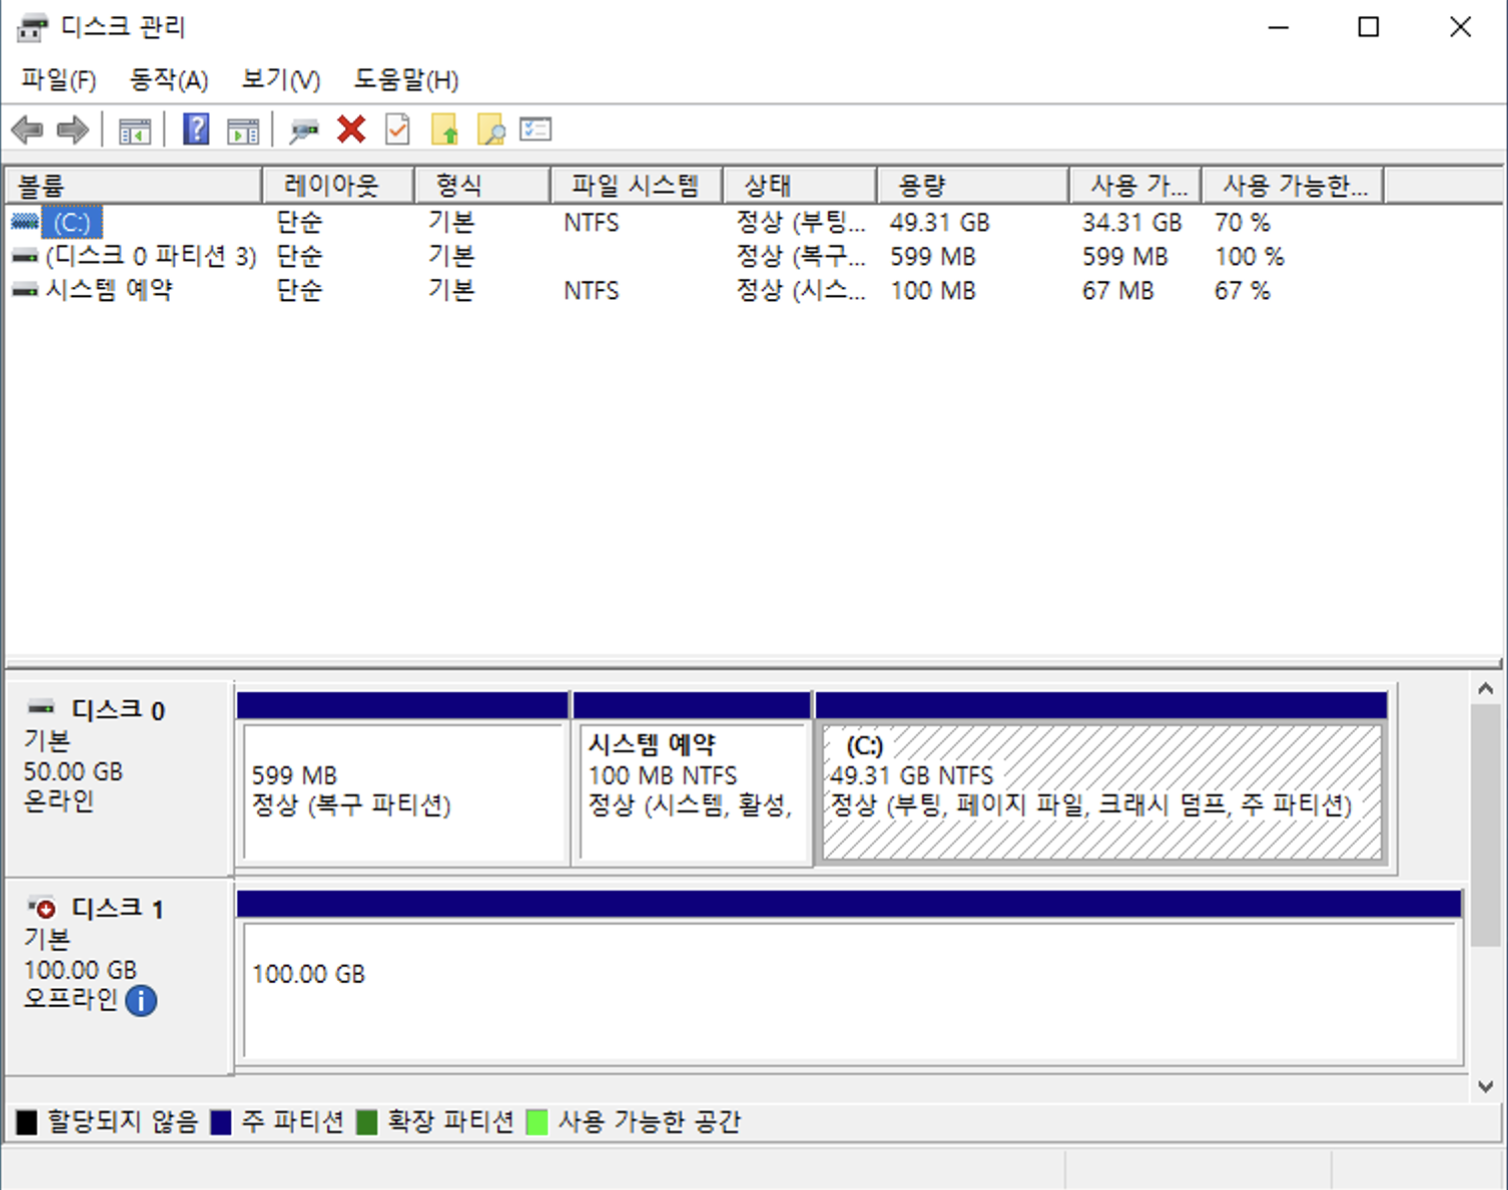
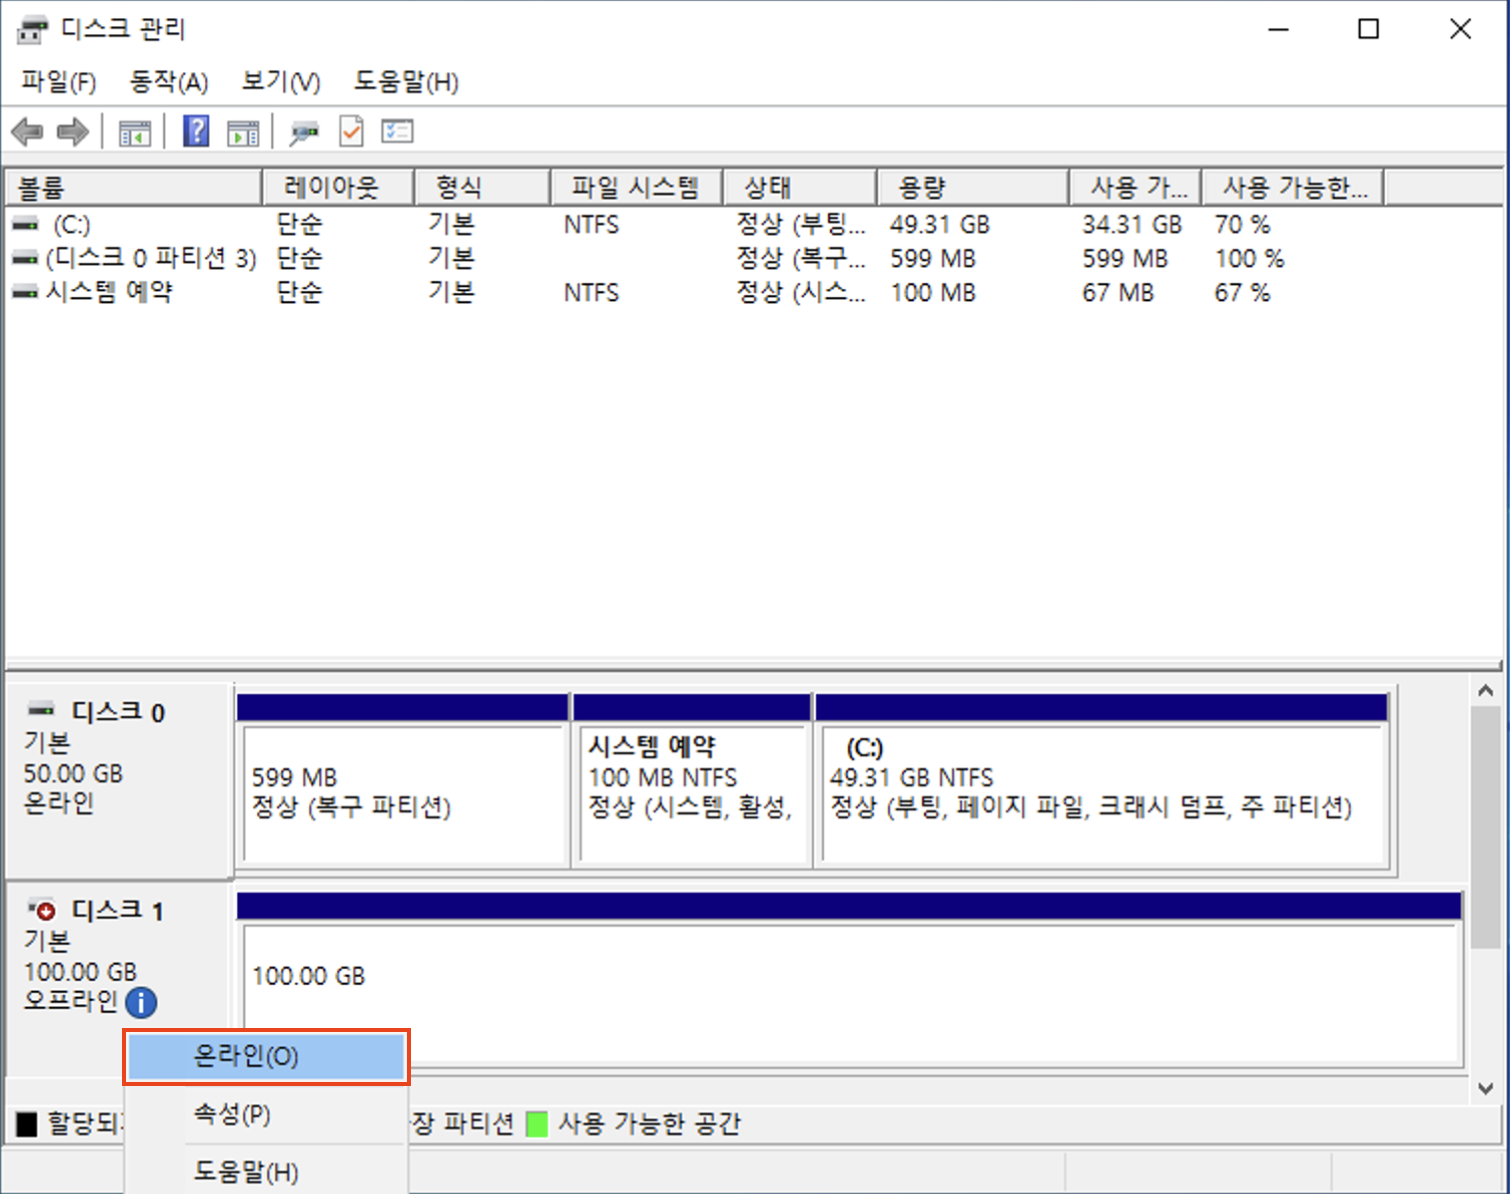
-
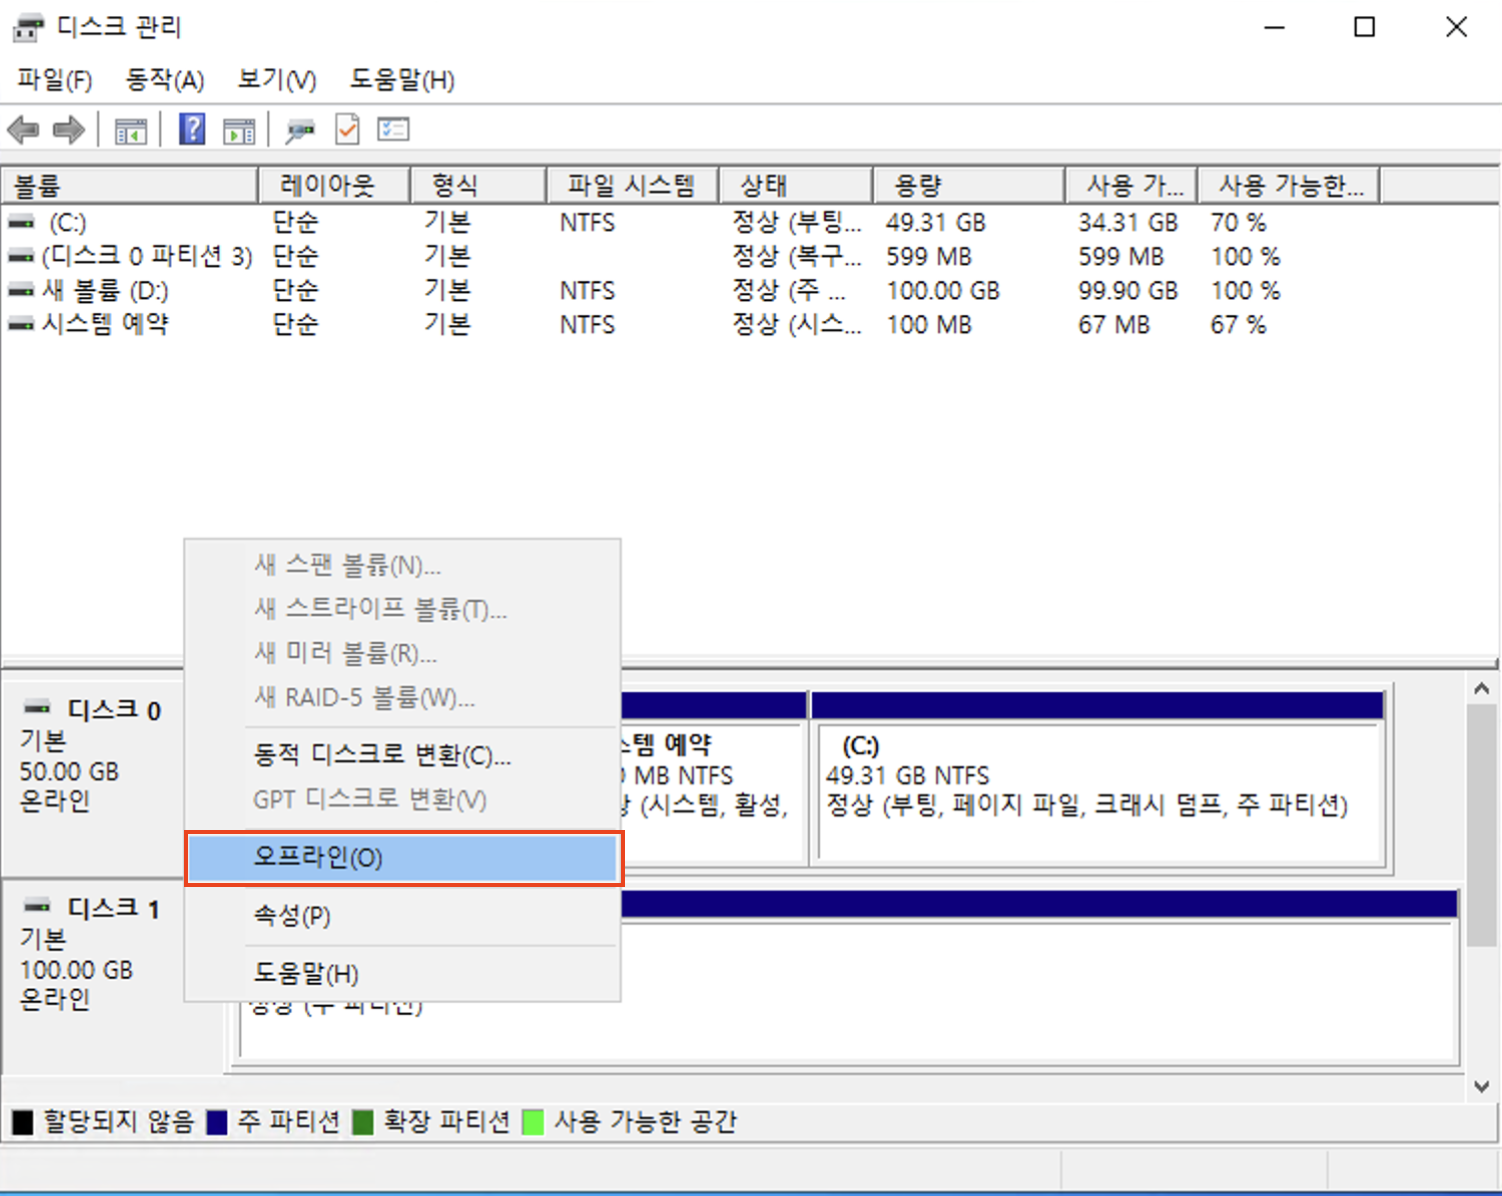
If the attached volume is detected, set its status to Online.
-
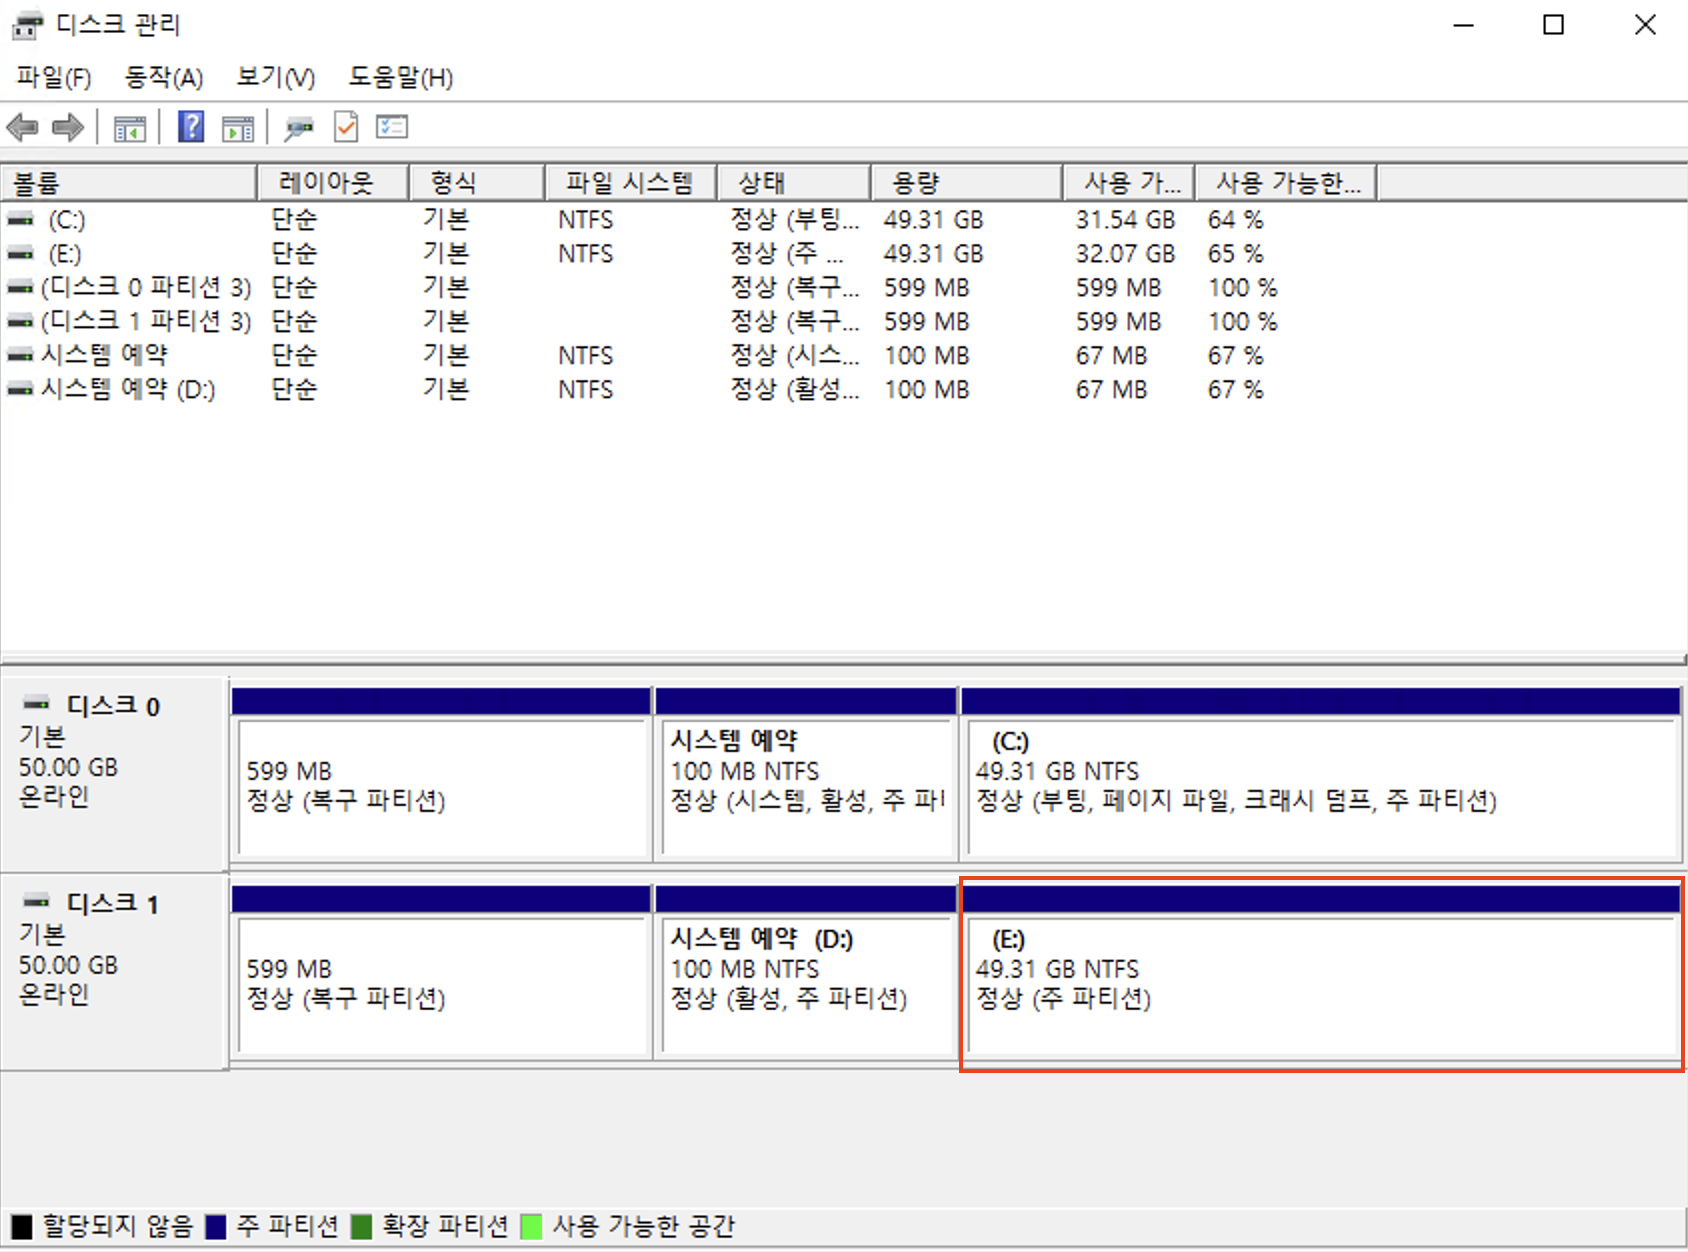
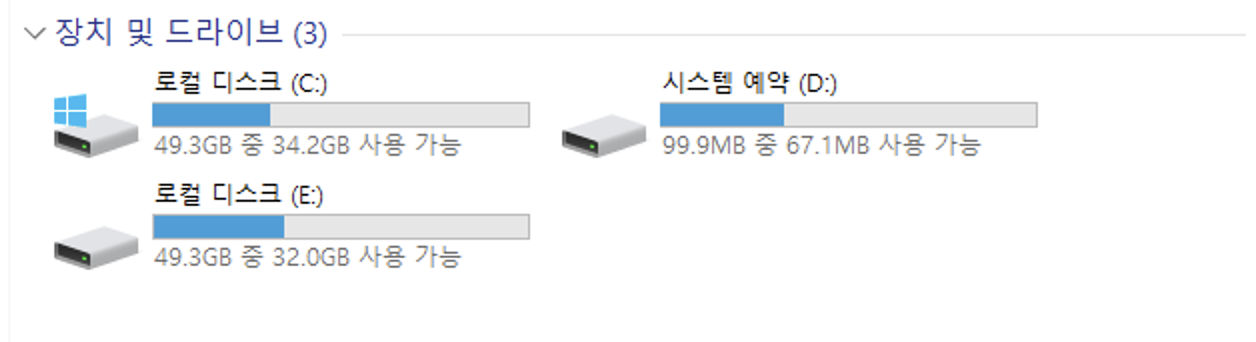
Check the mount point (drive letter) for the attached volume.
- Assume the data to be restored is on the system root partition.
- Check which path the system partition is mounted to.
- In the image above, it is mounted to (E:).
-
Open File Explorer to verify the mounted drive.
Step 6. Restore necessary data from the mounted volume
- Go to the source and destination directories in File Explorer.
- Use copy-paste (Drag & Drop) to restore the data.
Step 7. Detach the connected volume
-
Change the connected disk status to Offline.
-
Refer to Detach volume to disconnect the restored volume from the console.
Restore data on an active instance
This method restores data by attaching a volume to an existing active instance.
Snapshot-based data restoration is useful when an instance cannot be booted or accessed via SSH or RDP due to incorrect settings or service failure.
Step 1. Create a volume from the snapshot containing the data
Refer to Restore volume from snapshot tab to create a volume from the snapshot containing the data.
Step 2. Attach the volume to the instance requiring data recovery
Refer to Attach volume to attach the volume created from the snapshot to the active instance.
- Linux
- Windows
Step 3. Access the instance and mount the attached volume
-
Refer to Connect to instance to access the Linux instance with the attached volume.
-
Check the volumes:
Check device connectionlsblkResultNAME MAJ:MIN RM SIZE RO TYPE MOUNTPOINTS
vda 253:0 0 10G 0 disk
├─vda1 253:1 0 9G 0 part /
├─vda14 253:14 0 4M 0 part
├─vda15 253:15 0 106M 0 part /boot/efi
└─vda16 259:0 0 913M 0 part /boot
vdb 253:16 0 10G 0 disk -
Identify the file system type:
- Check file system type (ext4)
- Check file system type (xfs)
sudo file -s /dev/vdb/dev/vdb: Linux rev 1.0 ext4 filesystem data ...sudo file -s /dev/vdb/dev/vdb: SGI XFS filesystem data ... -
Verify the integrity of the attached volume:
- Verify integrity (ext4)
- Verify integrity (xfs)
sudo fsck -n /dev/vdb/dev/vdb: clean ...sudo xfs_repair -n /dev/vdbPhase 1 ...
Phase 7 ... -
Create the mount directory:
sudo mkdir -p /mnt/restore -
Mount the volume as read-only:
Mount command (ext4)sudo mount -o ro -t ext4 /dev/vdb /mnt/restoreMount command (xfs)sudo mount -o ro -t xfs /dev/vdb /mnt/restore -
Verify the mount:
findmnt /mnt/restore
Step 4. Restore necessary data
-
Copy data using
rsync:sudo rsync -avh --checksum /mnt/restore/ /path/to/restore/ -
Verify the copied files:
ls -alh /path/to/restore/
Step 5. Detach the volume
-
Unmount the volume:
sudo umount /mnt/restore -
Detach the volume in the console using Detach volume.
Step 3. Set the attached volume online
-
Refer to Connect to instance to access the Windows instance.
-
Verify the volume disk:
- Press
WIN + R, enterdiskmgmt.msc, and select OK. - Check the volume in Disk Management.
- Press
-
Set the volume status to Online:
-
Identify the mount path (e.g., D:):
-
Open File Explorer and confirm the mounted drive:

Step 4. Restore data from the mounted volume
- Use File Explorer to navigate source and target directories.
- Use copy-paste (Drag & Drop) to restore the data.
Step 5. Detach the connected volume
-
Change the disk status to Offline:
-
Detach the volume from the console using Detach volume.
Be sure to detach the volume in the console after recovery. Keeping it attached may result in data corruption, resource waste, or system conflicts.