Manage volumes
This guide applies to GPU and NPU instances.
Video transcoding instances are provided via Virtual Machines. For more details, refer to Virtual Machine > Create instance.
This document explains how to manage volumes and snapshots attached to virtual machine instances in the GPU service.
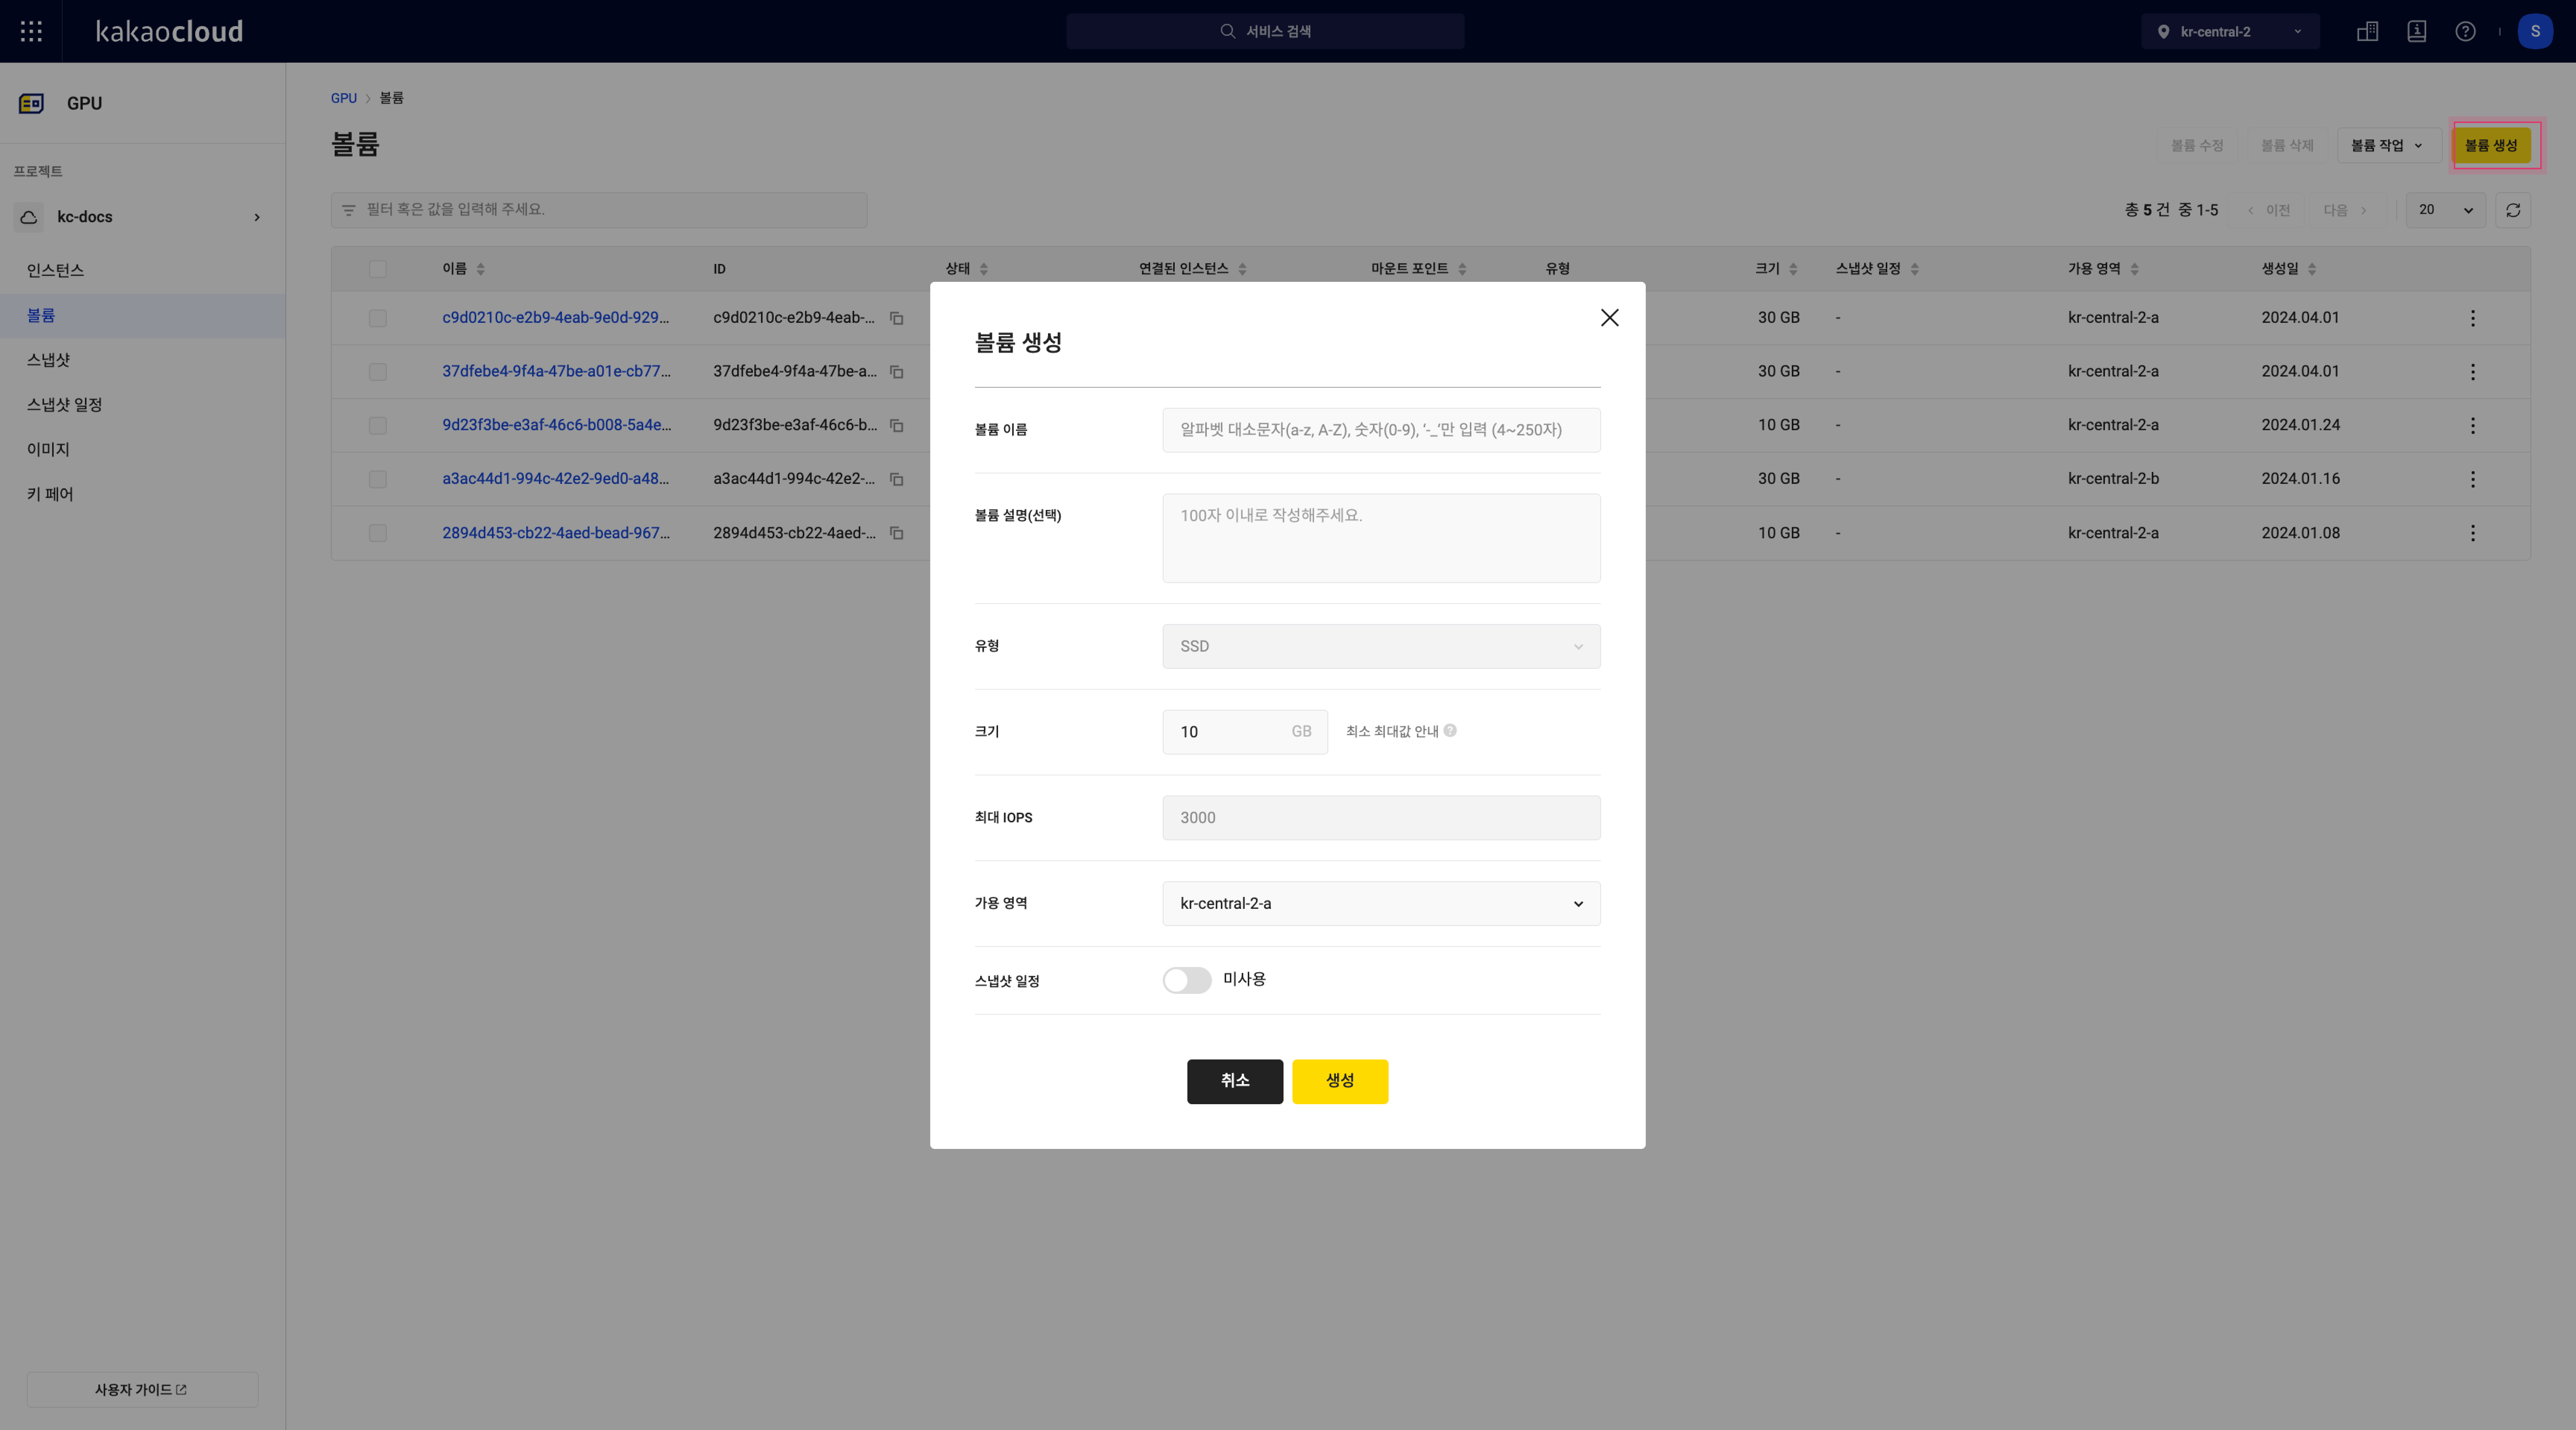
Create volume
You can create a new volume.
-
Go to KakaoCloud console > Beyond Compute Service > GPU.
-
In the Volume menu, select the [Create volume] button on the top right.
-
In the Create volume popup, enter the information and select [Create].
Field Description Volume name Enter the name of the volume Volume description (optional) Description of the volume Type Type of volume
- OnlySSDis supported currently; additional types will be supported laterSize volume size
- for Linux systems: can be created in sizes from 1 to 16,384 GB
- for Windows systems: can be created in sizes from 1 to 2,048 GBMax IOPS Maximum IOPS based on volume size
- Ranges from 3,000 IOPS to 16,000 IOPSAvailability zone The zone in which to create the volume Snapshot schedule Disabled
- The volume will not use snapshot schedules
Enabled
- The volume will automatically generate snapshots according to a defined policy
Manage volume
View volume list
You can view a list of running volumes and their basic information.
-
Go to KakaoCloud console > Beyond Compute Service > GPU.
-
In the Volume menu, view the list of currently running volumes. Use filters if needed.
Field Description Name Volume name ID Unique volume ID Status Volume status
- For more details, refer to Volume status valuesConnected instance Instance connected to the volume
- Select the instance name to go to its detail pageMount point Mount point of the volume Type Volume type Size Volume size Snapshot schedule Linked snapshot schedule Availability zone Availability zone where the volume was created Created at Date and time the volume was created More Execute actions by item
- Edit volume: Edit the volume settings applied to the instance
- Attach/detach volume: Set or remove the instance connection
- Create snapshot: Create a snapshot for the volume
- Attach/detach snapshot schedule: Set or remove the linked snapshot schedule
- Delete volume: Delete the created volume
View volume details
You can view and manage detailed information and snapshot history for the selected volume.
-
Go to KakaoCloud console > Beyond Compute Service > GPU.
-
In the Volume menu, select a volume to view its details.
-
On the volume detail page, review the information.
Details tab
Field Description Volume ID Unique identifier for the volume Volume name Name of the selected volume Creator User who created the volume Created at Time of volume creation Connected instance Name of the connected instance
- Select to go to the instance's detailsMount point Mount point of the volume Snapshot schedule Snapshot schedule linked to the volume
- Select to view the snapshot schedule listAvailability zone Availability zone where the volume was created Type Volume type Snapshot tab
Field Description Type Snapshot type
- Full: Saves the entire volume
- Incremental: Saves only changes from the base full snapshotSnapshot name Name of the created snapshot Status Status of the snapshot Size Size of the snapshot Snapshot schedule -: Manually created snapshot or a snapshot with a deleted/unlinked schedule
Snapshot schedule name: Snapshot automatically generated by policyCreator User who created the snapshot Created at Date the snapshot was created
- Hover to view the exact time and elapsed durationMore Available actions
- Edit snapshot: Modify snapshot name or description
- Restore snapshot: Create a volume from the snapshot
- Delete snapshot: Delete the snapshot
View volume by instance
You can view volume information connected to a specific instance.
- Go to KakaoCloud console > Beyond Compute Service > GPU.
- In the Instance menu, select the instance you want to inspect.
- On the instance detail page, go to the Volume tab to view connected volume information.
Modify volume
You can modify volume settings.
- Go to KakaoCloud console > Beyond Compute Service > GPU.
- In the Volume menu, select the [More] icon next to the volume and select Edit volume.
- When editing the volume size, only larger sizes (in 1 GB units) are allowed. After resizing, refer to Extend file system to expand the file system accordingly.
- In the Edit volume popup, configure the settings and select [Save].
Detach volume
You can detach a volume that is no longer in use.
- You cannot detach root volumes used for OS partitions.
- If you try to detach a volume from a running instance, make sure the volume is unmounted before detaching. For safe detachment, it is recommended to stop the instance first.
- Go to KakaoCloud console > Beyond Compute Service > GPU.
- In the Volume tab, select the [More] icon next to the volume and select Detach volume.
- In the Detach volume popup, verify the target volume and instance, then select [Detach].
Expand volume
You can increase the volume size.
- After expanding the volume size, use appropriate commands to extend the file system.
- You can begin extending the file system once the volume status changes to Extending. - To apply new volume QoS settings based on volume type:
- For root volumes: Shelve and then unshelve the instance.
- For additional volumes: Detach and then reattach the volume.
- Go to KakaoCloud console > Beyond Compute Service > GPU.
- In the Volume menu, select the [More] icon next to the volume and select Edit volume.
- In the Edit volume popup, enter the new size in the Volume size field and select [Save].
Attach volume
Newly created volumes are in the Available state, not attached to any instance. To use a volume properly, you must attach it to an instance via the console and connect it as a device according to the OS-specific guide.
Attach volume from console
To attach a volume to an instance using the KakaoCloud console, follow the steps below:
- Go to the KakaoCloud console, then navigate to Beyond Compute Service > GPU.
- In the Volume menu, select the [more options] icon for the volume you want to attach and select Attach volume.
- In the Attach volume popup window, enter the required information and select the [Save] button.
Attach volume on Linux
In a Linux environment, access the instance via SSH and configure the file system and mount point. For detailed instructions, refer to Connect to Linux instance.
-
Use the
lsblkcommand to check whether the volume is correctly connected as a device.- Example: After running
lsblk, the newly created 8GB volume appears as/dev/vdb.
lsblk command (check device connection)ubuntu@volume-attach-1:~$ lsblk
NAME MAJ:MIN RM SIZE RO TYPE MOUNTPOINT
vda 252:0 0 20G 0 disk /boot
vdb 252:16 0 8G 0 disk - Example: After running
-
Use the
file -scommand to check the file system type. If it outputsdata, the device does not have a file system.file -s command (check file system type)ubuntu@volume-attach-1:~$ sudo file -s /dev/vdb
/dev/vdb: data -
If no file system is present, create one using the
mkfs -tcommand.mkfs -t command (create file system)ubuntu@volume-attach-1:~$ sudo mkfs -t xfs /dev/vdb -
Verify the file system has been created successfully.
file -s command (verify file system creation)ubuntu@volume-attach-1:~$ sudo file -s /dev/vdb
/dev/vdb: SGI XFS filesystem data (blksz 4096, inosz 512, v2 dirs) -
Create a mount point directory using the
mkdircommand.mkdir command (create mount point)ubuntu@volume-attach-1:~$ sudo mkdir -p /data/vdb -
Mount the volume to the directory with the
mountcommand.mount command (mount volume to directory)ubuntu@volume-attach-1:~$ sudo mount /dev/vdb /data/vdb -
Confirm the file system and mount point are correctly applied using
lsblk.lsblk command (verify mount point)ubuntu@volume-attach-1:~$ sudo lsblk
NAME MAJ:MIN RM SIZE RO TYPE MOUNTPOINT
vda 252:0 0 20G 0 disk /boot
vdb 252:16 0 8G 0 disk /data/vdb -
To persist the volume after reboot, first retrieve the device UUID.
lsblk command (get UUID)ubuntu@volume-attach-1:~$ lsblk -o +UUID -
Add the UUID to the
/etc/fstabfile for persistent mounting.persist mount after rebootUUID=2d332f0b-1771-4b83-bd5c-7e9d1cc91ed2 /data/vdb xfs defaults,nofail 0 2
Attach volume on Linux(xfs)
When using an OS image based on the xfs file system (e.g., CentOS Stream 8, Rocky Linux 8), restoring a root volume snapshot to the same instance may cause a UUID conflict. Follow the steps below to resolve the issue.
-
Temporarily mount the file system using the
nouuidoption.mount command (nouuid option)$ sudo mount -t xfs -o nouuid /dev/vdb1 /home/centos/test -
Unmount the volume.
umount command$ sudo umount /dev/vdb1 -
Regenerate the UUID.
xfs_admin command (generate uuid)$ sudo xfs_admin -U generate /dev/vdb1 -
Set the new UUID on the restored snapshot volume.
xfs_admin command (update uuid)$ sudo xfs_admin -U ff714d9b-8c90-40e2-9e2f-12623220e1cf /dev/vdb1 -
Mount the snapshot again.
mount command (re-mount)$ sudo mount /dev/vdb1 /home/centos/test
Attach volume on Windows
On Windows, connect to the instance via Remote Desktop and initialize the disk.
-
Press Start > Run or use the
WIN+Rshortcut. -
In the Run window, enter
diskmgmt.mscand select [OK] or press Enter. -
In Disk Management, right-select the newly added disk and select Online.
Set disk to online
-
Right-select the disk and select Initialize disk.
Initialize disk
-
Check the new disk, select the GPT partition table, and select [OK].
- Use GPT for disks over 2TB.
Select GPT partition table
-
Right-select the initialized disk and select New simple volume to launch the wizard.
New simple volume
-
Follow the New Simple Volume Wizard.
New simple volume wizard
-
Follow the wizard to set volume size, assign a drive letter, and format the volume to complete the attachment.
Complete volume creation
Extend file system (Linux)
To utilize the newly added disk space after expanding a volume, users must access the instance directly and update the partition and file system sizes. Once the volume size is increased, follow these steps within the instance to expand the file system using relevant commands. Note that the required steps may vary depending on the file system and partition configuration of the instance.
OS-specific partition table format and file system type
| OS name | Version | Root volume partition table format | File system |
|---|---|---|---|
| Ubuntu | 20.04 | GPT | ext4 |
| Ubuntu | 22.04 | GPT | ext4 |
| Ubuntu | 24.04 | GPT | ext4 |
| CentOS Stream | 9 | MBR | xfs |
| Rocky Linux | 8.10 | MBR | xfs |
| Rocky Linux | 9.4 | MBR | xfs |
| Alma Linux | 8.10 | GPT | xfs |
| Alma Linux | 9.4 | GPT | xfs |
| Windows | 2019 | MBR | ntfs |
| Windows | 2022 | MBR | ntfs |
Modifying the file system or partition does not alter or delete volume data. However, it is recommended to back up any important data before making changes in case a rollback is needed.
The procedures below apply to ext4 and xfs, the most commonly used file systems in Linux environments.
- In the following Linux example, a user has an instance with a 50GB root volume. The root volume is expanded to 80GB, and the partition and file system are updated accordingly.
Connect to instance
Connect to the instance using the SSH command in a terminal. For more detailed steps, refer to Connect to Linux instance.
Check partition and file system info
Use lsblk and df commands to check the partition and file system information for expansion.
-
Example: Before expansion, the 50GB root volume is mapped as /dev/vda, and the 30GB non-root volume as /dev/vdb. The root partition vda1 is 50GB.
lsblk command (before volume expansion)ubuntu@volume-test:~$ sudo lsblk
NAME MAJ:MIN RM SIZE RO TYPE MOUNTPOINT
vda 252:0 0 50G 0 disk
├─vda1 252:1 0 49.9G 0 part /
├─vda14 252:14 0 4M 0 part
└─vda15 252:15 0 106M 0 part /boot/efi
vdb 252:16 0 30G 0 disk /data
After expanding the root volume, run lsblk again to verify the updated volume size.
-
Example: The /dev/vda device is now 80GB, but vda1 remains at 50GB.
lsblk command (after volume expansion)ubuntu@volume-test:~$ sudo lsblk
NAME MAJ:MIN RM SIZE RO TYPE MOUNTPOINT
vda 252:0 0 80G 0 disk
├─vda1 252:1 0 49.9G 0 part /
├─vda14 252:14 0 4M 0 part
└─vda15 252:15 0 106M 0 part /boot/efi
vdb 252:16 0 30G 0 disk /data
Run the df command to check the file system type.
-
Example: The /dev/vda1 partition is still 50GB and uses the ext4 file system.
df commandubuntu@volume-test:~$ sudo df -Th
Filesystem Type Size Used Avail Use% Mounted on
...
/dev/vda1 ext4 49G 1.5G 47G 3% /
...
/dev/vdb ext4 30G 45M 28G 1% /data
Extend partition
Use the growpart command to expand the partition to its maximum size.
-
Example: Run
growpartto extend the vda1 partition.Extend partitionubuntu@volume-test:~$ sudo growpart /dev/vda 1
Run lsblk again to confirm the partition size has been updated.
-
Example: vda1 has now been extended to 80GB.
Verify after partition extensionubuntu@volume-test:~$ lsblk
NAME MAJ:MIN RM SIZE RO TYPE MOUNTPOINT
vda 252:0 0 80G 0 disk
├─vda1 252:1 0 79.9G 0 part /
Extend file system
To use the expanded space, extend the file system. Use resize2fs for ext4 or xfs_growfs for xfs.
sudo resize2fs /dev/vda1
sudo xfs_growfs -d /
Verify the file system has been extended using df. No reboot is required after resizing.
-
Example: /dev/vda1 has been expanded to 80GB.
df command (after file system expansion)ubuntu@volume-test:~$ df -Th
Filesystem Type Size Used Avail Use% Mounted on
/dev/vda1 ext4 78G 1.6G 76G 2% /
...
/dev/vdb ext4 30G 45M 28G 1% /data
...
Extend file system (Windows)
To extend a file system in a Windows environment:
- In this example, the user has an instance with a 50GB root volume, which is expanded to 70GB using the volume expansion feature.
Expand file system with disk management tool
Follow these steps to expand the file system using Disk Management in Windows:
-
Go to KakaoCloud console > Beyond Compute Service > GPU.
-
In the Instance menu, select the [more options] icon for the instance and select RDP connection.
-
In the RDP connection popup, check the password and log in to the Windows instance.
-
Right-select the [Windows] icon and select Disk Management.
Launch disk management
-
In Disk Management, select Action > Rescan Disks.
Rescan disks
-
Right-select the formatted partition of the disk you wish to expand and select Extend volume.
- The partition must be adjacent to the unallocated space on the right. Extensions are disabled for non-adjacent layouts. Also, MBR-formatted volumes cannot exceed 2TB.
Extend volume from partition
-
Select [Next] in the Extend Volume Wizard.
Extend volume wizard
-
In Select the amount of space in MB, enter the amount to add and select [Next].
- Typically, allocate the maximum available space.
Select disk for extension
-
Select [Finish] and verify that the file system has been extended.
Complete extension wizard
Extend partition with PowerShell
To expand the file system using PowerShell in Windows:
-
Go to KakaoCloud console > Beyond Compute Service > GPU.
-
In the Instance menu, select the [more options] icon for the instance and select RDP connection.
-
In the RDP connection popup, check the password and log in to the Windows instance.
-
Right-select the [Windows] icon and select Windows PowerShell (Admin).
Launch Windows PowerShell
-
Identify the drive letter of the partition to expand.
Get drive letterGet-Partition -
Rescan the disks.
Rescan disks"rescan" | diskpart -
Check the minimum and maximum allowed size for the partition.
Check supported sizeGet-PartitionSupportedSize -DriveLetter <drive-letter> -
Expand the partition to the maximum size.
Expand to max sizeResize-Partition -DriveLetter <drive-letter> -Size $(Get-PartitionSupportedSize -DriveLetter <drive-letter>).SizeMax- To expand to a specific size, specify the
<size>in GB.
Expand to specific sizeResize-Partition -DriveLetter <drive-letter> -Size <size> - To expand to a specific size, specify the