Manage instance
The following describes how to manage instances in the Virtual Machine service.
View instance list and basic information
You can view the list of running instances and their basic information.
- Go to Compute > Beyond Compute Service > Virtual Machine in the KakaoCloud console.
- In the Instances menu, check the list of currently running instances.
Category Description Name User-defined instance name ID Unique ID of the instance Status Current status of the instance
- See Billing by instance stateType Server type of the instance Image Image installed on the instance Primary private IP Private IP address assigned to the primary network interface of the instance Primary public IP Public IP address that the user connected to the primary network interface of the instance Availability Zone Availability Zone where the instance is created Created Date when the instance was created
Run and manage instance
You can run various features by clicking the [⋮] button on the right side of the instance list.
-
Go to Compute > Beyond Compute Service > Virtual Machine in the KakaoCloud console.
-
In the Instances menu, click the [⋮] button of the instance, then select the feature to run.
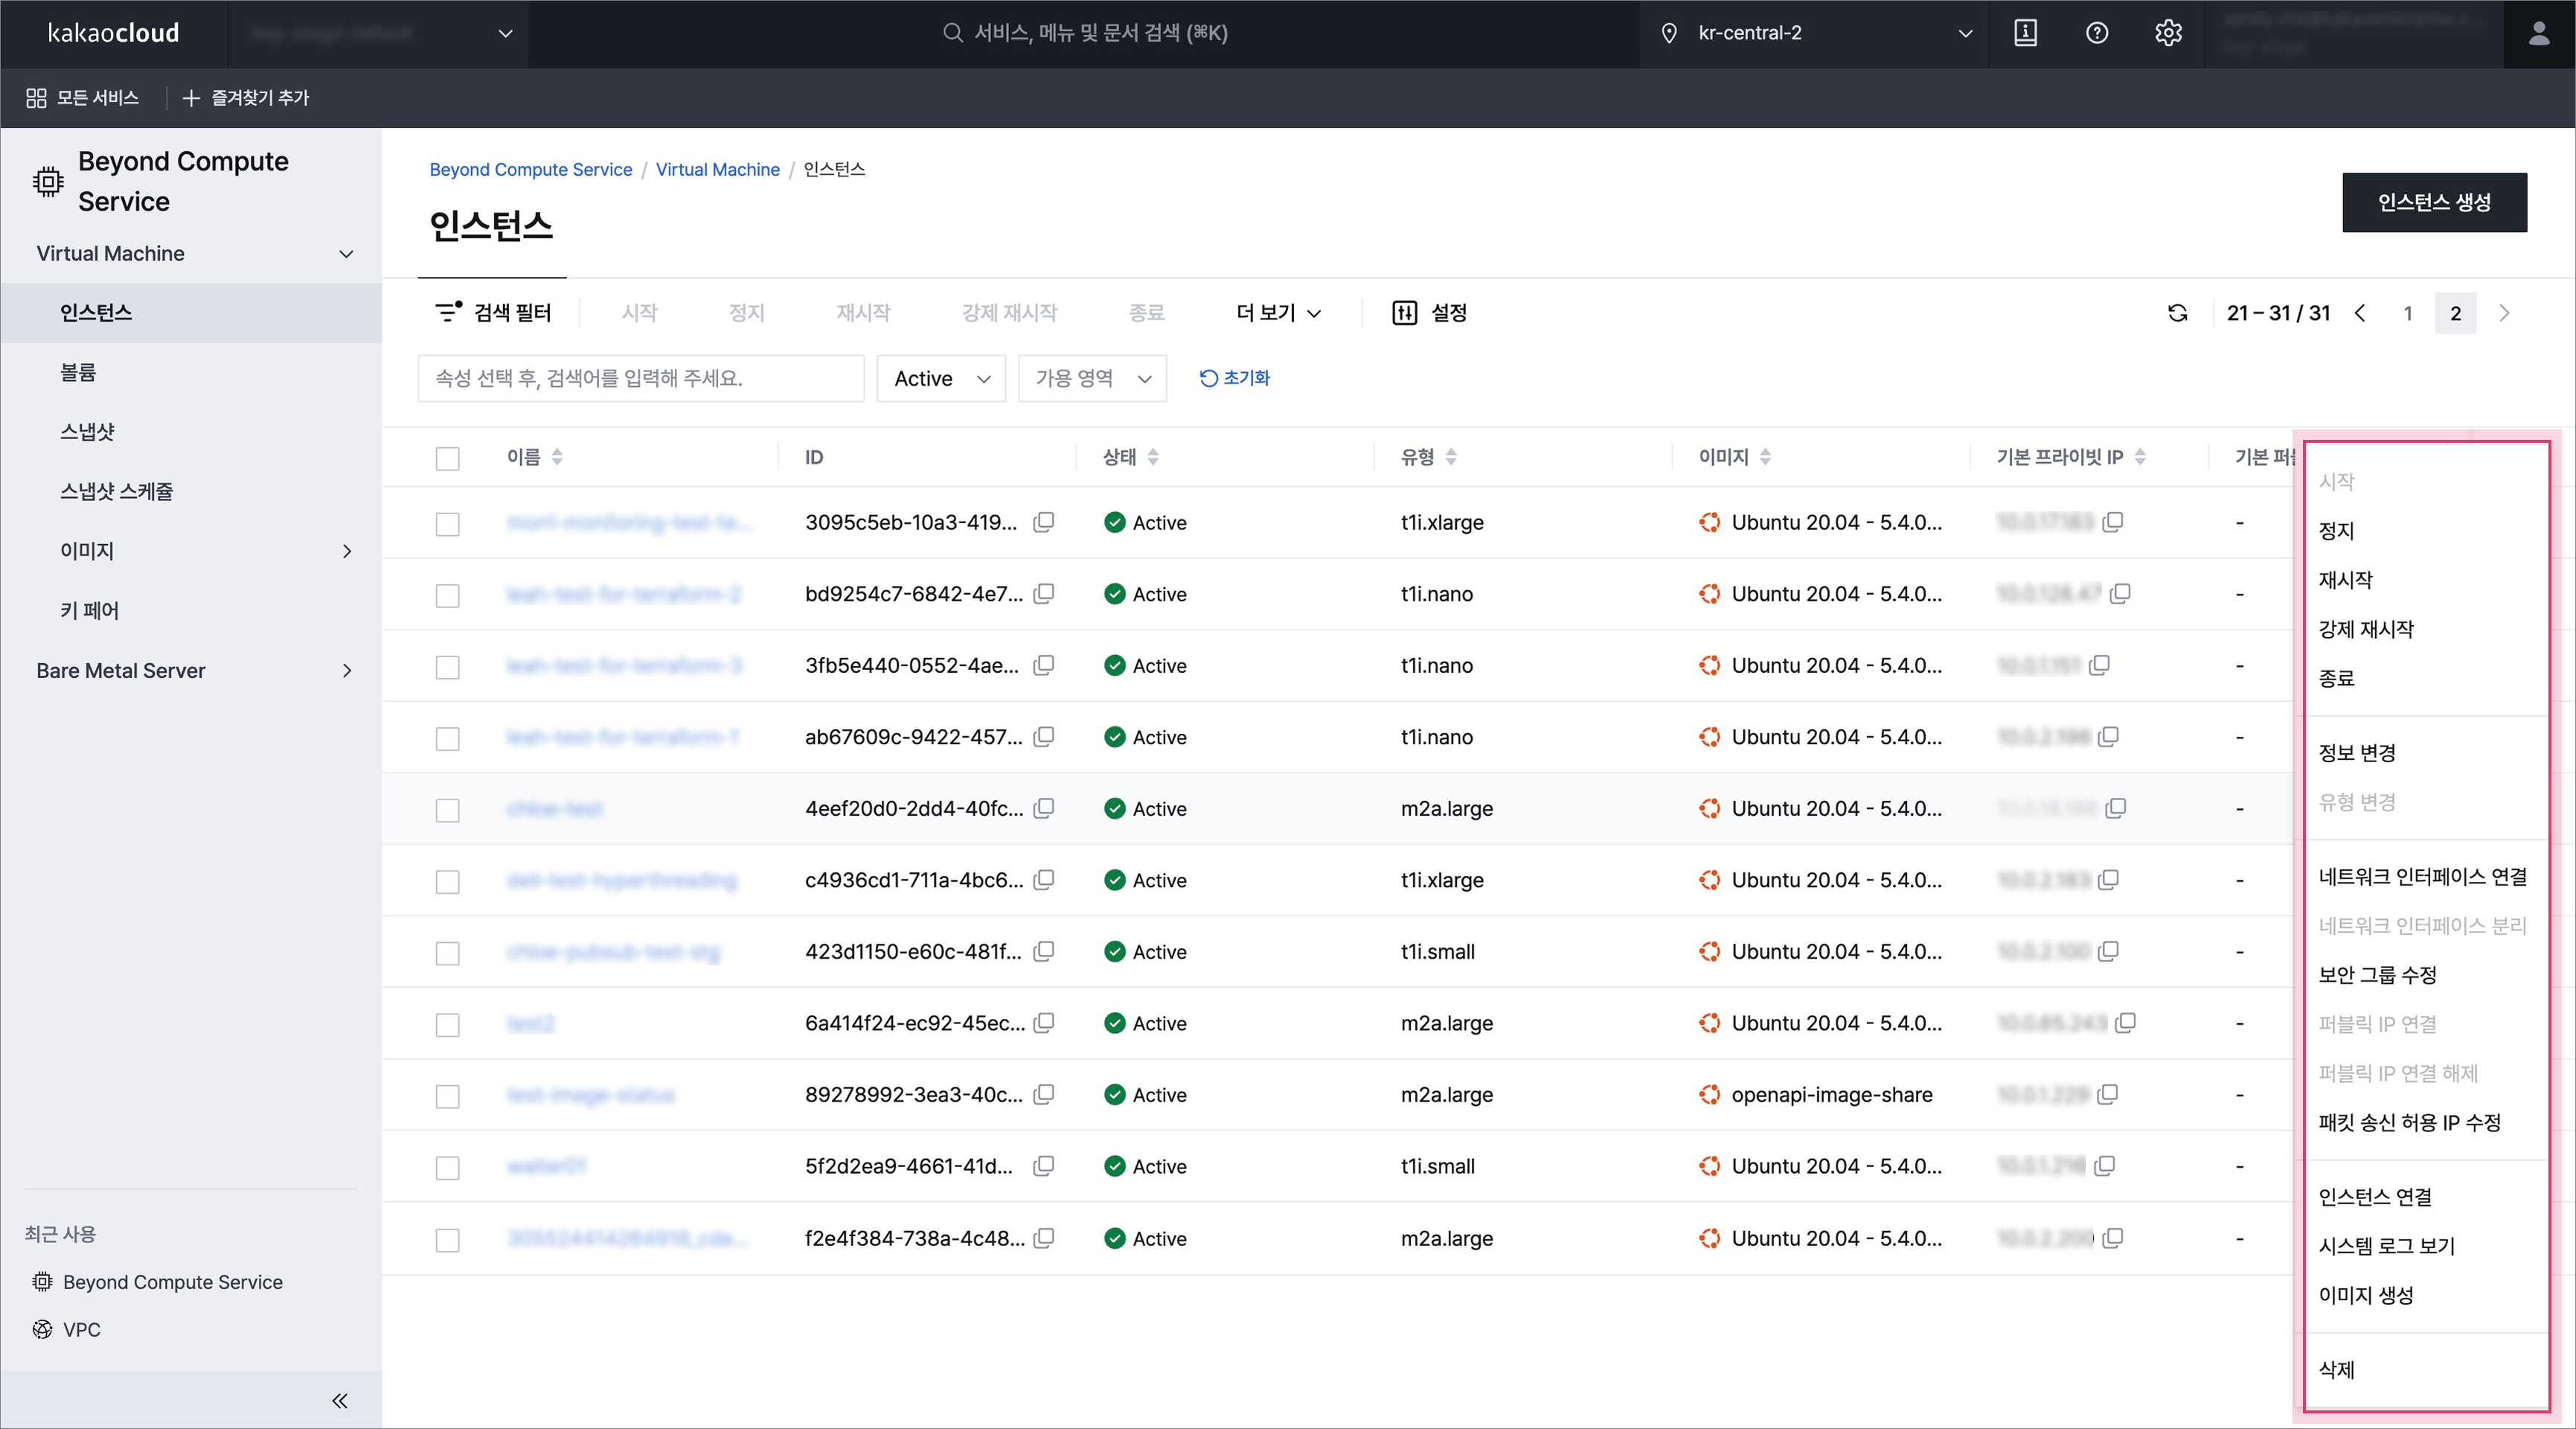 Instance more
Feature Description Instance status after execution Start Start the instance (start)
- Change an instance in theStoppedorShelved_offloadedstate to theActivestateActiveStop Stop the instance (stop) StoppedReboot Reboot the instance (soft reboot) ActiveHard reboot Force reboot the instance (hard reboot) ActiveShut down Shut down the instance (shelve) Shelved_offloadedEdit information Modify the instance name and description - Change type Change the instance type (resize)
- Type change is available only in theStoppedstate- Attach network interface Attach a secondary network interface to the instance - Detach network interface Detach a secondary network interface connected to the instance - Modify security group Modify the security group applied to the instance - Associate public IP Associate a public IP with the instance
- Available only to project administrators- Disassociate public IP Disassociate the public IP from the instance
- Available only to project administrators- Modify allowed packet source IPs Modify IP addresses or CIDRs allowed for packet transmission from the network interface connected to the instance
- Up to 10 additional entries can be added
💡 If a specific IP or CIDR is added, the network interface allows transmission of packets whose IP addresses fall within that IP address or CIDR range.- Connect to instance Provide guidance for connecting to the instance through SSH or RDP - View system log View system logs stored in the instance
- Data containing all records of the audited system, showing progress such as program operation status
- Not supported for instances with Windows OS installed- Create image Create an image from the root volume of the instance
- You can create an instance again from the backed-up image
💡 You can create an image when the instance is in theStoppedorActivestate, but for data consistency, creating an image in theStoppedstate is recommended.- Delete Completely terminate and release the instance -
View instance details
You can view detailed information such as instance details, networks, security, volumes, task logs, and monitoring information connected to the instance.
-
Go to Compute > Beyond Compute Service > Virtual Machine in the KakaoCloud console.
-
In the Instances menu, select the instance for which you want to view detailed information.
-
Check the detailed information in each tab.
- Details
- Network
- Security
- Volumes
- Task log
- Monitoring
You can check the detailed information of the instance.
Category Description Name User-defined instance name ID Unique ID (UUID) of the instance Description Description of the instance Status Current status of the instance Availability Zone Availability Zone where the instance is located Host name Host name automatically created in the private IP format
- Host name assigned in thehost-{PRIVATE_IP}formatInstance type Instance type selected when creating the instance Image Image name of the instance vCPU Number of CPUs according to the instance type Memory Memory size according to the instance type Volume Disk capacity applied to the instance Key pair Key pair of the instance CPU multithreading Whether the CPU multithreading feature is enabled Creator UUID User who created the instance Created Creation date and time of the instance (elapsed time since creation) You can check the detailed network information and network interface information of the instance.
Category Description Interface name Name assigned to the network interface Interface ID Unique UUID of the network interface Connection status Connection status of the network interface
-In Use: State connected to a resource
-Available: State not connected to a resourcePrivate IP Private IP assigned to the network interface Public IP Public IP connected to the network interface Availability Zone Availability Zone where the network interface is created VPC name VPC name where the network interface is created VPC ID Unique UUID of the VPC where the network interface is created Subnet name Subnet name where the network interface is created Subnet ID Unique UUID of the subnet where the network interface is created Allowed packet source IPs Display added IP addresses and CIDR entries as allowed packet source IPs [⋮] button - Modify allowed packet source IPs: Add or delete IP addresses or CIDRs allowed for packet transmission on the selected network interface
- Detach network interface: Detach the selected network interface from the instanceYou can check the security groups and rules applied to the instance. For more information, see Modify security group.
Category Description Security group List of configured security groups Detailed rules Detailed rules of the configured security groups
- Inbound tab: Inbound rules of the applied security groups
- Outbound tab: Outbound rules of the applied security groupsYou can check the volume information connected to the instance.
Category Description Volume name Name of the volume Volume ID Unique ID of the volume Status Status of the volume
- For more information about volume status, see Volume statesMount point Connected mount point Type Type of the volume Size Size of the volume Snapshot schedule Connected snapshot schedule policy Delete with instance Whether the volume is configured to be deleted when the instance is deleted Created Creation date and time of the volume caution- The number of resources that can be attached to a single instance, such as network interfaces, volumes, and GPUs, is limited and cannot exceed that limit. The total number of attachable resources differs by instance family. If attaching an additional network interface or volume fails, reduce the number of attached resources and try again.
You can check the task logs to see which user ran which task command.
Category Item Description ID - Unique ID of the request log Type create Instance creation task delete Instance deletion task stop Instance stop task shelve Instance shelve task start Instance start task reboot Instance reboot task revertResize Task to revert instance type change confirmResize Task to confirm instance type change resize Instance type change task attach_interface Task to attach an interface to the instance detach_interface Task to detach an interface from the instance attach_volume Task to attach a volume to the instance detach_volume Task to detach a volume from the instance createImage Task to create an instance image User account - Account ID of the user who ran the task Requested at - Date and time when the task was run You can manage resources flexibly and efficiently by using monitoring, while minimizing the resources required for management.
Instance monitoring is divided into Basic monitoring and Detailed monitoring.
Delete instance
You can delete an instance.
Deleted instance resources are fully released after termination and cannot be recovered.
- Go to Compute > Beyond Compute Service > Virtual Machine in the KakaoCloud console.
- In the Instances menu, select [⋮] button > Delete for the instance to delete.
- In the pop-up window, enter the confirmation text, then click the [Delete] button.
- When an instance is deleted, connected network interfaces are handled as follows.
- A network interface created as
New interfacewhen the instance was created is deleted together. - A network interface connected by selecting
Existing interfacewhen the instance was created remains even after the instance is deleted, and you must delete the network interface separately.
- A network interface created as
Monitoring
Monitoring is divided into basic monitoring and detailed monitoring.
Basic monitoring
You can check the basic monitoring results.
-
Go to Compute > Beyond Compute Service > Virtual Machine in the KakaoCloud console.
-
In the Instances menu, select the instance for which you want to check task log information.
-
In the Monitoring tab, click the Basic monitoring tab, then check the information.
Item Description vCPU usage (Core) Total vCPU usage over time Disk Read/Write Bytes Disk (volume) read and write usage over time Network Rx Network Rx usage over time Network Tx Network Tx usage over time info- For an instance with multiple network interfaces connected, the Network RX/TX value for each network interface is displayed.
Detailed monitoring
For detailed monitoring, you can check data after installing the monitoring agent in advance. The installation method of the monitoring agent is as follows.
- Go to Compute > Beyond Compute Service > Virtual Machine in the KakaoCloud console.
- In the Instances menu, select the instance on which to install the monitoring agent.
- Click [Go to installation guide] displayed in the Detailed monitoring tab.
- After installing the monitoring agent according to the guide, set each item in the Metric explorer tab under Management > Monitoring > Explorer. For more information, see Management > Monitoring > How-to Guides > Use explorer.
- If you need to check logs, you can view each item in the Log explorer under Management > Monitoring > Explorer. For more information, see Management > Monitoring > How-to Guides > Use explorer.
- A default monitoring dashboard is provided, but you can configure a custom dashboard to suit your monitoring purpose. For more information, see Management > Monitoring > How-to Guides > Use dashboard.
Associate public IP
You can associate a public IP to the instance.
Only users with the project administrator permission can connect a public IP.
- Go to Compute > Beyond Compute Service > Virtual Machine in the KakaoCloud console.
- In the Instances menu, select [⋮] button > Associate public IP.
- In the pop-up window, select the network interface and private IP address to connect, then click the [OK] button.
Disassociate public IP
You can disconnect a connected public IP.
Only users with the project administrator permission can disconnect a public IP.
If you disconnect only the public IP without deleting the resource connected to it, the public IP is not released. In this case, it is billed even if you do not use the public IP.
- Go to Compute > Beyond Compute Service > Virtual Machine in the KakaoCloud console.
- In the Instances menu, select [⋮] button > Disassociate public IP.
- In the pop-up window, select the network interface and public IP to disassociate, then check "Automatically delete the public IP after disassociating it from the instance.".
- Click the [Disassociate] button.
Modify security group
You can modify the security group connected to the network interface of the instance. One or more security groups are configured by default on the primary network interface.
-
Go to Compute > Beyond Compute Service > Virtual Machine in the KakaoCloud console.
-
In the Instances menu, select [⋮] button > Modify security group.
-
In the pop-up window, select the security group to apply to the instance.
- If multiple security groups are applied, all rules in each security group are applied to the instance.
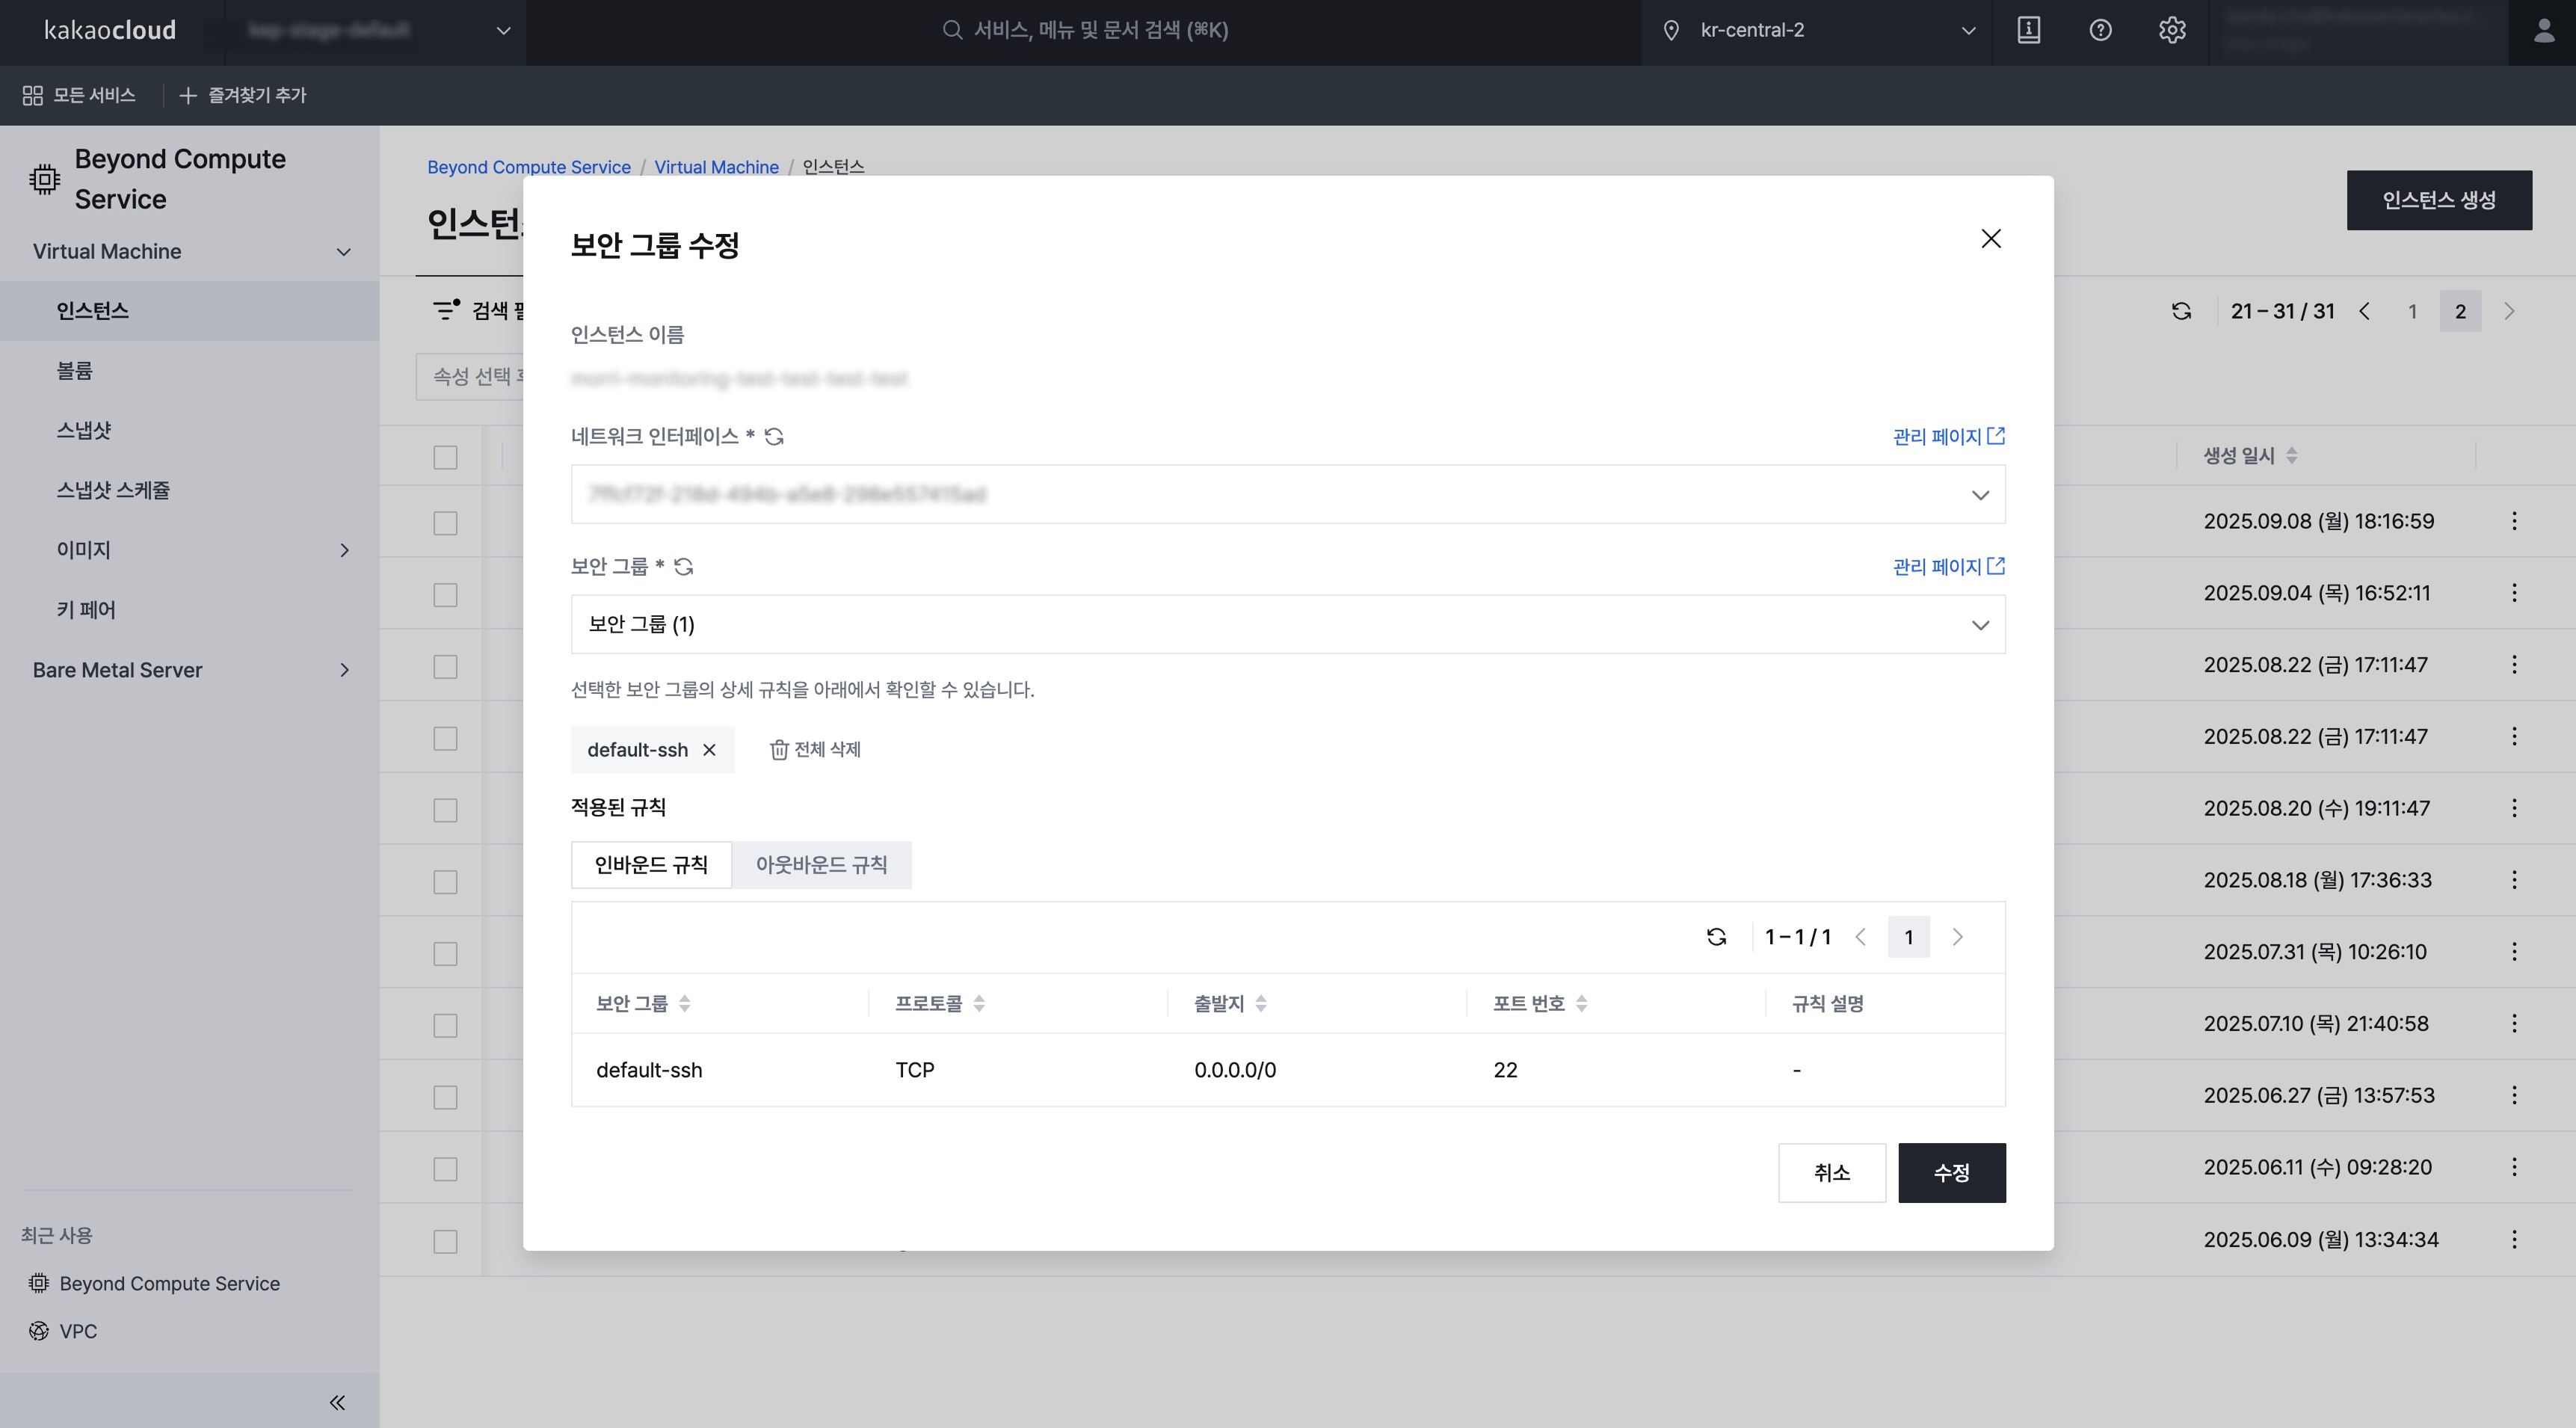 Modify security group
 -
Click the [Save] button.
Network interface
Attach network interface
You can attach a network interface to the instance.
- Go to Compute > Beyond Compute Service > Virtual Machine in the KakaoCloud console.
- In the Instances menu, select [⋮] button > Attach network interface.
- In the pop-up window, check the information, then select the network interface to attach.
- Click the [OK] button.
Detach network interface
You can detach a connected secondary network interface from the instance.
- The primary network interface cannot be detached.
- Go to Compute > Beyond Compute Service > Virtual Machine in the KakaoCloud console.
- In the Instances menu, select [⋮] button > Detach network interface.
- In the pop-up window, check the information, then select the network interface to detach.
- Click the [OK] button.
Set time reference
Consistent and accurate time reference is important for many server operations and processes. The images provided by KakaoCloud use time synchronization services provided by the operating system by default, such as Network Time Protocol(NTP), Chrony, and systemd-timesyncd. Through these time synchronization services, multiple servers can operate based on the same time standard and reference consistent time. However, these external services can be used only when the server has internet access.
In a local network environment, you can synchronize time using the NTP service provided by KakaoCloud. In a Linux environment, you can use the Chrony client to use the KakaoCloud NTP service inside the instance.
- The KakaoCloud synchronization service is provided through the IPv4 address
169.254.169.123. - VPCs created before February 21, 2024 do not provide an NTP service endpoint, and this will be migrated gradually.
- RHEL family
- Debian family
-
Install the Chrony package.
sudo yum install chrony -
Open the /etc/chrony.conf file and add the following line.
server 169.254.169.123 prefer iburst minpoll 4 maxpoll 4 -
Restart the chronyd daemon and apply the changes.
sudo service chronyd restart -
Use the following command to configure chronyd to start whenever the system boots.
sudo chkconfig chronyd on -
Check whether Chrony synchronizes time using the IP
169.254.169.123. Also check whether the default time source marked with^*is set to169.254.169.123.chronyc sourcesOutputMS Name/IP address Stratum Poll Reach LastRx Last sample
===============================================================================
^- 193.123.243.2 2 6 17 9 -8932us[-8909us] +/- 4550us
^- ec2-13-209-84-50.ap-nort> 2 6 17 9 -8534us[-8512us] +/- 5038us
^* 169.254.169.123 2 4 17 9 +11us[ +34us] +/- 39ms -
Check the time synchronization status of Chrony.
Check time synchronization statuschronyc trackingOutputReference ID : A9FEA97B (169.254.169.123)
Stratum : 3
Ref time (UTC) : Wed Jun 28 08:14:40 2023
System time : 0.000019450 seconds fast of NTP time
Last offset : +0.000022669 seconds
RMS offset : 0.000022669 seconds
Frequency : 1.352 ppm slow
Residual freq : +2.810 ppm
Skew : 0.061 ppm
Root delay : 0.076084495 seconds
Root dispersion : 0.000831026 seconds
Update interval : 2.0 seconds
Leap status : Normal
-
Install the Chrony package.
sudo apt install chrony -
Open the /etc/chrony/chrony.conf file and add the following line to the file.
server 169.254.169.123 prefer iburst minpoll 4 maxpoll 4 -
Then restart the chronyd daemon to apply the changes.
sudo /etc/init.d/chrony restart -
Check whether Chrony synchronizes time using the IP
169.254.169.123. Check whether the default time source marked with^*is set to169.254.169.123.Check whether time synchronization is enabledchronyc sourcesOutputMS Name/IP address Stratum Poll Reach LastRx Last sample
===============================================================================
^* 169.254.169.123 2 4 37 4 +41us[ +189us] +/- 39ms
^- pugot.canonical.com 2 6 17 18 -8895us[-8864us] +/- 162ms
^- prod-ntp-3.ntp1.ps5.cano> 2 6 17 18 -3232us[-3203us] +/- 125ms
^- prod-ntp-5.ntp1.ps5.cano> 2 6 17 19 -1723us[-1707us] +/- 123ms
^- alphyn.canonical.com 2 6 17 18 -2344us[-2321us] +/- 140ms
^- 121.174.142.82 3 6 17 19 -9870us[-9853us] +/- 28ms
^- ntp-seoul.gombadi.com 2 6 17 20 -8532us[-8519us] +/- 52ms
^- send.mx.cdnetworks.com 2 6 17 18 -8997us[-8971us] +/- 29ms
^- 193.123.243.2 2 6 17 19 -9014us[-8994us] +/- 4132us -
Check the time synchronization status of Chrony.
Check time synchronization statuschronyc trackingOutputReference ID : A9FEA97B (169.254.169.123)
Stratum : 3
Ref time (UTC) : Wed Jun 28 08:25:52 2023
System time : 0.000156159 seconds slow of NTP time
Last offset : -0.000184961 seconds
RMS offset : 0.000184961 seconds
Frequency : 5.999 ppm fast
Residual freq : -0.600 ppm
Skew : 35.807 ppm
Root delay : 0.076914668 seconds
Root dispersion : 0.000669460 seconds
Update interval : 16.2 seconds
Leap status : Normal