Create and manage target group
This guide explains how to create and manage a target group (Target Group) including viewing the list, editing settings, and configuring listener connections.
Create target group
-
Go to the KakaoCloud console > Beyond Networking Service > Load Balancing > Target group.
-
Select the [Create target group] button at the top right.
-
On the Step 1: Configure target group screen, enter settings and select [Next].
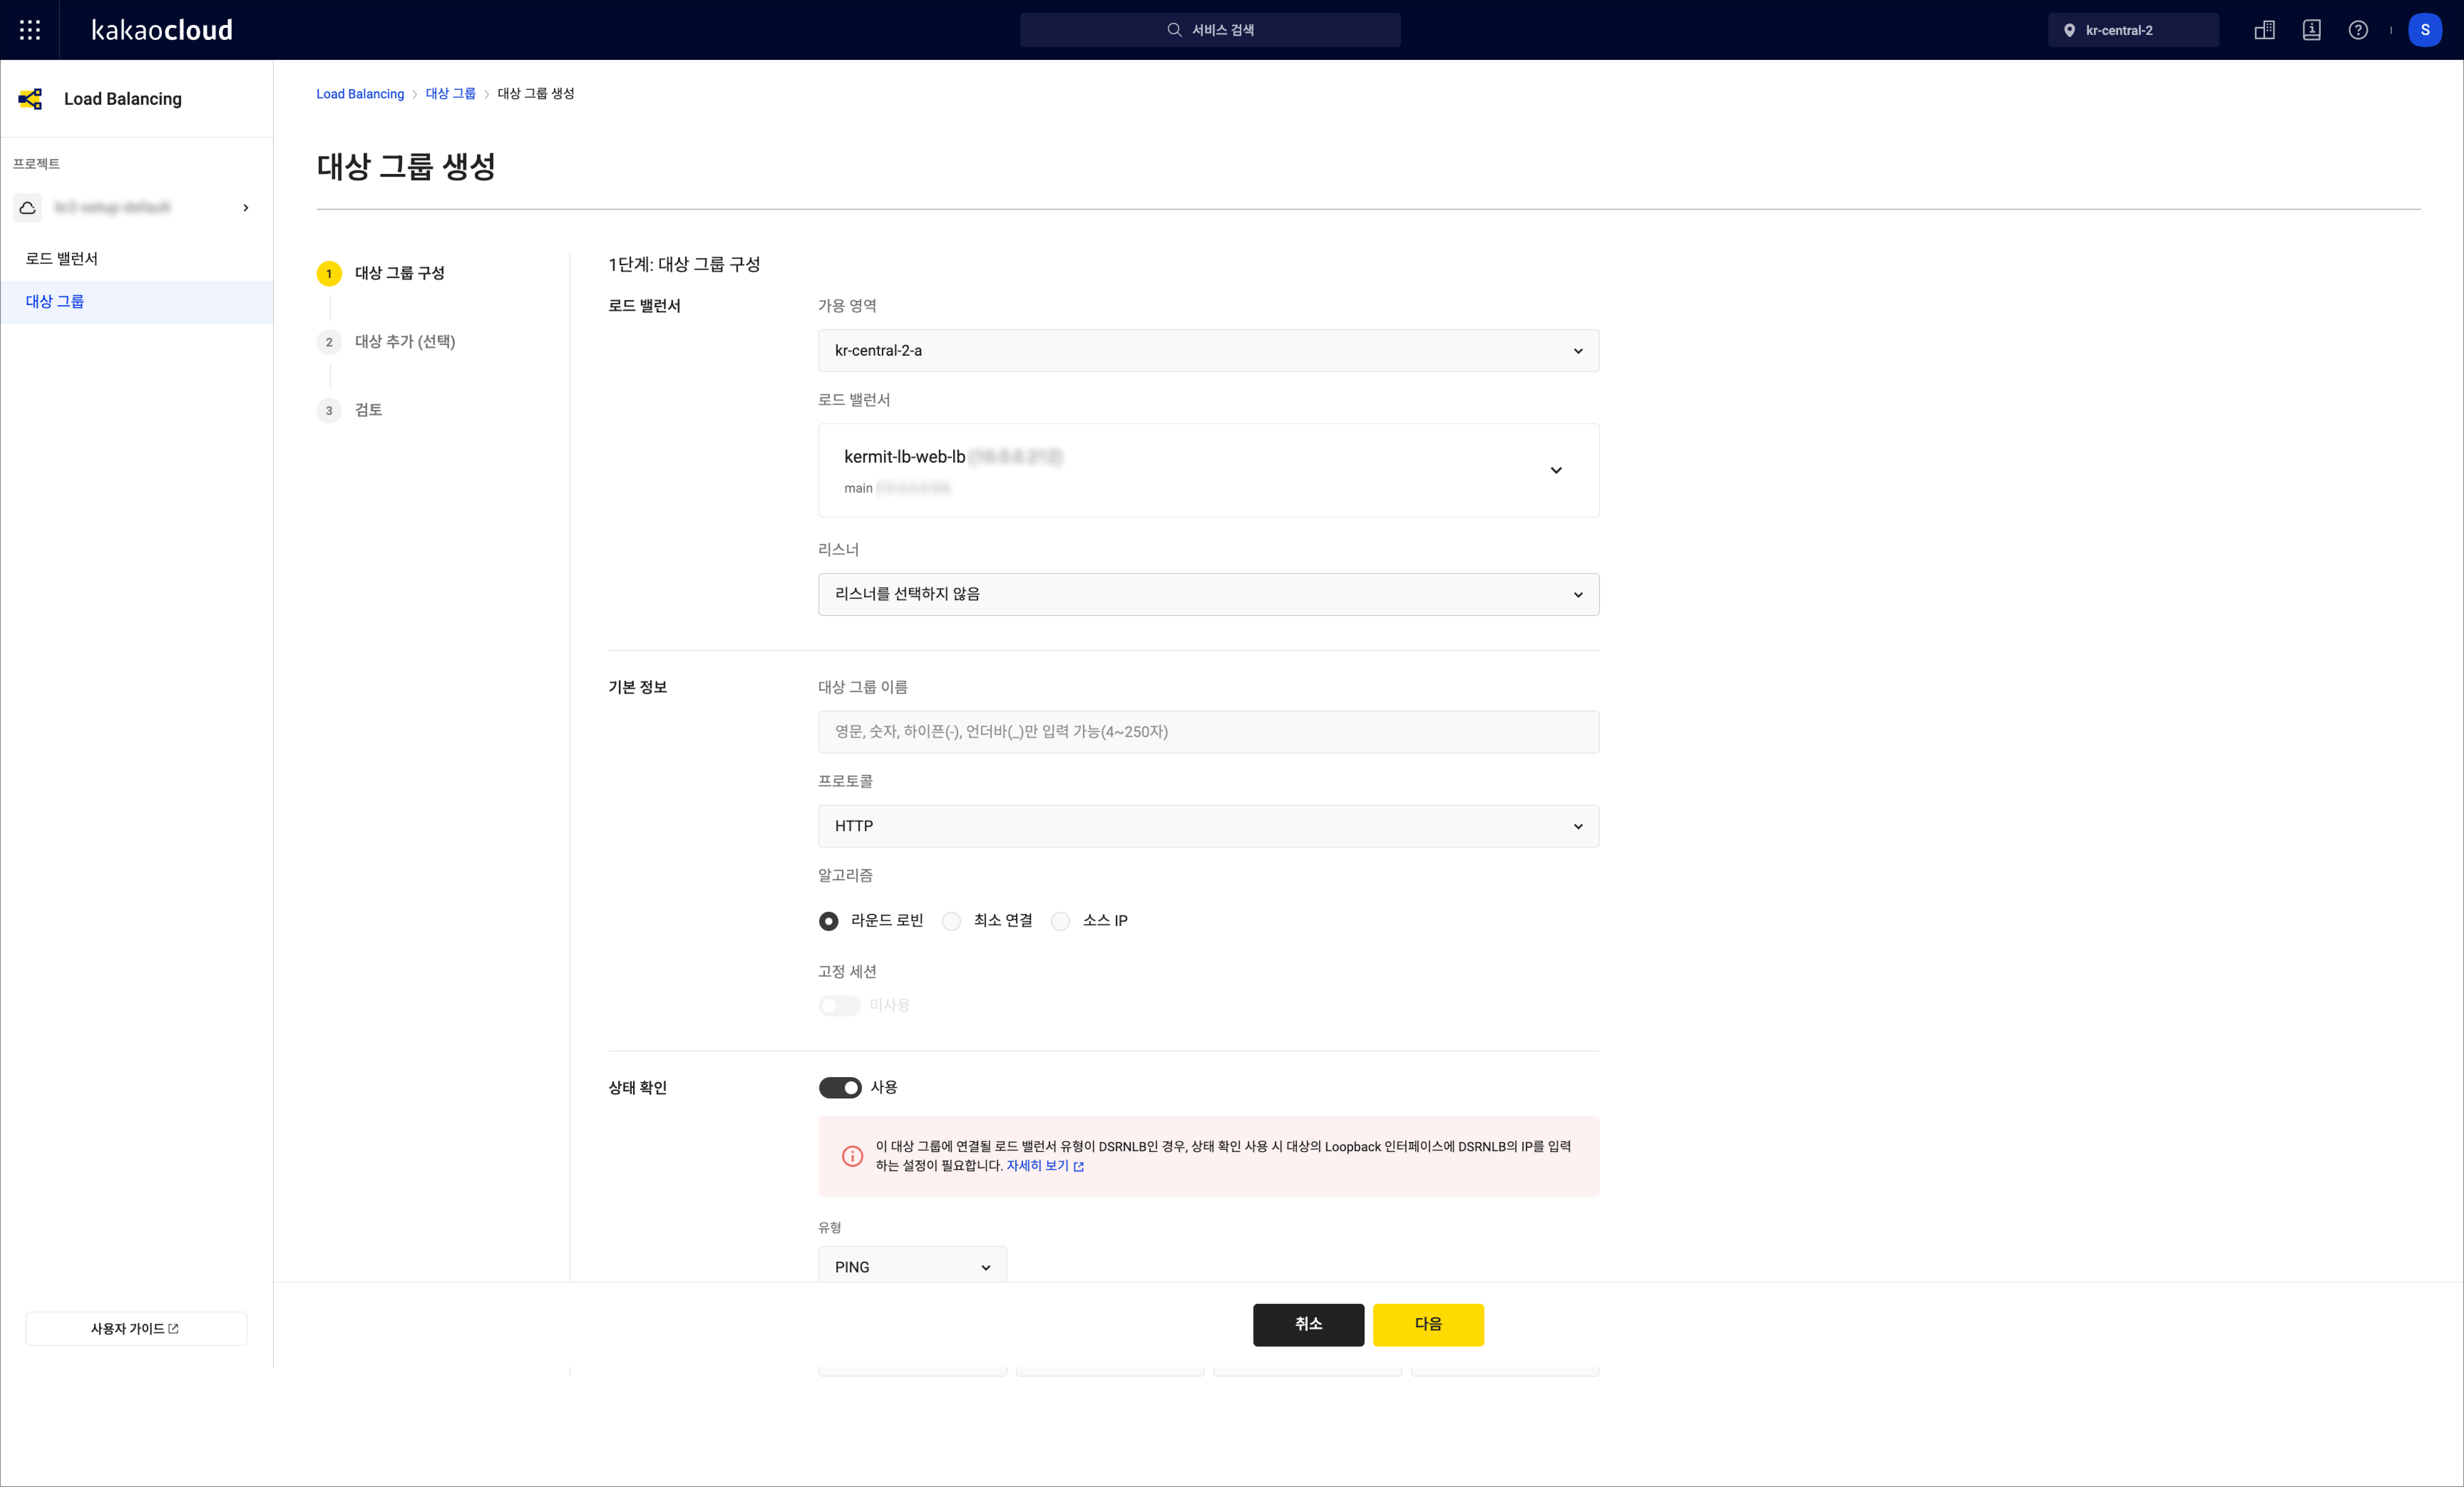
Section Field Description Load balancer Availability zone Select an availability zone from the project Load balancer Lists all load balancers in the selected zone Listener Lists all listeners for the selected load balancer and provides 'Do not select listener' option Basic info Target group name Enter a name for the target group Protocol Selectable protocols depending on the listener protocol:
- HTTP listener:HTTP,PROXY
- HTTPS listener:HTTPProtocol Version Displayed when the connected load balancer is an ALB, the selected listener is HTTPS, and the target group protocol is HTTP:
-HTTP/1.1: Sends requests to targets using HTTP/1.1.
-HTTP/2: Sends requests to targets using HTTP/2.Algorithm Select one of Round Robin,Least Connections,Source IP:
- Round Robin: Distributes traffic sequentially
- Least Connections: Routes traffic to targets with fewer connections
- Source IP: Sends traffic from the same source IP to the same targetSticky session Configurable only for specific listener-target group combinations:
- HTTP x HTTP, TCP x TCP, UDP x UDP
- Others: Fixed as "Disabled"Sticky session type Options depend on the listener-target group combination:
- HTTP x HTTP: HTTP cookie, App cookie
- TCP x TCP: Source IP
- UDP x UDP: Source IPStickiness duration Only enabled when sticky session uses HTTP or App cookie
- Range: 1–604800 (default: 3600s for HTTP cookie, 360s for others)Cookie name Required for App cookie:
- Custom app cookie name
- Allowed characters: alphanumeric and! # $ % ^ & _ * + ~ -
- Max length: 255 charactersHealth check Enable health check Toggle usage Type Available types based on protocol:
- HTTP group:HTTP,PING
- PROXY group:PING,TCPHTTP method Only when type is HTTP
- Options:CONNECT,DELETE,GET,HEAD,OPTIONS,PATCH,POST,PUT,TRACEHTTP version Only when type is HTTP
- Options:1,1.1HTTP status code Only when type is HTTP
- Supports single codes, comma-separated codes, or hyphenated rangesCheck path Enter URL path format Interval 1–3600 seconds (default: 30). Must be greater than timeout Timeout 1–900 seconds (default: 4). Must be less than interval Success threshold 1–10 times (default: 5) Failure threshold 1–10 times (default: 2) infoIf the algorithm is
Source IP, traffic is always routed to the same target from a single source IP. Sticky session settings are not needed and will be disabled. For persistent sessions, usingSource IPis recommended. -
In Step 2: Add targets, add resources in the same VPC and zone as the selected load balancer.
-
Select instances to add as targets and enter port numbers.
-
Select [Add target].
-
Modify ports to add the same target again or remove targets.
-
After adding targets, select [Next].
-
On Step 3: Review, verify the settings and select [Create].
info- After creation, configure security group settings for each target. Go to Target group details > Targets and check the health check IP. Add it to the inbound rules.
- These IPs must be open even if health checks are not used, as they serve on the service port.
Manage target group
You can view details, update settings, delete, or add new targets to existing target groups.
View target group list
-
Go to the KakaoCloud console > Beyond Networking Service > Load Balancing > Target group.
-
View the list of target groups. Use filters to search.
Field Description Name Name and ID of the target group Provisioning status Indicates if create/update/delete is in progress Operating status Indicates if the target group is active Protocol Protocol used for routing traffic Load balancer Load balancer name and ID VPC VPC name and ID [More options] icon Options: rename, configure listener, algorithm, targets, traffic weight, health check, sticky session, delete
View target group details
-
Go to the KakaoCloud console > Beyond Networking Service > Load Balancing > Target group menu.
-
Select the target group you want to view in detail.
-
In the detail view, check the information in the tabs: Details, Targets, Health checks, and Properties.
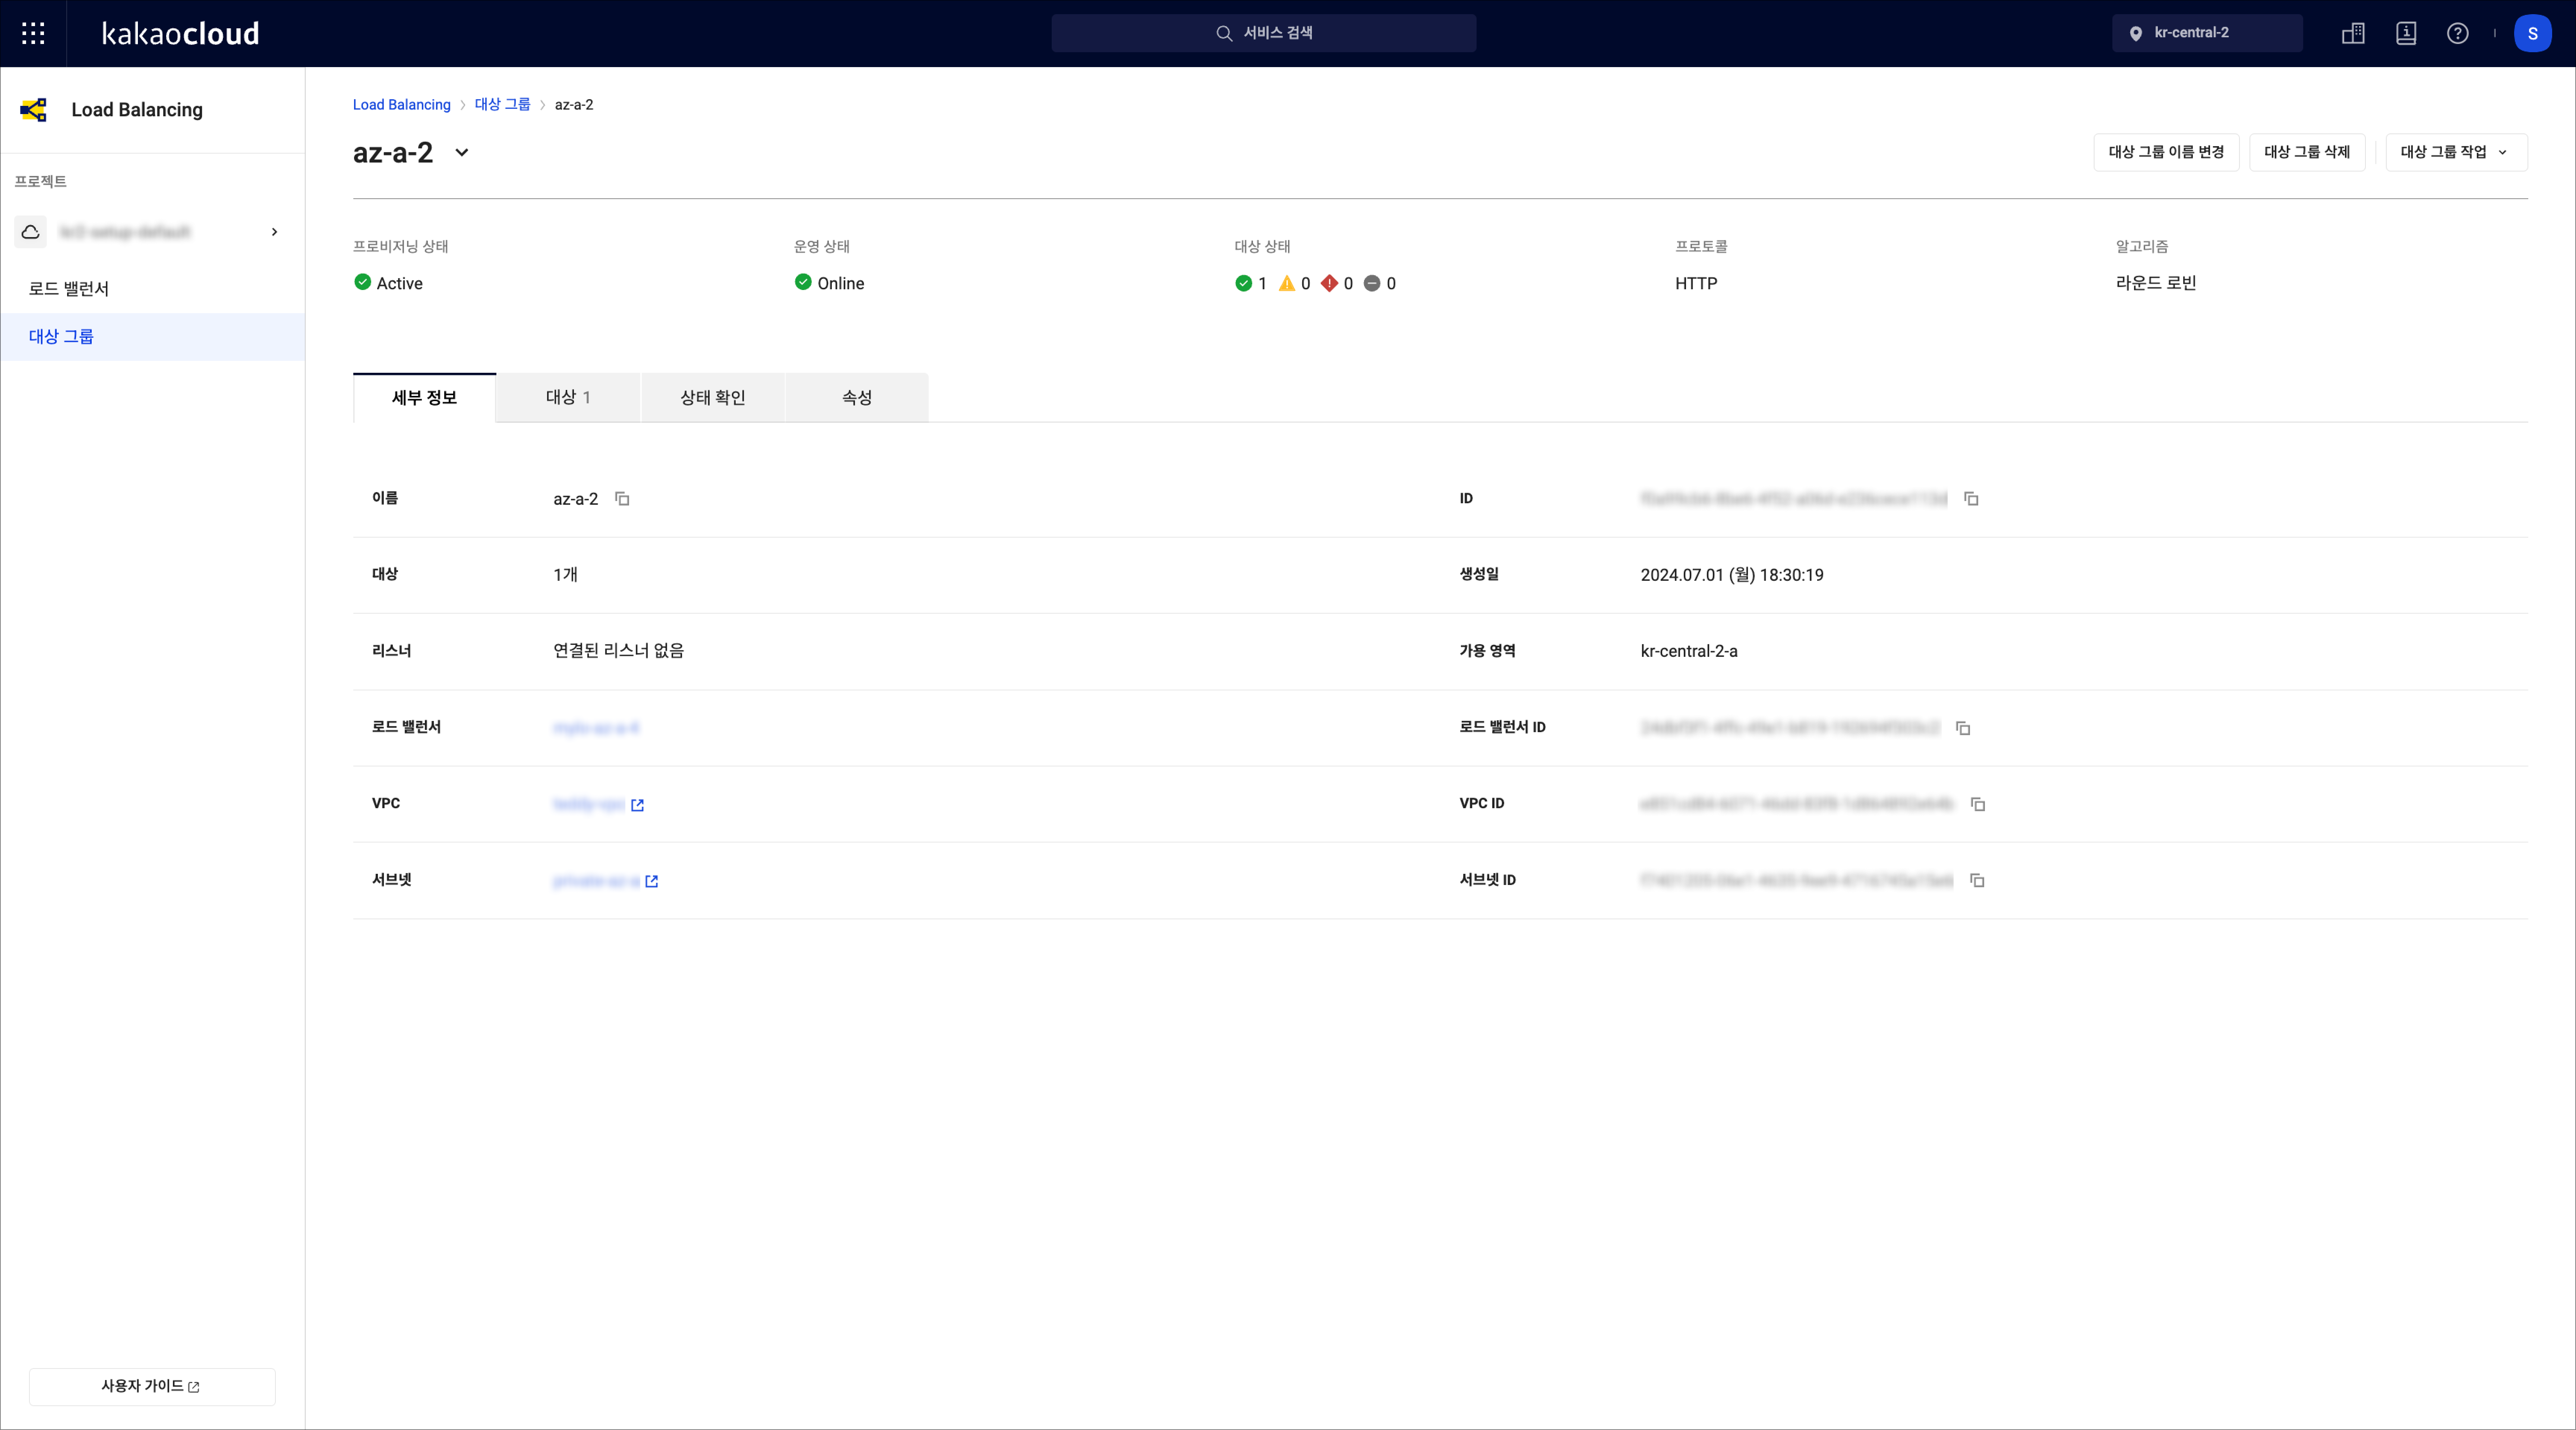 Target group details
Section Description Details View detailed information of the target group Target View the list and details of added targets Health checks View health check configuration information Properties View properties of the target group Monitoring Retrieve monitoring information such as the number of healthy or unhealthy instances within the target group
Rename target group
-
Go to the KakaoCloud console > Beyond Networking Service > Load Balancing > Target group menu.
-
Select the [More options] icon of the target group you want to rename.
-
Select Rename target group.
-
In the popup, enter the new name and select [Update].
Configure listener connection
-
Go to the KakaoCloud console > Beyond Networking Service > Load Balancing > Target group menu.
-
Select the [More options] icon of the target group whose listener connection settings you want to change.
-
Select Configure listener connection.
-
In the popup, modify the listener connection settings and select [Apply].
- To configure listener connection: Select one or more listeners to associate with the target group.
- To remove listener connection: Select the option to disconnect from listeners.
Set algorithm
-
Go to the KakaoCloud console > Beyond Networking Service > Load Balancing > Target groups menu.
-
Select the [More] icon for the target group whose connection settings you want to change.
-
From the [More] icon menu, select Set algorithm.
-
In the Set algorithm popup window, change the algorithm and select the Apply button.
Configure target
-
Go to the KakaoCloud console > Beyond Networking Service > Load Balancing > Target groups menu.
-
Select the target group for which you want to modify the target settings.
-
On the detail page, select the Target tab and then select the Configure target button.
-
In the Configure target popup window, review the registered targets, add or remove targets as needed, then select the Apply button.
- To revert changes during editing, select the Revert button at the top of the added target list.
Set traffic weight
-
Go to the KakaoCloud console > Beyond Networking Service > Load Balancing > Target groups menu.
-
Select the target group for which you want to configure traffic weight.
-
On the detail page, select the Target tab and then select the Set traffic weight button.
-
In the Set traffic weight popup window, modify the weight and select the Set button.
- Traffic weights must be integers between
0and256. - Weights are converted using the following formula:
- Converted weight: (weight / 256) * 100 (rounded up to the first decimal place)
- Ratio: converted weight / total sum of converted weights
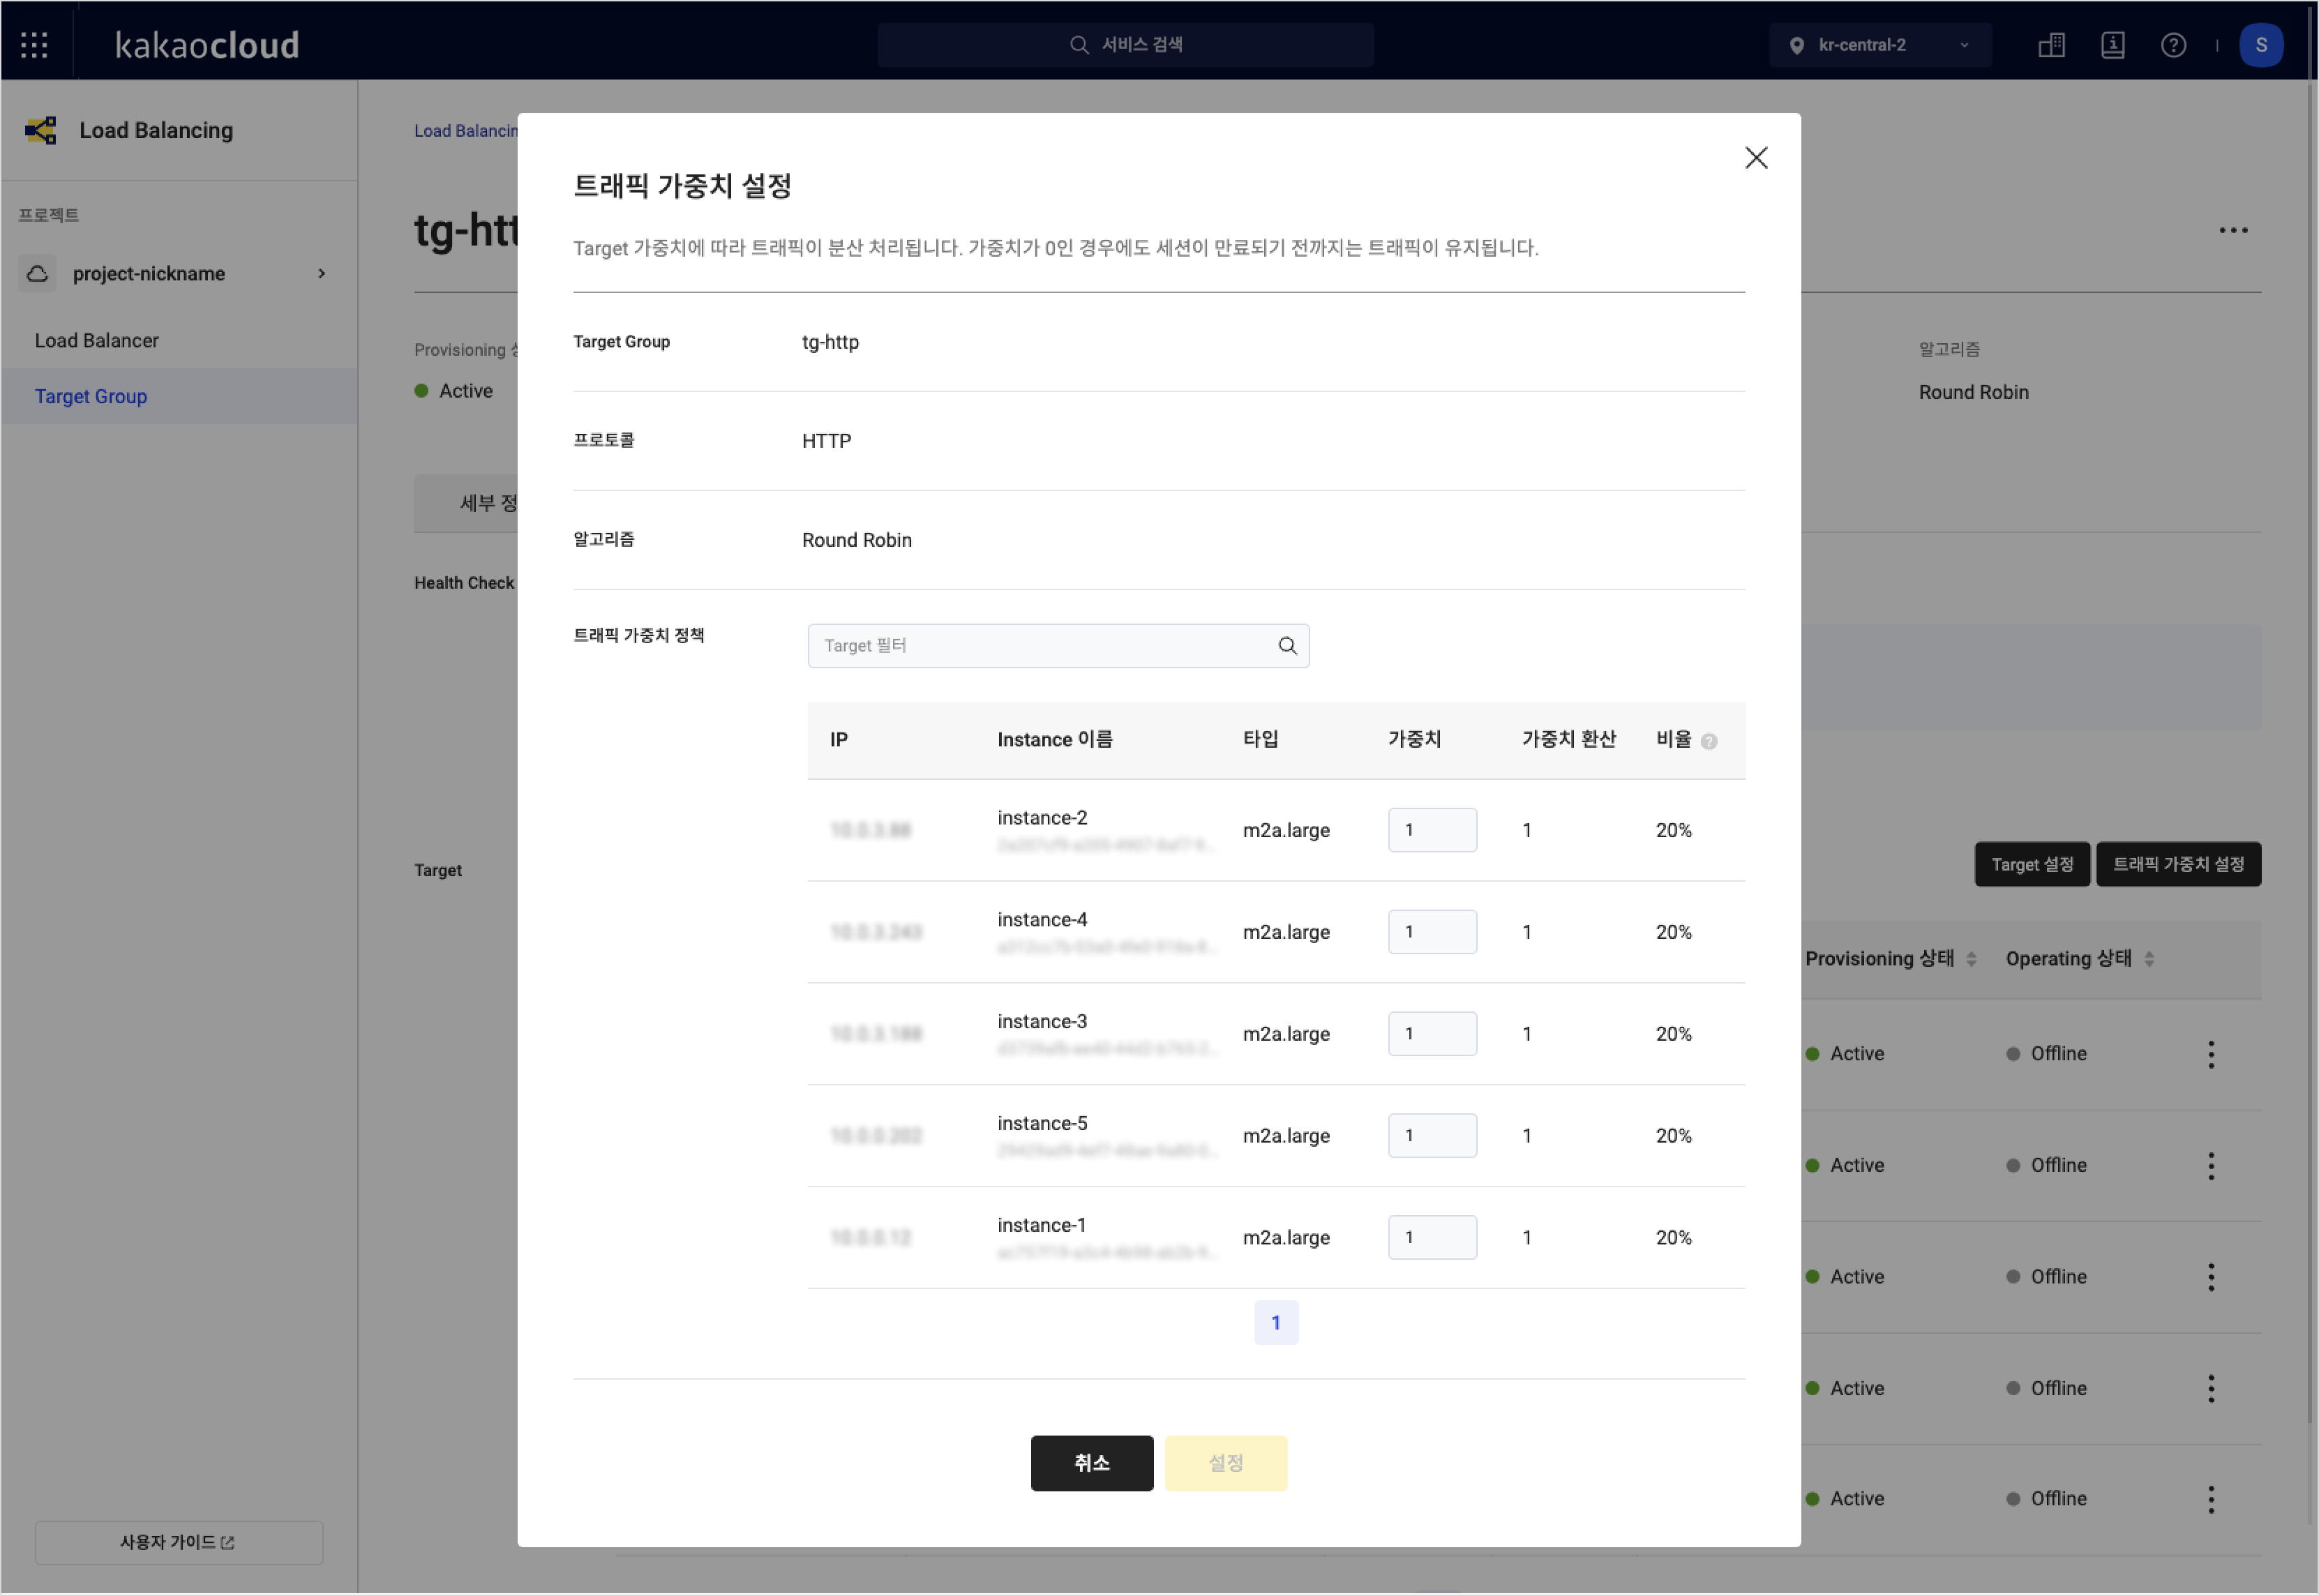 Configure traffic weight for target group
 - Traffic weights must be integers between
Configure health checks
-
Go to the KakaoCloud console > Beyond Networking Service > Load Balancing > Target groups menu.
-
Select the target group for which you want to configure health checks.
-
On the detail page, select the Health check tab and then select the Configure health check button.
-
In the Configure health check popup window, enable or disable the health check, or change its parameters.
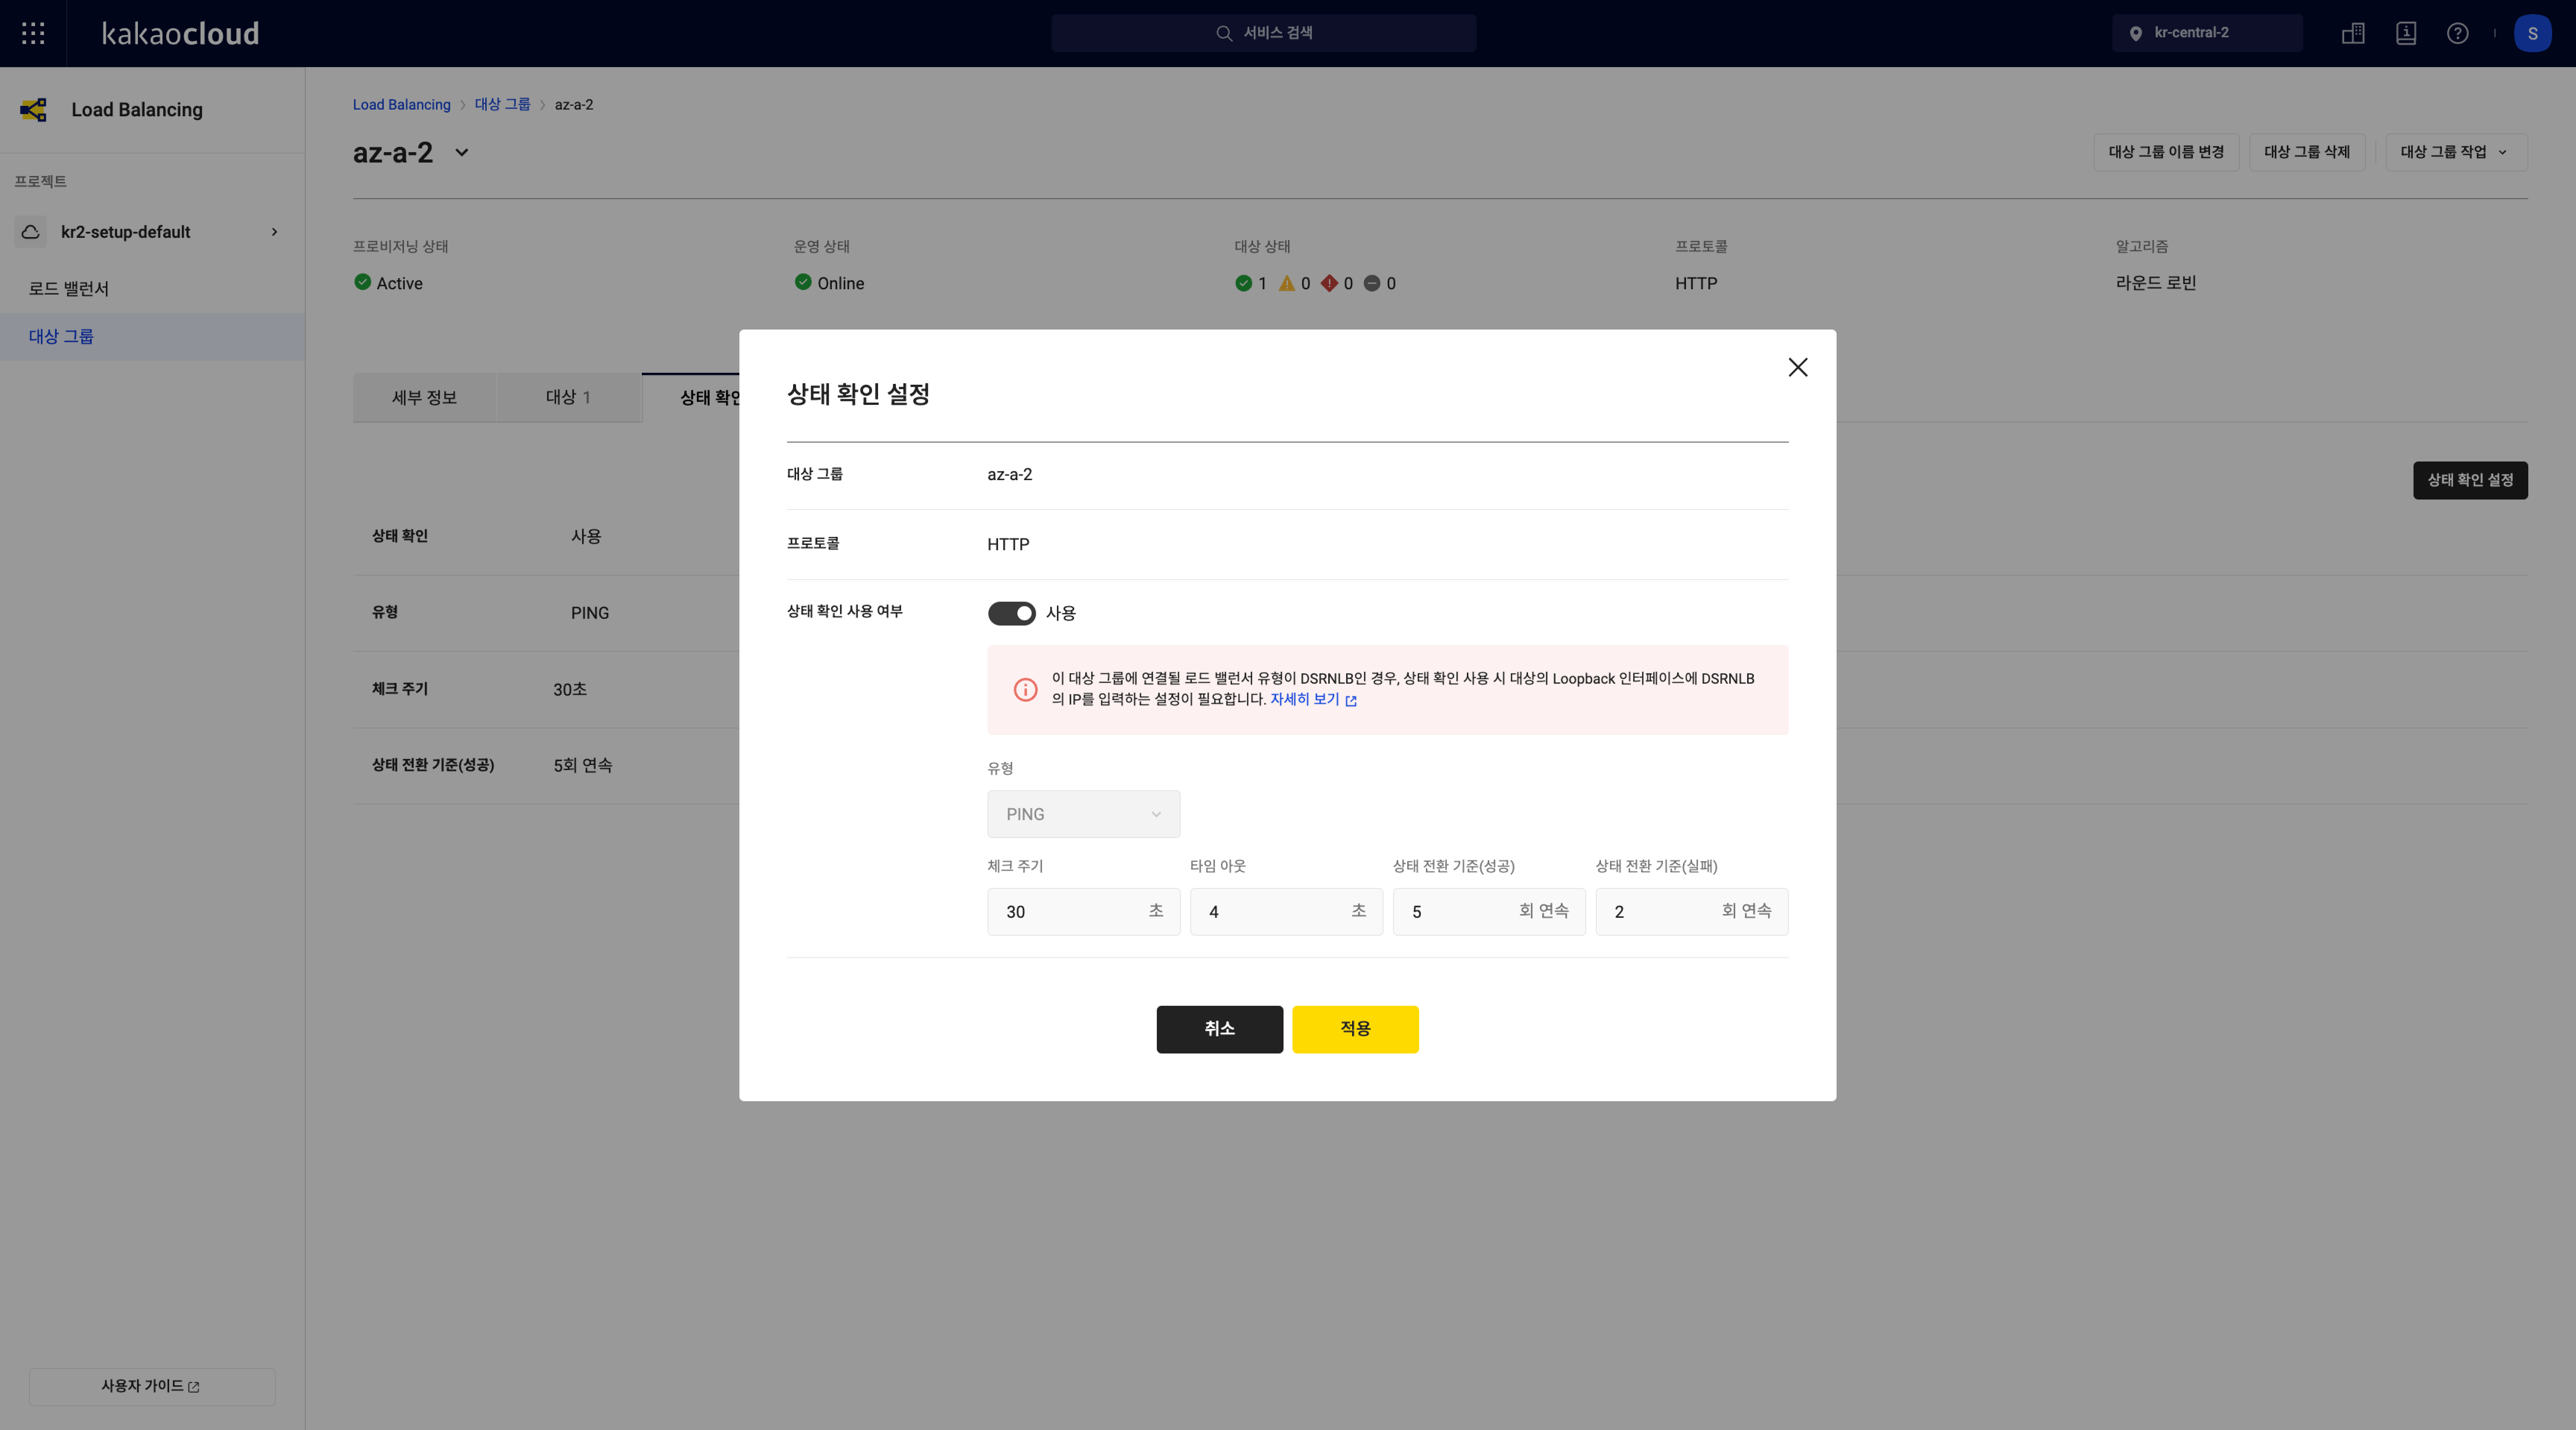 Configure health checks
Item Description Target group Name of the current target group Protocol Protocol type available based on the target group
- HTTP target group:HTTP,PING
- HTTPS target group:HTTPS,PING
- TCP target group:PING,TCP
- UDP target group:TCP,HTTP
- PROXY target group:PING,TCPEnable health check Type: Health check type
-PING: Sends a packet and verifies the response (ICMP ping)
-HTTP: Sends a packet to a specified path and verifies the response
-HTTPS: Verifies the response using the same method as HTTP for certificate-enabled targets
-TCP: Uses TCP protocol ports to verify the target’s stateInterval: Frequency of health checks (in seconds)
- Range: 1 to 3600 secondsTimeout: Maximum time to wait for a delayed response (in seconds)
- Communication is considered failed if the target does not respond within this time
- Must be less than the interval
- Range: 1 to 900 secondsSuccess threshold: Number of consecutive successful health checks required to consider the target healthy Failure threshold: Number of consecutive failed health checks required to consider the target unhealthy and remove it from traffic distribution -
If the health check type is
HTTPorHTTPS, you can configure additional settings.Item Description HTTP method Select from GET,HEAD,OPTIONS,POST,PUT,TRACE,PATCH,DELETE,CONNECTHTTP version Select either 1.0 or 1.1 HTTP status codes Specify expected HTTP status codes to determine successful checks
- Single code example: 200, 201
- Multiple codes: 201, 202, 401, 402
- Range: 200-500Path URL path for health checks -
Select the Apply button.
If the targets in the group use the SELinux option from the latest CentOS distribution, the PING type health check may not work, as SELinux blocks the shell_exec_t call.
Configure sticky session
Sticky session configuration is available only for certain target groups, depending on the listener and target group protocol.
Sticky session options by listener and target group protocol
| Target group\Listener | HTTP | HTTPS | TCP | UDP |
|---|---|---|---|---|
| HTTP | HTTP cookie, App cookie | X | X | X |
| HTTPS | X | X | X | X |
| TCP | X | X | Source IP | X |
| UDP | X | X | X | Source IP |
| PROXY | X | X | X | X |
-
Go to the KakaoCloud console > Beyond Networking Service > Load Balancing > Target groups menu.
-
Select the target group for which you want to configure sticky sessions.
-
On the detail page, select the Properties tab, then select the Configure sticky session button.
-
In the Configure sticky session popup window, enable or disable the feature and modify settings as needed, then select the Apply button.
Delete target group
-
Go to the KakaoCloud console > Beyond Networking Service > Load Balancing > Target groups menu.
-
Select the [More] icon next to the target group you want to delete.
-
From the menu, select Delete target group.
-
In the Delete target group popup window, enter the confirmation phrase and select the Delete button.
Manage target
You can view, modify, or delete targets added to a target group.
Two health check IPs are generated for each subnet that contains a target. To ensure proper health checks, allow traffic from these IPs.
Refer to View health check IP and Allow health check IP communication for configuring your security group.
View health check IP
-
Go to the KakaoCloud console > Beyond Networking Service > Load Balancing > Target groups menu.
-
Select the target group for which you want to view health check IPs.
-
On the detail page, select the Target tab.
-
At the top of the tab view, select Health check IP by subnet to view the list.
Allow health check IP communication
There are two methods to allow communication with health check IPs through your security group.
Choose one of the following methods depending on your preference:
Method 1: Add inbound rules to the existing security group of the target instance
-
Go to the KakaoCloud console > Beyond Networking Service > Load Balancing > Target groups menu.
-
Select the target group and view the health check IPs.
-
On the detail page, select the Target tab.
-
At the top of the tab, select Health check IP by subnet and either keep the window open or copy the IP list.
-
In the Target list section, find the instance to which communication should be allowed and select its security group name.
- If multiple security groups are attached, select any one.
- If a matching rule already exists in any security group, communication is already permitted.
-
In the Security group detail page, go to the Inbound rules tab and select Manage inbound rules.
-
In the Manage security group rules popup, select Add at the bottom of the Inbound rules tab.
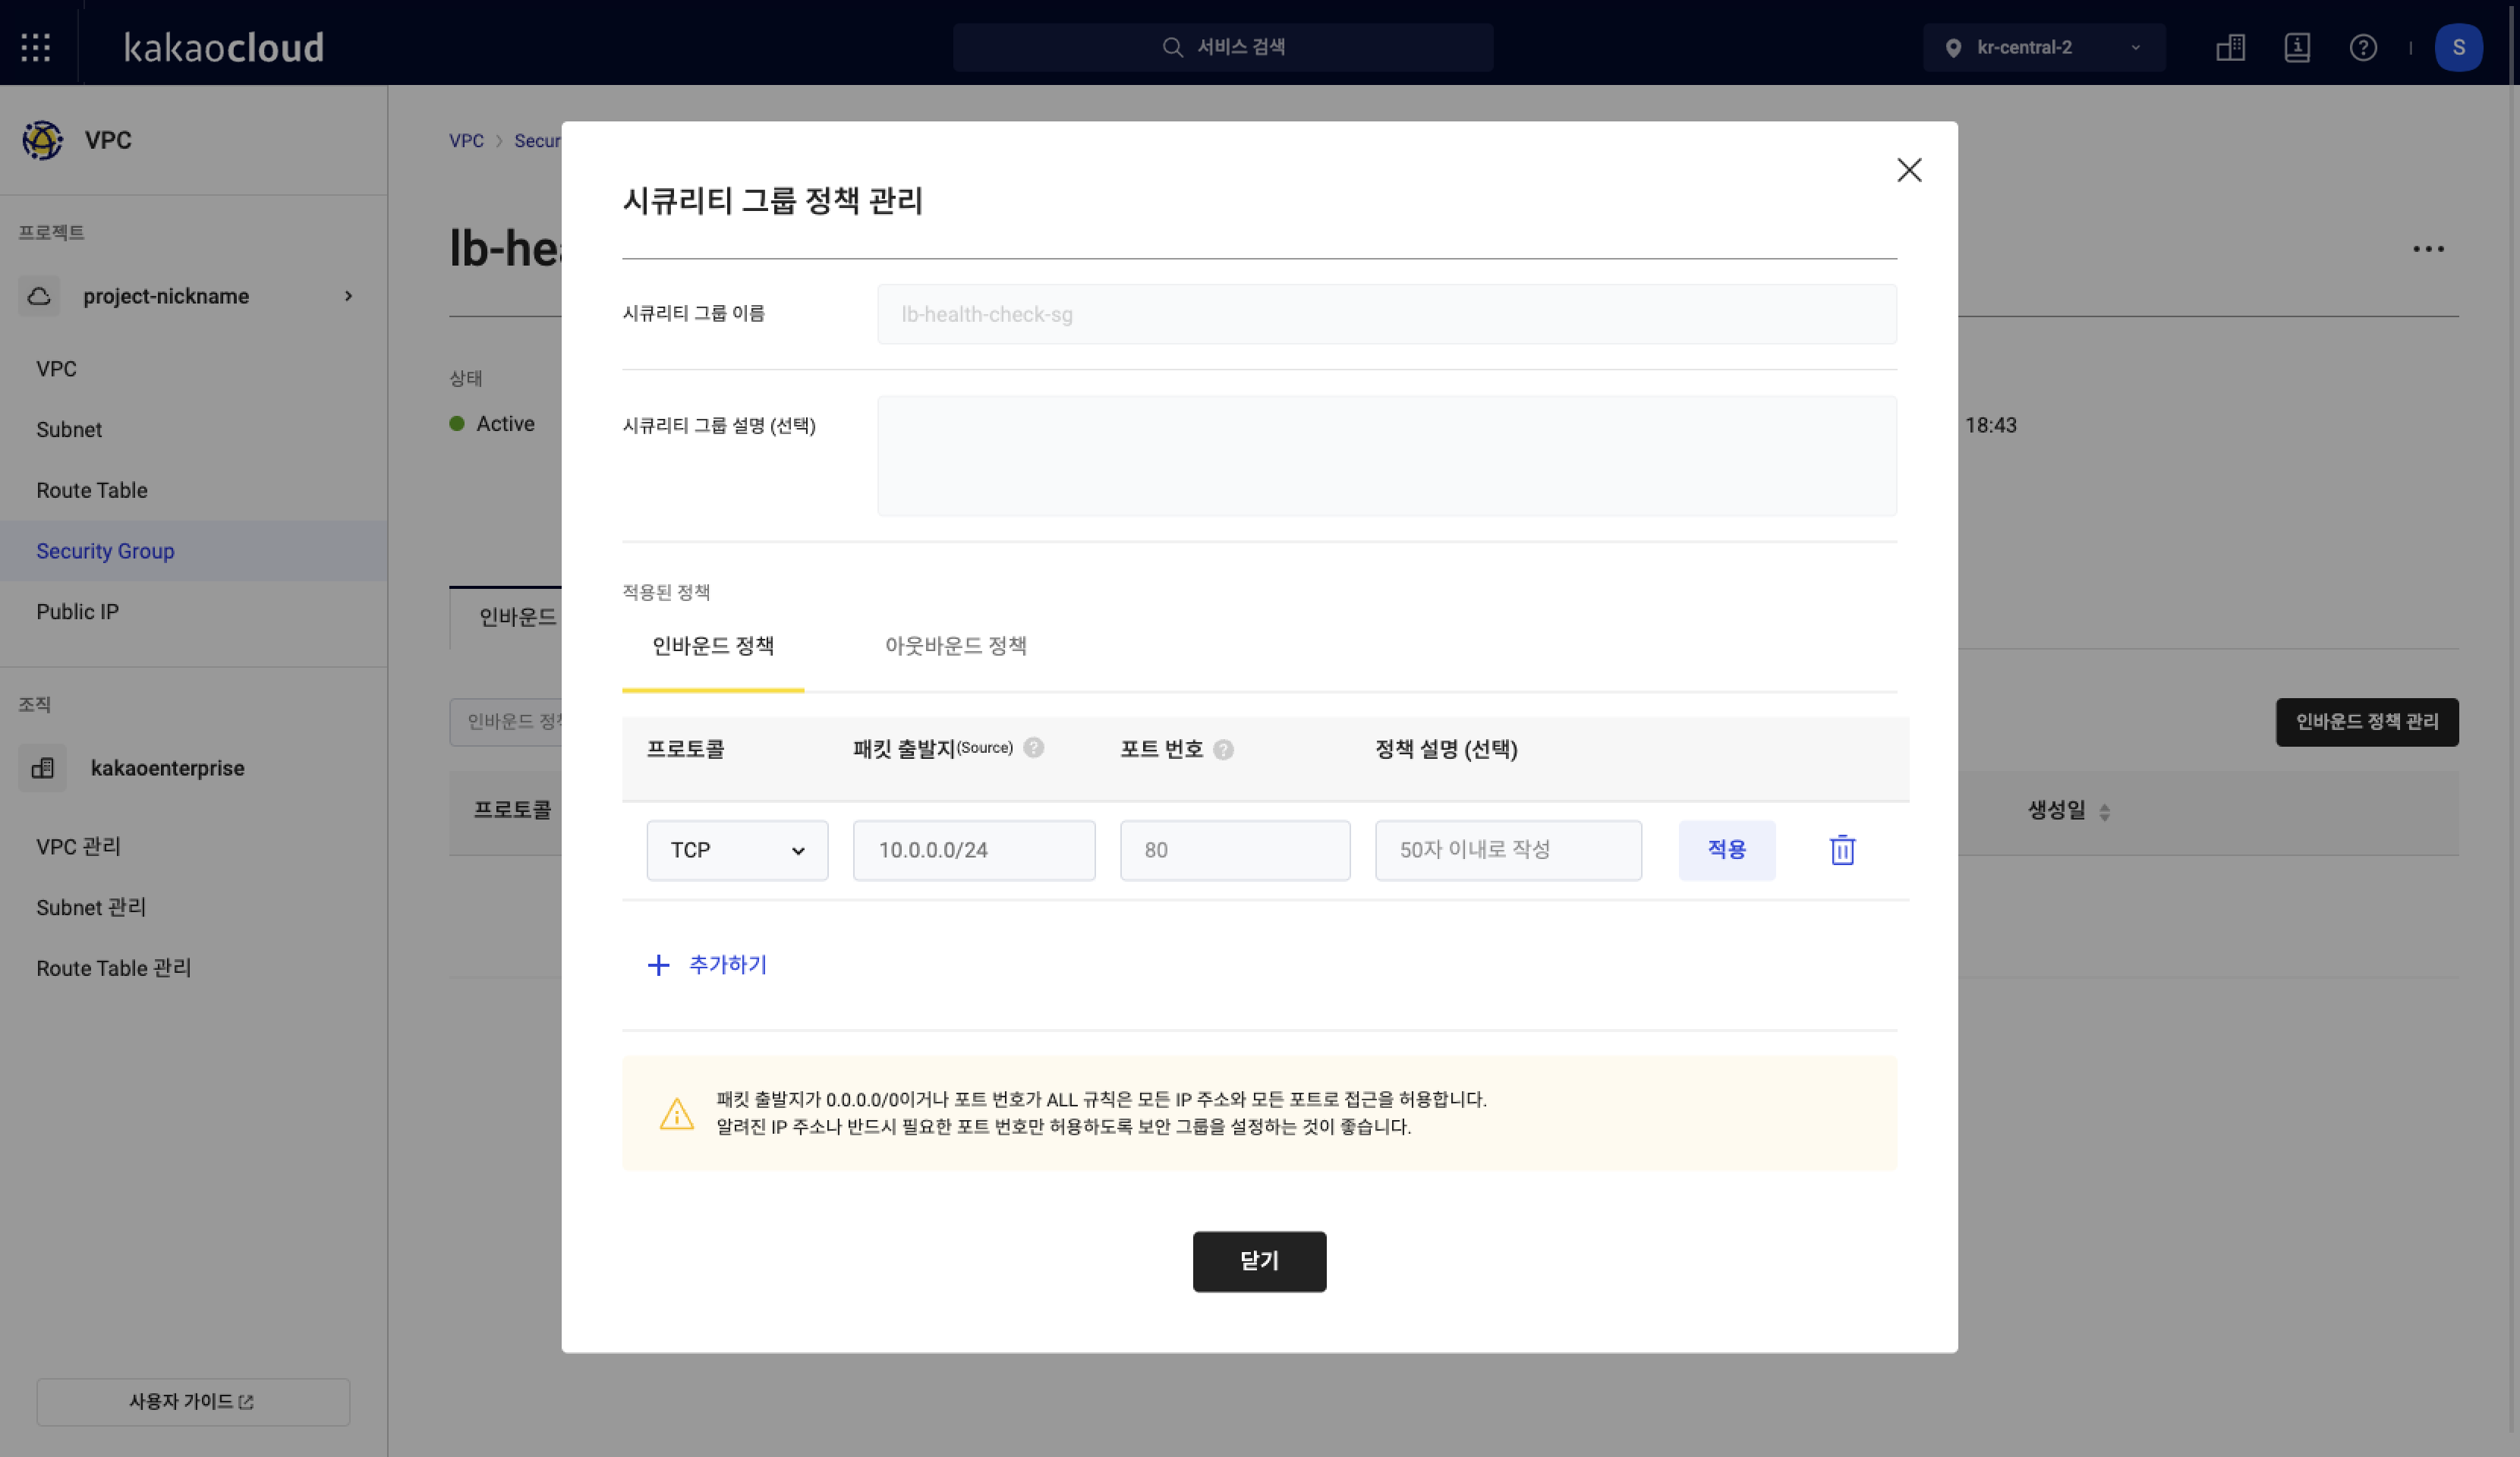 Manage security group rules
 -
Based on the Target tab details from step 5, enter the rule information and select Apply on the right.
Inbound rule configuration
Item Description Protocol Protocol used for communication (TCP, UDP, ICMP, ALL) depending on the health check type
-PING:ICMP
-HTTP,HTTPS,TCP:TCPSource Health check IPs from the target details
- Register both IPs per subnetPort Monitoring port of the target Description (optional) Description of the rule -
Select Close at the bottom of the popup to complete rule registration.
Method 2: Create a new security group and attach it to the target instance
-
Go to the KakaoCloud console > Beyond Networking Service > Load Balancing > Target groups menu.
-
Select the target group and view the health check IPs.
-
Select the Target tab.
-
At the top of the tab, select Health check IP by subnet and either keep the window open or copy the IP list.
-
Refer to Create security group to navigate to the security group creation screen.
-
In the Create security group popup, enter a name and description, and add inbound rules.
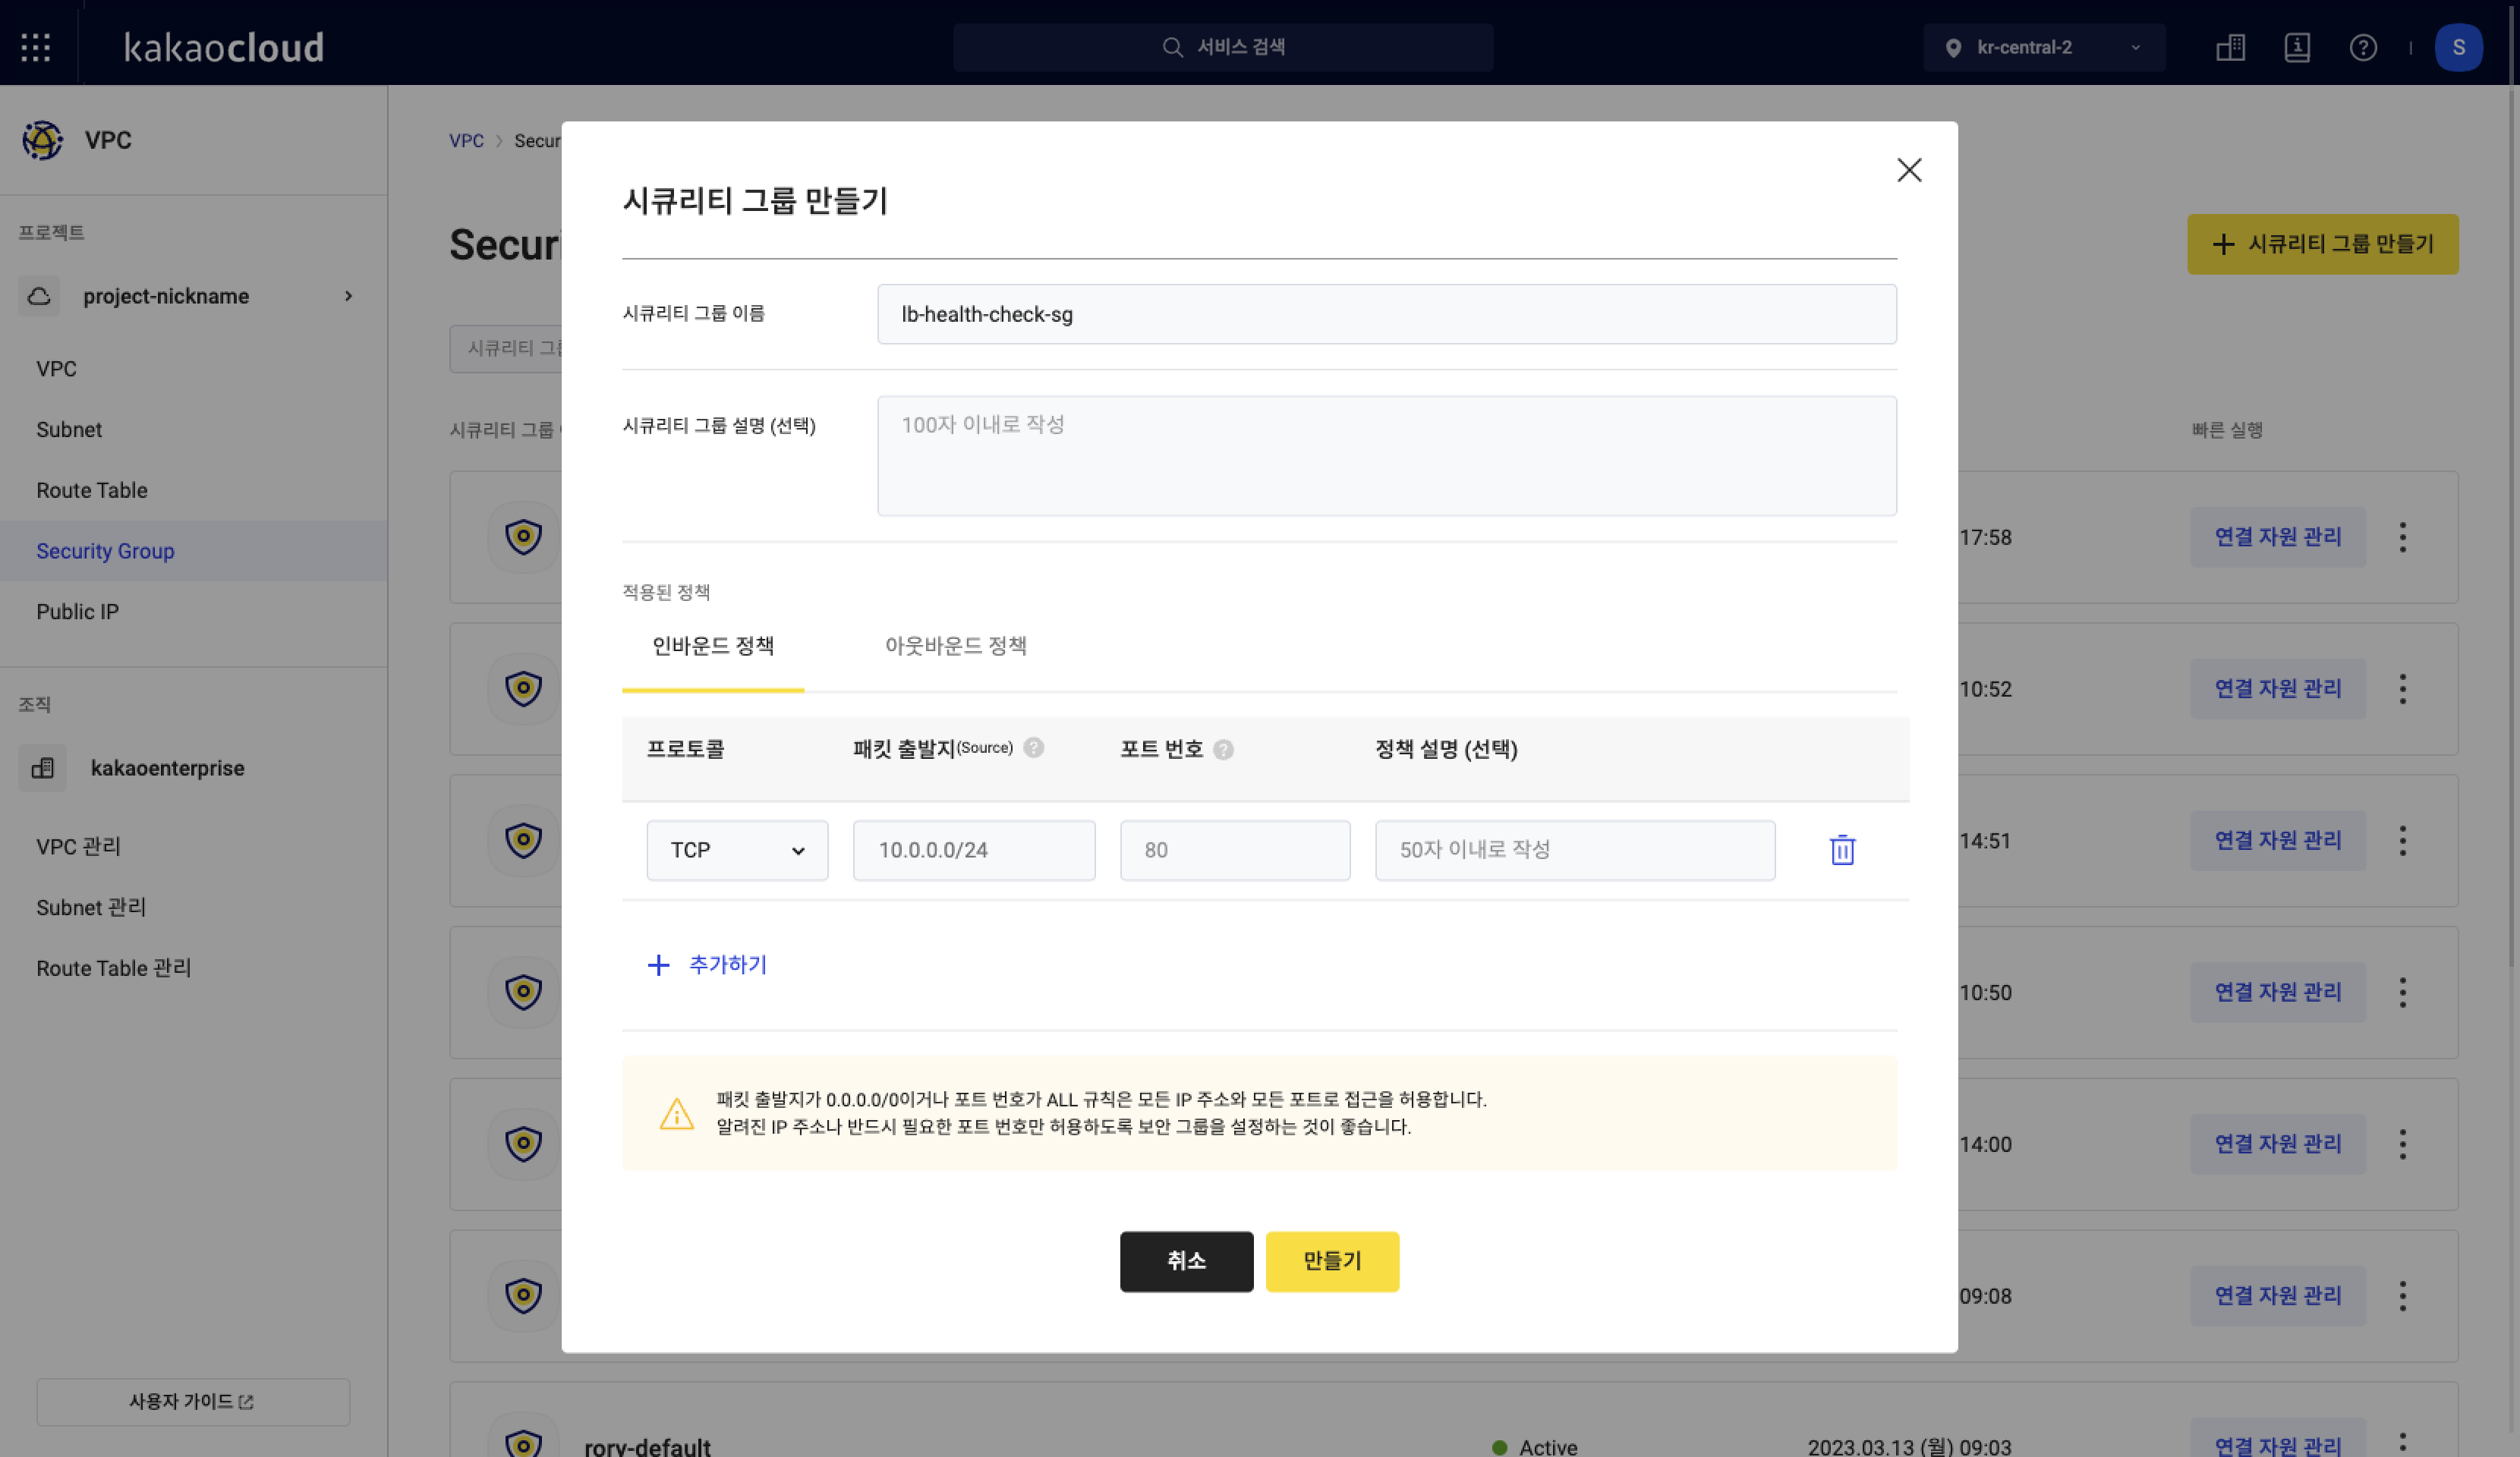 Create security group
 -
Based on step 3's Target tab details, configure all required rules.
- You may register all health check IPs in one security group and attach it to all target instances
or create separate security groups per subnet containing only the relevant IPs.
Inbound rule configuration
Item Description Protocol Protocol used for communication (TCP, UDP, ICMP, ALL) depending on the health check type
-PING:ICMP
-HTTP,HTTPS,TCP:TCPSource Health check IPs from the target details
- Register both IPs per subnet
- If using one group, register all IPsPort Monitoring port of the target
- Can be a single port or rangeDescription (optional) Description of the rule - You may register all health check IPs in one security group and attach it to all target instances
-
Select Create to finish creating the security group.
-
In the Security group list, select Manage linked resources for the group, and attach the target instance.
View target
-
Go to the KakaoCloud console > Beyond Networking Service > Load Balancing > Target groups menu.
-
Select the target group whose targets you want to view.
-
On the detail page, select the Target tab.
-
View the list of targets in the group. Use filters as needed to refine your search.
Item Description IP Target IP Port Target port Instance Name and ID of the target instance Subnet Name of the subnet containing the target Security group Security group attached to the target instance Monitoring port Port used for health checks Weight ratio Calculated weight ratio based on input weight Provisioning status Status indicating whether the target is added, being modified, or being deleted Operational status Indicates whether the target is available for use [More] icon Options for configuring monitoring port or detaching target
Modify target
You cannot change the port of an existing target. To change the port, delete the target and reconfigure it via Configure target.
Set monitoring port
-
Go to the KakaoCloud console > Beyond Networking Service > Load Balancing > Target groups menu.
-
Select the target group whose monitoring port you want to change.
-
On the detail page, select the Target tab.
-
Review the target list.
-
Select the [More] icon for the target you want to update.
-
Select Set monitoring port from the menu.
-
In the Set monitoring port popup, configure the following:
- Use same port as target: Monitoring port matches traffic port
- Use different port: Enter a different monitoring port
-
Select the Apply button.
Detach target
-
Go to the KakaoCloud console > Beyond Networking Service > Load Balancing > Target groups menu.
-
Select the target group containing the target to detach.
-
On the detail page, select the Target tab.
-
Review the list of added targets.
-
Select the [More] icon for the target you want to detach.
-
Select Detach target from the menu.
-
In the Detach target popup window, enter the confirmation phrase and select Detach.
Detaching a target does not delete the associated instance. To reattach, use Configure target.