Create and manage target group
This guide describes how to create a target group, view the list, modify configurations, set listener connections, and manage other related tasks.
Create target group
-
Go to the KakaoCloud console > Beyond Networking Service > Load Balancing > Target groups menu.
-
Select the Create target group button at the top right.
-
In the Step 1: Configure target group screen, enter the required settings and select Next.
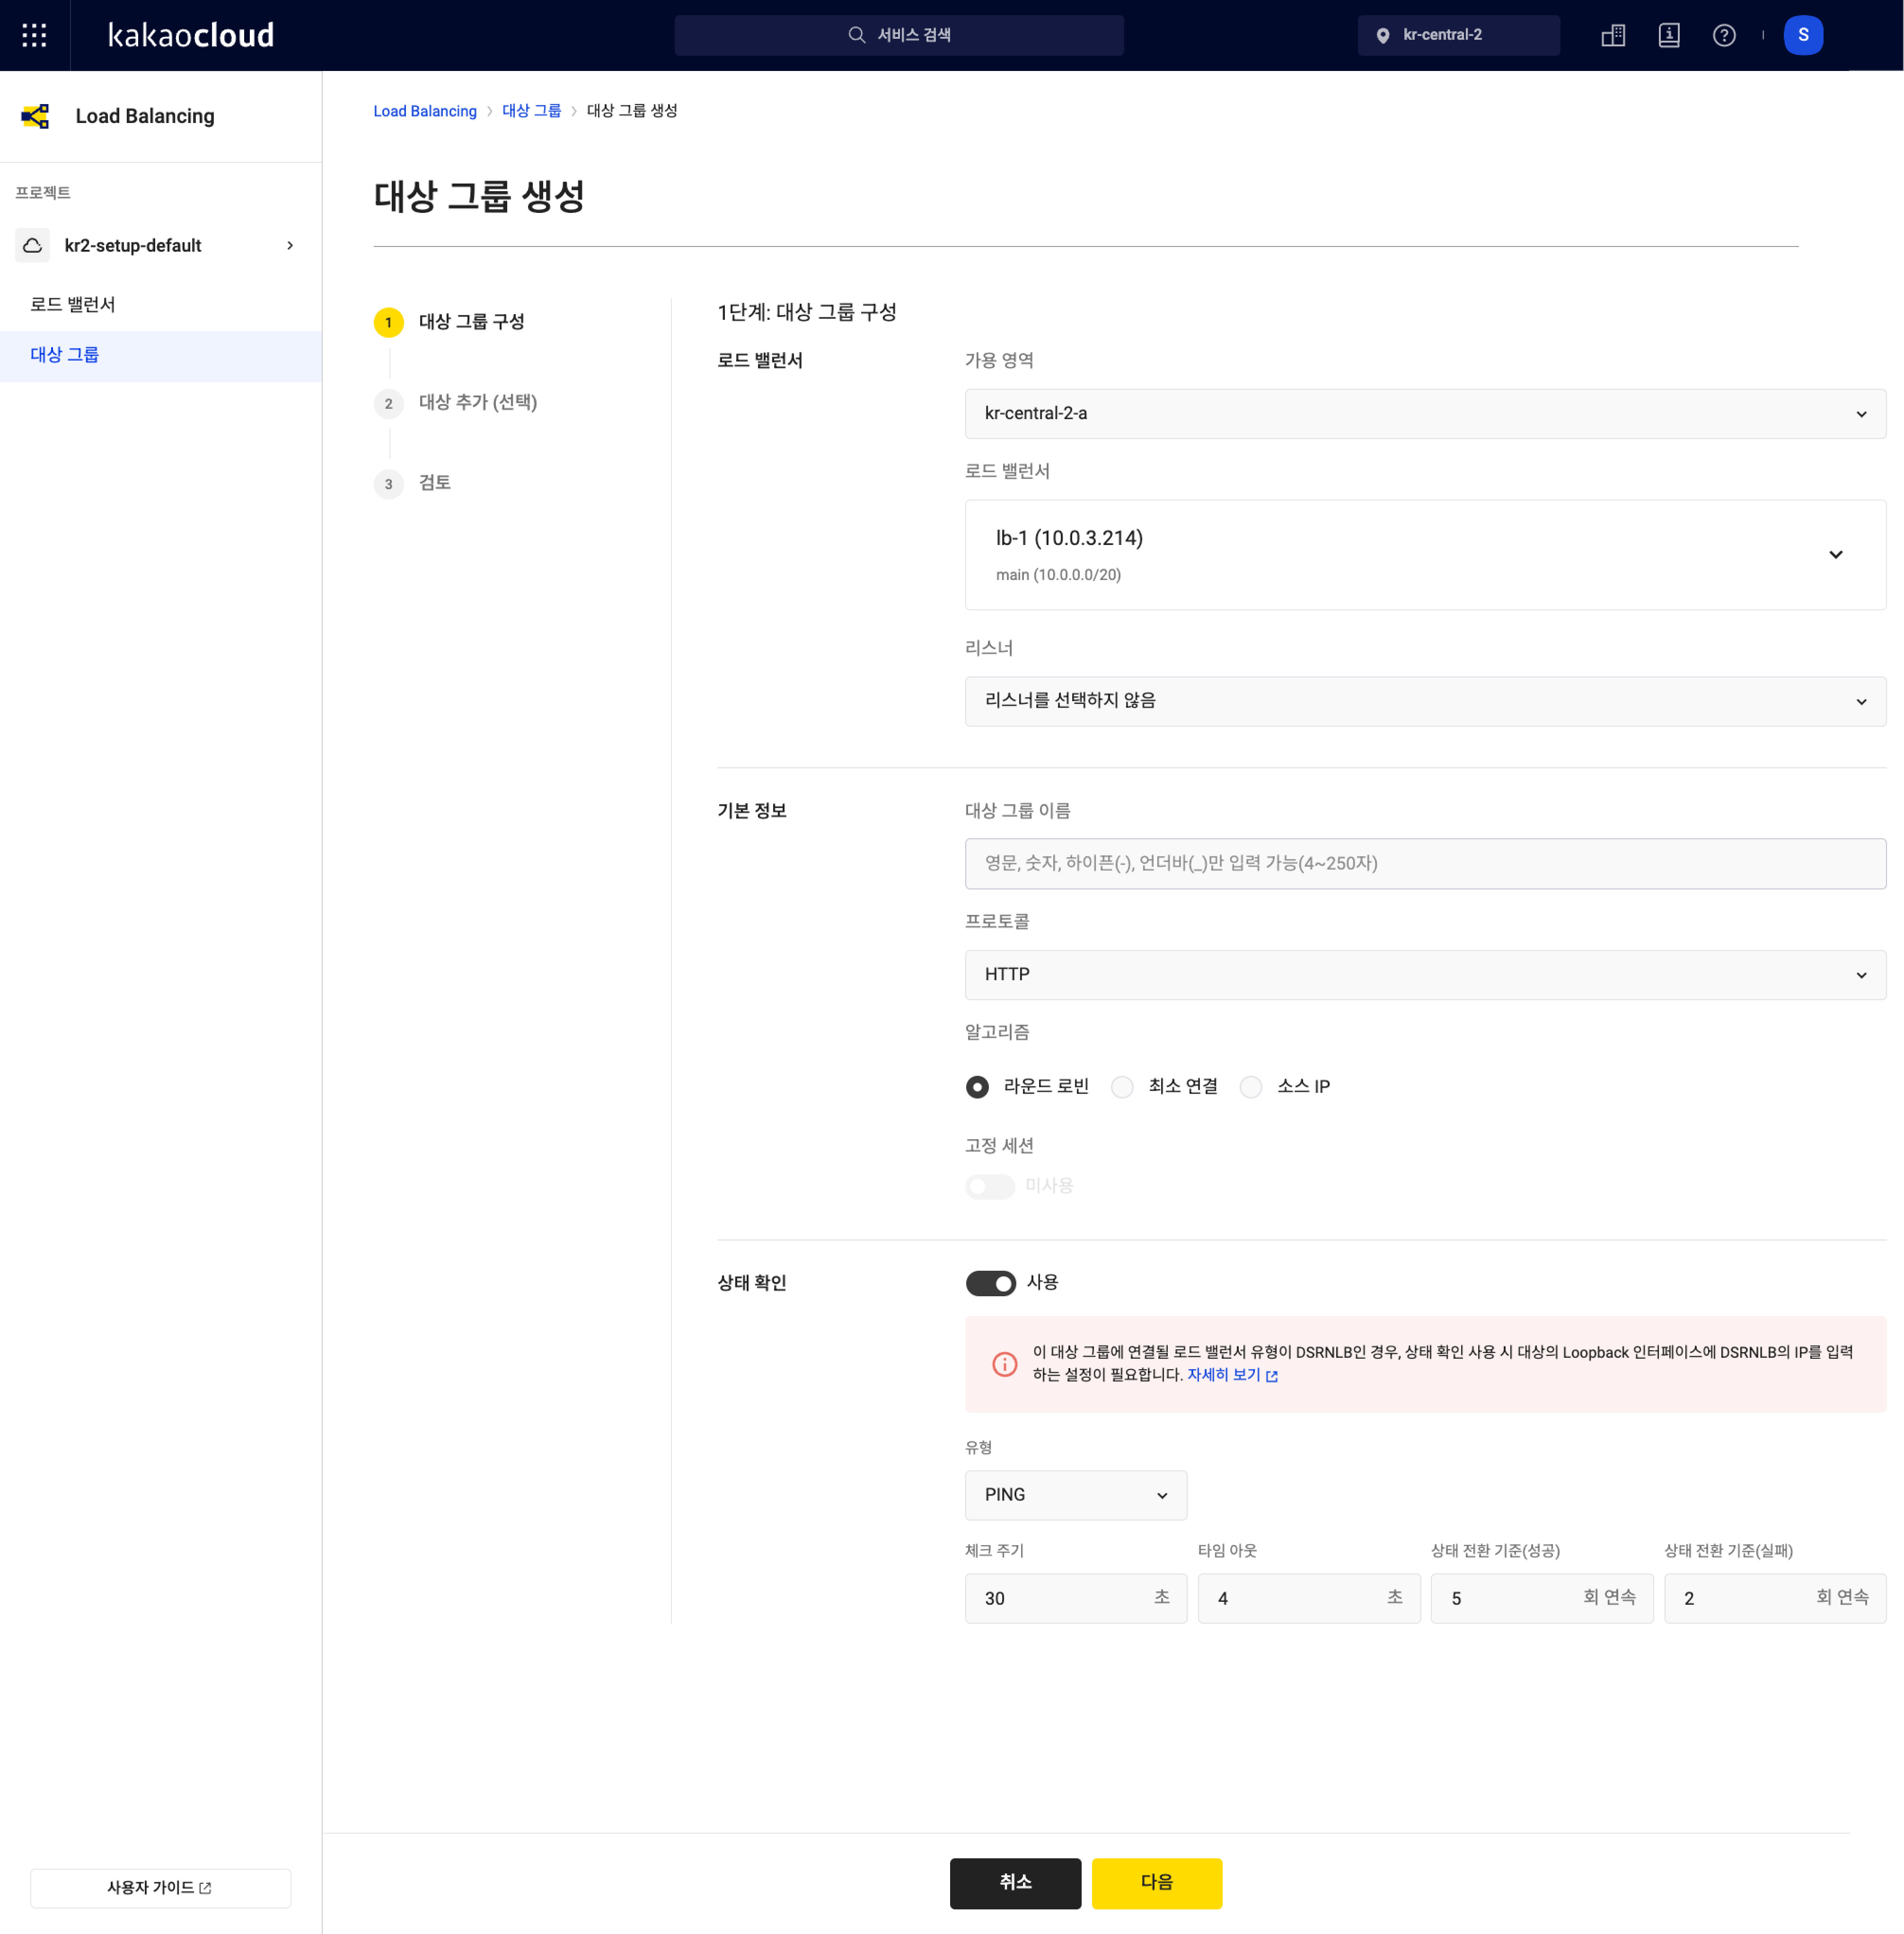 Step 1: Configure target group
Category Field Description Load balancer Availability zone Select from available zones Load balancer Lists all load balancers in the selected zone Listener Lists all listeners of the selected load balancer and an option for ‘Do not select listener’ Basic info Target group name Name of the target group Protocol Selectable based on the listener’s protocol:
- TCP listener:HTTP,TCP
- UDP listener:UDPAlgorithm Choose from Round Robin, Least Connections, Source IP:
-Round Robin: Distributes traffic sequentially
-Least Connections: Prioritizes targets with fewer connections
-Source IP: Always routes traffic from the same client IP to the same targetSticky session Enabled only for the following combinations:
-TCP x TCP,UDP x UDP
- Others: Fixed to 'Disabled'Sticky session type Available for:
-TCP x TCP: Source IP
-UDP x UDP: Source IPStickiness duration Enabled only when using HTTP or App cookies
- Integer between 1 and 604800Cookie name Required when using App cookies
- Must match the application's cookie name
- Allowed: A-Z, a-z, 0-9, and specific special characters
- Length: 1–255 charactersHealth check Health check Enable or disable Type Available types based on protocol:
- HTTP:HTTP,PING
- TCP:PING,TCP
- UDP:TCP,HTTPHTTP method Select when HTTPis used:CONNECT,DELETE,GET, etc.HTTP version Choose between 1.0 or 1.1 HTTP status codes Acceptable codes: single, comma-separated, or range Check path Enter as URL path Interval Integer from 1 to 3600 (default: 30 sec); must be greater than timeout Timeout Integer from 1 to 900 (default: 5 sec); must be less than interval Success threshold Integer from 1 to 10 (default: 5) Failure threshold Integer from 1 to 10 (default: 2) infoIf the algorithm is set to
Source IP, sticky session is implicitly maintained without requiring additional configuration. To maintain long-term stickiness, it is recommended to useSource IP. -
In Step 2: Add targets, select resources in the same availability zone and VPC as the selected load balancer.
-
Select the instance(s) to add and enter the port number.
-
Select Add target.
- Filter added targets by IP, port, instance name, instance ID, status.
cautionDSRNLB requires that the listener protocol and target port number match. A target group already connected to a listener cannot be reused in another listener. All targets in a group must use the same port number.
-
After adding the targets, select Next.
-
In Step 3: Review, confirm the settings and select Create.
After creating the target group, configure the security group rules.
Go to Target group > Target tab to check the health check IP addresses and add them to the inbound rules of the target’s security group.
Manage target group
You can modify or delete an existing target group, or add new targets from the target group detail screen.
View list of target groups
-
Go to the KakaoCloud console > Beyond Networking Service > Load Balancing > Target groups menu.
-
Review the list of target groups. Use filters to easily locate the desired target group if needed.
Item Description Target group name Name and ID assigned at creation Provisioning status Indicates whether the target group is active, being modified, or being deleted Operational status Indicates whether the target group is currently usable Protocol Protocol used to route traffic to targets Load balancer Name and ID of the associated load balancer VPC Name and ID of the VPC containing the load balancer [More] icon Allows renaming, listener connection, algorithm configuration, target management, traffic weight adjustment, health check configuration, sticky session setup, or deletion
View target group details
-
Go to the KakaoCloud console > Beyond Networking Service > Load Balancing > Target groups menu.
-
Select the target group to view its details.
-
In the detail screen, use the tabs to check information about details, targets, health checks, and properties.
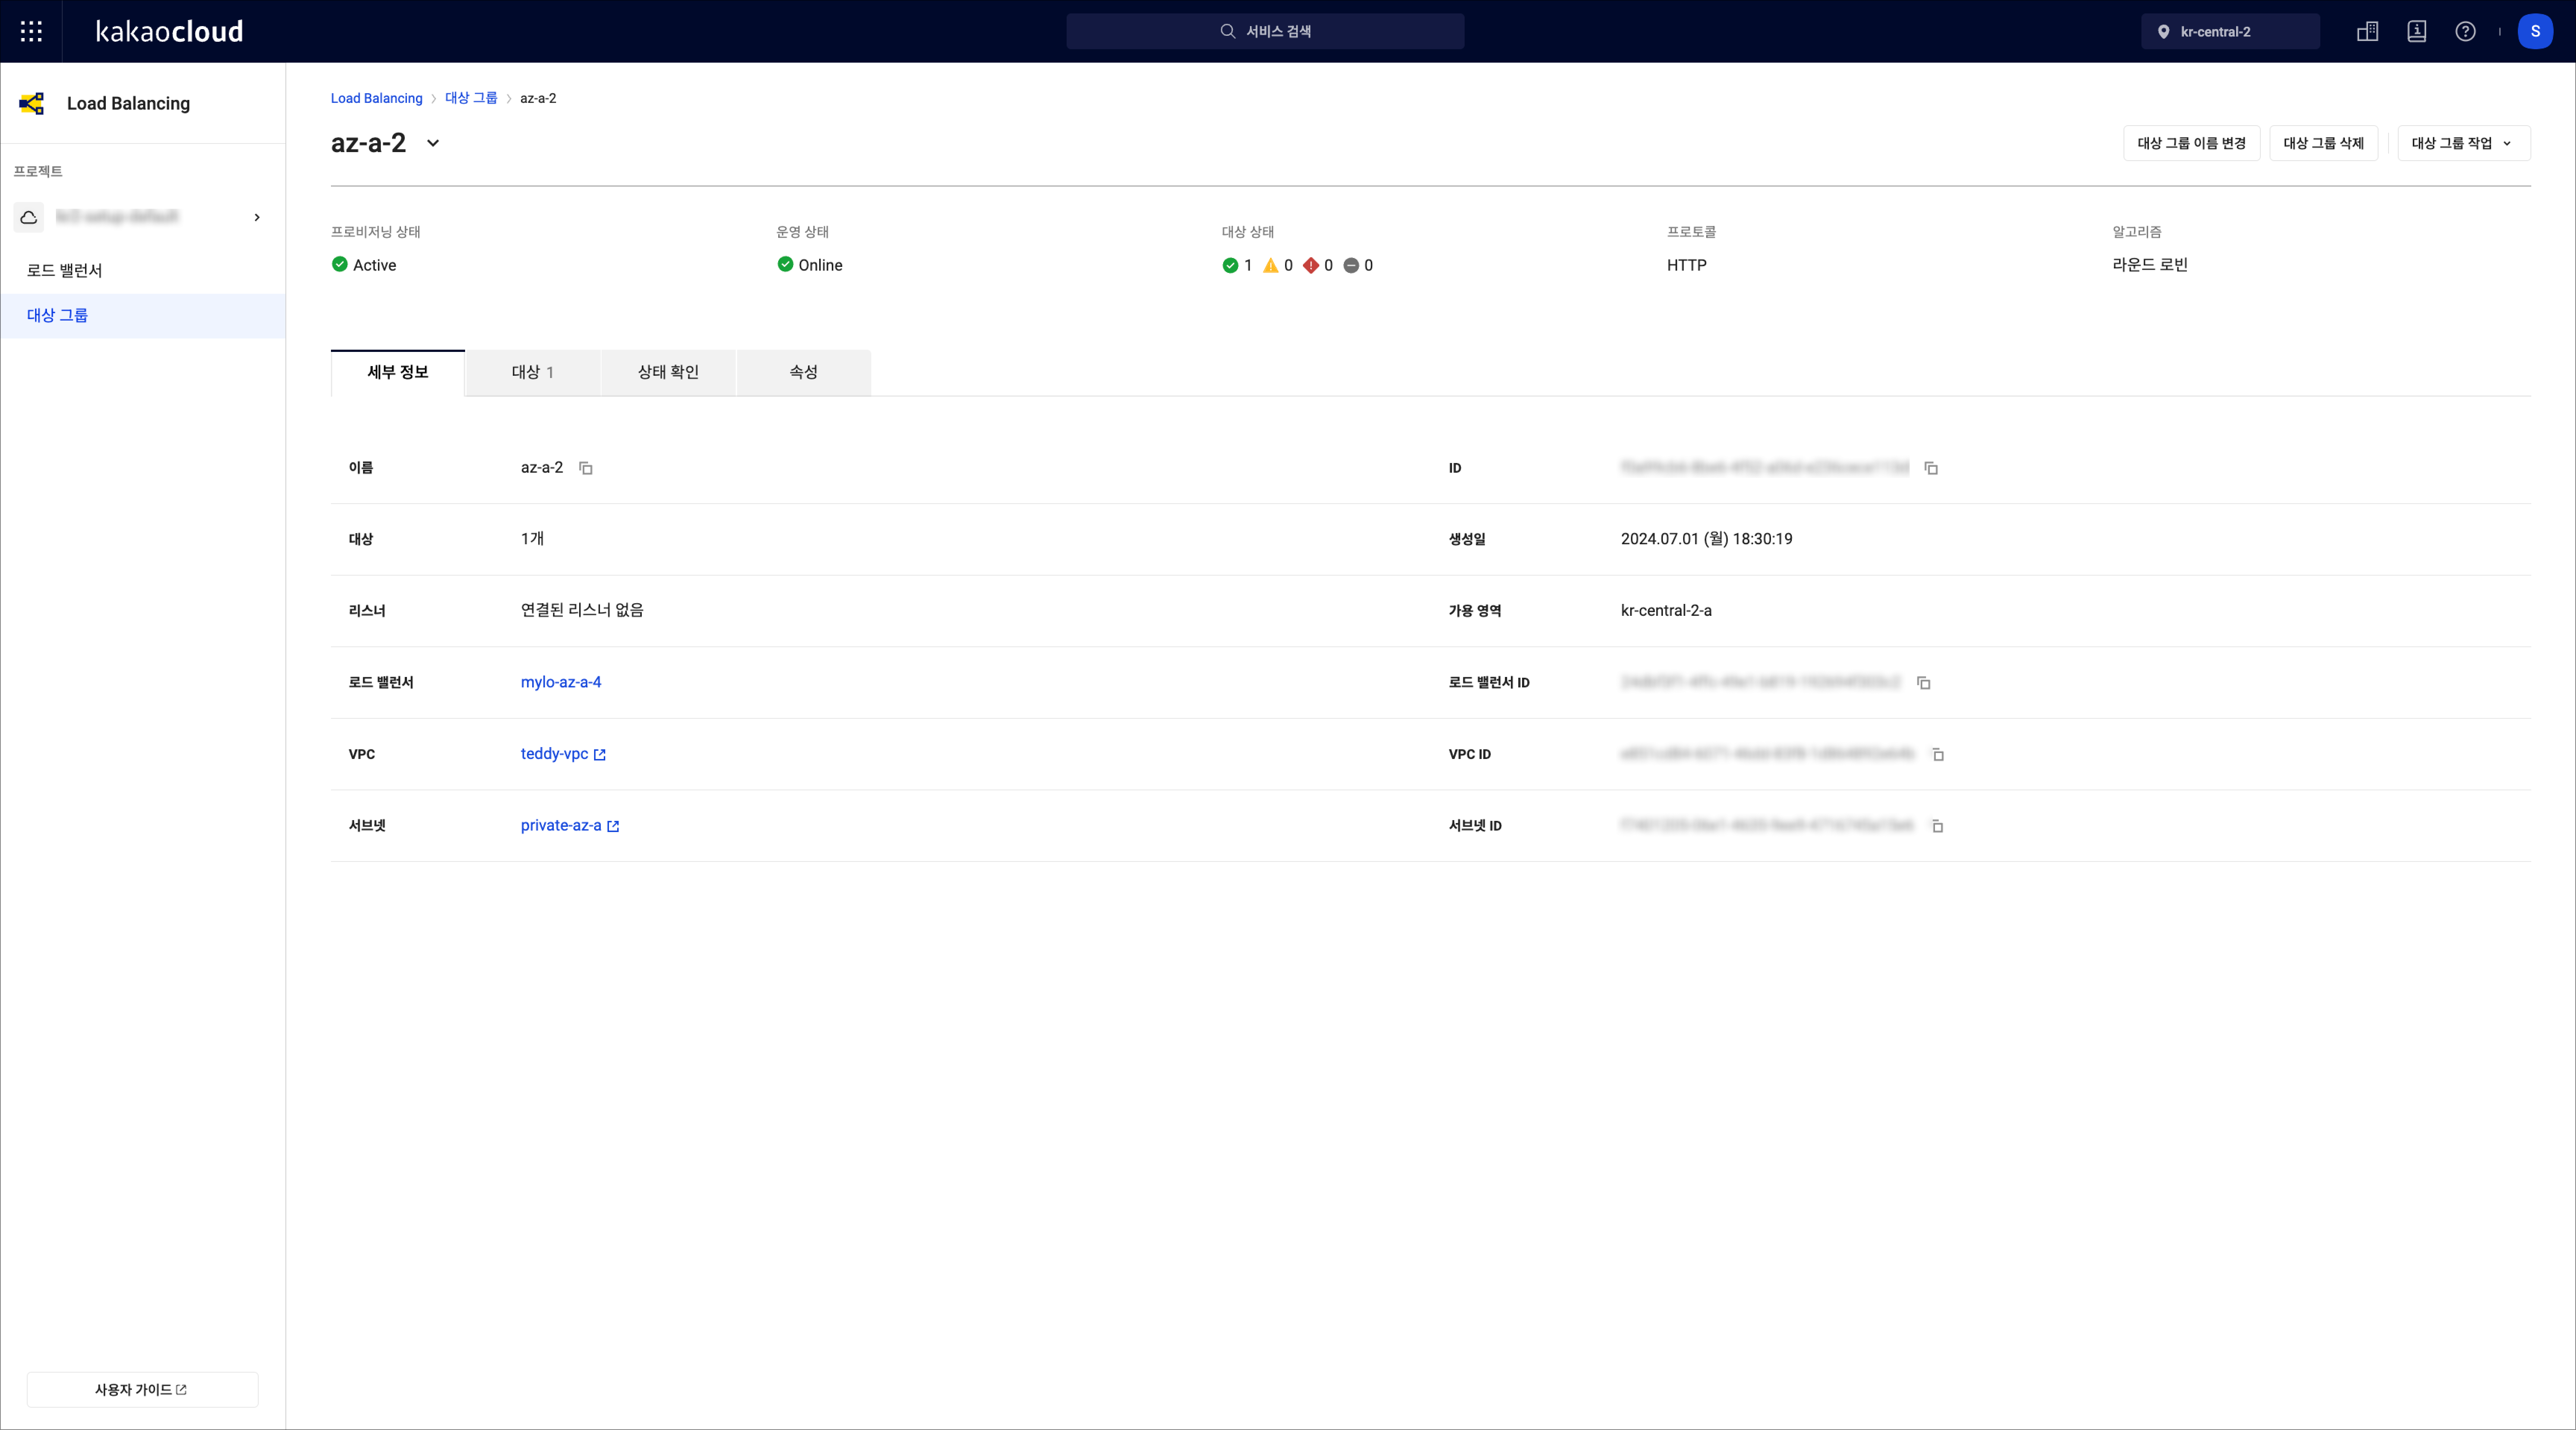 Target group details
Tab Description Details View general information about the target group Target View the list of registered targets and their details Health check View current health check configuration Properties View target group properties Monitoring Retrieve monitoring information such as the number of healthy or unhealthy instances within the target group
Rename target group
-
Go to the KakaoCloud console > Beyond Networking Service > Load Balancing > Target groups menu.
-
Select the [More] icon of the target group you want to rename.
-
From the menu, select Rename target group.
-
In the popup, modify the name and select the Change button.
Delete target group
-
Go to the KakaoCloud console > Beyond Networking Service > Load Balancing > Target groups menu.
-
Select the [More] icon of the target group you want to delete.
-
Select Delete target group from the menu.
-
In the popup, enter the confirmation phrase and select Delete.
Configure listener connection
-
Go to the KakaoCloud console > Beyond Networking Service > Load Balancing > Target groups menu.
-
Select the [More] icon for the target group to modify.
-
Select Configure listener connection from the menu.
-
In the popup, update the listener connection settings and select Apply.
- If not yet connected, you can select a listener from the list.
- To disconnect, choose the Do not connect listener option.
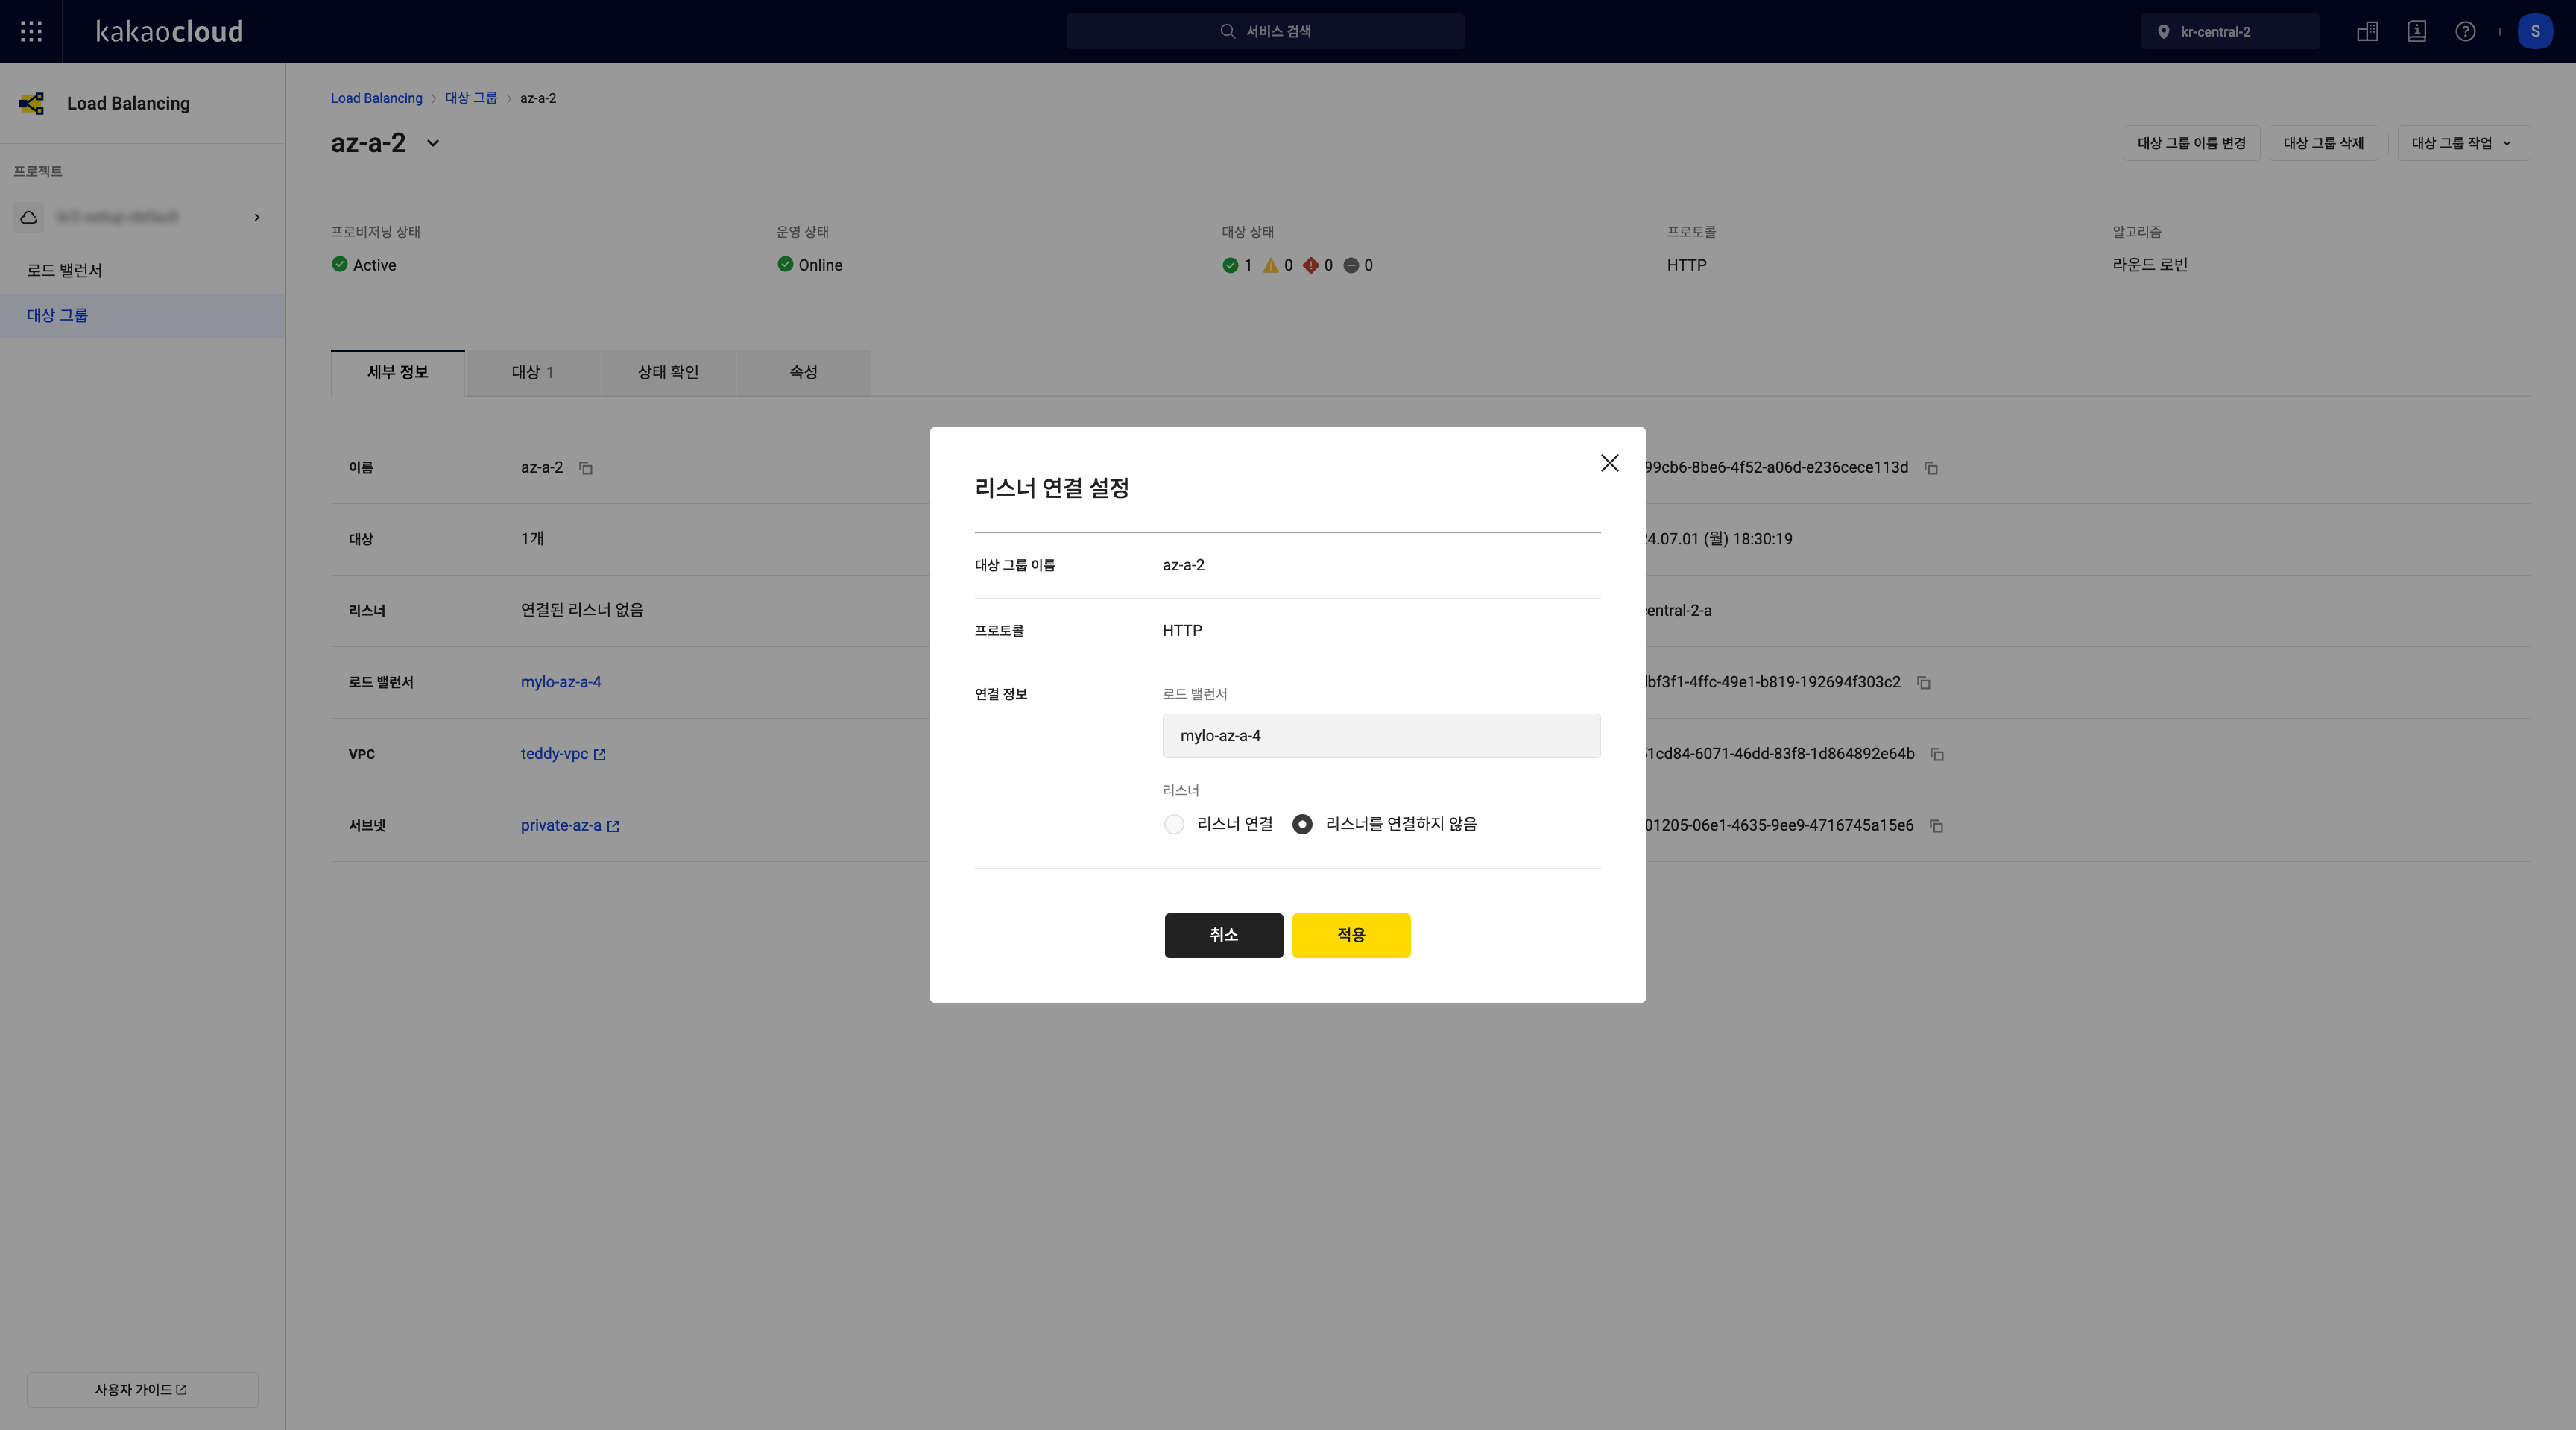 Configure listener connection
A DSRNLB target group can only be connected to a single listener created under the same DSRNLB.
Set algorithm
-
Go to the KakaoCloud console > Beyond Networking Service > Load Balancing > Target groups menu.
-
Select the [More] icon for the target group to modify.
-
Select Set algorithm from the menu.
-
In the popup, change the algorithm and select Apply.
Configure target
-
Go to the KakaoCloud console > Beyond Networking Service > Load Balancing > Target groups menu.
-
Select the target group to modify.
-
In the detail screen, go to the Target tab and select Configure target.
-
In the popup, review the registered targets, delete or add new ones, then select Apply.
- To revert changes, select the Revert button at the top of the added targets list.
caution- All targets within a group must use the same port number.
- When using DSRNLB, the load balancer and target instances must be in the same subnet.
Set traffic weight
-
Go to the KakaoCloud console > Beyond Networking Service > Load Balancing > Target groups menu.
-
Select the target group to modify.
-
In the detail screen, go to the Target tab and select Set traffic weight.
-
In the popup, adjust the weight and select Set.
- Traffic weights must be integers between
0and256. - Converted weight = (weight / 256) * 100 (rounded up)
- Ratio = converted weight / sum of converted weights
- Traffic weights must be integers between
Set health check
For DSRNLB, proper health checks require target instance configuration.
-
Go to the KakaoCloud console > Beyond Networking Service > Load Balancing > Target groups menu.
-
Select the target group to modify.
-
In the detail screen, go to the Health check tab and select Configure health check.
-
In the popup, enable or disable health checks or modify the settings.
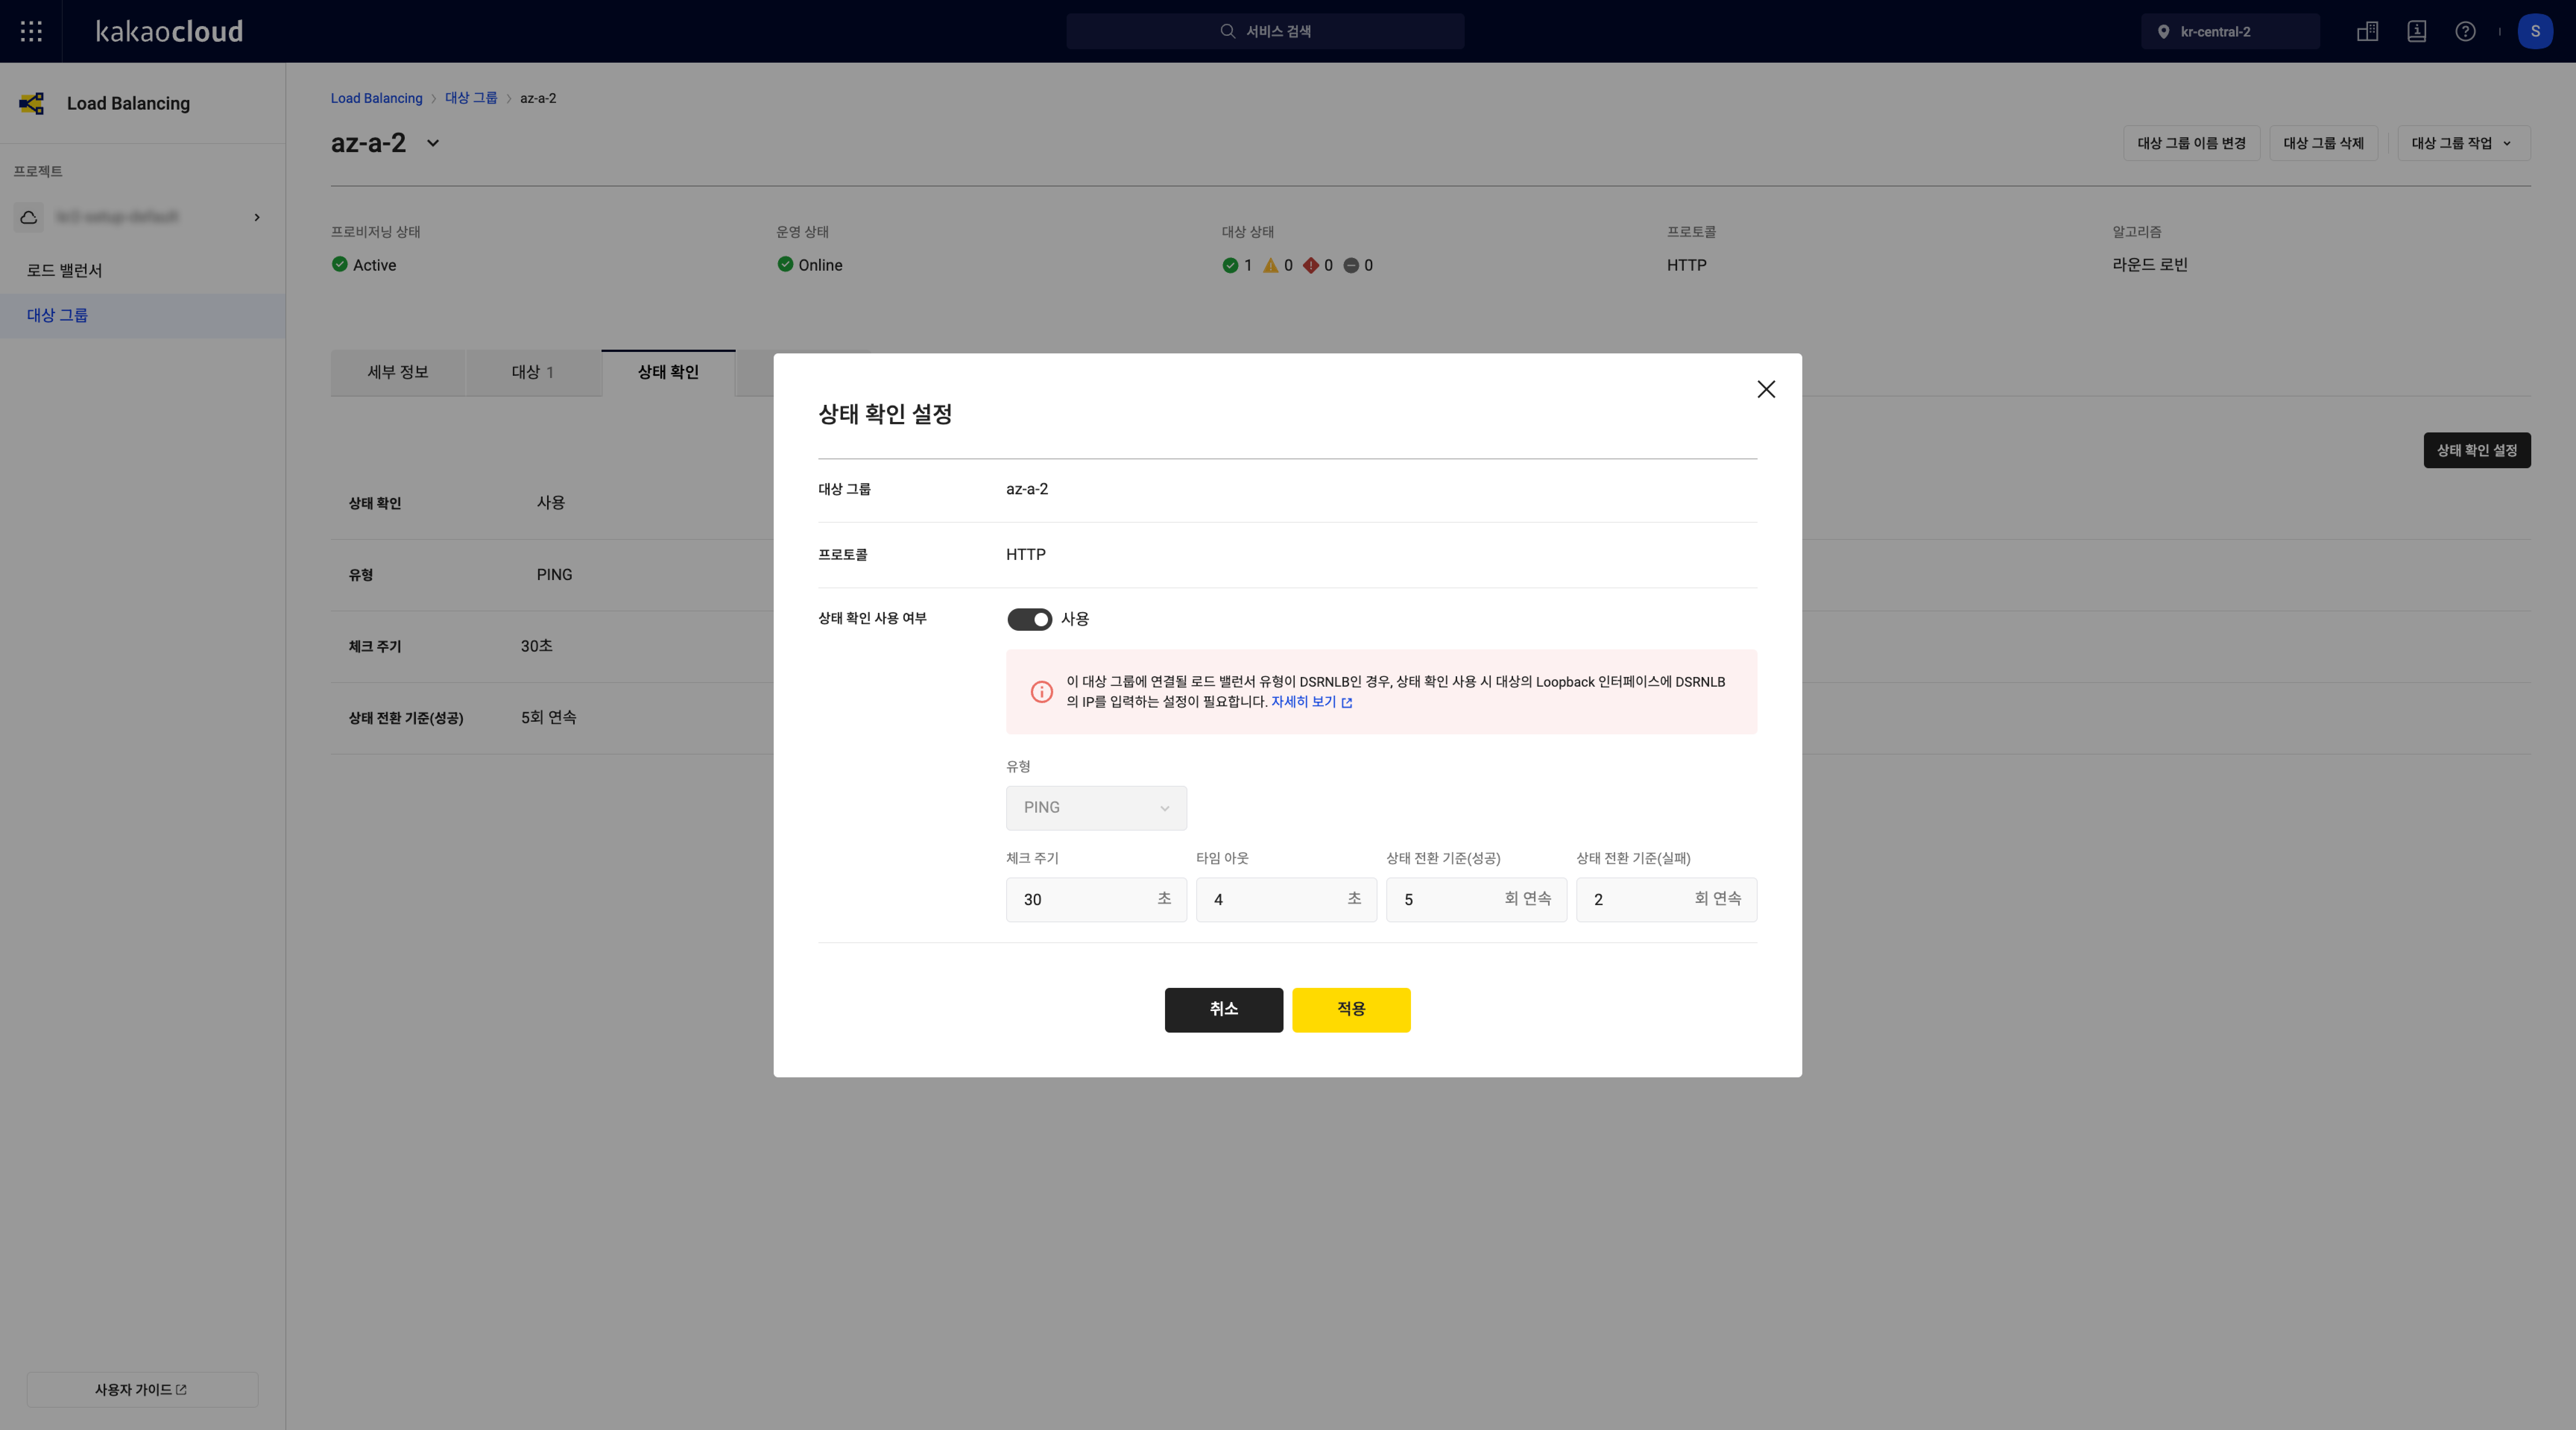 Configure health check
Field Description Target group Name of the current target group Protocol Type options vary by protocol:
- HTTP:HTTP,PING
- TCP:PING,TCP
- UDP:TCP,HTTPEnable health check Type:
-PING: Uses ICMP ping
-HTTP: Sends a request to a path and checks response
-HTTPS: Verifies response with certificate like HTTP
-TCP: Uses TCP port to check statusInterval: Health check frequency in seconds (1–3600) Timeout: Max wait time for a response (1–900), must be less than interval Success threshold: Number of consecutive successes to mark as healthy Failure threshold: Number of consecutive failures to mark as unhealthy -
If the type is
HTTPorHTTPS, additional settings are available:Field Description HTTP method Choose from GET,HEAD,OPTIONS,POST,PUT,TRACE,PATCH,DELETE,CONNECTHTTP version Select 1.0 or 1.1 HTTP status codes Expected response codes:
- Single:200,201
- Multiple:201,202,401,402
- Range:200-500Path URL path to use for health checks -
Select the Apply button.
If a target is using the latest CentOS with SELinux enabled, the shell_exec_t call may be blocked. In such cases, PING type health checks will not function.
Configure sticky session
Sticky session settings can be applied only to specific target groups depending on the listener and target group protocol combinations.
Sticky session options by listener and target group protocol
| Target group\Listener | HTTP | HTTPS | TCP | UDP |
|---|---|---|---|---|
| HTTP | HTTP cookie, App cookie | X | X | X |
| HTTPS | X | X | X | X |
| TCP | X | X | Source IP | X |
| UDP | X | X | X | Source IP |
| PROXY | X | X | X | X |
-
Go to the KakaoCloud console > Beyond Networking Service > Load Balancing > Target groups menu.
-
Select the target group for which you want to modify the sticky session configuration.
-
In the detail screen, select the Properties tab and then select the Configure sticky session button.
-
In the Configure sticky session popup window, enable or disable the sticky session option and modify any settings as necessary. Select the Apply button to save the changes.
Configure target instance
To use DSRNLB properly, additional configuration is required on the target instance based on the operating system. After creating the instance that will be designated as a target, perform the following tasks. Failure to do so will result in improper health check behavior.
Modify allowed address pairs
-
Go to the KakaoCloud console > Virtual Machine > Instance menu.
-
Select the More icon of the instance to be set as a target.
-
In the More menu, select Modify allowed address pairs.
-
In the Modify allowed address pairs popup, select the network interface of the target instance that is in the same VPC and availability zone as the DSRNLB. Then, enter the private IP address of the DSRNLB as the allowed IP for packet transmission. Select the [Apply] button.
- To use DSRNLB, the target instance’s security group must allow inbound traffic from the DSRNLB's private IP and listener port.
Configure network on target instance
To use DSRNLB, additional configuration is required depending on the operating system of the target instance. This includes Address Resolution Protocol (ARP) settings and loopback address configuration.
- Linux-based OS
- Windows-based OS
-
Connect to the target instance via SSH.
-
Run the following commands. Replace
<private_ip_of_dsrnlb>with the private IP address of the DSRNLB that is associated with the target group (e.g., 10.0.3.49).cautionThe following commands must be executed with root privileges. Use
sudo -ito switch to root before proceeding.Network configurationsysctl -w net.ipv4.conf.all.arp_ignore=1
sysctl -w net.ipv4.conf.all.arp_announce=2
ip a add <private_ip_of_dsrnlb>/32 dev lo
ip link set dev lo upPersist settings after rebootThese settings must be reapplied after each instance reboot. To make them persistent, refer to Set up crontab to automatically run scripts at boot.
-
If the target instance is based on an Ubuntu image, DNS resolver settings must be configured for proper DNS resolution.
infoFor instances in VPCs created before February 21, 2024, add the address
VPC network IPv4 CIDR + 2to the/etc/resolv.conffile. For VPCs created after this date, add169.254.169.253.Edit /etc/resolv.confnameserver 169.254.169.253 # Add 169.254.169.253 or "VPC network IPv4 CIDR + 2"
nameserver 127.0.0.53
options edns0 trust-ad
search kr-central-2.c.kakaoi.ioNote: Persist DNS resolver settings after reboot
-
Modify the
systemd-resolvedservice configuration:sudo vi /etc/systemd/resolved.conf/etc/systemd/resolved.conf[Resolve]
DNS=169.254.169.253 # For instances in VPCs created before Feb 21, 2024, use "VPC network IPv4 CIDR + 2" -
Restart the
systemd-resolvedservice:sudo systemctl restart systemd-resolved -
Link
/etc/resolv.conftosystemd-resolved:sudo ln -sf /run/systemd/resolve/resolv.conf /etc/resolv.conf
-
Set up crontab to automatically run scripts at boot
On Linux operating systems, the configurations applied earlier may be reset when the instance is rebooted, requiring reconfiguration. To retain the settings after reboot, you can save the previous configuration steps into a script file and configure the crontab command to execute the script automatically upon reboot.
-
Open the crontab file using the following command:
Open crontab filecrontab -e -
Add an
@rebootexpression to the file to specify the script to be executed automatically on reboot:Add script for automatic execution on reboot@reboot sh /<file_directory>/<file_name>Parameter Description <file_directory>Directory where the script file is located <file_name>Name of the shell script to execute at boot
- Example:@reboot sh /home/setup_dsr.sh -
Write the shell script to be executed. The following example script executes the network configuration steps described in Configure network on target instance and the steps in Bind process running on target instance to DSRNLB's private IP.
setup_dsr.sh#!/bin/sh
sysctl -w net.ipv4.conf.all.arp_ignore=1
sysctl -w net.ipv4.conf.all.arp_announce=2
# Private IP address of the DSRNLB associated with the target group
ip a add 172.30.4.237/32 dev lo
ip link set dev lo up
# If using a UDP listener, bind the process on the target instance to the DSRNLB's private IP (start UDP server)
python3 /home/sample_python_udp_server.py -
Grant execute permission to the shell script and Python script. Specify the full file paths or navigate to the directory containing the files before executing:
Grant execute permissionchmod +x setup_dsr.sh
chmod +x sample_python_udp_server.py -
After rebooting the instance, verify that the settings have been retained:
Verify each configuration item# Check ARP settings
sysctl -a | grep net.ipv4.conf.all.arp_ignore
sysctl -a | grep net.ipv4.conf.all.arp_announce
# Check loopback IP address
ip a
# Confirm the UDP server is running correctly (check the port number defined in the Python script)
netstat -tuln | grep 12345
Step 1. Installation of Microsoft KM-TEST loopback adapter
-
From the bottom-left Search bar on the Windows desktop, search for and select Run.
-
In the Run dialog, enter
hdwwizand select [OK]. -
The Add Hardware Wizard will appear. Select [Next].
-
Select Install the hardware that I manually select from a list (Advanced).
-
Select Network adapters, then select [Next].
-
Under Manufacturer, select
Microsoft, and under Model, selectMicrosoft KM-TEST Loopback Adapter. Select [Next]. -
Select [Next] again to begin installation.
-
Once the installation is complete, select [Finish].
Step 2. Set up IP into adaptor
-
From the bottom-left Search bar on the Windows desktop, search for and select Network status.
-
In the Network status window, select Change adapter options.
-
In the Network connections window, identify the Ethernet interface marked as Unidentified network. Right-select it and select [Properties].
-
In the Ethernet Properties window, select Internet Protocol Version 4 (TCP/IPv4), then select [Properties].
-
In the Internet Protocol Version 4 (TCP/IPv4) Properties window, under the General tab, select Use the following IP address: and enter the following:
- IP address: The private IP address of the DSRNLB
- Subnet mask: 255.255.255.255
Step 3. Configuration of Weak Host Model and ARP request ignorance
-
From the bottom-left Search bar on the Windows desktop, search for and select Command Prompt.
-
Run the following command to configure the system to ignore ARP requests.
<loopback_adapter_name>refers to the name of the adapter added in Step 1. Installation of Microsoft KM-TEST loopback adapter (e.g., Ethernet):Ignore ARP requestsnetsh interface ipv4 set interface <loopback_adapter_name> metric=254 -
Run the following commands to enable the Weak Host Model.
<default_network_adapter_name>refers to the default network adapter, not the newly added one (e.g., tap6d769000e-0a):Configure Weak Host Modelnetsh interface ipv4 set interface <default_network_adapter_name> weakhostreceive=enabled
netsh interface ipv4 set interface <loopback_adapter_name> weakhostreceive=enabled
netsh interface ipv4 set interface <loopback_adapter_name> weakhostsend=enabled
Additional configuration for target instance when using UDP listener
When using the UDP listener of DSRNLB, only Linux-based operating systems are supported. Additionally, one of the following three configurations must be applied to use the service. Even if the configuration is completed correctly, due to the nature of UDP communication, packet loss may occur and it may intermittently fail to function properly.
- Bind process running on target instance to DSRNLB's private IP
- Use iptables provided by the Linux kernel for stateful NAT configuration
- Use nftables provided by the Linux kernel for stateless NAT configuration
Bind process running on target instance to DSRNLB's private IP
-
On the target instance, create a script with the following sample code. This example is written in Python, but you may use any programming language suitable for your environment.
sample_python_udp_server.pyimport socket
localIP = "172.30.4.237" # Private IP address of the DSRNLB
localPort = 12345 # Port number used by this UDP server
bufferSize = 1024
msgFromServer = "Hello UDP Client, this is Simple UDP Server."
bytesToSend = str.encode(msgFromServer)
# Create a datagram socket
UDPServerSocket = socket.socket(family=socket.AF_INET, type=socket.SOCK_DGRAM)
# Bind to address and IP
UDPServerSocket.bind((localIP, localPort))
print("UDP server up and listening")
# Listen for incoming datagrams
while(True):
bytesAddressPair = UDPServerSocket.recvfrom(bufferSize)
message = bytesAddressPair[0]
address = bytesAddressPair[1]
clientMsg = "Message from Client:{}".format(message)
clientIP = "Client IP Address:{}".format(address)
print(clientMsg)
print(clientIP)
# Sending a reply to client
UDPServerSocket.sendto(bytesToSend, address) -
Run the script on the target instance.
Use iptables provided by the Linux kernel for stateful NAT configuration
Using NAT consumes additional CPU resources, and because DNAT is stateful, it may also increase memory usage.
-
On the target instance, create a script using the same example above, but modify the
localIPvalue to0.0.0.0.sample_python_udp_server.pyimport socket
localIP = "0.0.0.0"
localPort = 12345
bufferSize = 1024
msgFromServer = "Hello UDP Client, this is Simple UDP Server."
bytesToSend = str.encode(msgFromServer)
UDPServerSocket = socket.socket(family=socket.AF_INET, type=socket.SOCK_DGRAM)
UDPServerSocket.bind((localIP, localPort))
print("UDP server up and listening")
while(True):
bytesAddressPair = UDPServerSocket.recvfrom(bufferSize)
message = bytesAddressPair[0]
address = bytesAddressPair[1]
clientMsg = "Message from Client:{}".format(message)
clientIP = "Client IP Address:{}".format(address)
print(clientMsg)
print(clientIP)
UDPServerSocket.sendto(bytesToSend, address) -
Run the script on the target instance.
-
Add the following iptables DNAT rules:
Add DNAT rulesiptables -p udp -t nat -A POSTROUTING -j RETURN -d <private_ip_of_target> --dport <udp_server_port>
iptables -p udp -t nat -A PREROUTING -j DNAT --dport <udp_server_port> --to-destination <private_ip_of_target> -d <private_ip_of_dsrnlb>Parameter Description <private_ip_of_target>Private IP address of the target instance <udp_server_port>Port number specified in the example script ( localPort)<private_ip_of_dsrnlb>Private IP address of the DSRNLB associated with the target group
Use nftables provided by the Linux kernel for stateless NAT configuration
To use nftables, the Linux kernel version must be 4.10 or higher.
-
On the target instance, follow step 1 from Use iptables provided by the Linux kernel for stateful NAT configuration.
-
Run the example script on the target instance.
-
Run the following commands:
Modify source address in IP header for outgoing packetsnft add table raw
nft add chain raw postrouting {type filter hook postrouting priority 300 \; }
nft add rule raw postrouting ip saddr <private_ip_of_target> udp sport <udp_server_port> ip saddr set <private_ip_of_dsrnlb>Parameter Description <private_ip_of_target>Private IP address of the target instance <udp_server_port>Port number specified in the example script ( localPort)<private_ip_of_dsrnlb>Private IP address of the DSRNLB associated with the target group
Manage target
You can view, modify, and delete targets added to a target group.
Two health check IPs are created for each subnet that contains a target. To ensure proper health checks, communication must be allowed from these IPs.
Refer to View health check IP and Allow communication with health check IP to add the appropriate inbound rules to the security group.
View health check IP
-
Go to the KakaoCloud console > Beyond Networking Service > Load Balancing > Target group menu.
-
Select the target group for which you want to view the health check IPs.
-
In the detailed view, select the Target tab.
-
Select Health check IP by subnet at the top of the tab to view the list of health check IPs.
Allow communication with health check IP
There are two methods to configure security groups for allowing communication with health check IPs.
Choose one of the following methods based on your convenience.
Option 1: Add inbound rules to the target instance's existing security group
-
Go to the KakaoCloud console > Beyond Networking Service > Load Balancing > Target group menu.
-
Select the target group for which to allow communication with health check IPs.
-
In the detailed view, select the Target tab.
-
Select Health check IP by subnet at the top of the tab to view the list of health check IPs. Keep the view open or copy the IPs.
-
In the Target list section below, find the instance you want to allow communication with, and select its associated security group name.
- If multiple security groups are attached, choose one arbitrarily to register the rule.
- If the rule already exists in any one of the connected security groups, communication is already permitted.
-
In the Security group detail view, go to the Inbound rules tab and select the [Manage inbound rules] button.
-
In the Manage security group rules popup, select [Add] at the bottom of the inbound rules section to create a new rule.
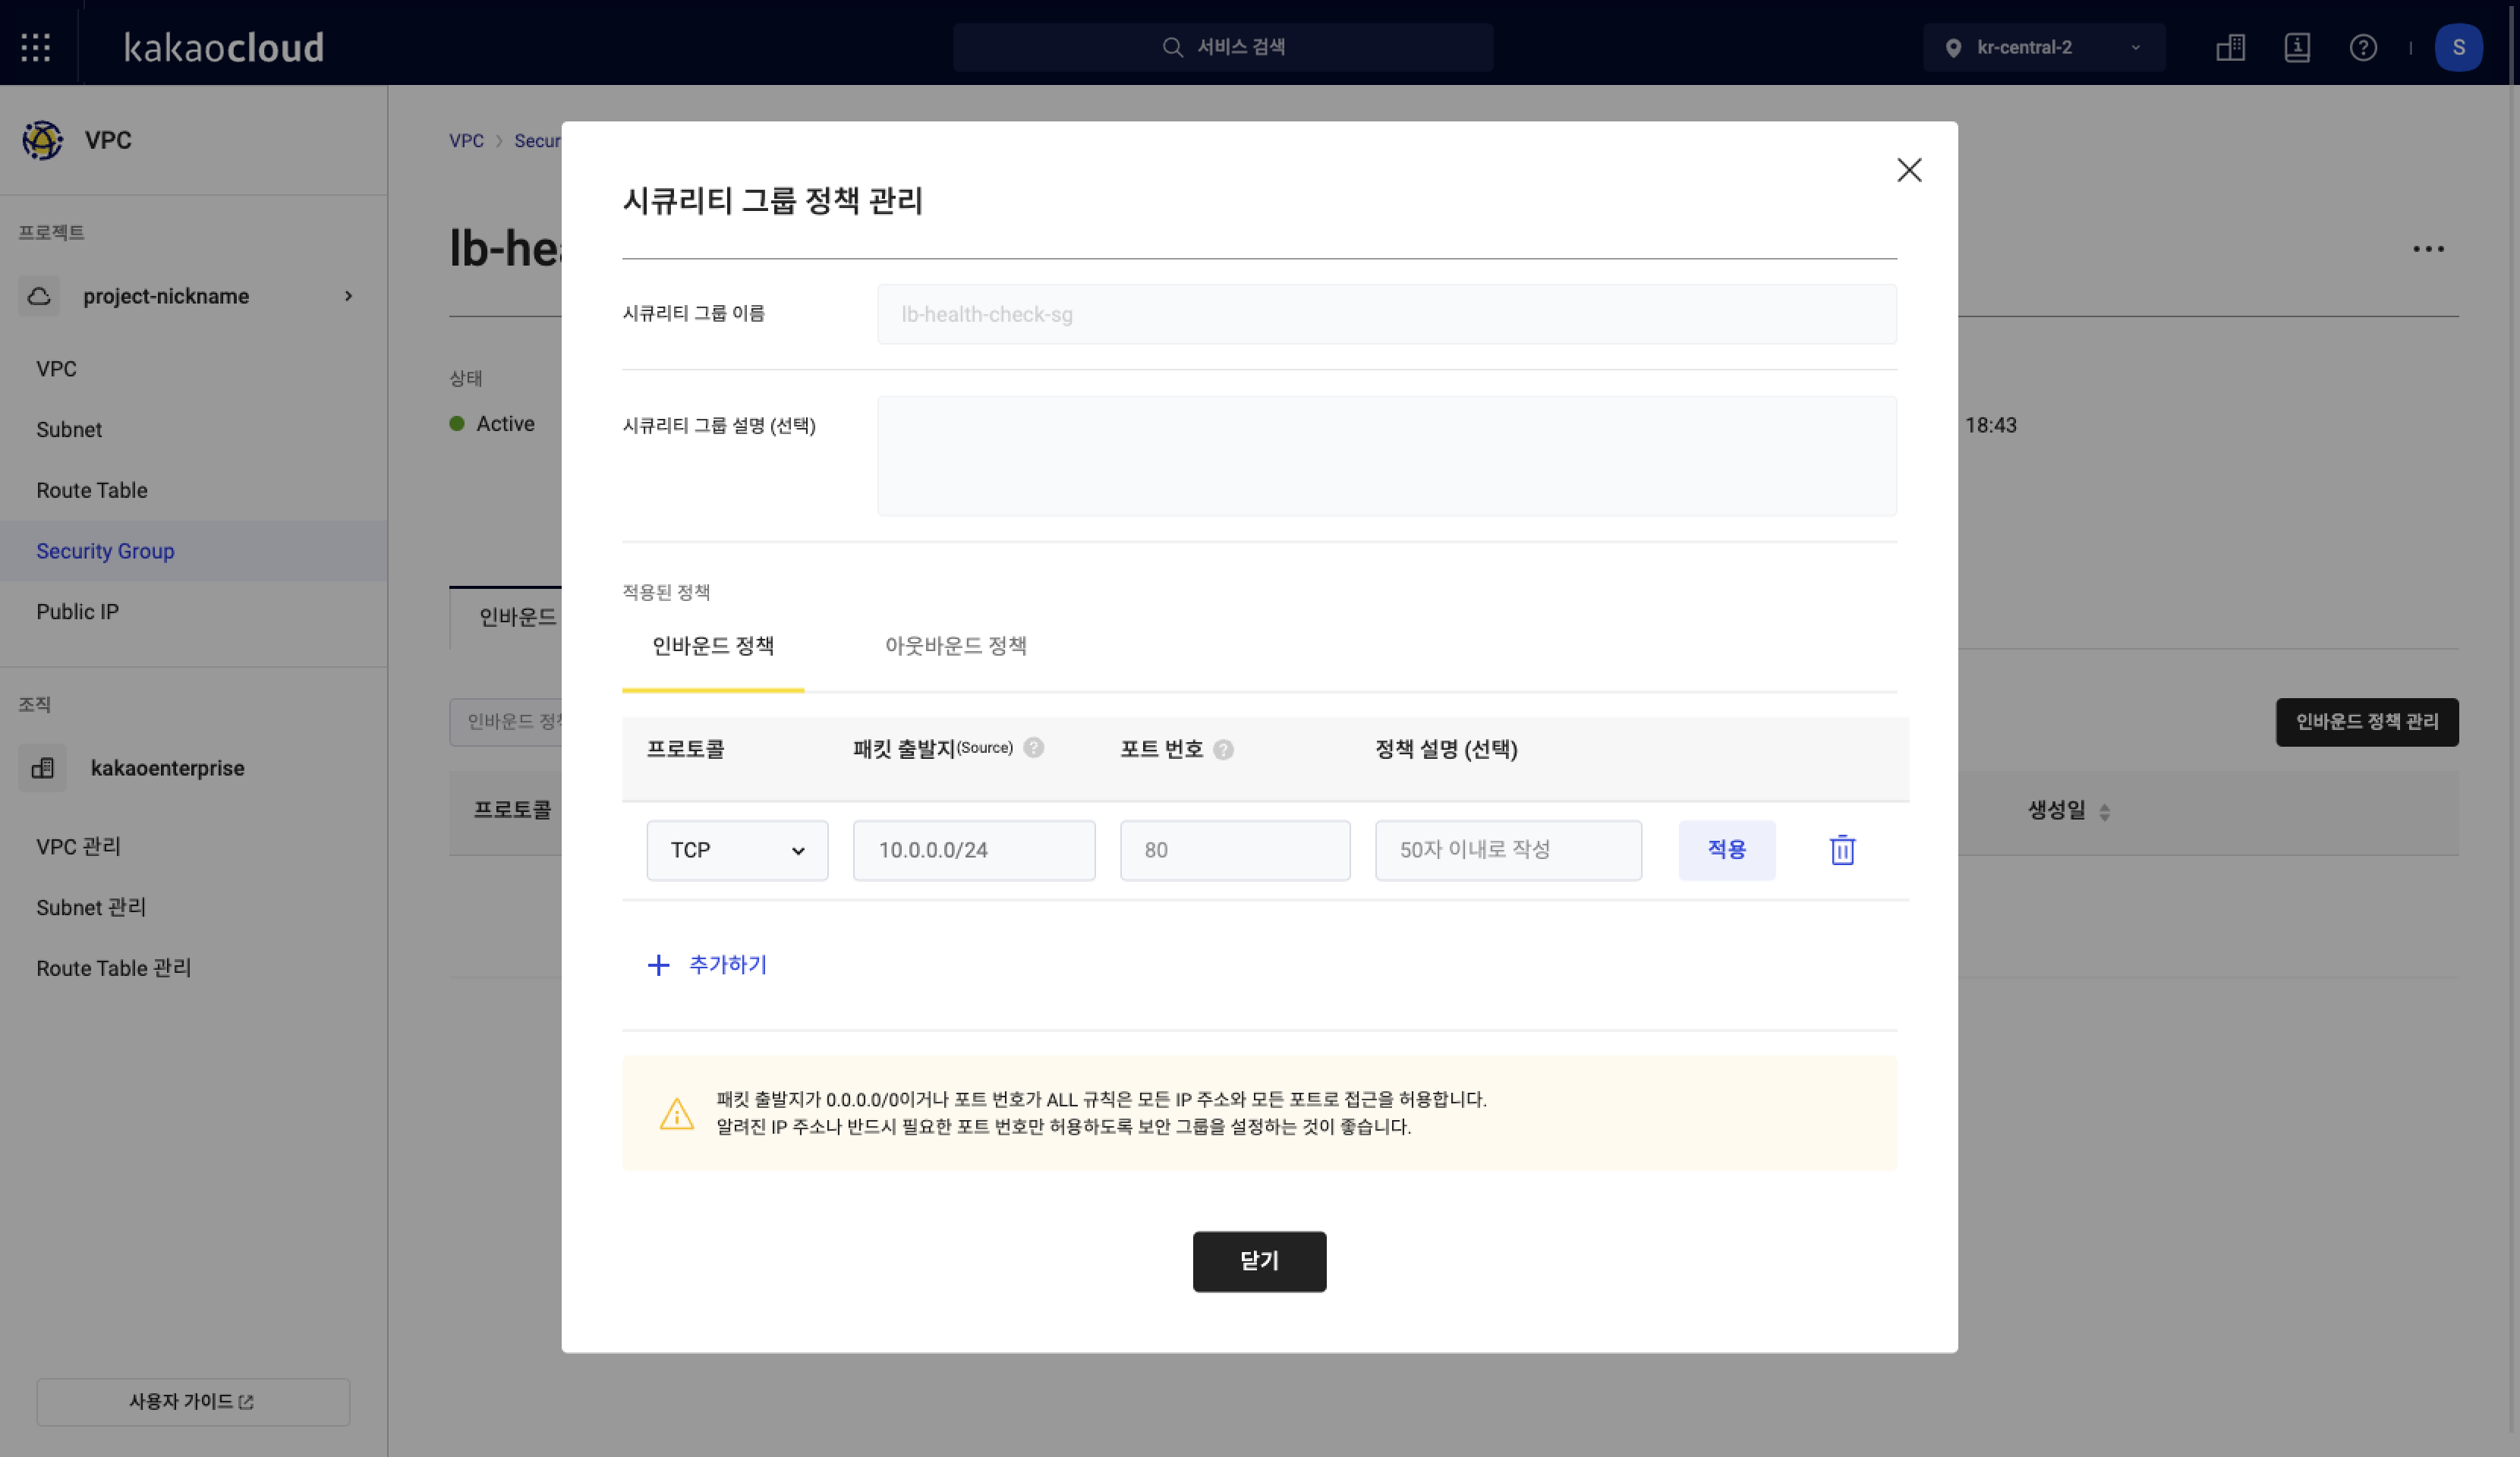 Manage security group rules
 -
Based on the information from Step 5 in the Target group > Target tab, fill in the rule details and select the [Apply] button on the right.
Field Description Protocol Select the protocol used for communication (TCP, UDP, ICMP, ALL) based on the target group’s health check type
- If PING:ICMP
- If HTTP, HTTPS, TCP:TCPPacket source (Source) Source IPs to be allowed
- Enter the health check IPs identified earlier
- Register both health check IPs per subnetPort Port used for communication
- Enter the monitor port of the targetRule description (optional) Description for the rule -
Select the [Close] button at the bottom of the popup to complete rule registration.
Option 2: Create a new security group for health checks and attach it to the target instance
-
Go to the KakaoCloud console > Beyond Networking Service > Load Balancing > Target group menu.
-
Select the target group for which to allow communication with health check IPs.
-
In the detailed view, select the Target tab.
-
Select Health check IP by subnet at the top of the tab to view the list of health check IPs.
Keep the view open or copy the list. -
Refer to Create security group to open the security group creation page.
-
In the Create security group popup, enter a name and description, then add inbound rules.
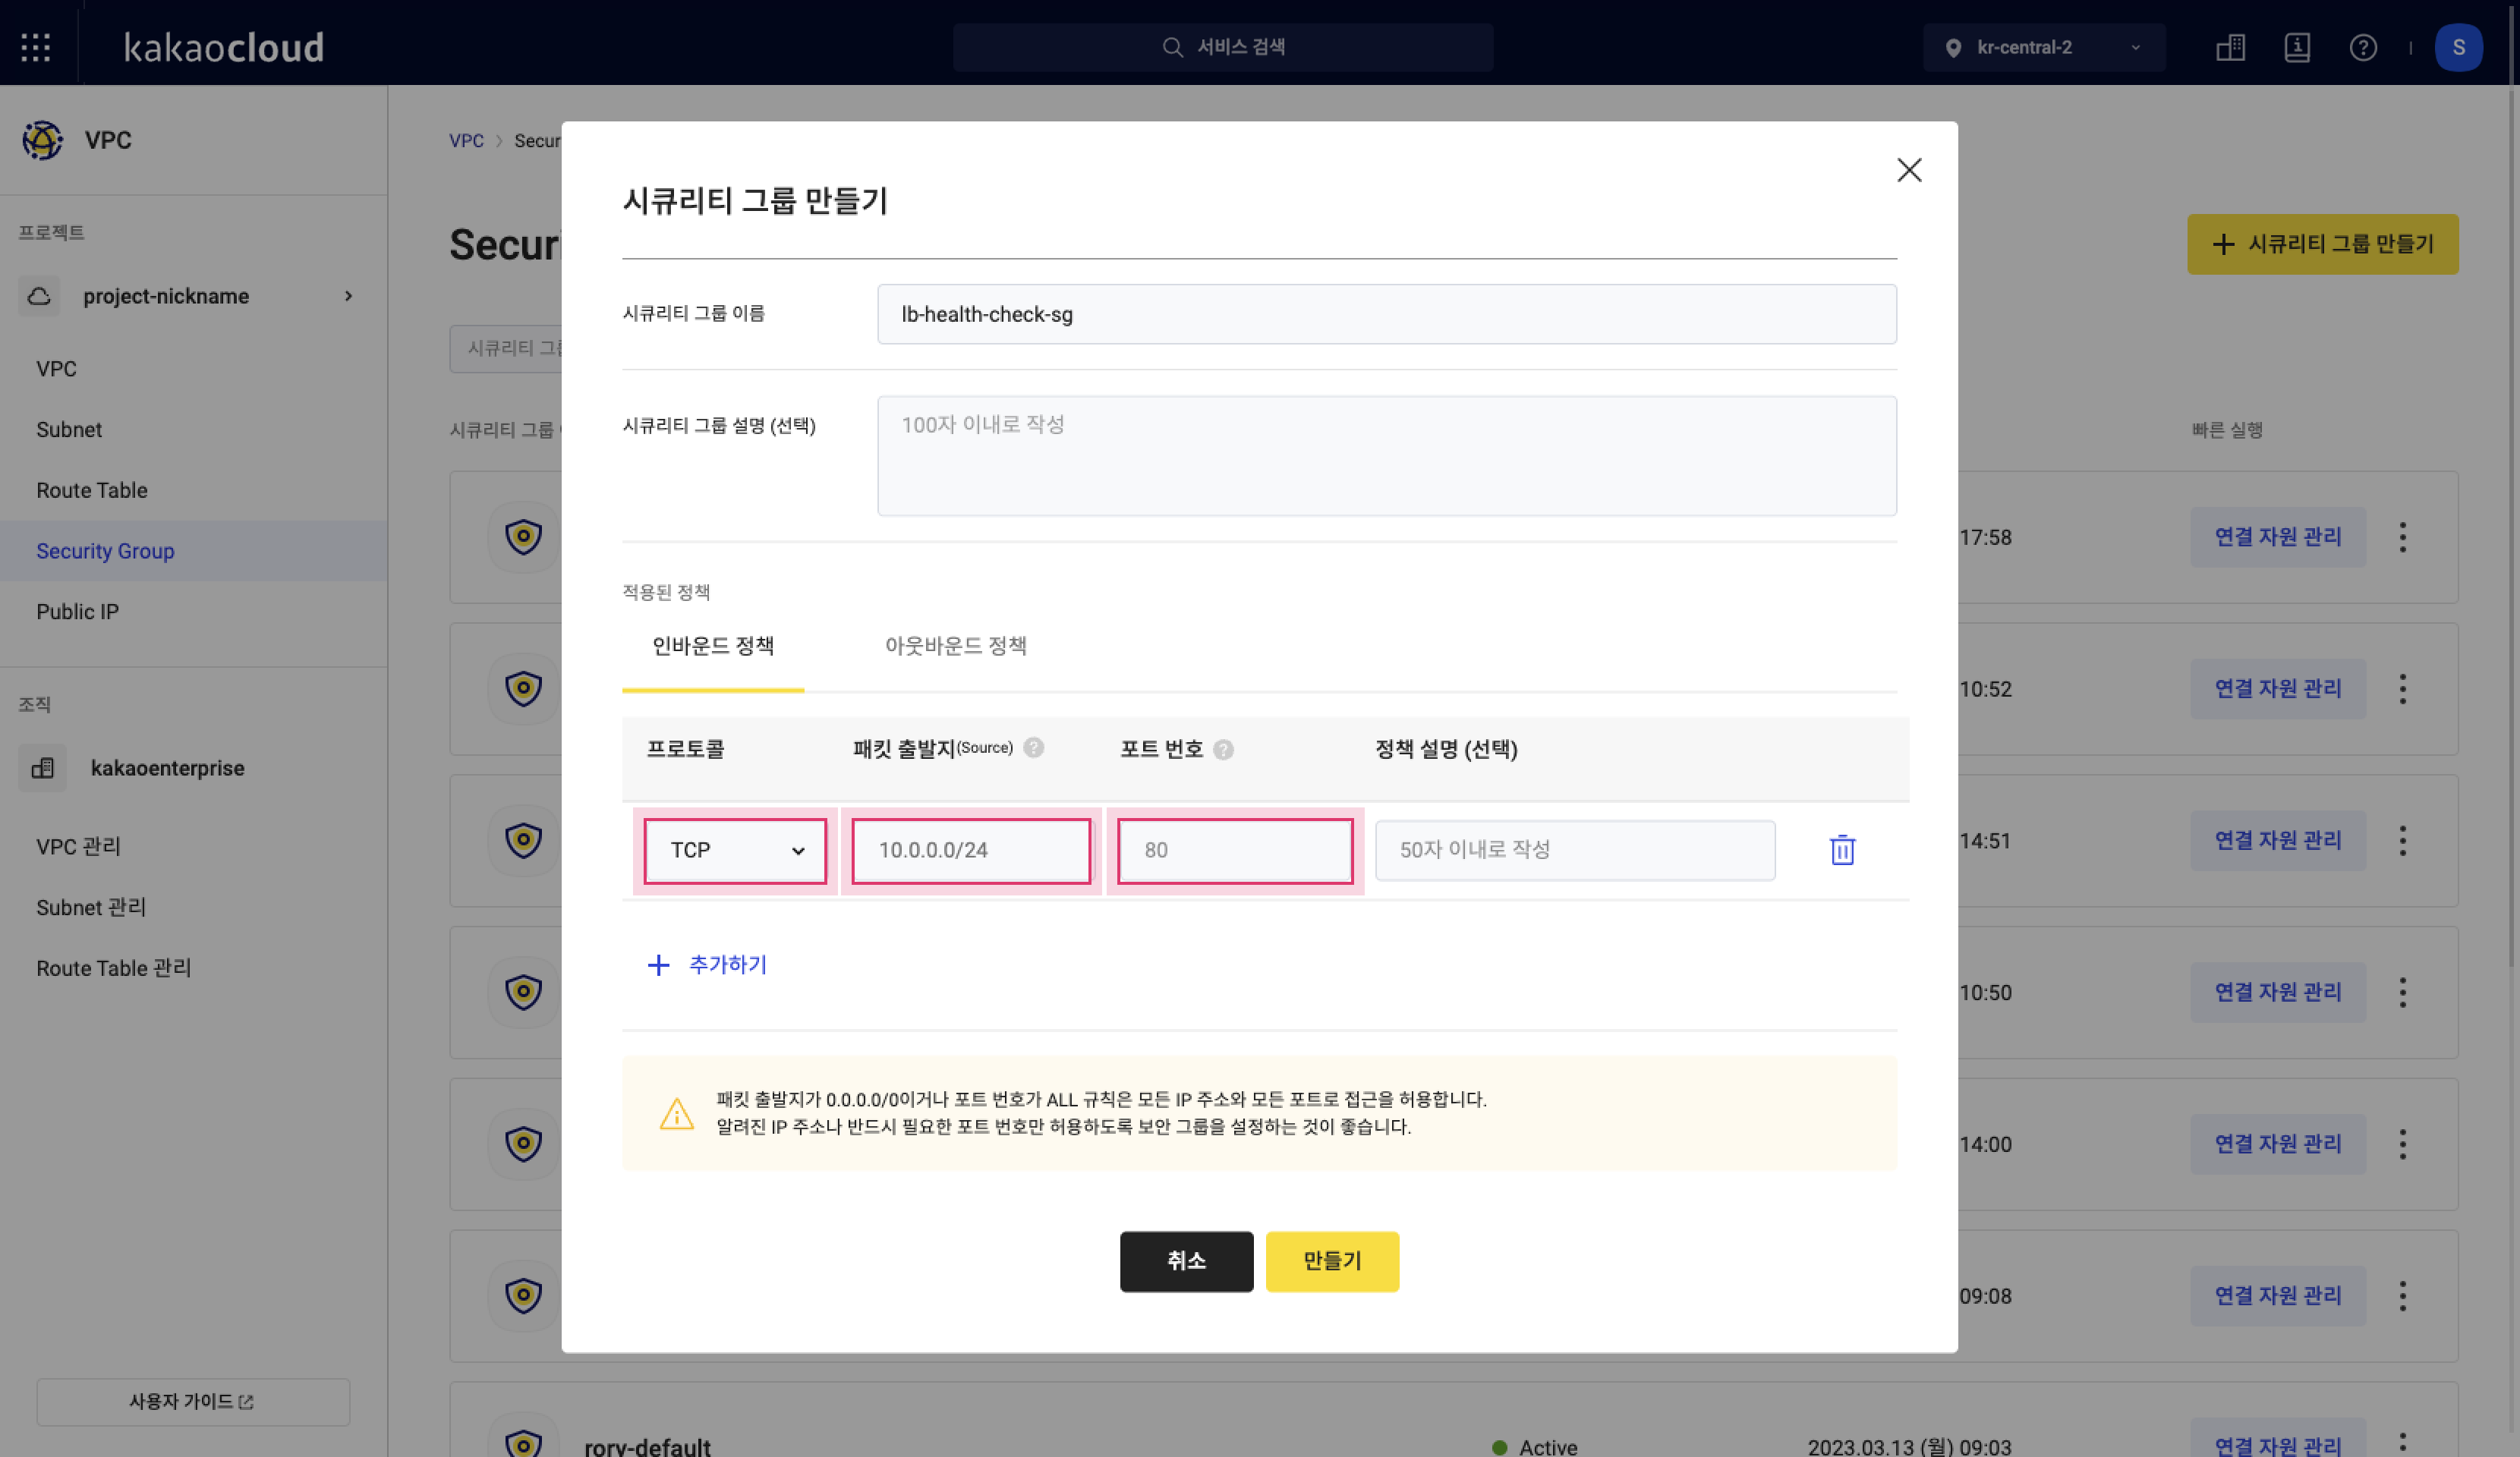 Create security group
 -
Based on the detailed information in Step 3 from the Target group > Target tab, fill in all rule details.
- You can register all health check IPs to one security group and attach it to all target instances.
Alternatively, create a separate security group per subnet, register only the health check IPs for that subnet, and attach it to instances within that subnet.
Field Description Protocol Select the protocol used for communication (TCP, UDP, ICMP, ALL) based on the target group’s health check type
- If PING:ICMP
- If HTTP, HTTPS, TCP:TCPPacket source (Source) Source IPs to be allowed
- Enter the health check IPs
- Register both health check IPs for each subnet
- If managing with a single security group, register all health check IPsPort Port used for communication
- Enter the monitor port of the target
- Can be a single port or a rangeRule description (optional) Description for the rule - You can register all health check IPs to one security group and attach it to all target instances.
-
Select [Create] to finish security group creation.
-
In the Security group list, select the [Manage attached resources] button next to the created group, and attach it to the target instance(s).
Set monitoring port
-
Go to the KakaoCloud console > Beyond Networking Service > Load Balancing > Target group menu.
-
Select the target group containing the target to modify.
-
Select the Target tab in the detailed view.
-
Check the list of targets added to the group.
-
Select the [More] icon next to the target whose monitoring port you want to change.
-
In the More menu, select [Set monitoring port].
-
In the Set monitoring port popup, configure the settings:
- Set same as target port: Monitoring port is the same as the traffic port.
- Set differently from target port: Monitoring port differs from traffic port; manually enter the port.
-
Select the [Apply] button.
View target
-
Go to the KakaoCloud console > Beyond Networking Service > Load Balancing > Target group menu.
-
Select the target group whose targets you want to view.
-
In the detailed view, select the Target tab.
-
Review the list of targets in the group. Use filters as needed to easily find the desired target.
Field Description IP Target IP Port Target port Instance Name and ID of the target instance Subnet Subnet to which the target belongs Security group Security group(s) attached to the target instance Monitoring port Port used for health checks Weight ratio Calculated weight ratio based on the input weight Provisioning status Indicates whether the target was added successfully or is being modified or removed Operating status Indicates whether the added target is currently available [More] icon Provides options to set monitoring port or detach the target
Modify target
The port of an added target cannot be modified. To change the port, delete the target and add it again using Configure target.
Detach target
-
Go to the KakaoCloud console > Beyond Networking Service > Load Balancing > Target group menu.
-
Select the target group from which you want to detach a target.
-
In the detailed view, select the Target tab.
-
Review the list of targets in the group.
-
Select the [More] icon for the target to be detached.
-
Select [Detach target] from the More menu.
-
In the Detach target popup, enter the confirmation phrase and select [Detach].
Detaching a target does not delete the instance. To reconnect it, go to Configure target and add it again.
Detach target
-
Go to the KakaoCloud console > Beyond Networking Service > Load Balancing > Target group menu.
-
Select the target group from which you want to detach a target.
-
In the detailed view, select the Target tab.
-
Review the list of targets added to the group.
-
Select the [More] icon for the target you want to detach.
-
From the More menu, select [Detach target].
-
In the Detach target popup, enter the confirmation phrase, then select the [Detach] button.
Detaching a target does not delete the instance. To reconnect the instance, go to Configure target and add it again.