appendix. using nat instances
When instances in a private subnet need to communicate with the internet, you can use a NAT instance for NAT communication.
The private subnet, connected to the routing table, sends traffic to the NAT instance in the public subnet based on the routing policy. The NAT instance then forwards the traffic to the internet gateway. The IP used for communication with the internet gateway is the NAT instance's public IP. Therefore, the NAT instance must be created in a public subnet, with a public IP attached and internet access enabled.
The method for using a NAT instance to communicate with the internet from a private subnet is as follows.
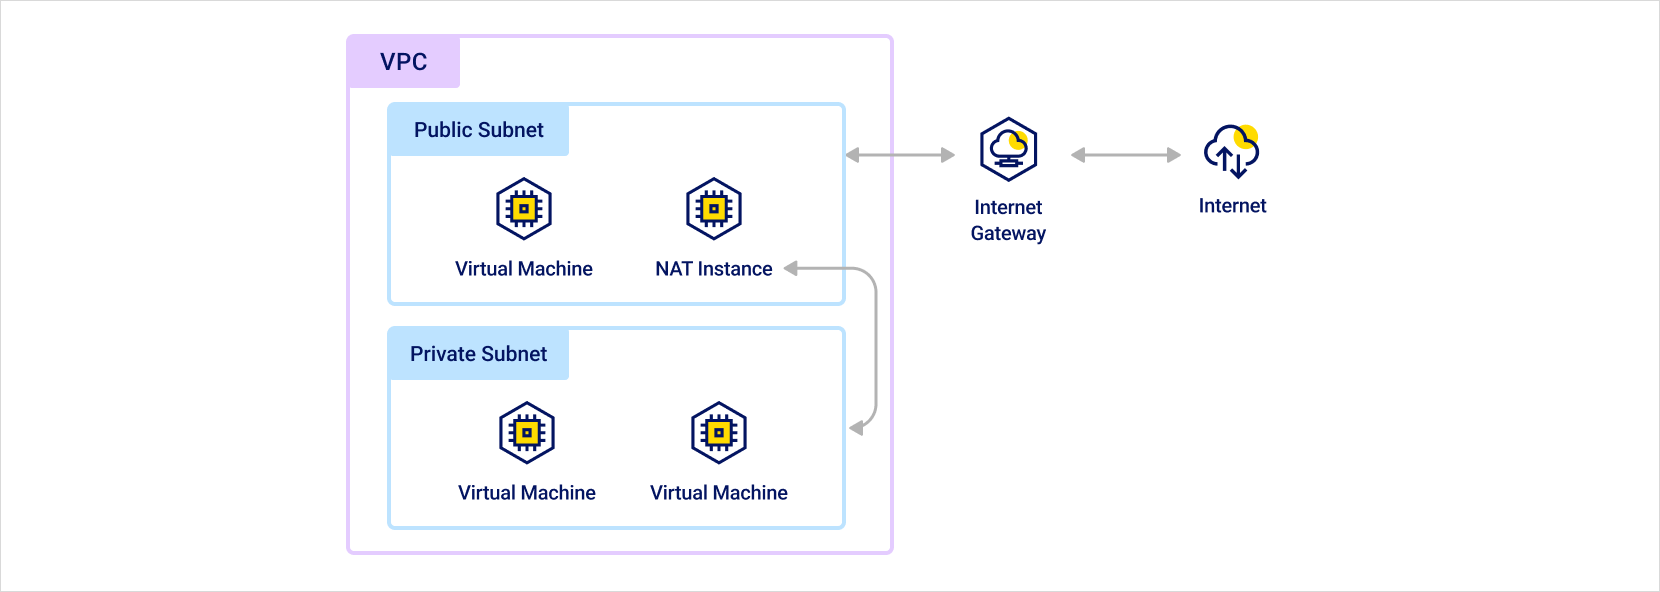 NAT instance routing path
Step 1. create subnet and configure route tables
Create private and public subnets, and configure the routing tables.
-
Create private and public subnets. For detailed instructions, refer to Create and manage subnets.
-
Configure the routing tables for the private and public subnets. Ensure that the subnets are correctly connected to the routing tables based on their use. For detailed instructions, refer to Create and manage route tables.
[Public Subnet] Route Table
Destination Target Type Target Name VPC CIDR IP Local Local 0.0.0.0/0 Internet Gateway Internet Gateway ID [Private Subnet] Route Table
Destination Target Type Target Name VPC CIDR IP Local Local
Step 2. configure nat instance
Create a NAT instance in the public subnet and attach the public IP.
-
Create an instance in the public subnet that will be used as the NAT instance.
-
Attach a public IP to the NAT instance. For detailed instructions, refer to Create and manage public IPs.
-
Connect to the NAT instance and configure it as follows. The commands differ based on the operating system of the instance. Check the tabs below and follow the appropriate commands for your environment. The example commands will not persist after a reboot. If you want these settings to remain after rebooting, additional configurations are required.
- Ubuntu
- CentOS
For Ubuntu 20.04, use the following commands:
BASHsudo apt-get update -y
LINE=$(grep 'net.ipv4.ip_forward=' /etc/sysctl.conf)
sudo sed -i "s/${LINE}/net.ipv4.ip_forward=1/" /etc/sysctl.conf
sudo sysctl -p
INTERFACE=$(ip link | awk -F: '$0 !~ "lo|vir|wl|^[^0-9]"{print $2;getline}')
sudo /sbin/iptables -t nat -A POSTROUTING -o ${INTERFACE} -j MASQUERADE
sudo apt-get install -y iptables-persistentFor CentOS8, use the following commands:
BASHsudo sysctl -w net.ipv4.ip_forward=1
sudo yum install -y iptables
sudo iptables -t nat -A POSTROUTING -o {interface} -j MASQUERADEParameter Description {interface}Replace with the network interface name used for NAT communication
- Example:eth0,enp3s0, etc.
Step 3. Modify allowed IPs for packet forwarding
By default, an instance checks the source and destination of the traffic and only receives traffic that has itself as the destination. However, a NAT instance should be able to send and receive traffic even if the source and destination are not itself.
You can configure the instance as a NAT instance using the Modify Allowed IPs for Packet Forwarding feature.
- Go to the Virtual Machine menu in the KakaoCloud console.
- In the Instances tab, select the [More Options] icon for the instance to be used as the NAT instance and choose Modify Allowed IPs for Packet Forwarding.
- In the Modify Allowed IPs for Packet Forwarding popup, select the network interface, and enter and add
0.0.0.0/0in the input box, then select [Apply].
- By default, network interfaces only allow traffic to and from their own IP/MAC address for security reasons. By adding IP addresses or CIDR blocks through the Modify Allowed IPs for Packet Forwarding feature, traffic from those IP addresses will be allowed, and packets will be forwarded according to security group policies.
Step 4. Set up security group for NAT instance
When using an instance with the Modify Allowed IPs for Packet Forwarding setting, you can communicate based on the following security group policies.
Configure the inbound and outbound rules for the security group as follows.
If you want to communicate using ports other than HTTP and HTTPS in the private subnet, you need to add the ports to the inbound and outbound rules in the NAT instance's security group.
Inbound rules
The NAT instance should receive packets from instances in the private subnet and forward them to the internet, while also allowing system administrators to access it via SSH. The inbound security group rules are configured as follows:
| Protocol | Source IP Range | Port Number | Description |
|---|---|---|---|
| TCP | Private subnet CIDR | 80 | Allow inbound HTTP traffic from private subnet instances |
| TCP | Private subnet CIDR | 443 | Allow inbound HTTPS traffic from private subnet instances |
| TCP | Public IP range of the administrator's network | 22 | Allow inbound SSH access to the NAT instance from the administrator's network |
Outbound rules
To allow traffic from the NAT instance to the internet, configure the outbound security group rules as follows:
| Protocol | Destination IP Range | Port Number | Description |
|---|---|---|---|
| TCP | 0.0.0.0/0 | 80 | Allow outbound HTTP traffic |
| TCP | 0.0.0.0/0 | 443 | Allow outbound HTTPS traffic |
Step 5. Update route table
Update the route table for the private subnet to send traffic to the NAT instance. To update the route table, you need to add an instance route to the route table connected to the private subnet. For more details, refer to Add Route.
| Destination | Target Type | Target Name |
|---|---|---|
| VPC CIDR IP | Local | Local |
| 0.0.0.0/0 | Instance | Instance IP (Instance ID) |