Create and manage VPC
KakaoCloud's VPC (Virtual Private Cloud) is a user-defined private network service. By using VPC, users can quickly and easily build a network suited to their environment by combining various network components.
This guide explains how to create and manage VPCs in the VPC service.
- VPC role management follows IAM-based access control (RBAC), and only Project Admin can create and manage VPCs. Other project members can only view the VPC.
- For information about your IAM permissions, please contact your Org Admin.
Create VPC
You can create a new VPC.
A maximum of 3 VPCs can be created per project.
-
Go to the KakaoCloud console > Beyond Networking Service > VPC menu.
-
Select the VPC menu, then select the [Create VPC] button.
-
In the Create VPC screen, enter VPC information, availability zone, and subnet settings, then select the [Create] button.
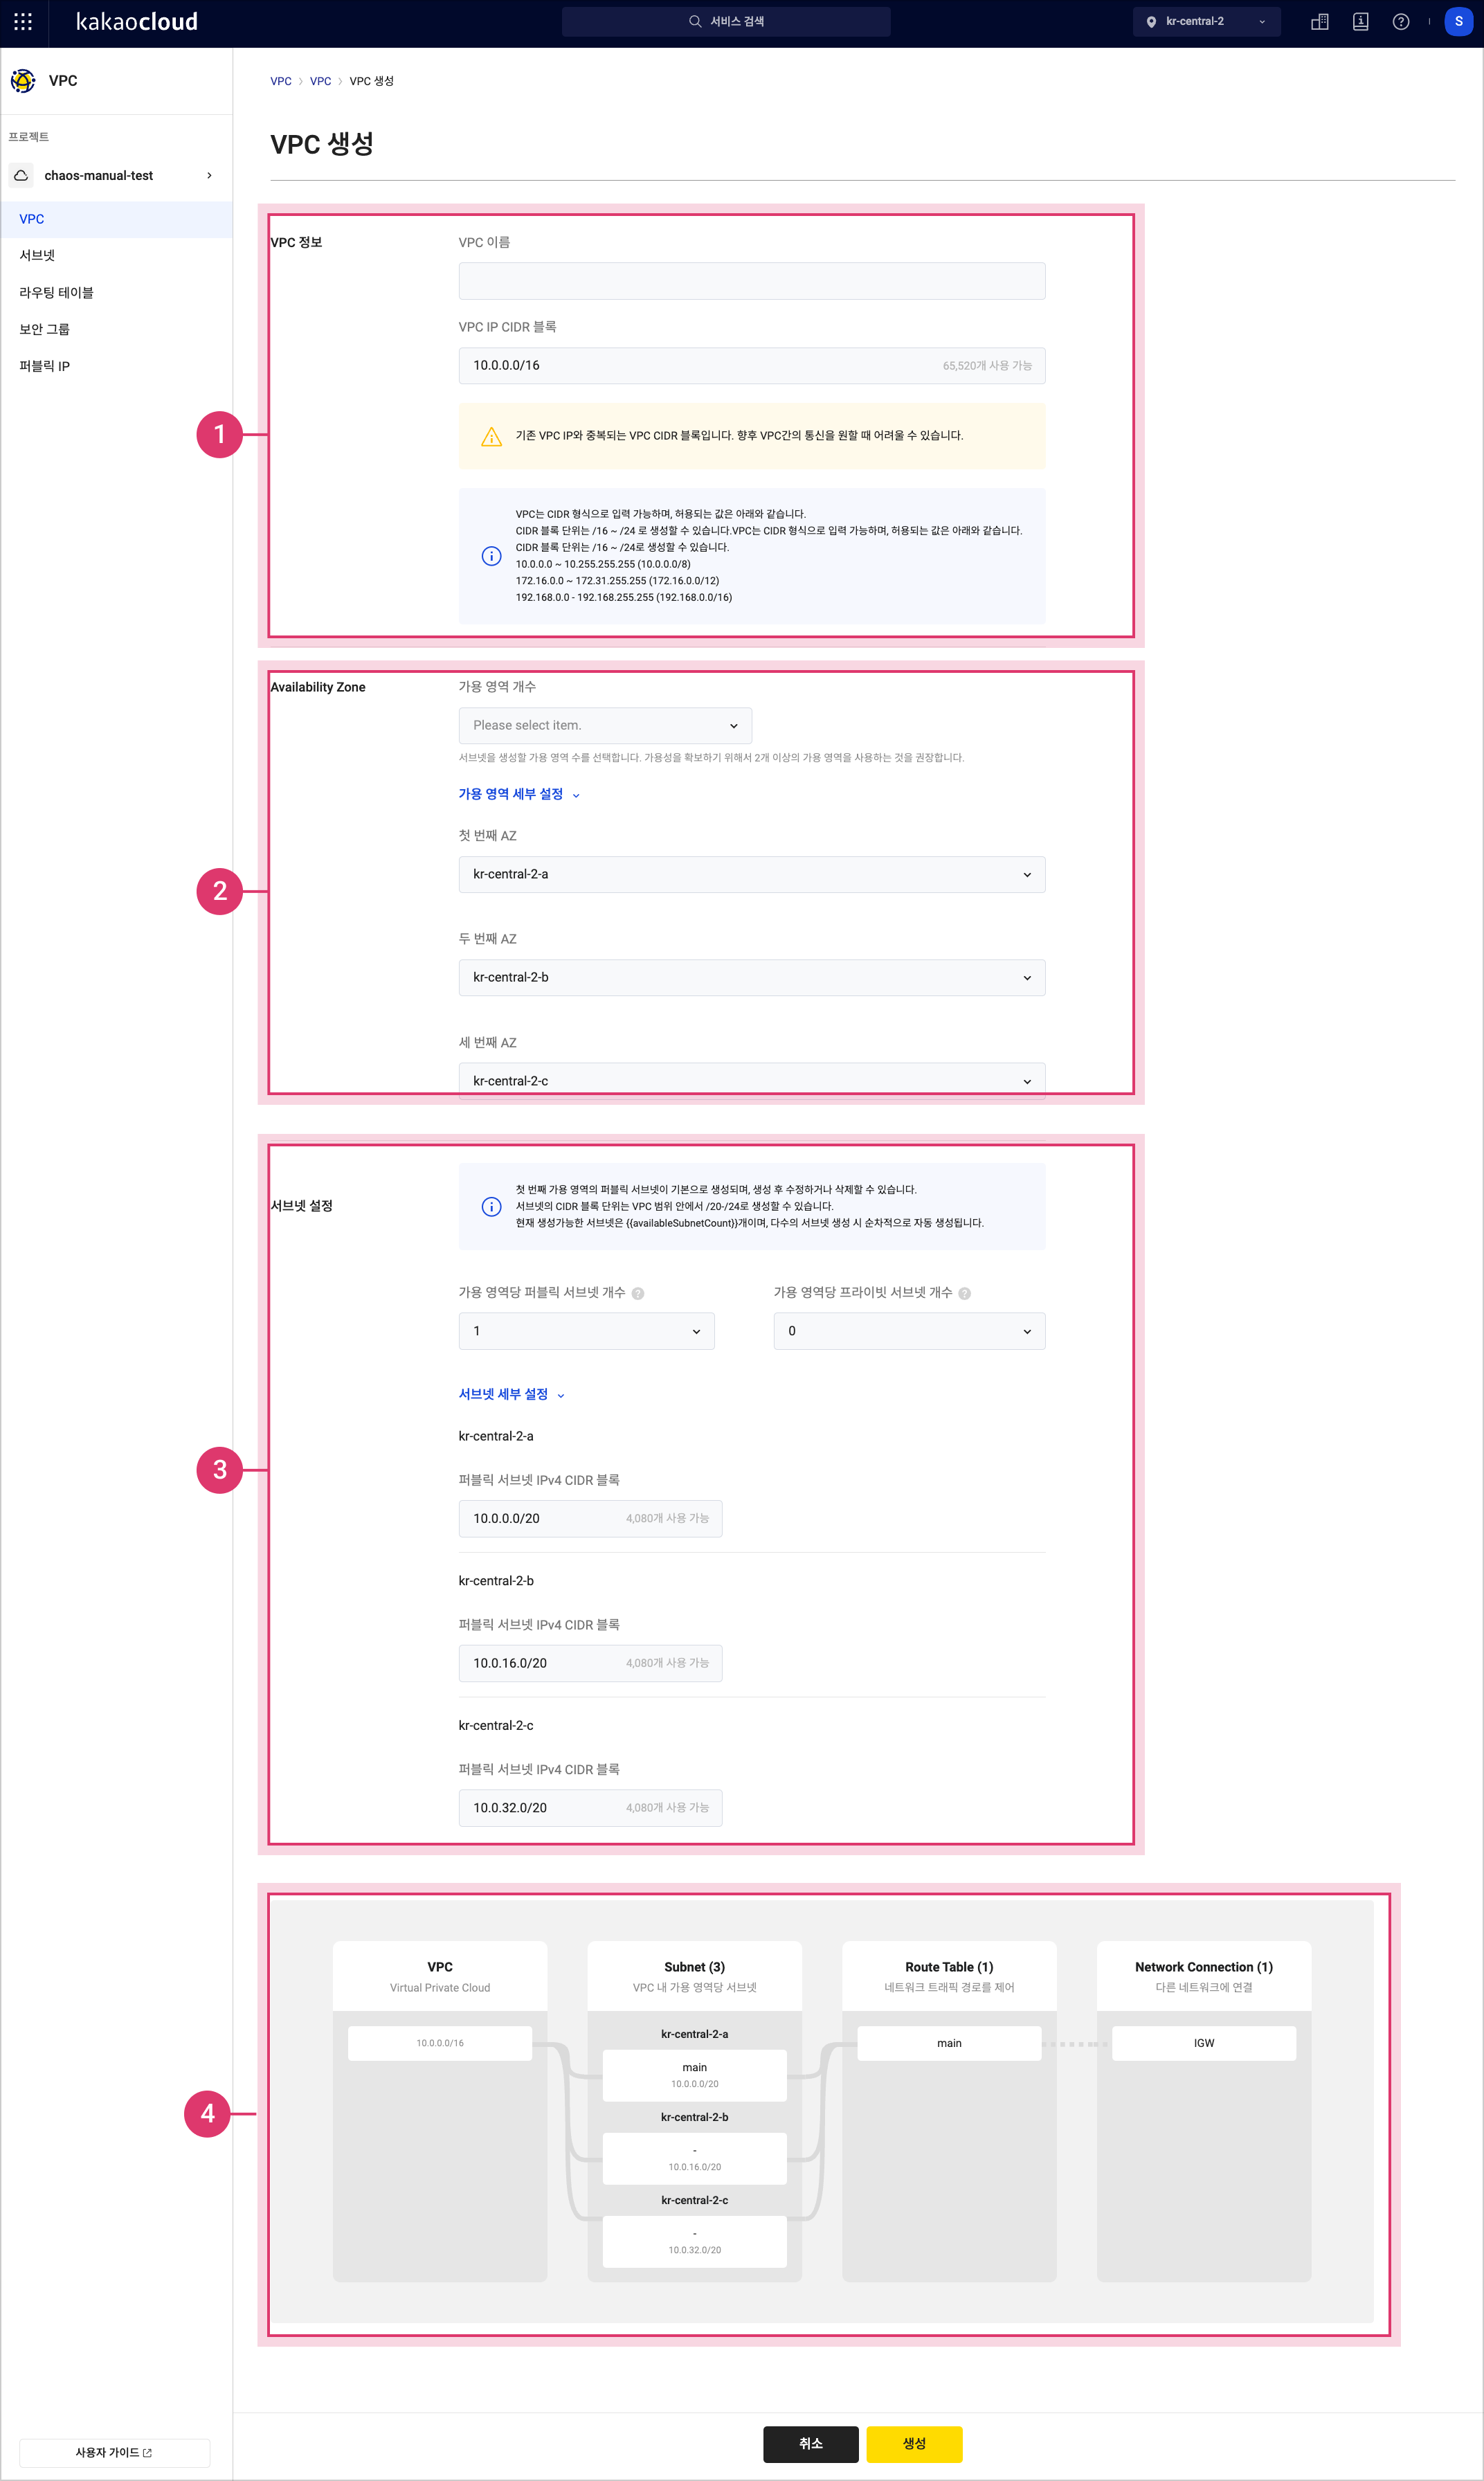 Create VPC
Item Description VPC Information - VPC Name: Enter the name of the VPC
- VPC IP CIDR Block: Enter the VPC IP CIDR block
Choose from private IP ranges (172.16.0.0 / 192.168.0.0 / 10.0.0.0) and specify a Prefix Length (16-24).Availability Zones - Number of Availability Zones: Up to 3 can be set
- Detailed Availability Zone Settings: Configure specific AZs from the list.Subnet Settings Review subnet information
- Public Subnet per Availability Zone: Default of 1 subnet per AZ, limited to quota.
- Private Subnet per Availability Zone: Select 0-10 subnets per AZ, limited to quota.
- Subnet Detailed Settings: Subnets will be exposed based on the number of public and private subnets configured.
- Public Subnet IPv4 CIDR Block: Displayed based on selected AZ values.
- Private Subnet IPv4 CIDR Block: Select prefix length between 20-26.Topology Preview Preview the changes in VPC information, availability zones, and subnet settings in a graph.
View VPC
You can view the list of VPCs currently created, as well as the VPC details and subnet information.
-
Go to the KakaoCloud console > Beyond Networking Service > VPC menu.
-
Select the VPC menu, then view the list of currently created VPCs.
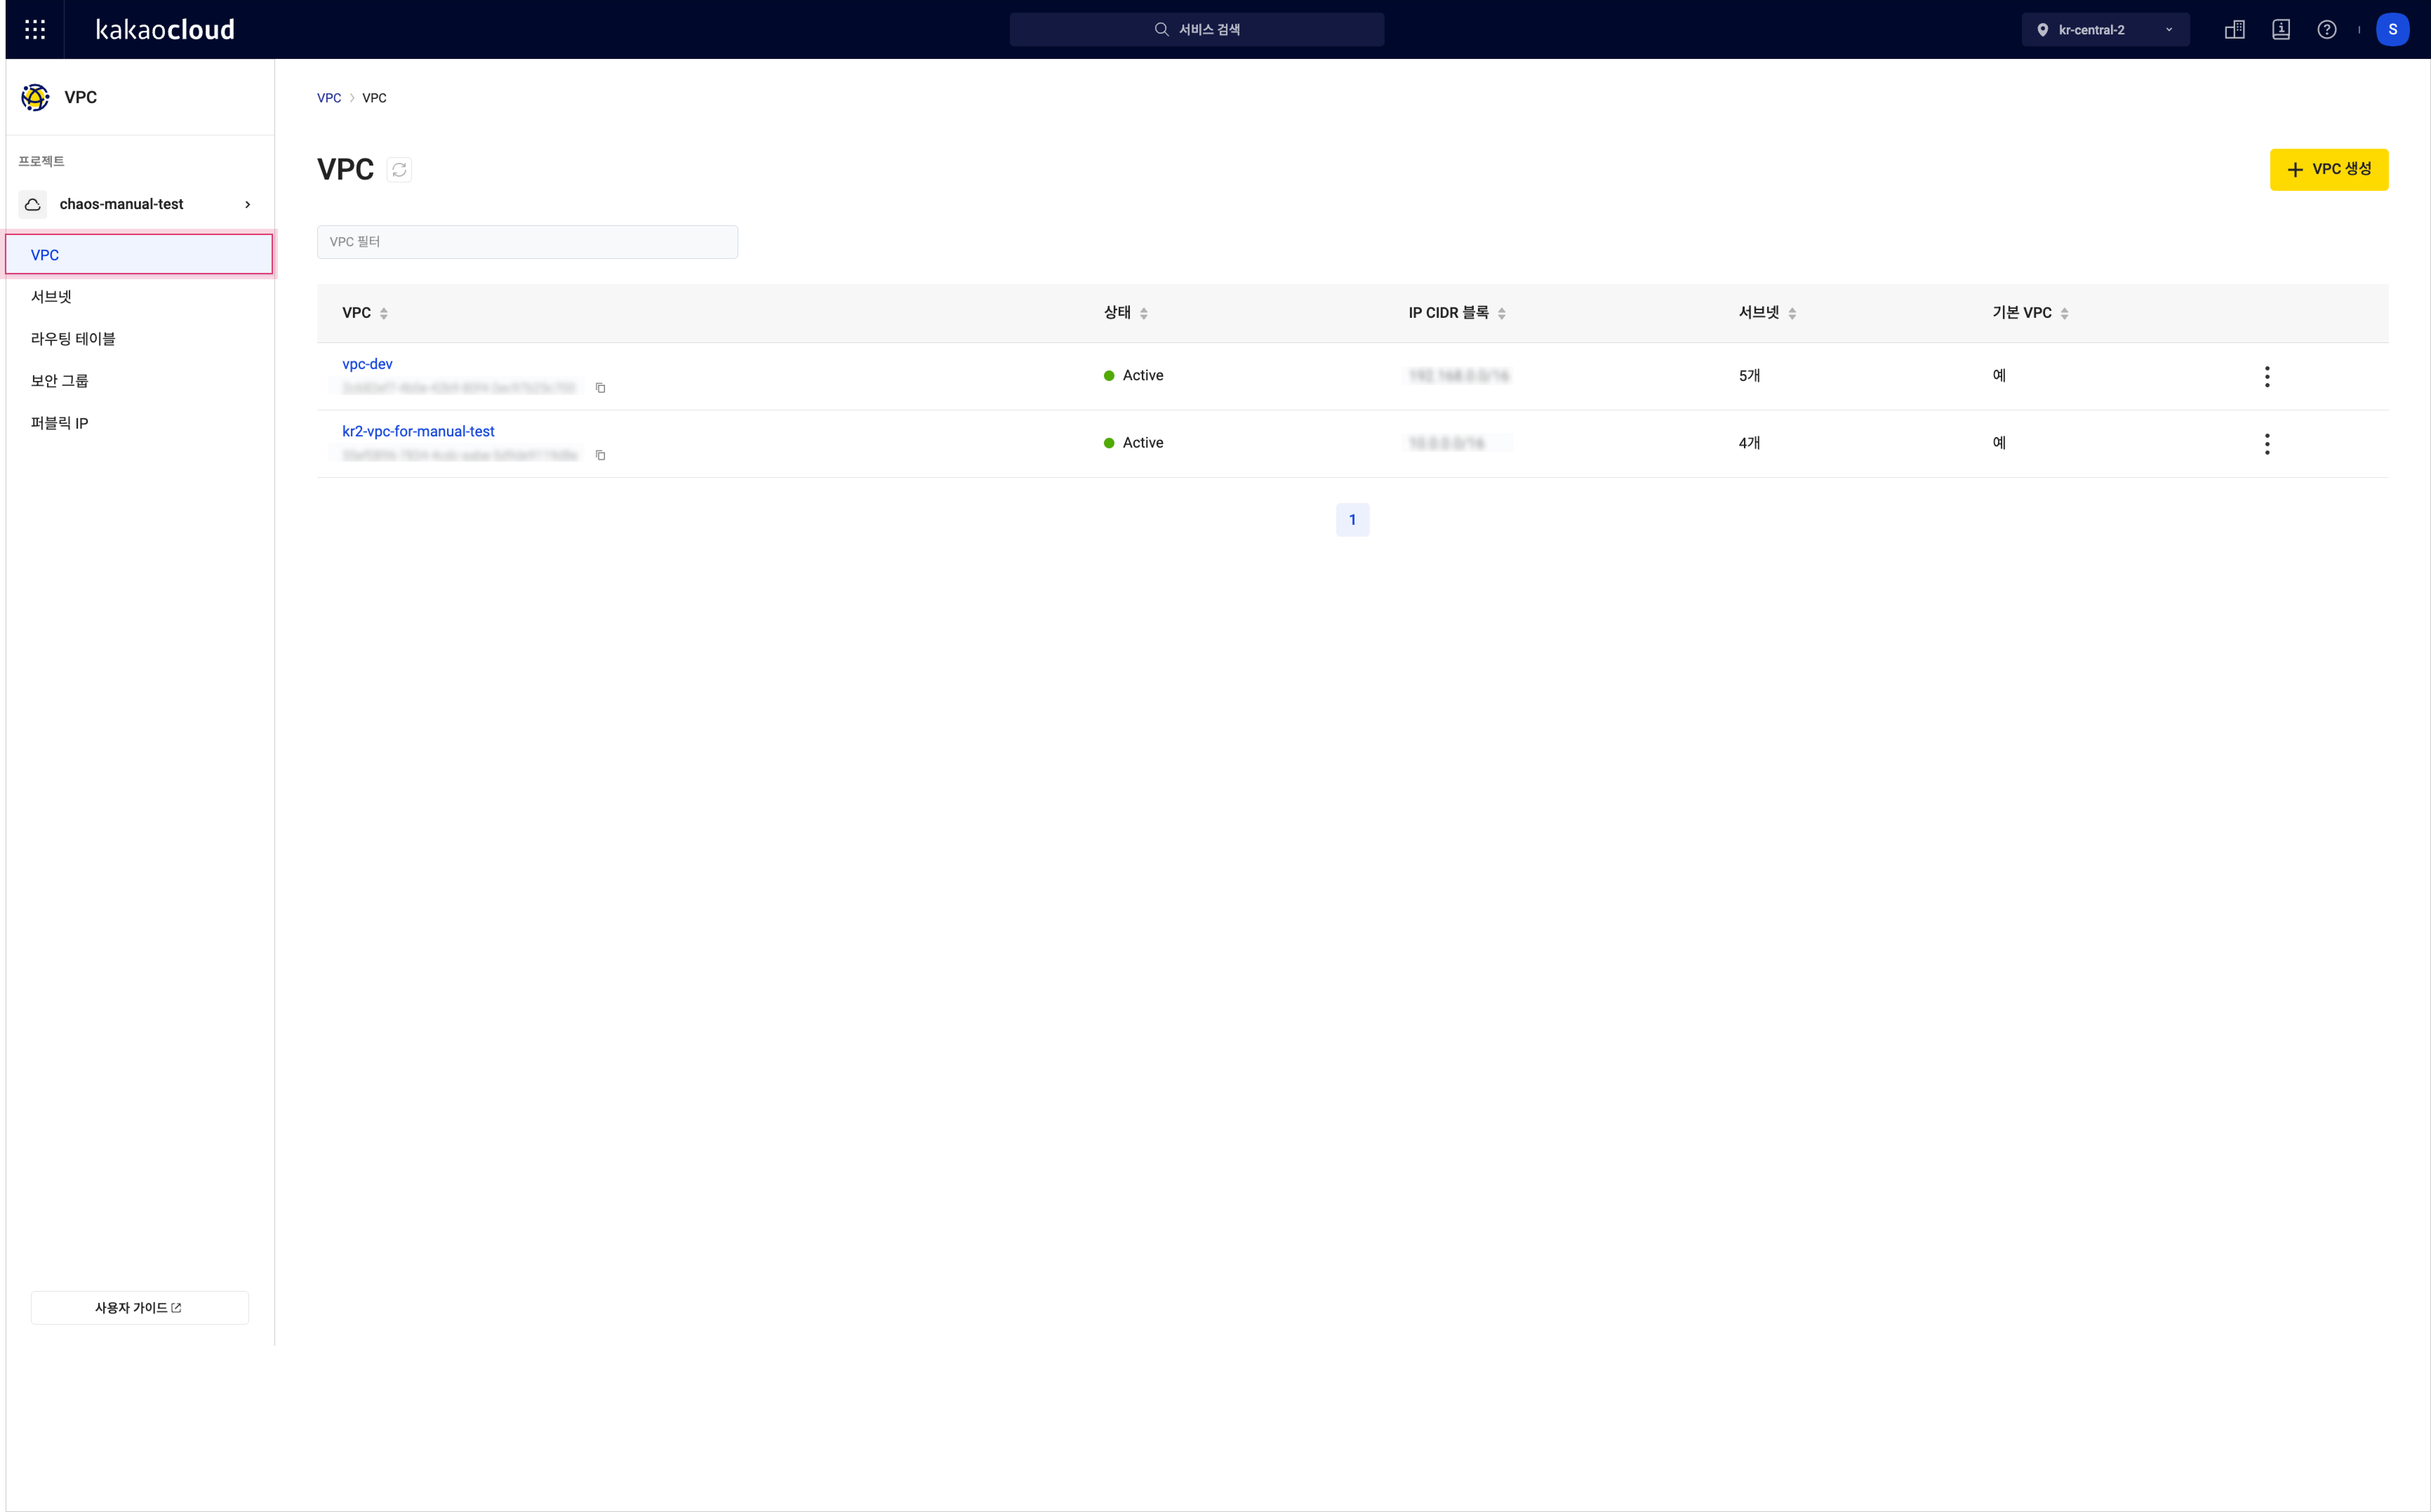 View VPC list
Item Description VPC Name and ID VPC name and VPC ID Status VPC status
-Active: Activated
-Pending Create: Creating
-Pending Update: Updating
-Pending Delete: Deleting
-Error: Error occurredIP CIDR Block VPC's IP CIDR block Subnets Number of subnets created in the VPC [More Options] icon Rename VPC: Change the VPC name
Delete VPC: Delete the VPC from the listinfoAfter a VPC is created and its status becomes
Active, it may take up to 20 additional minutes for internal components such as the DNS resolver to complete their configuration. -
Select on the VPC whose details you want to view, and check the information on the VPC's detail page.
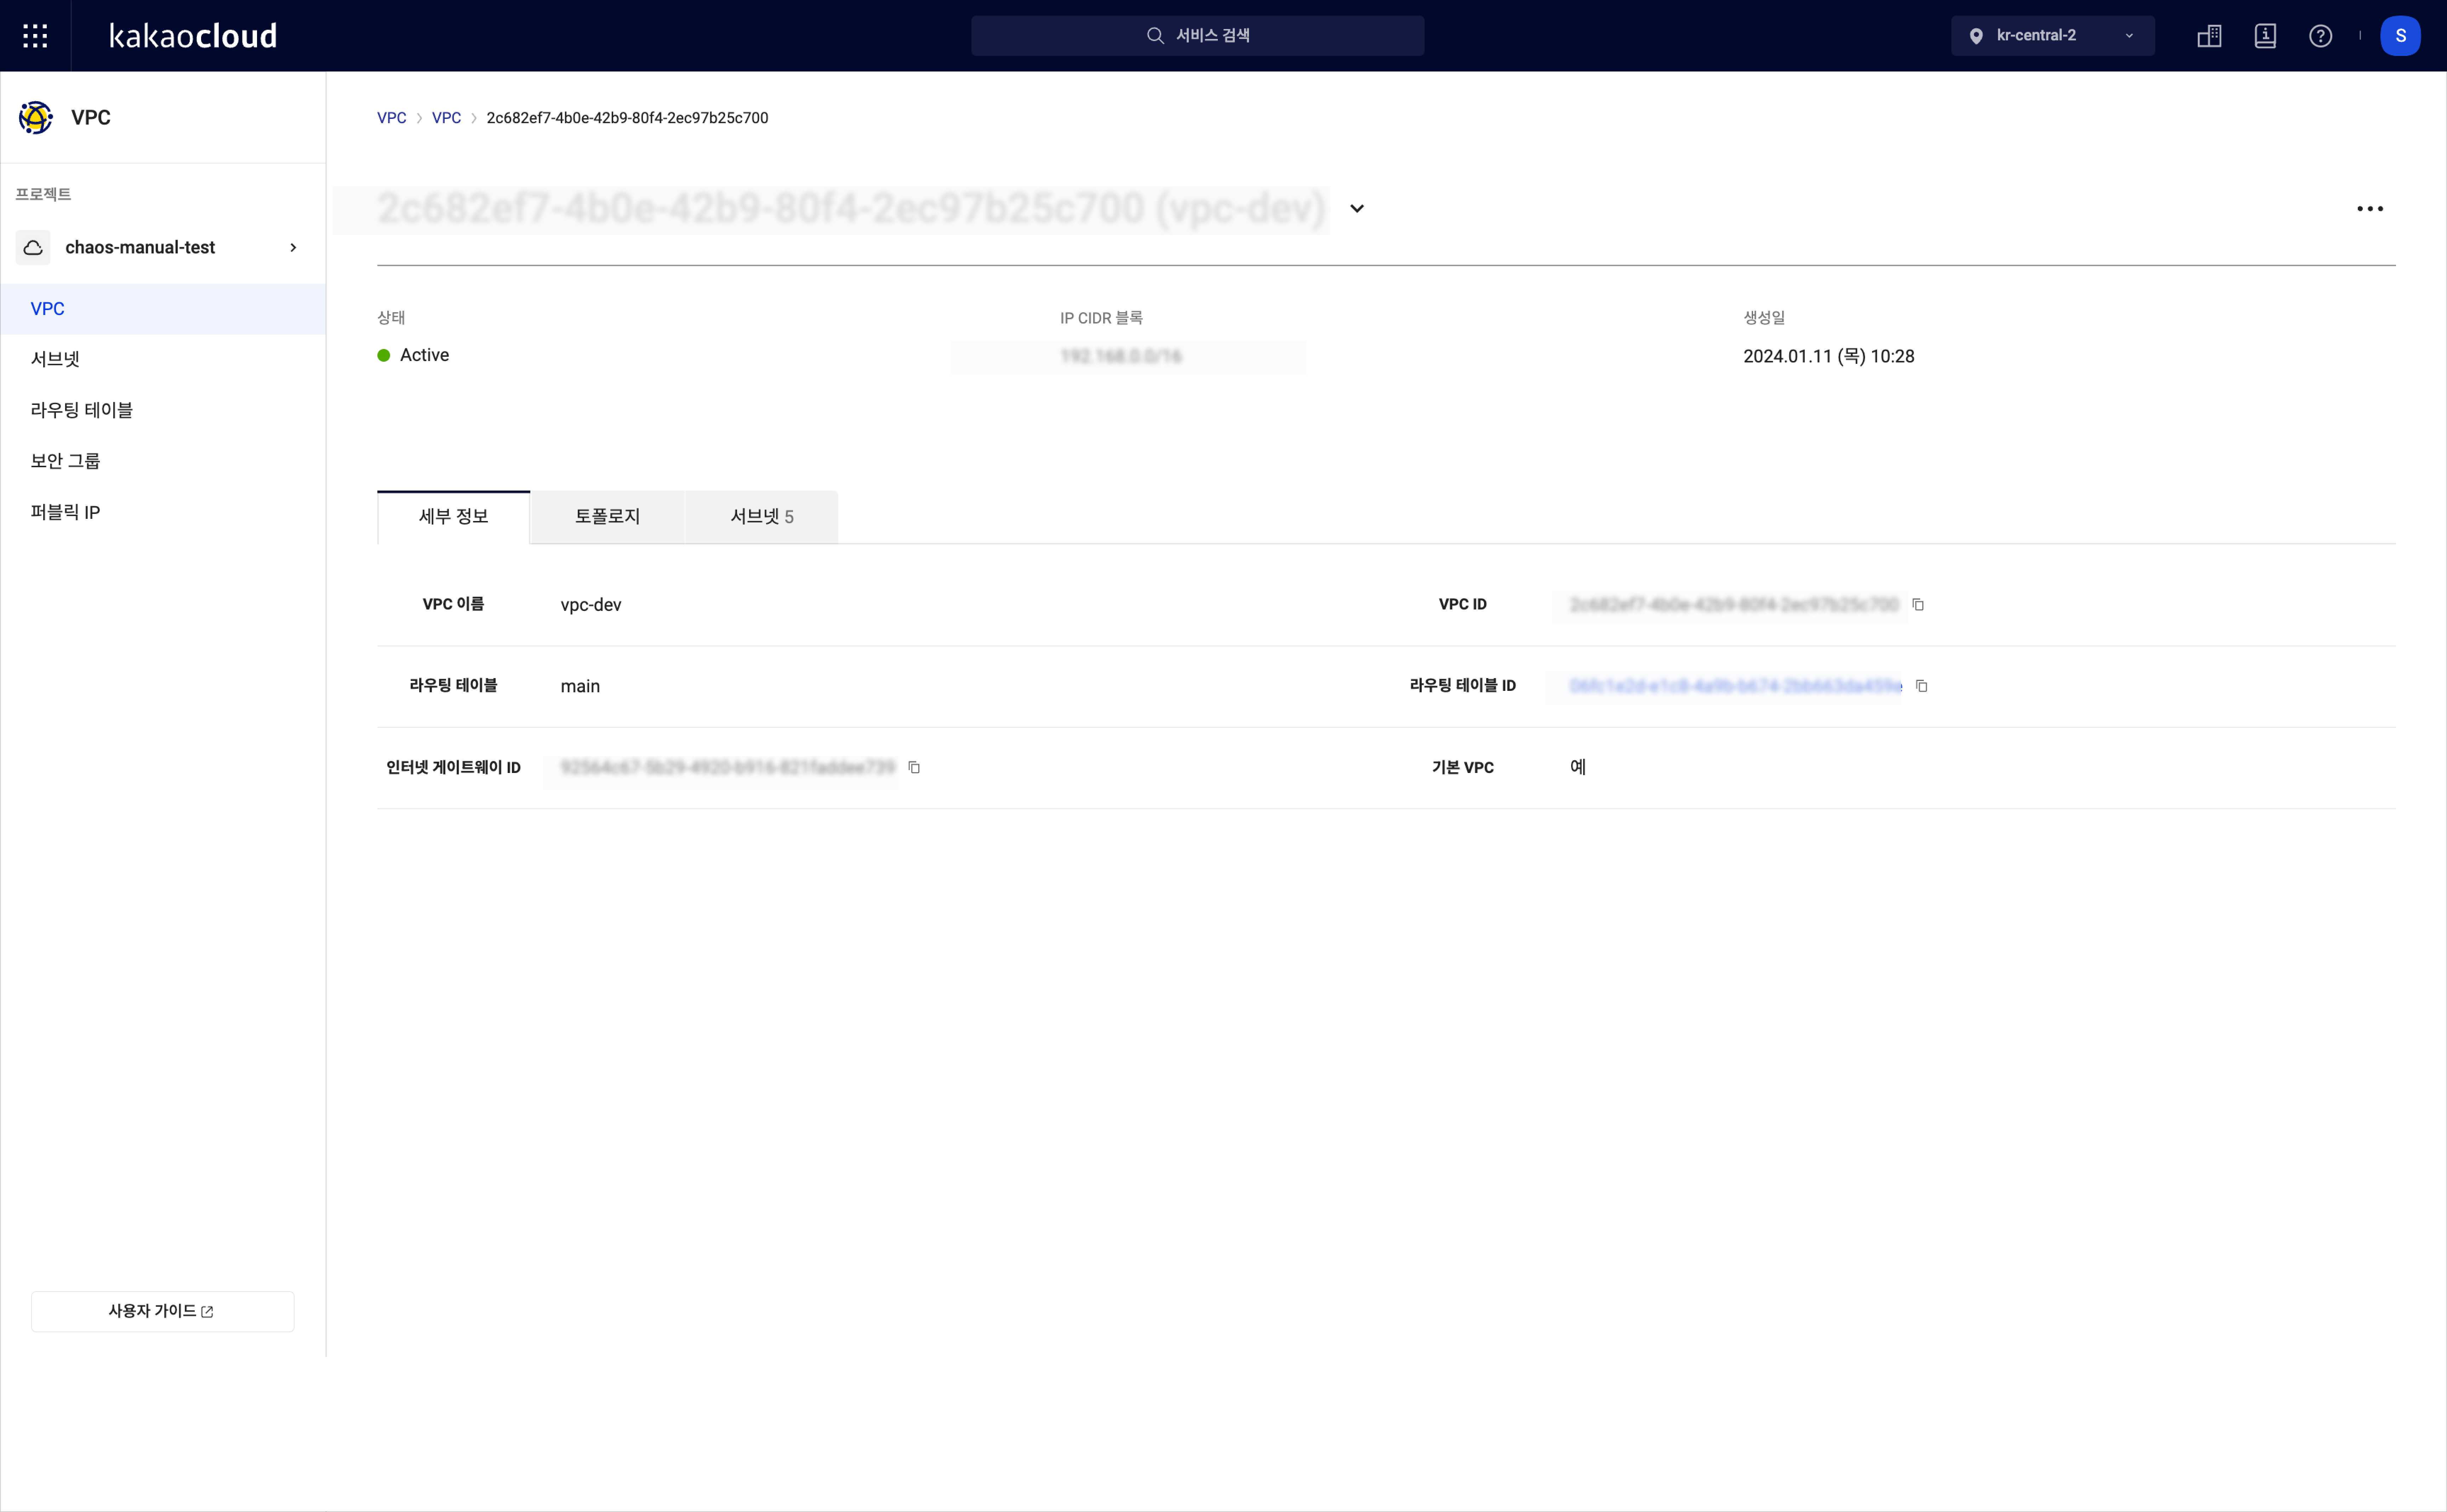 View VPC details
Tab Description Details Detailed information about the VPC
- VPC name: The name of the VPC
- VPC ID: The ID of the VPC
- Routing table: The name of the default routing table
- Routing table ID: The ID of the default routing table
- Internet gateway ID: The ID of the internet gateway connected to the VPCTopology A graph showing the VPC configuration
- Displays the relationship between VPC, subnets, and routing tables
- Displays routing settings for IGW, Transit GatewaySubnets Subnet details
- Subnet: Automatically created subnet name and ID
- Status: Subnet status
- IP CIDR Block: Subnet's IP CIDR block
- Availability Zone: Name of the availability zone the subnet belongs to
- Routing Table: Routing table connected to the subnet
- [More Options] icon: Rename or delete the subnet
Rename VPC
You can rename the VPC.
-
Go to the KakaoCloud console > VPC menu.
-
Select the VPC menu, then select the [More Options] icon for the VPC you want to rename > Rename VPC.
-
In the Rename VPC popup, enter the new name and select [Apply].
Configure DNS resolver query logging
You can configure query logging for the DNS resolver within a VPC.
Enable DNS resolver query logging
To enable DNS resolver query logging for a specified VPC, you must first create an Object Storage bucket to store log files and an S3 access key required for authentication. Refer to DNS resolver query logging for instructions on how to create them.
Follow the steps below to enable DNS resolver query logging:
-
Go to KakaoCloud console > Beyond Networking Service > VPC.
-
Click the VPC menu, then click the [More] icon for the VPC where you want to enable DNS resolver query logging, and select Configure DNS resolver query logging.
-
In the Configure DNS resolver query logging popup, click the current [Disabled] setting to change it to [Enabled].
-
In the Configure DNS resolver query logging popup, under [Select bucket], choose the Object Storage bucket to store the log files. You can set whether to enable encryption for the selected bucket. For security, it is recommended to select
Enablewhen creating the bucket. For more information on creating Object Storage buckets, refer to the Object Storage > Create and manage bucket document. -
Under [Select S3 access key], choose the pre-created S3 access key.
-
Click [Apply] to enable the setting.
- If the Object Storage bucket designated as the log storage target is deleted, query logs will not be stored correctly. If you have deleted the bucket, reconfigure the setting with a new bucket.
- If the account permissions change while DNS resolver query logging is enabled, query logs may not be stored correctly. Reassign the necessary permissions to the account that configured DNS resolver query logging.
- VPCs created before the feature release on June 12, 2025, will be gradually migrated to support this feature. For related inquiries, contact the Helpdesk.
Disable DNS resolver query logging
Follow the steps below to disable DNS resolver query logging:
-
Go to KakaoCloud console > Beyond Networking Service > VPC.
-
Click the VPC menu, then click the [More] icon for the VPC where DNS resolver query logging is currently enabled, and select Configure DNS resolver query logging.
-
In the Configure DNS resolver query logging popup, review the message and click [Yes].
-
In the popup, click the current [Enabled] setting to change it to [Disabled].
-
Click [Apply].
Delete VPC
You can delete a VPC that is no longer needed.
- Go to the KakaoCloud console > Beyond Networking Service > VPC menu.
- Select the VPC menu, then select the [More Options] icon for the VPC you want to delete > Delete VPC.
- In the Delete VPC popup, enter the VPC name and select [Delete].