Create and manage instance
Create instance
To use File Storage, you need to create an instance, which is a virtual server allocated for storage space. Here's how to create an instance in File Storage.
The capacity of basic type instance can be allocated from a minimum of 1.0TB to a maximum of 16TB, in increments of 0.5TB.
-
Go to KakaoCloud console > Beyond Storage Service > File Storage.
-
Select the [Create instance] button on the Instance menu.
-
Enter the required information and select the [Create] button.
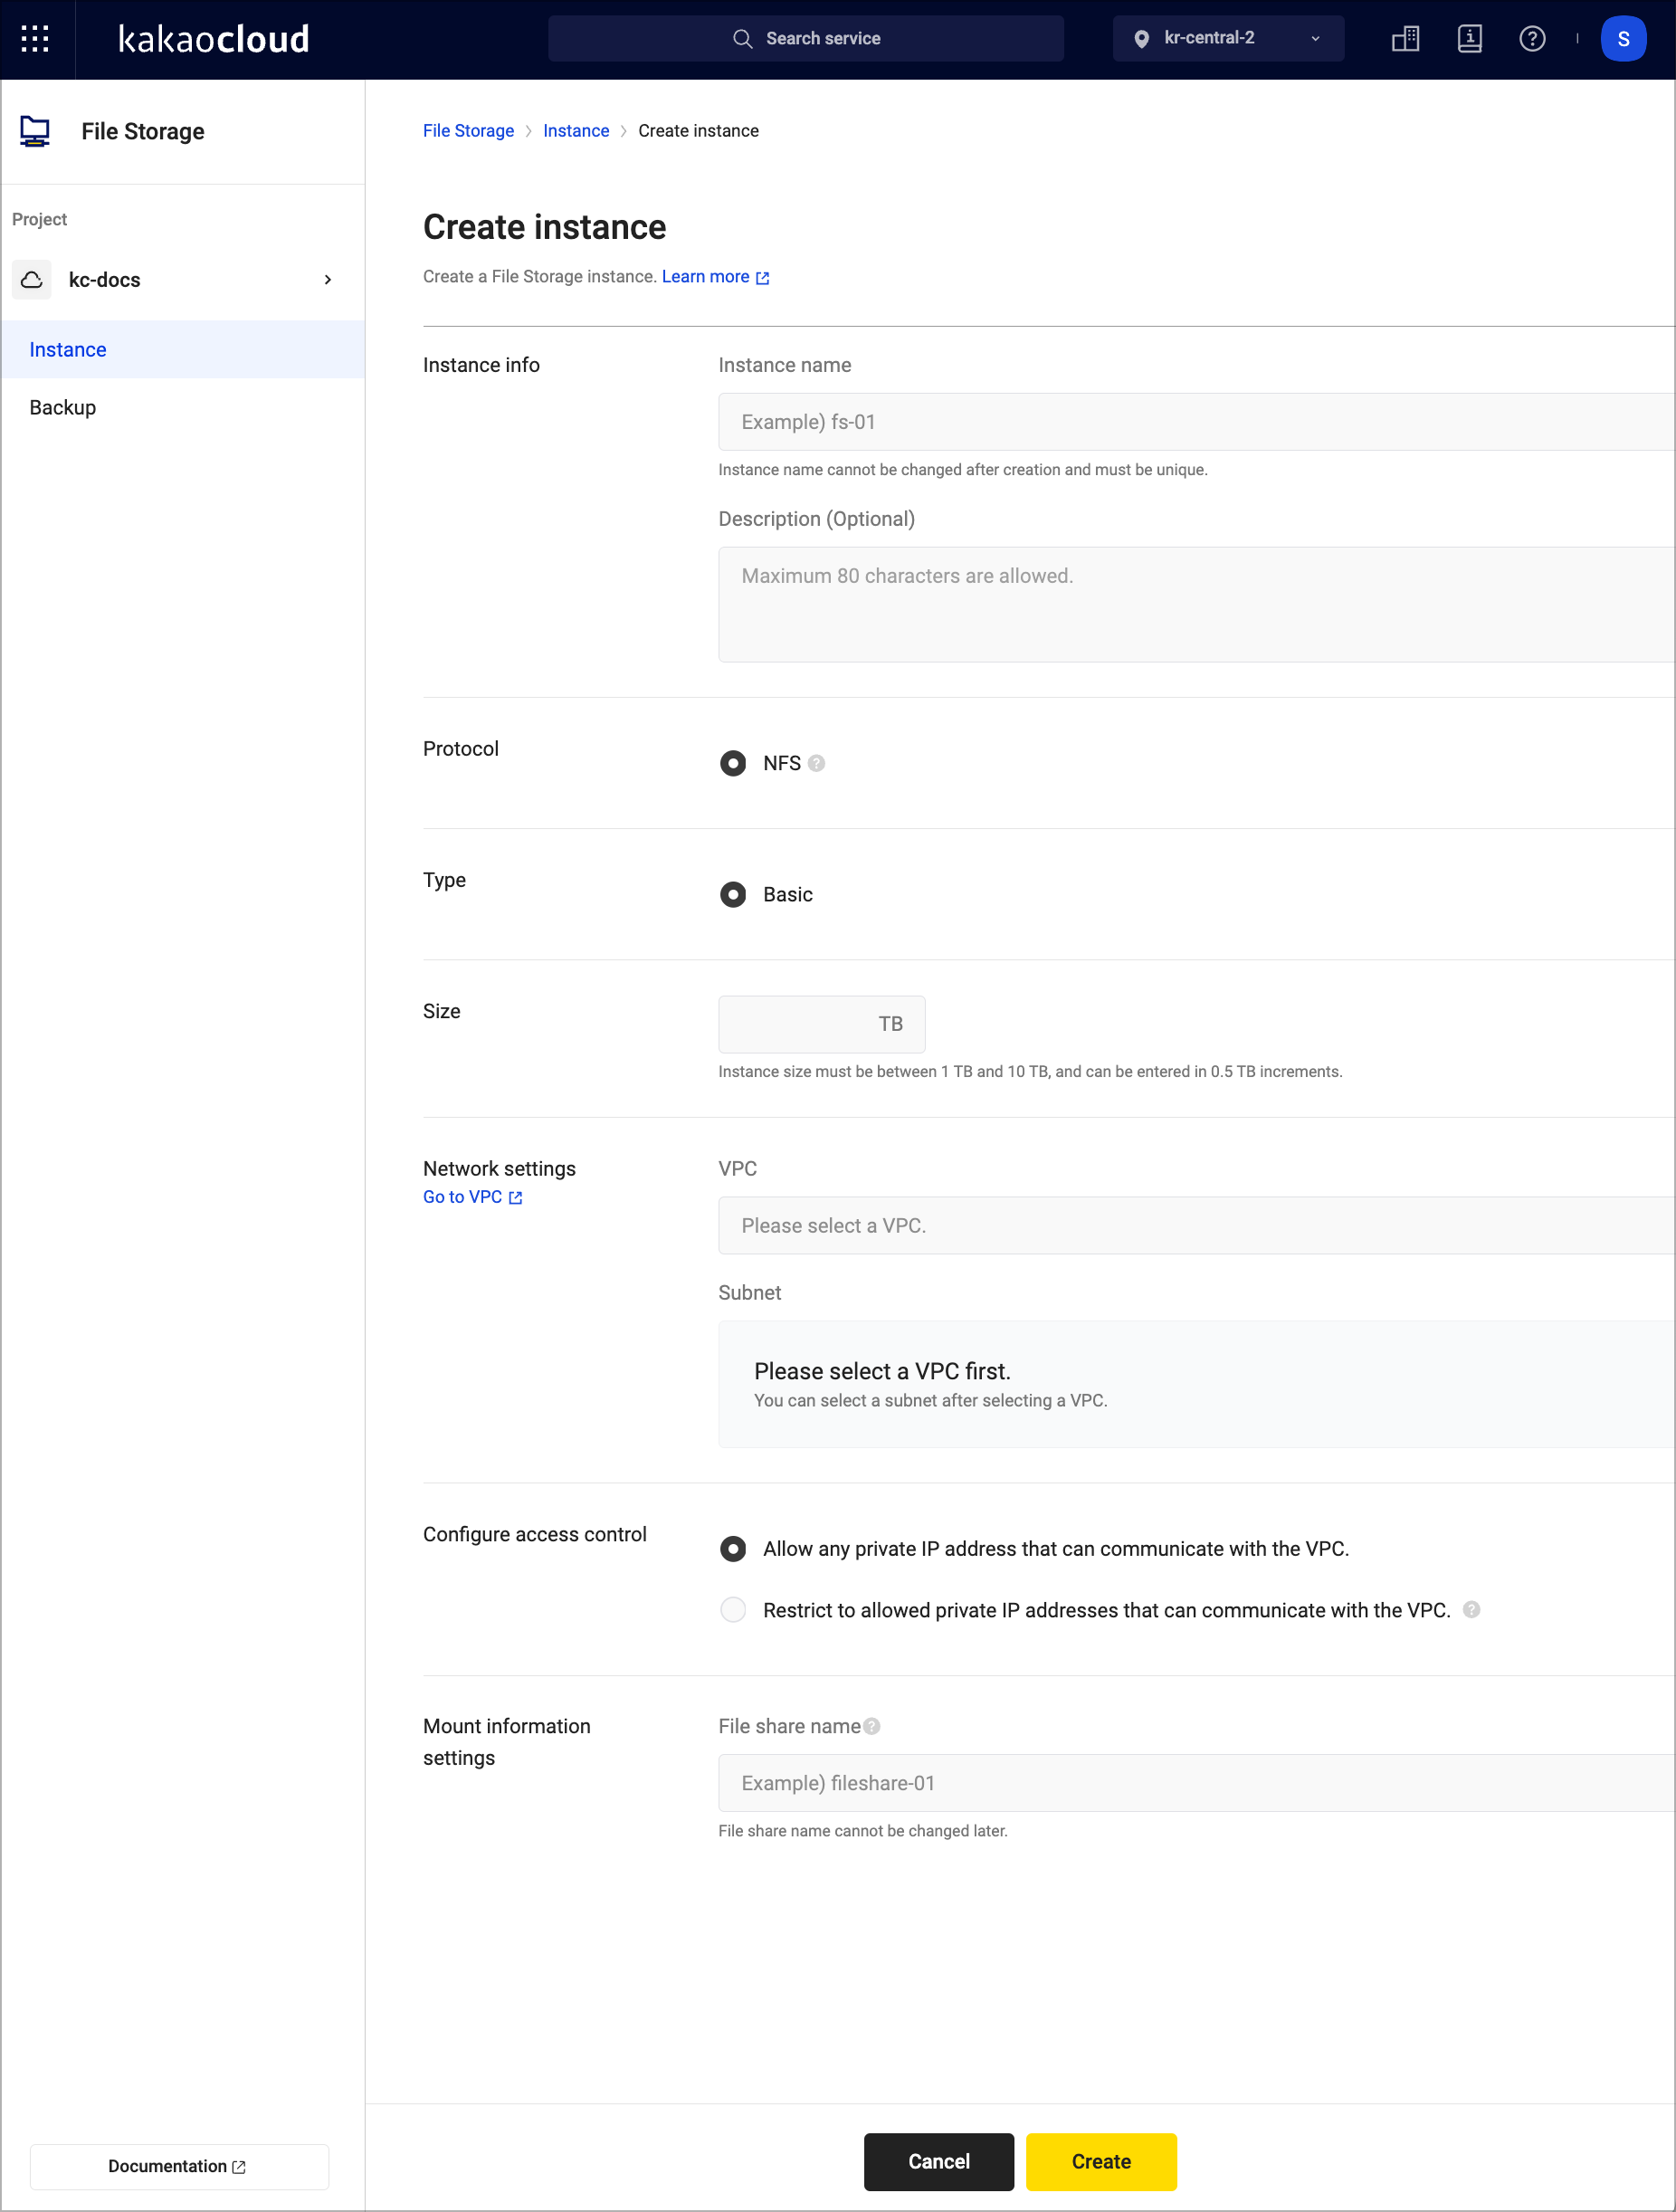 Create instance
Category Description Instance info Instance name: Name of the instance to create
- Example: fsinstance-01
- Cannot use duplicate instance names within the same project.
Description (Optional): Description of the instance to createProtocol Choose the protocol for the OS of the server to be mounted.
- Currently only NFS protocol for Linux servers is provided.
- NFS protocol supports Ubuntu, CentOS, etc.
- File Storage supports only NFS v4 and uses port 2049.Type Currently only Basictype is provided.
- Continuously expanding types to allow selection according to user environment.
- Refer to Instance type for details.Size Set the instance size.
- Enter an appropriate size for the instance allocation.
- Minimum and maximum instance sizes available vary by type.
ᄂ Currently, the available sizes for basic type instances are from 1.0TB to 16TB, in increments of 0.5TB.
ᄂ Example for Basic type: "1.5TB" can be entered.Network settings VPC: Select the VPC to configure the instance.
Subnet: Partial network divided from IP address.Configure access control Configure resources accessible to File Storage instance.
- Allow any private IP address that can communicate with the VPC.: Accessible from resources within the communicating VPC without separate access control settings.
- Restrict to allowed private IP addresses that can communicate with the VPC.: Only allows access from private IPs of specific resources created (up to 30).
* Note
- When selecting a VPC shared with another project, resources from the shared VPC of the other project can also be mounted.
- If inter-subnet access is not supported, even if access settings are configured by entering IP addresses, access cannot be made.Mount information settings Set the file sharing name: Set the file sharing name to be used as the mount point.
- Example: fileshare-01
- Refer to unavailable shared directory names below.
Unavailable shared directory names
| Name | ||||
|---|---|---|---|---|
| bin | lib | media | run | usr |
| boot | lib32 | mnt | sbin | var |
| dev | lib64 | opt | srv | etc |
| libx32 | proc | sys | home | lost+found |
| root | tmp |
Manage instance
Here's how to manage instances in File Storage.
View instance list
You can view the current list of instances and their basic information.
-
Go to KakaoCloud console > Beyond Storage Service > File Storage.
-
On the Instance menu, check the currently created instances and basic information.
Category Description Name Name of the instance entered when created. State State of the instance
- Refer to instance lifecycle and state For details.Private IP Private IP address assigned when the instance is created Size Size of the instance Mount information Mount point
- A directory address that combines the private IP and file share name
- Utilized when mounting on Virtual Machine instancesAvailable zone Availability zone where the instance is created Created at Date when the detailed information of the instance was last modified [More] icon - Configure access control: Check the deployed VPC and Subnet and configure access control settings
- Modify instance settings: Modify instance description
- Delete: Delete the instance
Change instance size
Here's how to set the instance size in File Storage.
- Go to KakaoCloud console > Beyond Storage Service > File Storage.
- On the Instance menu, Select the [More] icon and select Modify instance settings.
- Change the size and select the [Save] icon. You can only enter a larger value than the current instance size. Decreasing the instance size is not allowed.
Resizing the instance may result in downtime due to instance reboot.
View instance details
You can view detailed information, network, and backup information, etc.
-
Go to KakaoCloud console > Beyond Storage Service > File Storage.
-
In the Instance menu, select the instance to view details.
-
Select the Details tab and check the information.
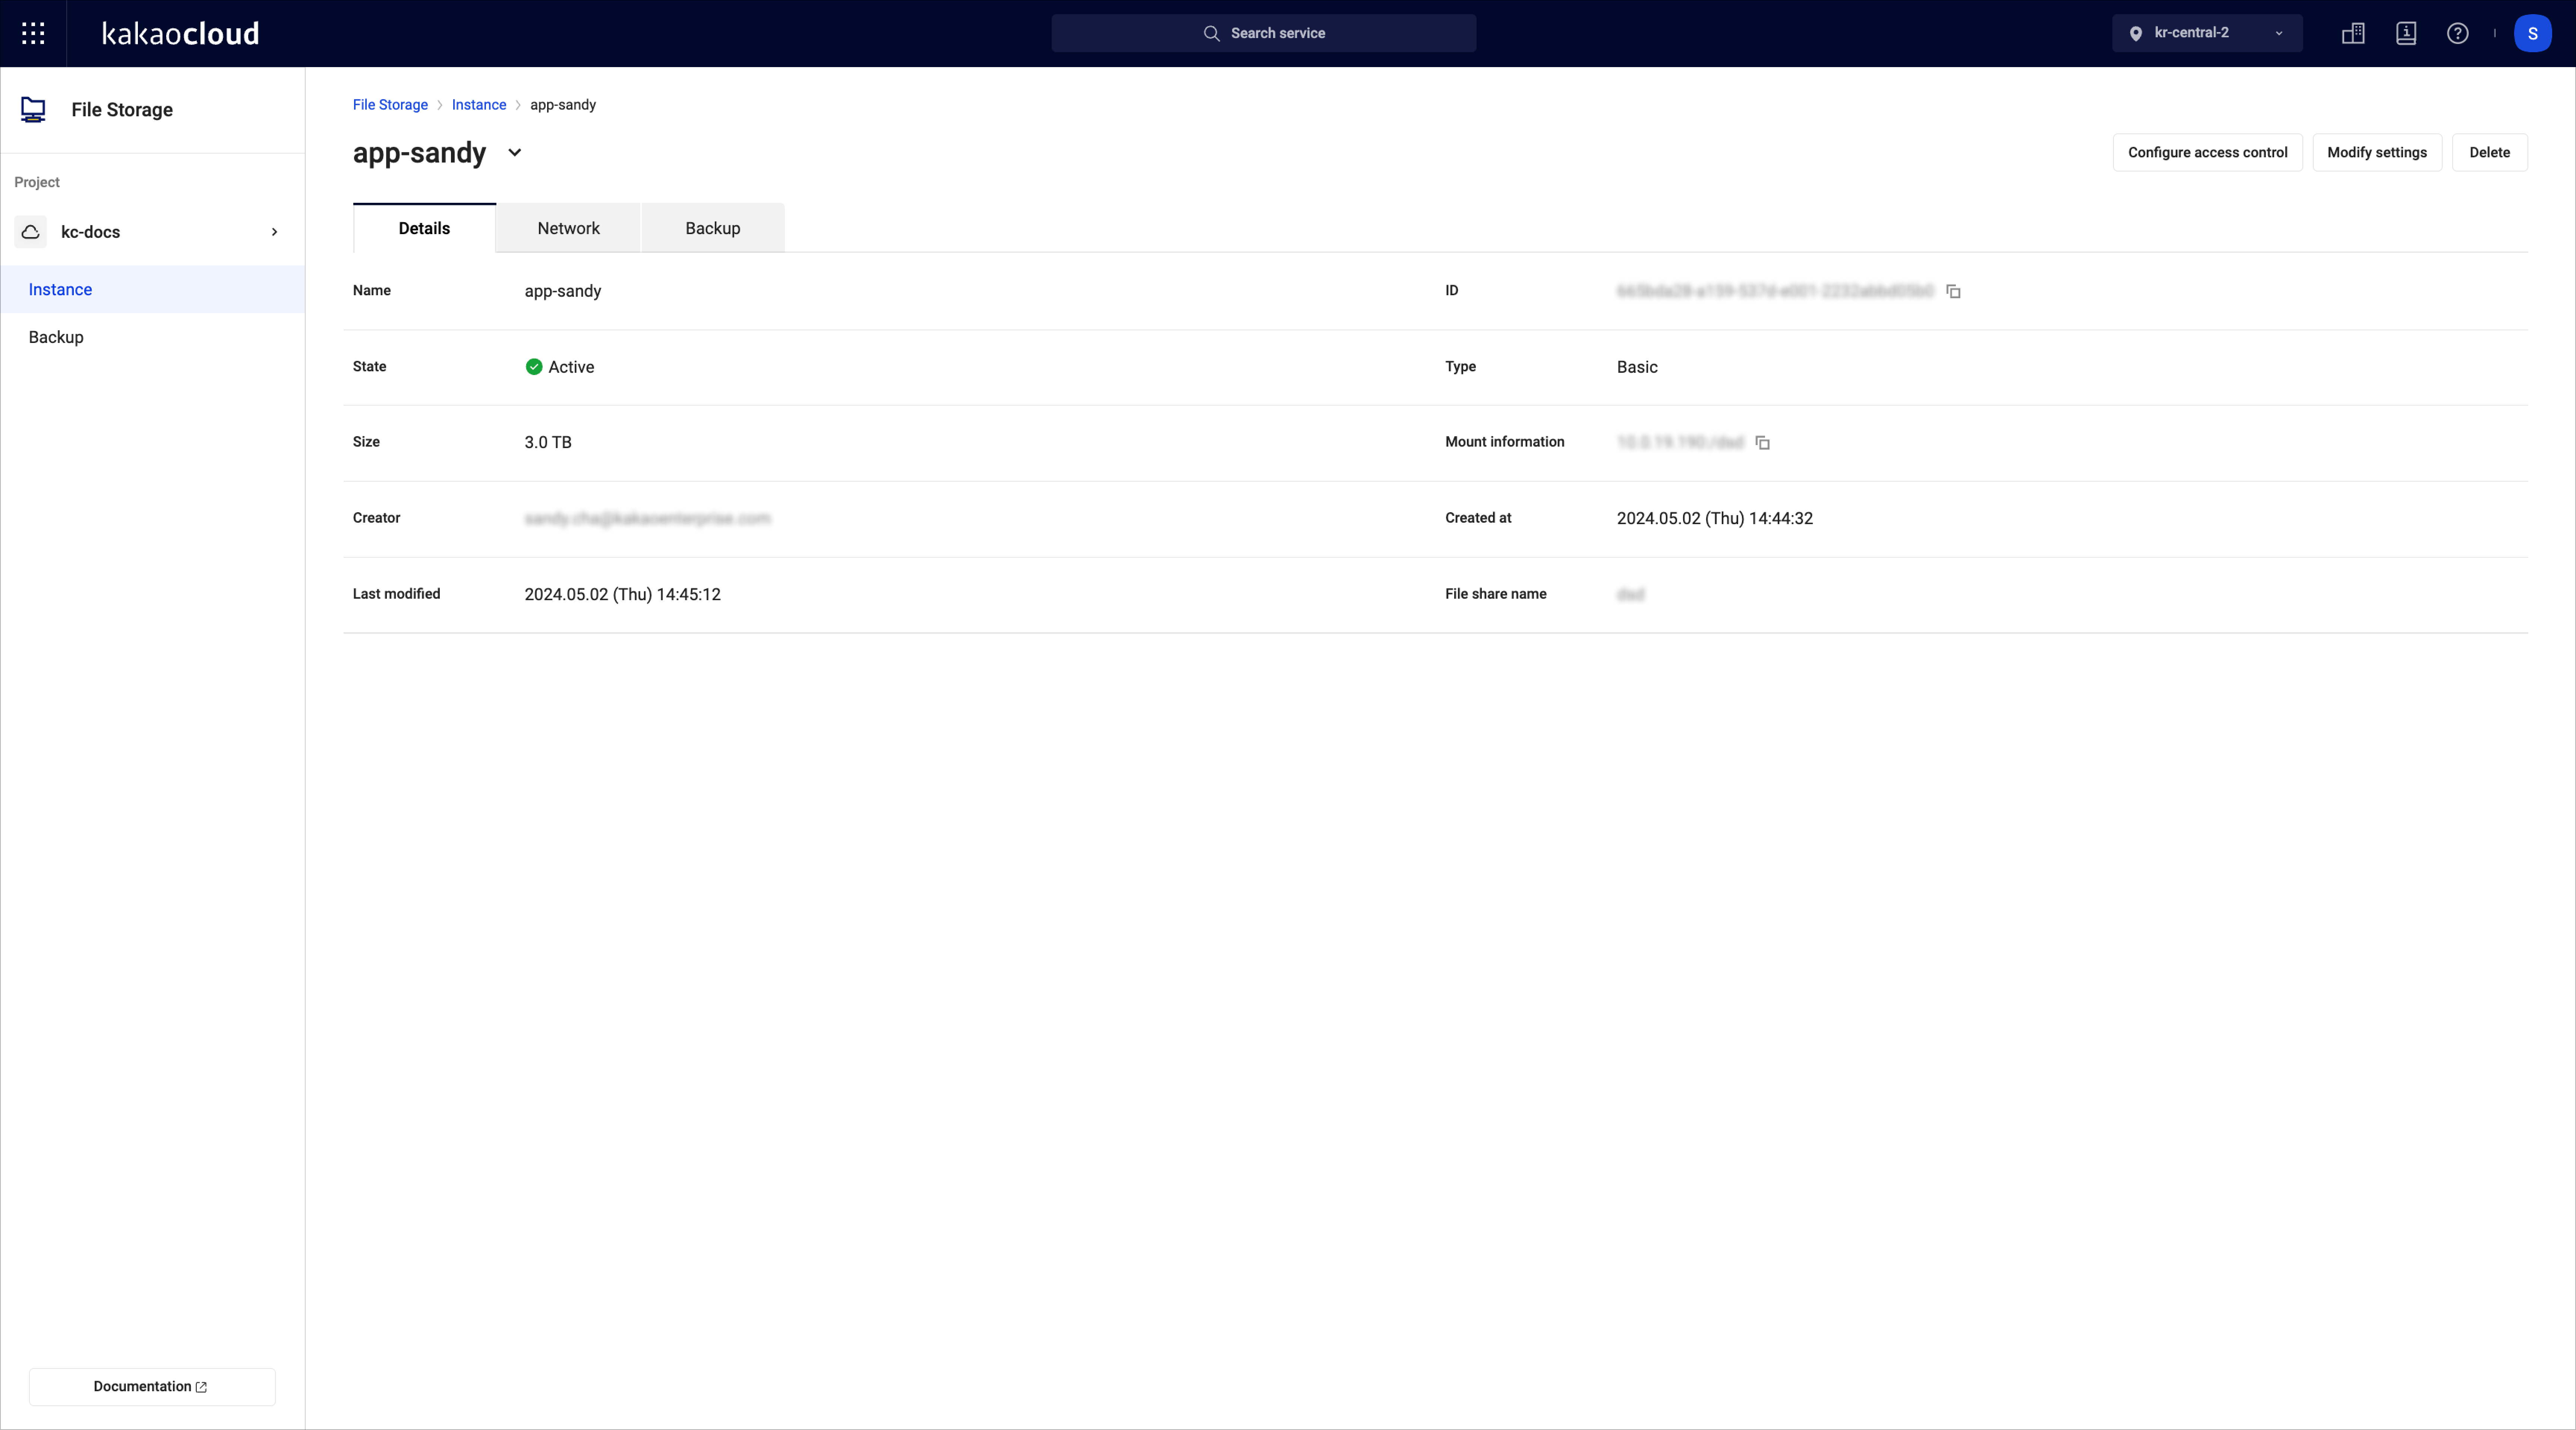 Instance details
Category Description Name Name of the created instance State Current state of the instance:
-Creating: Allocating resources for the instance and configuring it with the specified volume size.
-Active: Instance is running normally and available for use.
-Restoring: Instance is performing restoration tasks.
-Setting-up: Instance is performing post-restoration reboot tasks.
-Backing-up: Instance is performing backup tasks.
-Updating: Instance is undergoing configuration changes, image changes by administrators, or migrations.
-Deleting: Instance is being terminated and returned.
-Error: Instance is in an unusable state due to an error.Size Size allocated to the instance Creator Account ID (email address) of the user who created the instance Last modified Date and time when the instance details were last modified ID Instance ID Type Type of instance configured Mount information Mount point:
- Directory address combined with private IP and file share name
- Utilized when mounted on Virtual Machine instancesCreated at Date of instance creation File share name Shared directory name
View network information
You can check the network information of File Storage instances.
-
Go to KakaoCloud console > Beyond Storage Service > File Storage.
-
Select the Instance menu and choose an instance.
-
On the Network tab, check the detailed network information of the instance.
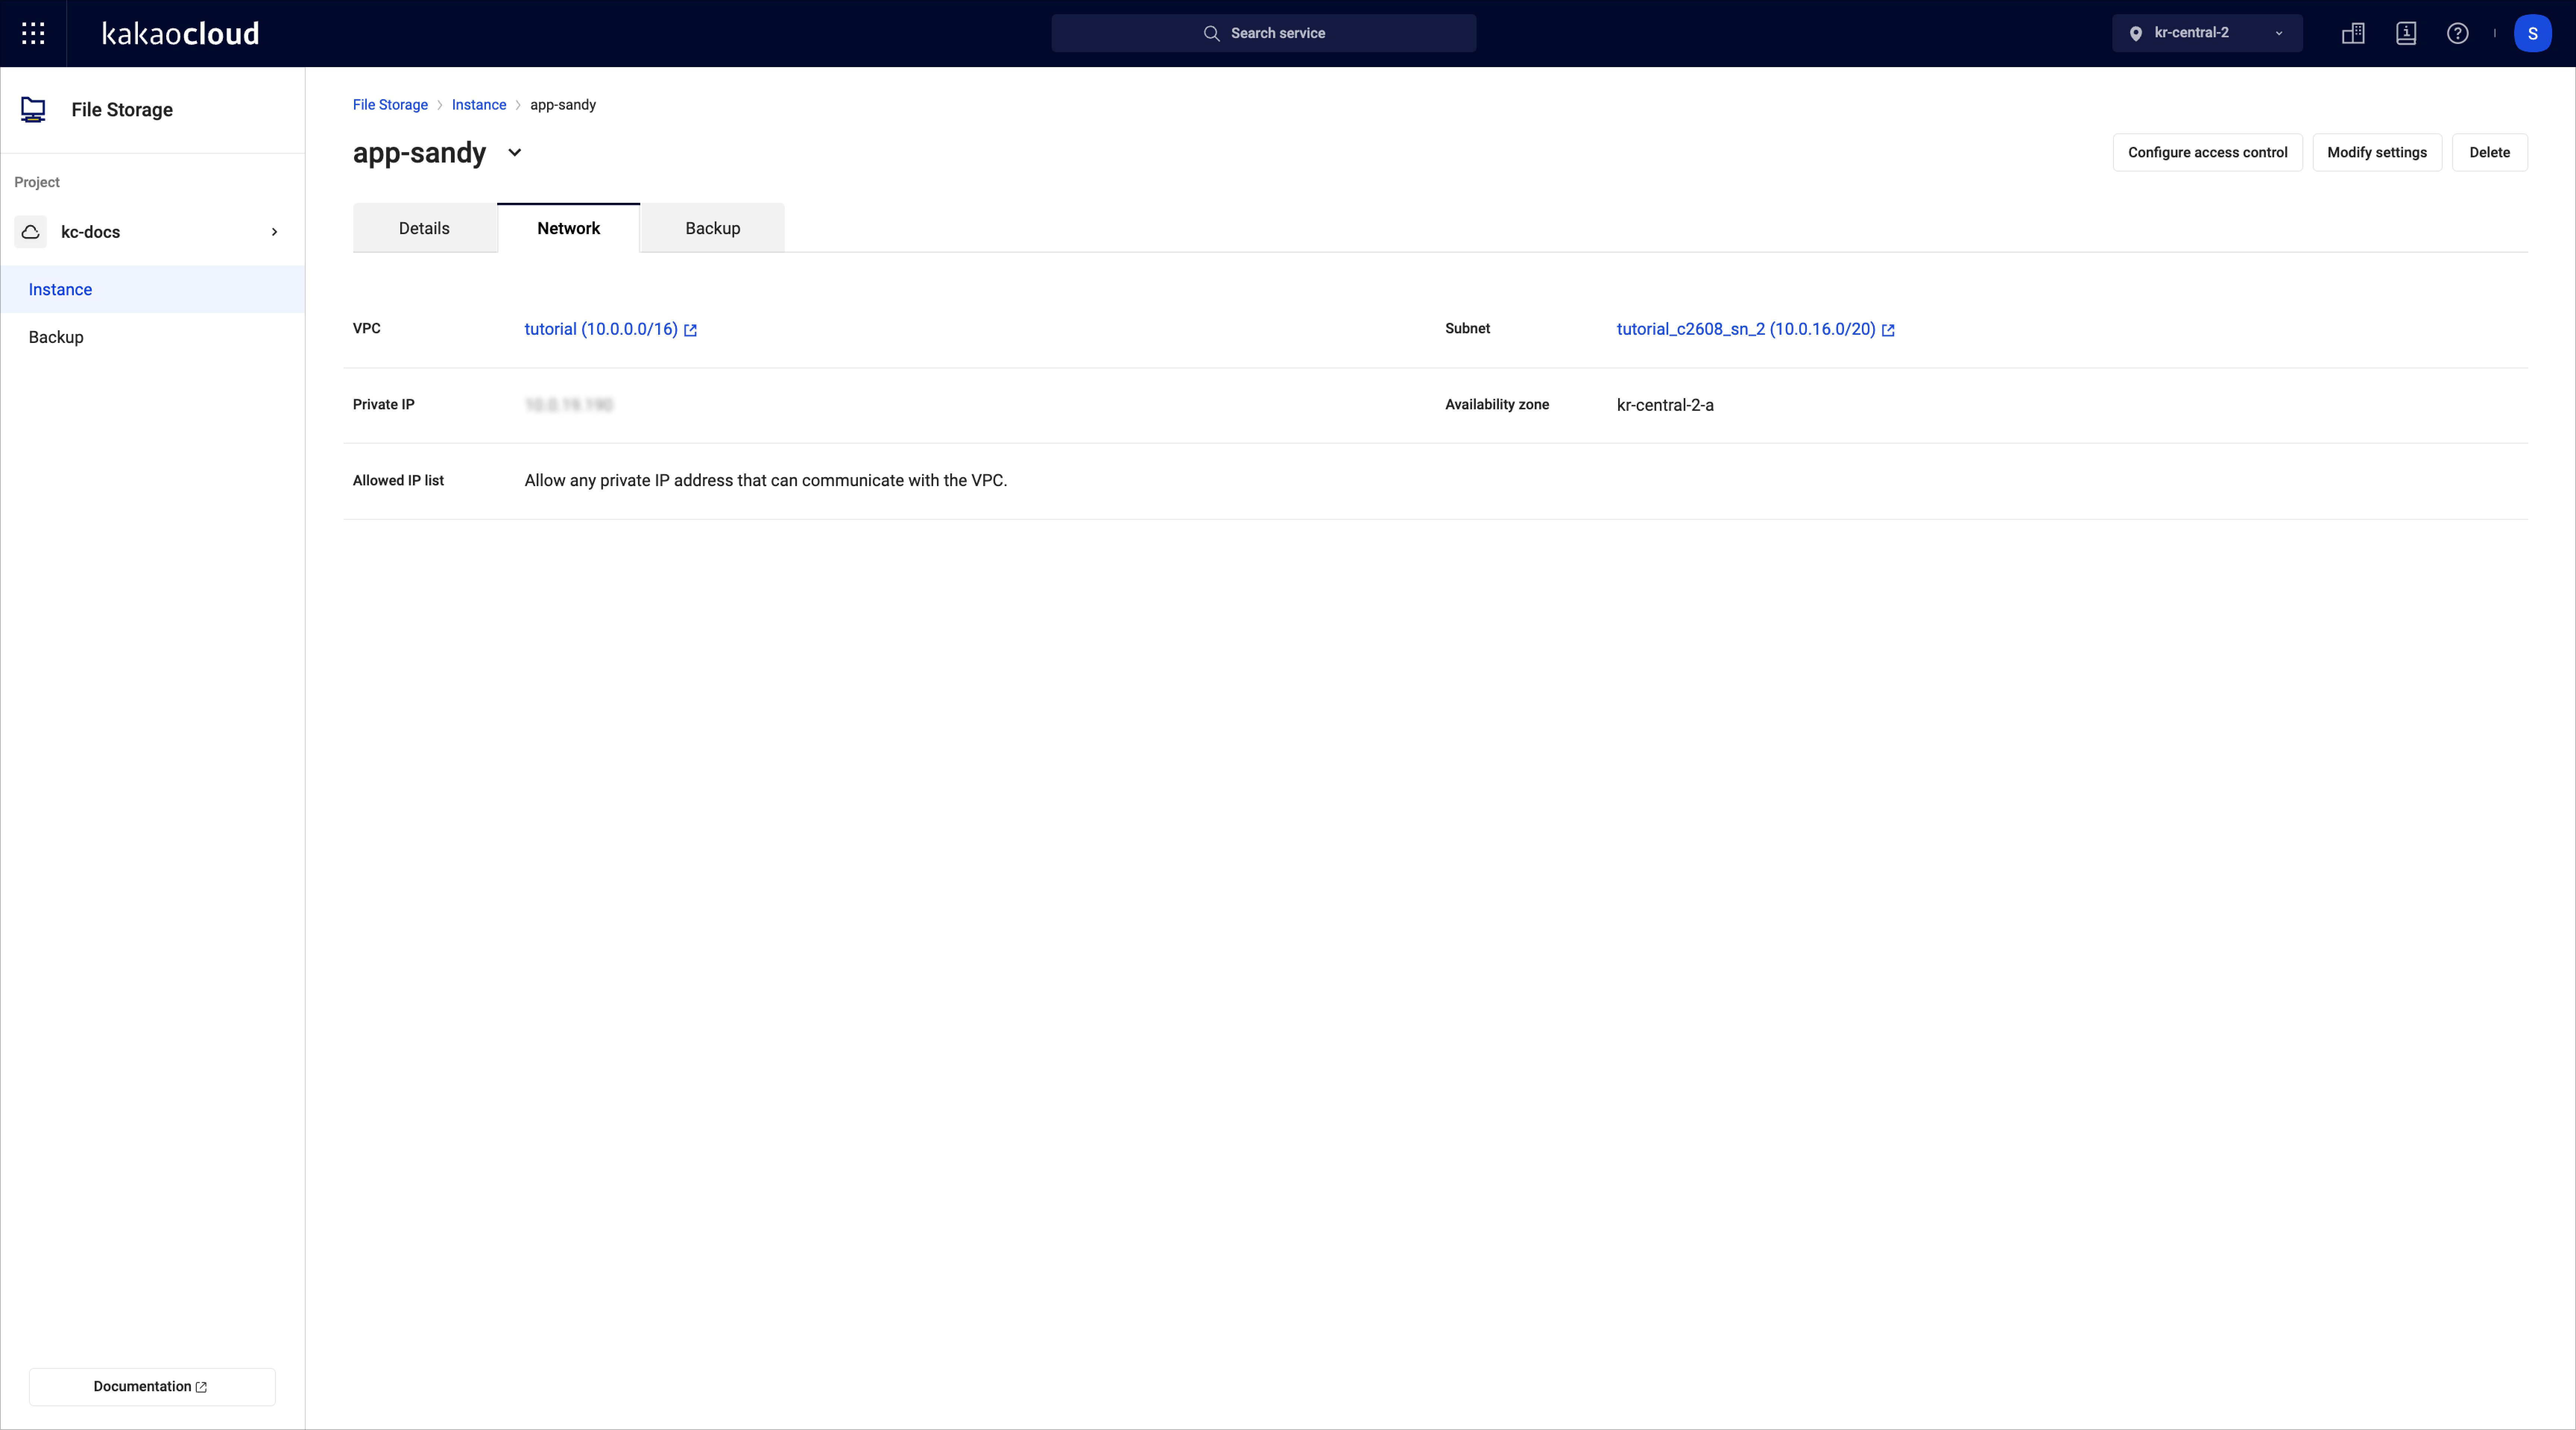 Instance network
Category Description VPC VPC to configure the instance Private IP Private IP address assigned when the instance is created Allowed IP List List of IPs that can access the instance and access control settings Subnet Subnet created in the VPC Availability zone Availability zone where the instance is created
Configure access control
You can configure resources accessible to File Storage instance.
-
Go to KakaoCloud console > Beyond Storage Service > File Storage.
-
Select the Instance menu and choose an instance.
-
On the Network tab, select the Configure access control button on the top right.
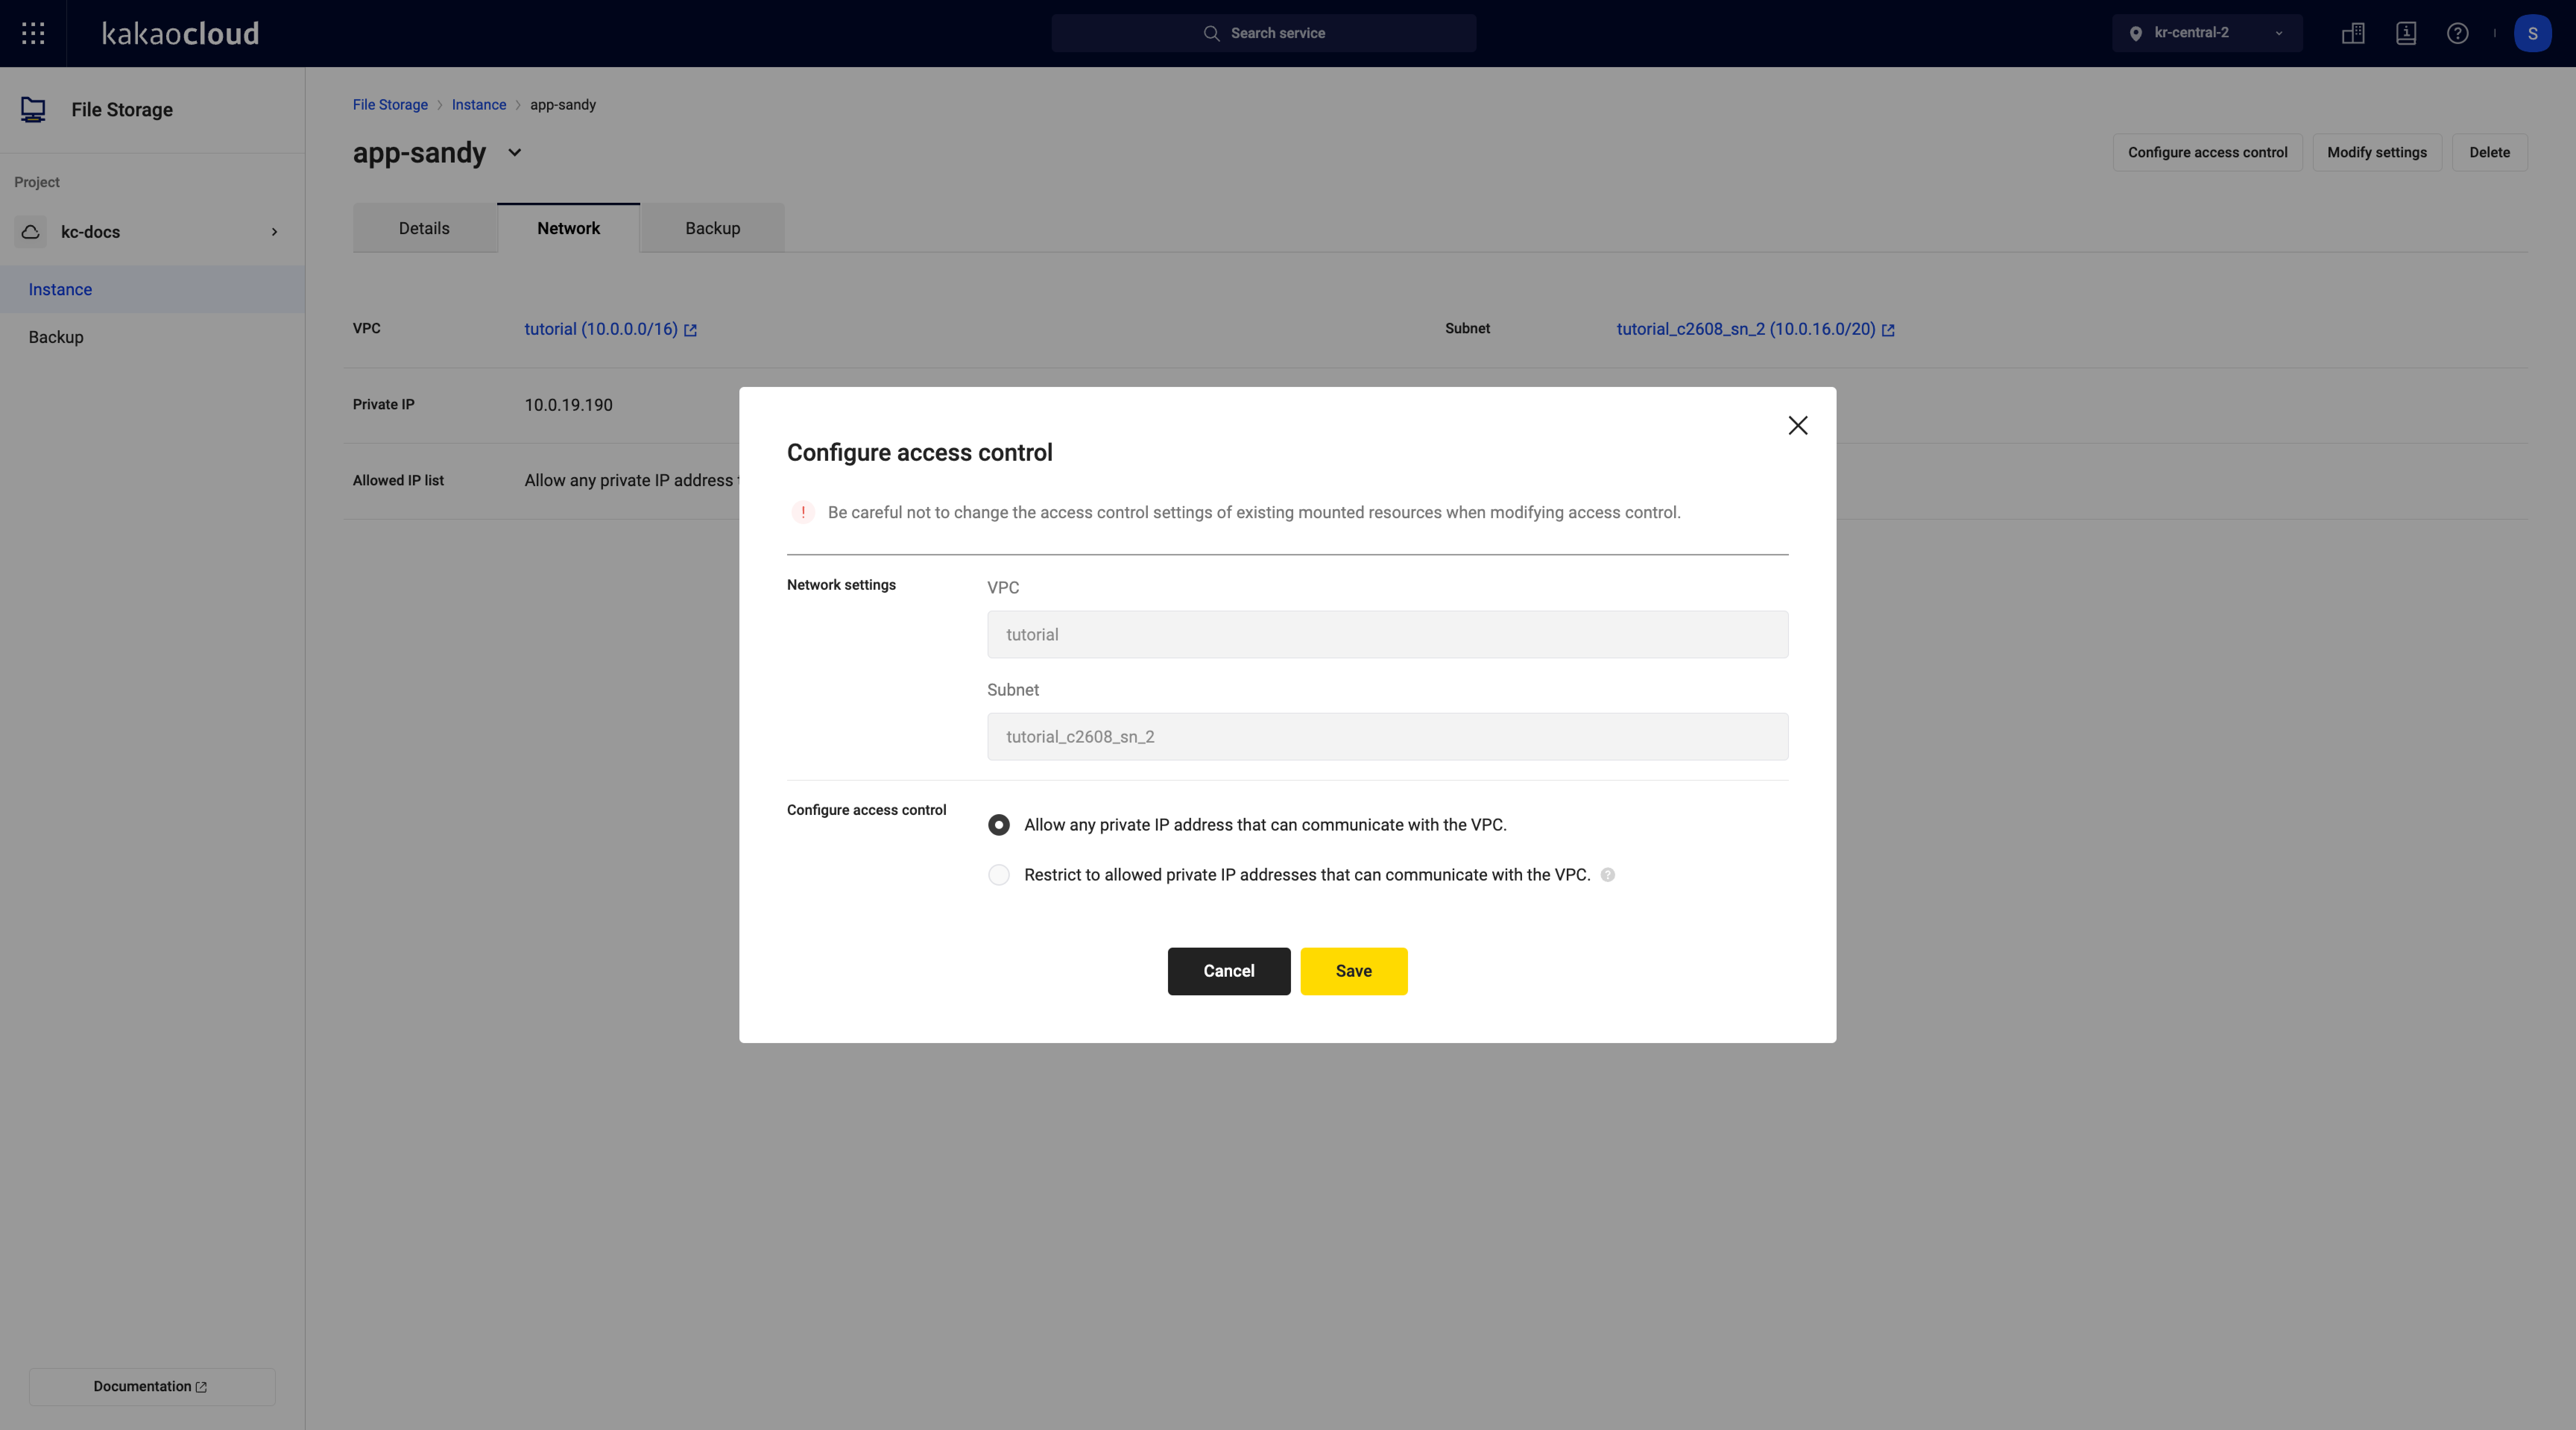 Configure access control
Category Description Network settings Configure VPC and Subnet resources
- VPC: Select the VPC to configure the instance.
- Subnet: Select one of the subnets created in VPCConfigure access control Configure resources accessible to File Storage instance
- Allow any private IP address that can communicate with the VPC.: Accessible from resources within the communicating VPC without separate access control settings.
- Restrict to allowed private IP addresses that can communicate with the VPC.: Only allows access from private IPs of specific resources created (up to 30).
💡 Note
- When selecting a VPC shared with another project, resources from the shared VPC of the other project can also be mounted.
- If inter-subnet access is not supported, configuring access based on IP addresses will still not enable access.
Delete instance
When deleting a File Storage instance, the instance operation is terminated and returned completely. Once returned, it will disappear from the instance list, and no longer be billed for resources. You can only delete the instance if the instance status is Active.
Deleted instance resources are completely returned after shutdown and cannot be recovered.
- Go to KakaoCloud console > Beyond Storage Service > File Storage.
- On the Instance menu, select the [More] icon of the instance and Delete.
- In the pop-up window, enter the name of File Storage instance to delete, and select the [Delete] button.