Create and manage cluster
Create cluster
A cluster is the fundamental resource of Kubernetes Engine, where all Kubernetes objects including container applications are run.
Clusters can be created via the console; API-based creation is planned for future support.
Here is how to create a cluster in the Kubernetes Engine service:
- You can operate clusters and nodes across multiple availability zones (AZs) in multi-AZ-supported regions to improve availability.
- To create a cluster, VPC and subnets must be preconfigured. If not, refer to Create and manage VPC.
Create cluster in the console
You can create a cluster from the KakaoCloud console.
-
Go to KakaoCloud console > Container Pack > Kubernetes Engine.
-
Select the [Start] button to begin using Kubernetes Engine.
- When the service starts, a Service Agent is automatically created to access Kubernetes Engine resources.
-
In the Cluster menu, select the [Create cluster] button.
-
In the Create cluster window, enter the required information and select [Create].
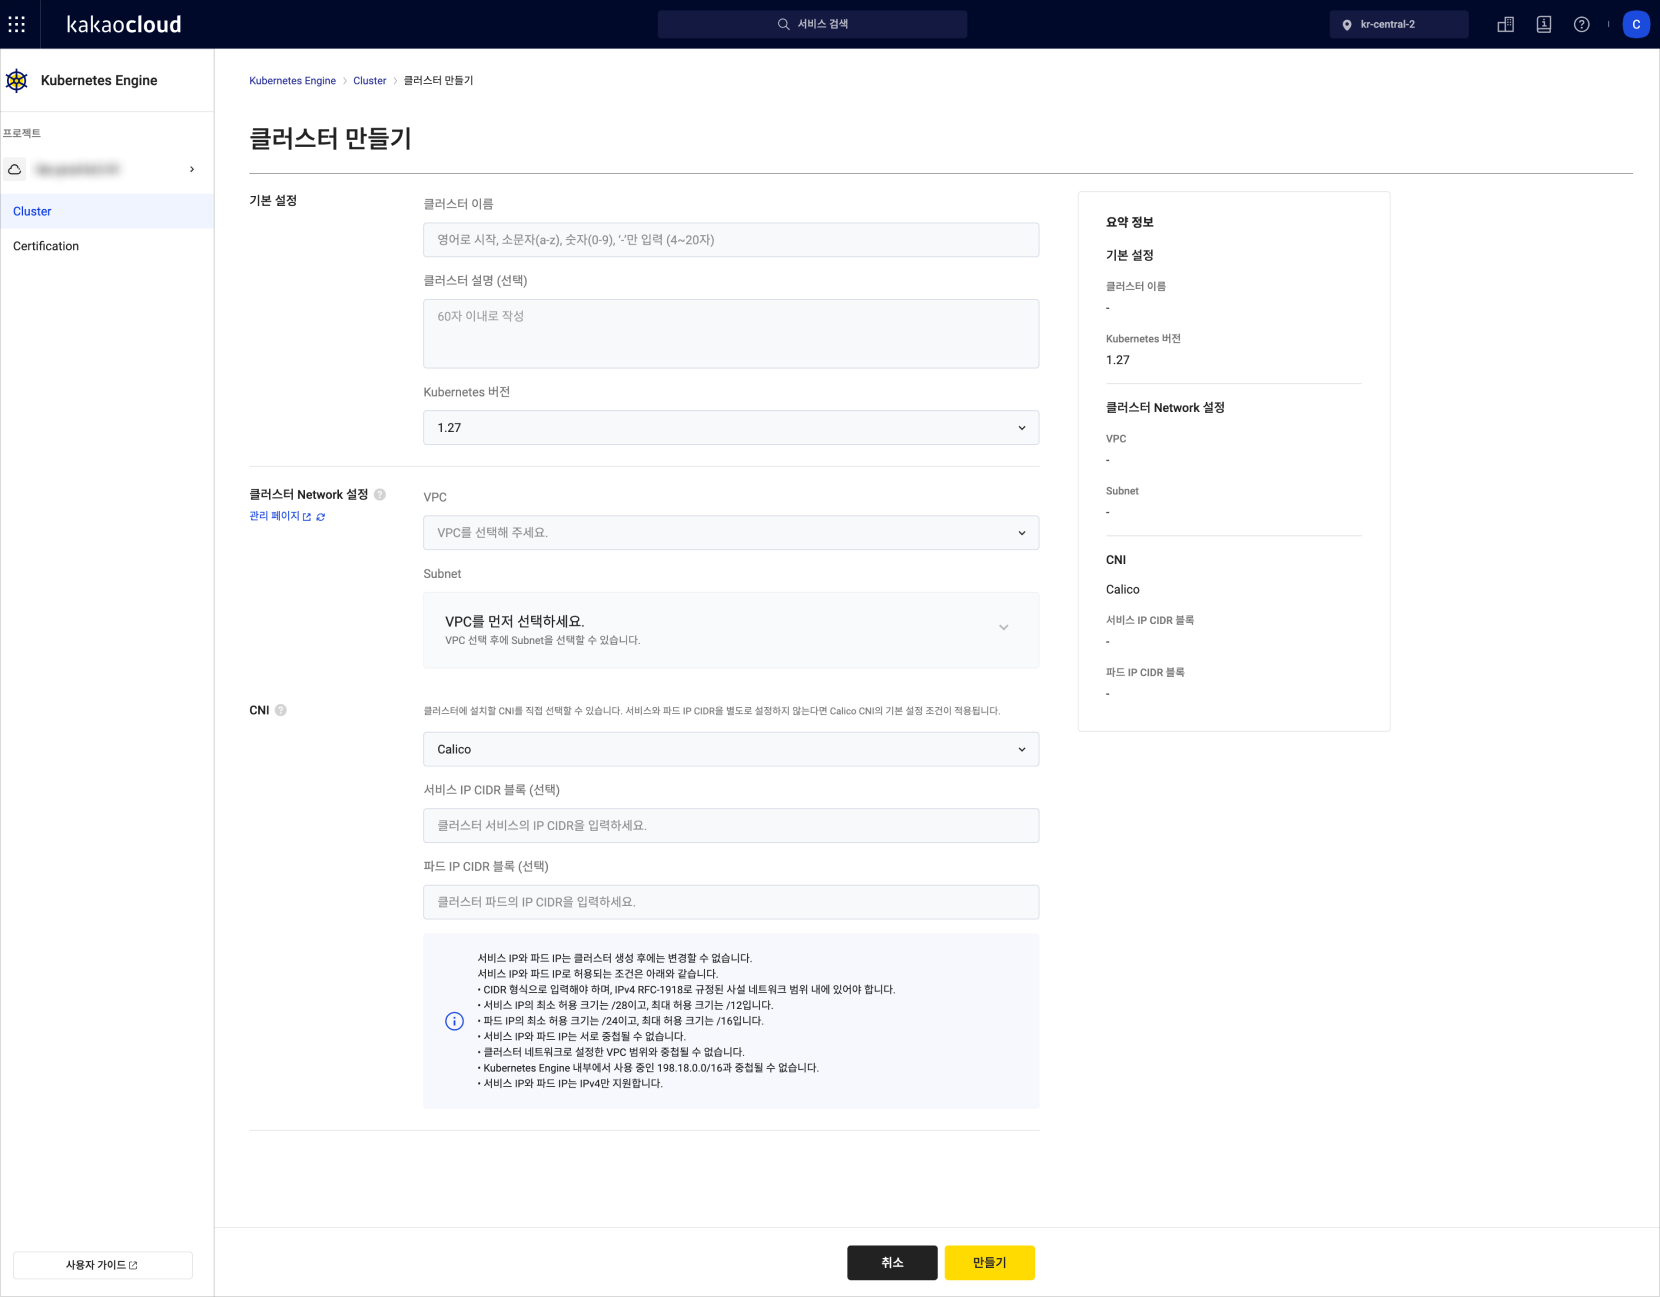
Category Description Basic settings • Set basic cluster information
- Cluster name: Enter the cluster name
- Cluster description (optional): Up to 60 characters
- Kubernetes version: Choose the Kubernetes version for the cluster
ㄴ For details on supported versions, refer to Support informationCluster network settings • Configure network settings
- VPC: Select the VPC to deploy the cluster
- Subnet: Select the subnet to deploy the cluster
ㄴ When creating a node pool, choose from the subnets configured in the cluster network
ㄴ In multi-AZ environments, select multiple subnets across different AZs to improve availability
ㄴ For multi-AZ clusters, select at least one subnet per AZ
• Cluster endpoint access: Choose public or private endpoint
ㄴ Public: API server accessible from the internet
ㄴ Private: API server accessible only within the VPCCNI • Choose a CNI plugin for the cluster: Calico or Cilium
- Service IP CIDR block (optional): IP range for service objects
- Pod IP CIDR block (optional): IP range for pods
⚠️ Caution
Service and Pod IPs cannot be changed after cluster creation.
If the cluster network is in a private subnet, internet communication is not available.
Use a NAT instance to allow outbound access for nodes in a private subnet.
See Using NAT instance for more.
The following conditions apply to service and pod IPs for CNIs:
- Must be in CIDR format and within the RFC-1918 private IPv4 range.
- Minimum /28 and maximum /12 for service IPs.
- Minimum /24 and maximum /16 for pod IPs.
- Service and pod IPs must not overlap.
- Must not overlap with VPC IP ranges.
- Must not overlap with internal range 198.18.0.0/16 used by Kubernetes Engine.
- Only IPv4 is supported.
Cluster endpoint
-
The cluster API server endpoint URL is based on the access option.
Option Behavior Public cluster endpoint Provides a publicly accessible API server endpoint with a public IP. Private cluster endpoint Provides a private API server endpoint accessible only within the VPC.
After creating a cluster, see the following tutorials for operational setup expansion.
- Deploy Kubernetes cluster with Kubernetes Engine: Basic deployment flow
- Integrate Kubernetes cluster with object storage: Application storage integration
- Use NVIDIA GPU worker nodes in Kubernetes Engine clusters: GPU workload runtime setup
Manage cluster
Here’s how to manage clusters in Kubernetes Engine.
View cluster list
You can view the list of existing clusters.
-
Go to KakaoCloud console > Container Pack > Kubernetes Engine.
-
In the Cluster menu, view the created clusters.
Category Description Name Cluster name ID Unique cluster ID Status Cluster status
-Provisioned: Provisioning complete
-Pending: Preparing to provision
-Provisioning: Provisioning in progress
-Deleting: Being deleted
-Failed: Requires user interventionKubernetes version Current version Creator ID of the user who created the cluster Created at Cluster creation date [More] icon - kubeconfig file: Download for kubectl setup
- Edit cluster: Modify name and description
- Delete cluster: Delete the cluster
Modify cluster
Modify cluster name, description, and creation date.
-
In the KakaoCloud console, go to Kubernetes Engine.
-
In the Cluster menu, select the [More] icon for the cluster and select Edit cluster.
-
In the Edit cluster popup, update the information and select [Update].
Category Description Cluster name Current name Created at Created Cluster description (optional) Modify or add description (max 60 characters)
Delete cluster
Delete unused clusters.
- Deleting a cluster also deletes the resources created automatically with it. See Automatically generated resources.
- If non-node resources are attached to auto-created security groups, those groups are not deleted.
- Go to Kubernetes Engine in the KakaoCloud console.
- In the Cluster menu, select the [More] icon and select Delete cluster.
- Enter required info in the popup and select [Delete].
Update cluster
If a newer Kubernetes version is available, you can update the control plane of your cluster.
Refer to Support information for supported versions.
Before starting update
Make sure all update conditions are met. Otherwise, the update cannot proceed.
Review the Kubernetes changelogs for application impact.
Update conditions
| Condition | Description |
|---|---|
| Cluster status | Must be Provisioned |
| Node pool status | All must be Running |
| Node pool version | Must match the cluster version exactly |
Update procedures
If the cluster is eligible, perform the update:
Kubernetes supports sequential version updates. You can only update one version at a time.
Updates cannot be canceled or rolled back once started.
- Go to KakaoCloud console > Container Pack > Kubernetes Engine.
- In the Cluster menu, select the [Update] button next to the Kubernetes version.
- In the popup, confirm the version and select [Update].
- The cluster status changes to
Updatingand reverts toProvisionedafter completion. Node pool settings are locked during the update.
Considerations after updating
New node pools will use the latest cluster version.
Existing node pools must be updated. See Update nodes.
What to check if an update fails
If an update fails, the cluster status changes to Failed.
Contact Helpdesk > Technical Inquiry.
- In the KakaoCloud console, go to Helpdesk (top-right).
- In the Q&A tab, select [Ask a question].
- Select Technical Inquiry.
- Fill in the form and select [Submit].
View cluster details
You can check cluster details, node pools, and nodes.
-
Go to KakaoCloud console > Container Pack > Kubernetes Engine.
-
Select the cluster from the Cluster menu.
-
View detailed information on the cluster page.
Category Description Cluster status Current cluster status Kubernetes version Active version Creator ID of creator Created at Date of creation
View cluster details (tab)
Check unique ID, vCPU total, and network info.
-
Go to the Details tab.
Category Description ID Cluster ID API server endpoint URL to call Kubernetes API Total vCPU Total vCPUs across worker nodes Total memory Total memory across worker nodes VPC VPC where cluster is deployed Subnet Deployed subnet(s); all selected subnets shown for multi-AZ
View node pool information
See all node pools and their configurations.
-
Select a cluster from the Cluster menu.
-
Go to the Node pool tab.
Category Description Node pool Name and description (select name for details) Node pool status Status: Running,Running (Scheduling Disable),ScalingUp,ScalingDown,Deleting,FailedKubernetes version Version of nodes in the pool Instance type VM type used by nodes Node pool type Type of instance used Volume size Volume size of node instance Node count Number of nodes AZ Availability zone of associated subnets
View node information
Check all nodes within the cluster.
-
Go to the Node tab of the selected cluster.
Category Description Node Name and description (select name for details) Node status Status: Running,Running (Scheduling Disable),Provisioned,Deleted,Pending,Provisioning,Deleting,FailedNode pool Node pool to which the node belongs Private IP Node’s private IP address AZ Availability zone of the subnet the node runs in Pod scheduling Allowed or Blocked for new pods Uptime Time since the node creation was requested (not creation time)