Manage nodes
A node is a server that runs container applications. In Kubernetes Engine, nodes are managed in groups called node pools, where all nodes share the same instance type.
Create and manage node pools
The following explains how to manage node pools in the Kubernetes Engine service.
Create node pool
You must first create a cluster before creating a node pool.
-
Go to KakaoCloud console > Container Pack > Kubernetes Engine.
-
In the Cluster menu, select the cluster in which to create the node pool.
-
On the cluster's detail page, go to the Node pool tab and select the [Create node pool] button.
-
Enter the required information in the Create node pool form and select [Create].
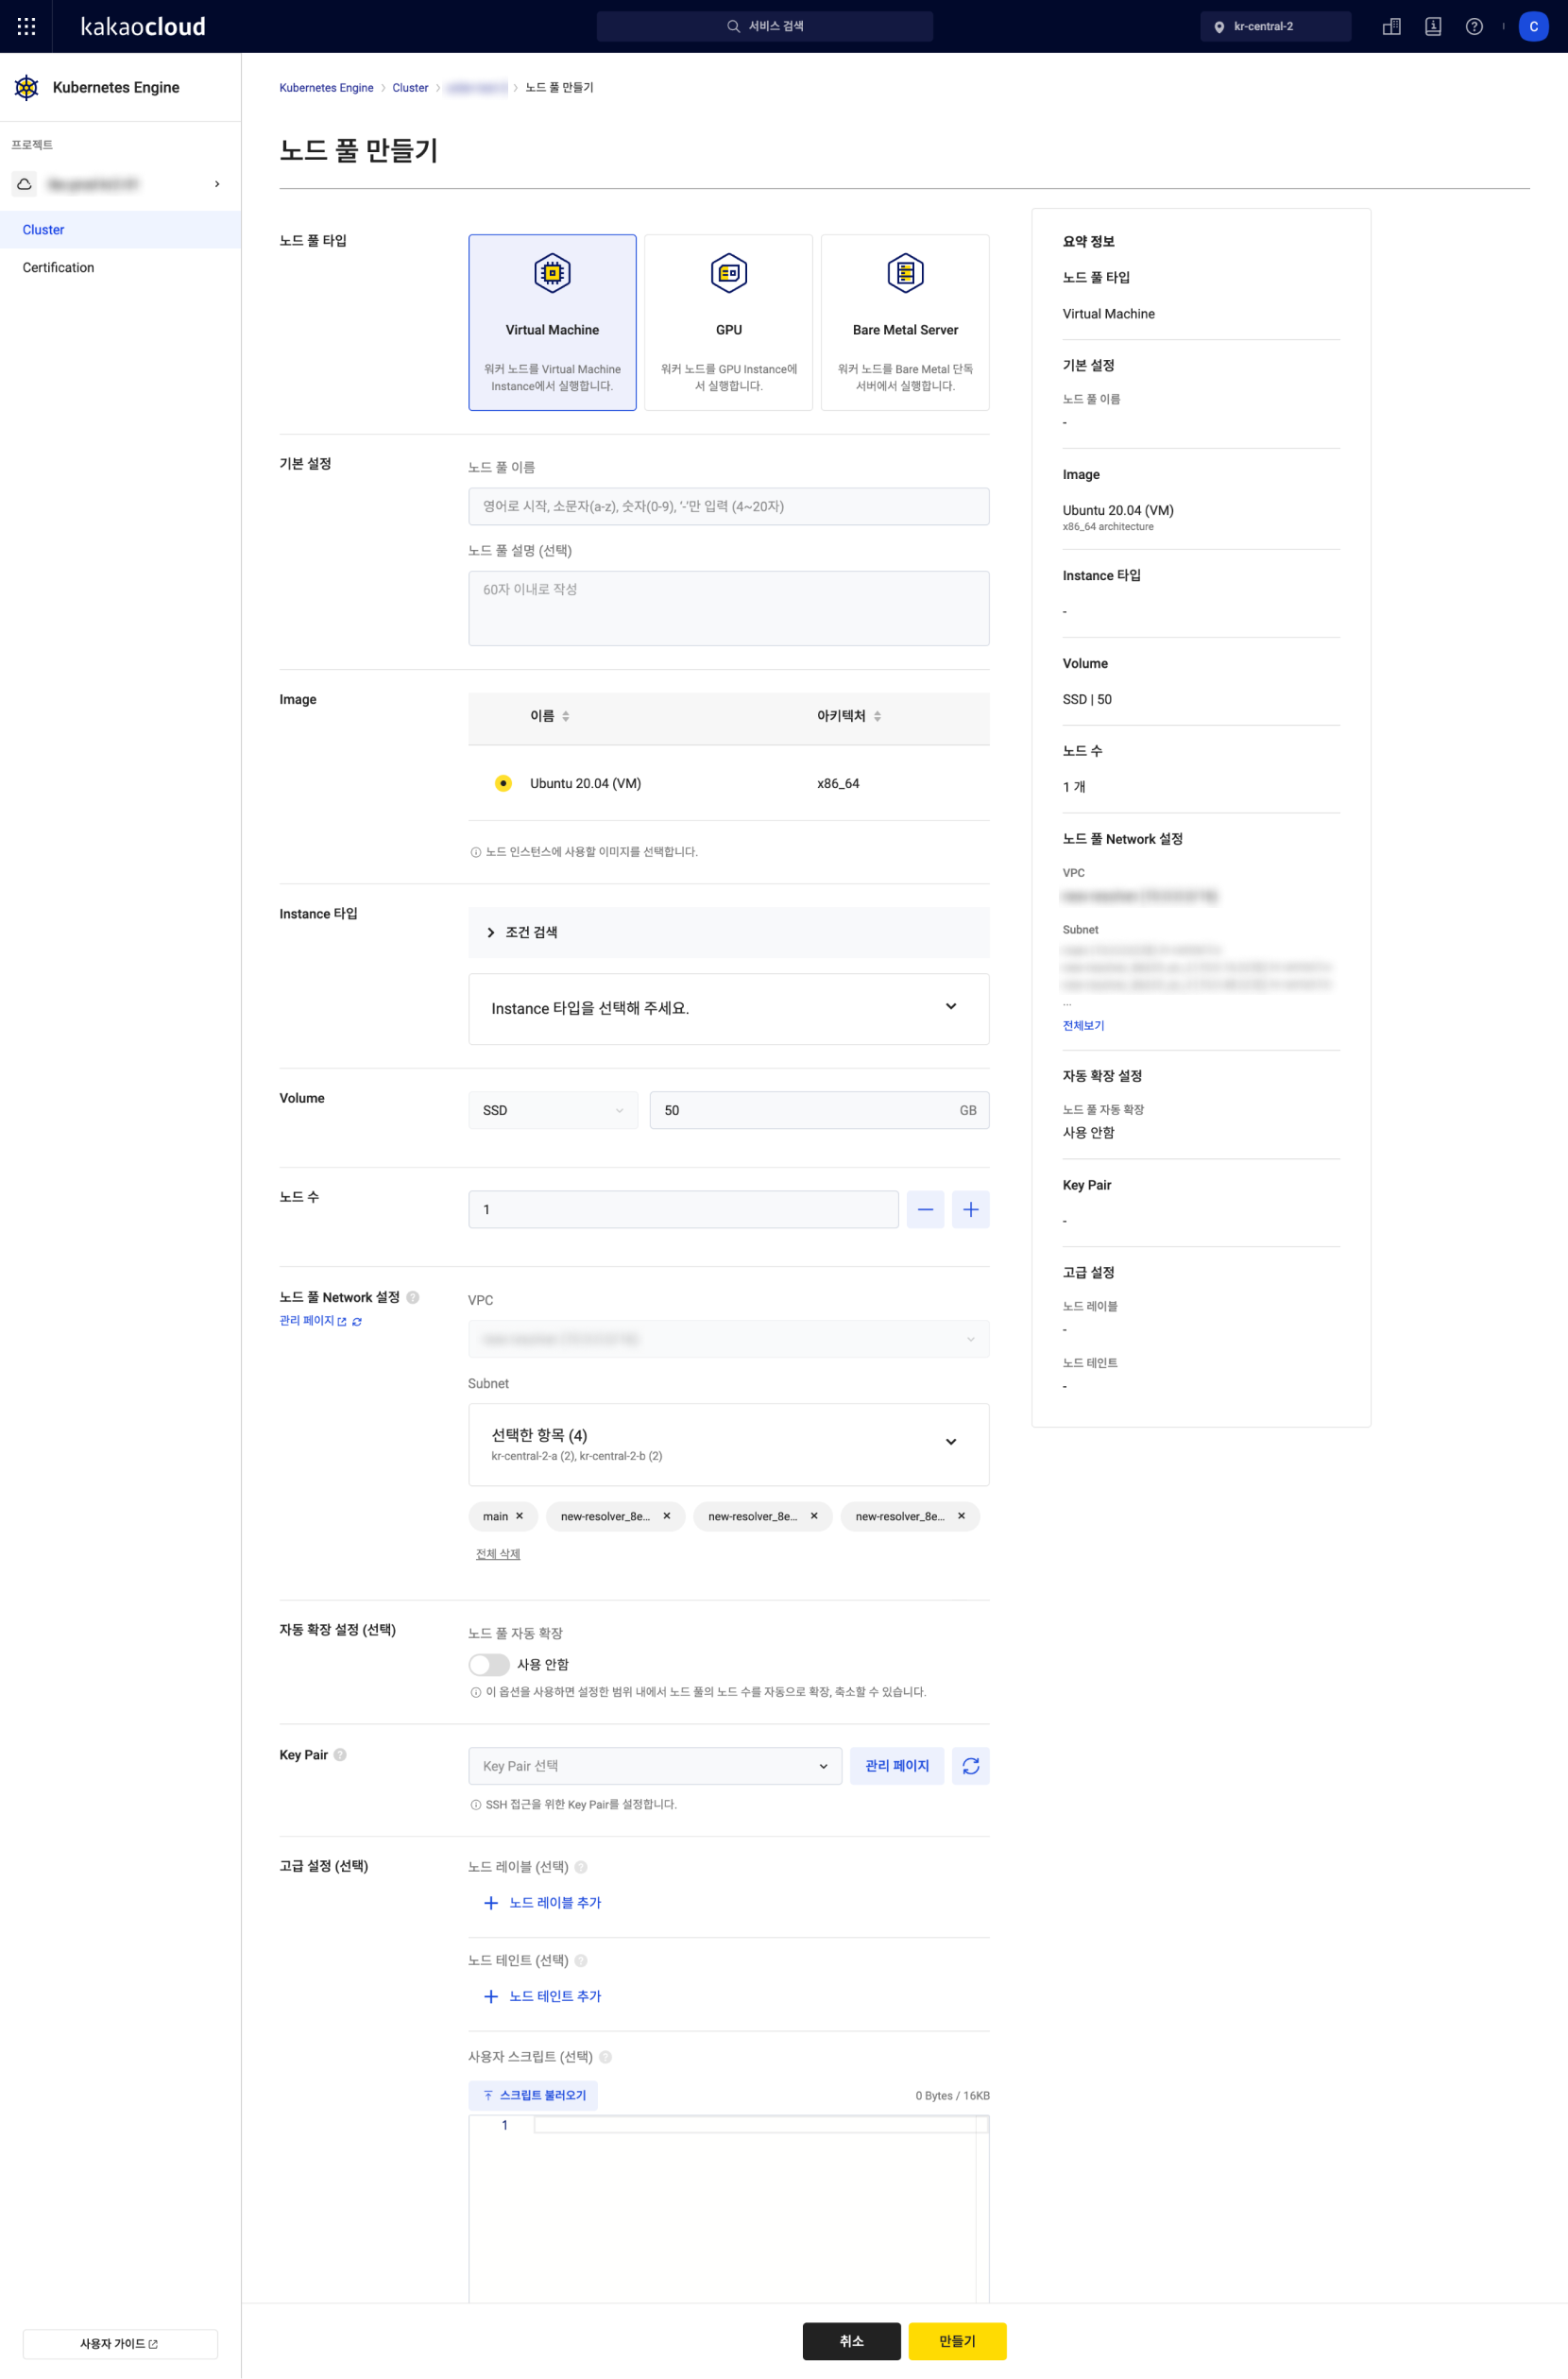
Category Description Node pool type Select the type of node pool to create Basic settings Enter node pool basic info
- Node pool name
- Node pool description (optional): Up to 60 charactersImage Select one image for the node
- Available options vary by node pool typeInstance type Choose an instance type
⚠️ At least 1 GiB requiredVolume Set the volume type and size
- SSD type only, size between 30–16,384 GB
⚠️ Not available forBare Metal Servernode poolsNode count Set the number of nodes in the node pool Node pool network settings Select VPC/subnet for node deployment
- VPC: Same as the cluster (not editable)
- Subnet: Choose from those selected during cluster creation
ㄴ Multi-AZ environments support multiple subnets for higher availability
- Security group (optional): Apply to nodesKey pair Configure SSH access
ㄴ Select existing or create new key pair
ㄴ After creation, download the.pemfile
- Once set, the key pair cannot be changedNetwork bonding For Bare Metal Servernode pools only
- Enables dual interfaces for higher availability
- Single AZ onlyAdvanced settings (optional)
- Node labels: Apply to all nodes in the pool, usable withnodeSelector
- Node taints: Apply to all nodes, usable withtoleration
- CPU multithreading: Optimize performance (some types require it)
ㄴ Recommended to disable for HPC workloads
- User script: Run on node creation
ㄴ Up to 16 KB, not editable later
Configure node pool
View or modify node pool details and node count.
-
Go to Container Pack > Kubernetes Engine in the KakaoCloud console.
-
In the Cluster menu, select the cluster.
-
In the Node pool tab, select the [More] icon next to the target pool > Configure node pool.
-
In the popup, review or update details and select [Save].
Category Description Node pool info
- Name: Cannot be changed
- Description: Optional, up to 60 charactersNode count
- Update number of nodes
View node pool details
You can check detailed information about a node pool and the nodes belonging to it.
-
Go to KakaoCloud console > Container Pack > Kubernetes Engine.
-
In the Cluster menu, select the cluster that contains the node pool.
-
On the cluster's detail page, go to the Node pool tab and select the node pool you want to view.
-
On the node pool detail page, check the information.
Tab Category Description Details Key pair Key pair applied to the nodes in the node pool Created at Date the node pool was created Volume type Volume type configured for the node pool Image Detailed info about the image installed on the nodes Node labels Labels configured on the node pool Node taints Taints configured on the node pool User script User script configured for the node pool Network VPC VPC of the cluster Subnet Subnet where the node pool's nodes are deployed Security group Security group applied to the node pool's nodes Scaling Resource-based auto scaling Create and manage resource-based auto scaling policies Scheduled auto scaling Create and manage scheduled auto scaling policies
- View scheduled autoscale eventsNode Node Node information
- Select the node name to view detailed node informationNode status Node status details
-Running: Node is ready and running
-Running (Scheduling Disable): Node is blocked from new scheduling (does not affect already running pods)
-Provisioned: Node provisioning complete
-Deleted: Node deleted
-Pending: Node provisioning pending
-Provisioning: Node provisioning in progress
-Deleting: Node deletion in progress
-Failed: User intervention requiredNode pool Node pool the node belongs to Private IP Private IP of the node Availability zone Availability zone of the node's subnet Uptime Time elapsed since node creation request (not the creation date)
Configure node labels
-
Go to KakaoCloud console > Container Pack > Kubernetes Engine.
-
In the Cluster menu, select the cluster containing the target node pool.
-
On the cluster detail page, go to the Node pool tab and select [Configure node labels].
-
Enter the Key and Value for the label and select [Save]. The label will apply to all nodes in the node pool.
Category Description Key Key to distinguish labels, up to 50 Value Value for the label [Trash] icon Select to delete the corresponding label
- Reserved keys from KakaoCloud and Kubernetes cannot be used.
Configure user script
- Go to KakaoCloud console > Container Pack > Kubernetes Engine.
- In the Cluster menu, select the cluster containing the target node pool.
- On the cluster detail page, go to the Node pool tab and select [Configure user script].
- Load or enter the script and select [Save].
- The user script is applied only to nodes created after the setting.
Delete node pool
You can delete node pools that are no longer in use.
When a node pool is deleted, all nodes in it are also deleted and cannot be recovered.
- Go to KakaoCloud console > Container Pack > Kubernetes Engine.
- In the Cluster menu, select the cluster that contains the node pool.
- In the Node pool tab, select the [More] icon next to the target node pool > Delete node pool.
- In the Delete node pool popup, enter the required information and select [Delete].
Configure pod scheduling
Configure whether pods can be scheduled to specific nodes.
-
Go to KakaoCloud console > Container Pack > Kubernetes Engine.
-
From the Cluster list, select the cluster containing the target node.
-
On the cluster detail page, go to the Node pool tab, select the node pool, then go to the Node tab.
-
Select the node and select the [Configure pod scheduling] button.
Pod scheduling Description Allow (uncordon) Pods can be scheduled to this node Block (cordon) New pods cannot be scheduled to this node -
In the Configure pod scheduling popup, select a value and select [Apply].
Manage node pool scaling
- The previous “Auto Scaling” setting has been renamed to Resource-based auto scaling.
- You can configure either Resource-based auto scaling or Scheduled auto scaling, but not both simultaneously.
ㄴ Support for simultaneous configuration is planned.
Configure resource-based auto scaling
Resource-based auto scaling automatically increases or decreases the number of nodes in a node pool depending on resource usage.
If available node resources are insufficient and pods cannot be scheduled, the number of nodes is automatically increased.
Conversely, if the resource usage remains below a defined threshold, the number of nodes is automatically reduced.
This feature is based on the official Kubernetes project Cluster Autoscaler.
- Auto scaling is not available for node pools using the Bare Metal Server type.
- Resource-based auto scaling operates based on the request values defined in the pod resource settings.
- If a pod does not define a request value, auto scaling will not function.
-
Go to KakaoCloud console > Container Pack > Kubernetes Engine.
-
In the Cluster menu, select the desired cluster.
-
On the cluster’s detail page, go to the Node pool tab and select the node pool.
-
On the Node pool details, go to the Scaling tab and select the [Configure resource-based auto scaling] button.
-
In the Configure resource-based auto scaling popup, enter or edit the settings, then select [Save].
Category Item Description Resource-based auto scaling Desired node count Current number of nodes in the node pool
- Can be changedMinimum node count Minimum number of nodes when auto-scaling down Maximum node count Maximum number of nodes when auto-scaling up Auto scale-down rules Scale-down threshold condition Threshold of CPU/Memory usage for triggering scale-down
- Range: 1 ~ 100
- Default: 50%Threshold duration Time period for which resource usage must stay below threshold
- Range: 1 ~ 86400 (seconds), 1 ~ 1440 (minutes)
- Default: 10 minutesExclude monitoring period after scale-up Duration to exclude new nodes from scale-down monitoring after auto scale-up
- Range: 1 ~ 86400 (seconds), 1 ~ 1440 (minutes)
- Default: 10 minutes
Configure HPA and load testing
Configuring HPA (HorizontalPodAutoscaler) alongside the Cluster Autoscaler allows for more efficient resource management.
The following test example demonstrates automatic scaling in action.
HPA automatically adjusts the number of pods in workloads (e.g., Deployments, StatefulSets) based on CPU or other resource usage.
For more details, see the Kubernetes official documentation.
-
Before setting up HPA, install the Helm client.
Refer to the Helm installation guide for instructions by OS. -
Install metrics-server for monitoring pods and resources.
Install metrics-serverhelm repo add metrics-server https://kubernetes-sigs.github.io/metrics-server/
helm upgrade --install metrics-server metrics-server/metrics-server --set hostNetwork.enabled=true --set containerPort=4443 -
Verify that node resource usage is being collected correctly.
It may take up to 5 minutes after installation.Check node resource usagekubectl top node -
Deploy the php-server app to test HPA and Cluster Autoscaler together.
php-server App deploymentapiVersion: apps/v1
kind: Deployment
metadata:
name: php-apache
spec:
selector:
matchLabels:
run: php-apache
template:
metadata:
labels:
run: php-apache
spec:
containers:
- name: php-apache
image: ke-container-registry.kr-central-2.kcr.dev/ke-cr/hpa-example:latest
ports:
- containerPort: 80
resources:
limits:
cpu: 500m
requests:
cpu: 500m
---
apiVersion: v1
kind: Service
metadata:
name: php-apache
labels:
run: php-apache
spec:
ports:
- port: 80
selector:
run: php-apacheDeploy php-server appkubectl apply -f php-apache.yaml -
Create the HPA:
Create HPAkubectl autoscale deployment php-apache --cpu-percent=10 --min=1 --max=10
kubectl get hpaSample outputNAME REFERENCE TARGETS MINPODS MAXPODS REPLICAS AGE
php-apache Deployment/php-apache 46%/50% 1 10 5 28m -
Run a pod to generate load:
Run load generator podkubectl run -i --tty load-generator --rm --image=ke-container-registry.kr-central-2.kcr.dev/ke-cr/busybox:latest --restart=Never -- /bin/sh -c "while sleep 0.01; do wget -q -O- http://php-apache; done" -
Observe the increasing number of pods and nodes as load increases.
- HPA triggers scaling due to rising load, but some pods remain in
Pendingdue to insufficient resources. - Nodes are automatically scaled up to accommodate pending pods.
Verify HPA and autoscaling behaviorkubectl get pods -w # Monitor pod count changes
kubectl get nodes -w # Monitor node count changesSample outputNAME READY STATUS RESTARTS AGE
php-apache-766d5cdd5b-2t5p8 0/1 Pending 0 44s
...
NAME STATUS ROLES AGE VERSION
host-10-187-5-177 Ready <none> 51s v1.24.6
... - HPA triggers scaling due to rising load, but some pods remain in
-
Once nodes are added, all
Pendingpods transition to theRunningstate.
Configure scheduled-based auto scaling
Scheduled-based auto scaling allows you to automatically adjust the number of nodes in a node pool at specified times.
This is useful when traffic patterns can be predicted — such as increased load on weekdays and reduced load on weekends.
You can optimize costs and performance by defining scaling rules like the following:
- Scheduled-based auto scaling example:
ㄴ Rule 1: Every Monday at 08:30 AM | Scale up to the desired maximum node count
ㄴ Rule 2: Every Friday at 07:30 PM | Scale down to the desired minimum node count
- You can define up to two scheduled scaling rules.
- It is recommended to configure one rule for scale-up and another for scale-down at specific times.
-
Go to KakaoCloud console > Container Pack > Kubernetes Engine.
-
In the Cluster menu, select the cluster where the node pool is configured.
-
On the cluster’s detail page, go to the Node pool tab and select the node pool.
-
In the Scaling tab, under Scheduled-based auto scaling, select the [Create rule] button.
-
In the Create rule popup, enter the rule name and configuration, then select [Create].
Field Description Name Name of the scheduled-based auto scaling rule Rule Desired number of nodes
- Set the desired node count at the scheduled time
- Recurrence options: [Once], [Daily], [Weekly], [Monthly]Start time The time at which the rule takes effect
- This determines the recurrence triggerNext execution date Displays the upcoming execution time based on the defined start time
Recurrence options
To create a recurring schedule, select one of the recurrence types below when creating a rule:
| Recurrence type | Description |
|---|---|
| Once | Executes only once at the specified time |
| Daily | Repeats daily at the time of the start date e.g., Start time: 2024/05/01 (Wed) 10:00 → Repeats daily at 10:00 |
| Weekly | Repeats weekly on the same weekday and time e.g., Start time: 2024/05/01 (Wed) 10:00 → Repeats every Wednesday at 10:00 |
| Monthly | Repeats monthly on the same day and time e.g., Start time: 2024/05/01 (Wed) 10:00 → Repeats on the 1st of each month at 10:00 |
Delete scheduled-based auto scaling
To delete a scheduled-based scaling rule:
- Go to KakaoCloud console > Container Pack > Kubernetes Engine.
- Select the target cluster.
- On the cluster’s detail page, go to the Node pool tab and select the node pool.
- In the Scaling tab, locate the rule and select the [Trash can] icon.
- In the Delete rule popup, enter the rule name and select [Delete].
- You cannot delete a schedule while the node pool is in a transitional state:
ScalingUp,ScalingDown,Updating
Scheduled-based auto scaling events
You can view the result of scheduled scaling executions in the event history.
Each rule maintains up to 20 execution history entries. These events are also available via the Cloud Trail service.
- If a rule execution results in a Failed status, it means the node pool entered a failed state during the scaling process.
- This could be due to issues like quota limits or timeouts during capacity changes.
If the failure cannot be resolved manually, please contact the Helpdesk. - Deleting a rule also deletes its associated event history.
ㄴ However, related logs in Cloud Trail will still be preserved.
| Field | Description |
|---|---|
| Event time | Time the rule was executed |
| Rule name | Name of the executed rule |
| Result | Execution result - [Success], [Failure] with detailed popup view |
Manage nodes
This section describes how to manage nodes in the Kubernetes Engine service.
View node details
You can view the detailed information of a node.
-
Go to KakaoCloud console > Container Pack > Kubernetes Engine.
-
In the Cluster menu, select the cluster that contains the node pool.
-
In the cluster’s detail page, select the Node tab and select the node you want to inspect.
-
In the Details tab, review the following information:
Category Description Instance ID VM instance ID of the node
- Select the instance ID to navigate to the VM instance pageInstance type VM instance type and associated node pool type Instance creation date Created of the VM instance Kubernetes version Kubernetes version of the node Availability zone Availability zone where the node is running Volume Volume information attached to the VM instance Key pair Key pair assigned to the node
- Key pairs set through the node pool are not displayed in the instance detailsPrivate IP Private IP address of the node Image Detailed information about the installed image on the node CPU multithreading Indicates whether CPU multithreading is enabled Node summary Provides node performance and state data, refreshed using the [Refresh] icon
- Pods: Pods currently running on the node
- Node conditions: Detailed health status of the node
- Taints: Taints set on the node
- Labels: Labels assigned to the node
- Annotations: Annotations set on the node
- Allocatable resources: Resources currently allocatable on the node
- Events: Node-related events
Monitor nodes
You can check node resource usage trends and metrics through time-series charts.
Node monitoring in Kubernetes Engine requires node-exporter to be installed on port 59100 of each node. This port cannot be used for other purposes.
-
Go to KakaoCloud console > Container Pack > Kubernetes Engine.
-
In the Cluster menu, select the cluster that contains the node pool.
-
In the cluster’s detail page, select the Node tab and select a node to inspect.
- Alternatively, go to Node pool tab > Node tab and select a node.
-
In the Monitoring tab, select the period and choose Node or Pod to view metrics.
Monitor nodes
Selecting Node displays the following metrics:
| Metric | Description |
|---|---|
| CPU usage (millicores) | CPU usage of the node |
| Memory usage (Bytes) | Memory usage of the node |
| Disk usage (Bytes) | Disk usage of the node |
| RX Network (byte/s) | Bytes received via network |
| TX Network (byte/s) | Bytes transmitted via network |
| Reserved CPU (%) | CPU reserved by node components |
| Reserved memory (%) | Memory reserved by node components |
| Pods (count) | Number of pods running on the node |
| Containers (count) | Number of containers running on the node |
Monitor pods
Selecting Pod displays metrics for each pod running on the selected node:
| Metric | Description |
|---|---|
| CPU usage (millicores) | CPU usage of the pod |
| Memory usage (Bytes) | Memory usage of the pod |
| RX Network (byte/s) | Bytes received by the pod |
| TX Network (byte/s) | Bytes transmitted by the pod |
| Reserved CPU (%) | CPU reserved for the pod |
| Reserved memory (%) | Memory reserved for the pod |
Recreate nodes
You can manually recreate a node.
Recreating a node will drain the current node, create a new one, and delete the existing node. This may disrupt running services. The deleted node is unrecoverable, and the new node will have a different IP.
- Go to KakaoCloud console > Container Pack > Kubernetes Engine.
- In the Cluster menu, select the cluster that contains the node pool.
- In the cluster’s Node tab, select the [More] icon next to the target node > Recreate node.
- In the Recreate node popup, enter the required information and select [Recreate].
Delete nodes
Select the desired nodes to delete.
Deleting nodes may affect running services, and deleted nodes cannot be recovered.
-
Go to KakaoCloud console > Container Pack > Kubernetes Engine menu.
-
In the Cluster menu, select the cluster that contains the node pool whose details you want to check.
-
On the cluster detail page, go to the Nodes tab, select the nodes to delete, then click the [More] icon > Delete nodes.
-
In the Delete nodes popup, enter the information and click the [Delete] button.
Update nodes
If the cluster control plane is updated to a newer Kubernetes version or node image components have updates (e.g., OS), you can update your nodes to the latest image.
Node updates are performed as rolling updates through the following steps:
- A new node with the latest image is created.
- Pods on the old node are evicted, and the node is marked as unschedulable.
- The evicted pods are launched on the new node.
- The old node is deleted after the migration is complete.
- These steps repeat for each node in the node pool.
Node updates cannot proceed unless the following conditions are met:
| Condition | Description |
|---|---|
| Cluster status | Provisioned status - If in other status, disable update button |
| All node pool status | Running status - If in other status, disable update button |
| All node pool version | Same version as cluster - If the cluster and node pool versions differ by more than one version, disable update button |
Update procedures
If the node pool meets the update prerequisites, you can initiate an update.
Once started, the update cannot be canceled or rolled back.
- Go to KakaoCloud console > Container Pack > Kubernetes Engine.
- In the Cluster menu, select the cluster that contains the node pool.
- In the Node pool tab, select the Kubernetes version of the node pool > [Update].
- In the Node pool version update popup, confirm the information and select [Update].
- The node pool status will change to
Updating. Once complete, it changes back toRunning.- During the update, no new node pools can be added and no changes can be made to the existing node pool.
Troubleshoot update failures
Rolling updates may fail if pods cannot be drained due to PDB (PodDisruptionBudget) settings.
Troubleshooting options:
- Modify Min Available or Max Unavailable values in the PDB.
Max Unavailableset to0will block node draining. - Backup and delete the PDB before the update. Reapply it after the update.
- If pods are deployed as Deployments or StatefulSets managed by ReplicaSets, temporarily delete them after backup to allow draining.
- Refer to the Kubernetes official doc: Safely Drain a Node for safe node draining techniques.
- Ensure enough VM/IaaS resources are available to create new nodes for rolling updates.
- If a node enters a
Failedstate during the update and the node pool is stuck inUpdating, you can recreate the failed node to resume the update process. - If the node pool remains in
Updatingfor an extended period, please contact the Helpdesk > Technical Inquiry.