Configure NFS client provisioner
To use persistent volumes in a cluster, storage and PersistentVolume objects typically need to be manually configured. In Kubernetes Engine, you can use the NFS client provisioner to mount KakaoCloud File Storage as a persistent volume. Once the NFS client provisioner is installed in the cluster, you can dynamically create persistent volumes simply by creating PersistentVolumeClaims.
The steps to configure the NFS client provisioner are as follows.
Step 1. Complete prerequisites
Before configuring the NFS client provisioner, complete the following prerequisites. These steps only need to be done once per cluster.
Configure kubectl control
Before deployment, configure kubectl access to the cluster.
If kubectl is not yet configured, refer to Configure kubectl control.
Create file storage
Create File Storage for use with your Kubernetes Engine cluster.
-
Go to KakaoCloud console > Storage > File Storage.
-
In the Instance menu, select [Create instance].
- The file storage’s VPC must match the VPC of the cluster where NFS is to be used.
- For Kubernetes Engine nodes to access it, set Access Control Settings to Allow access from all private IPs in the specified VPC.
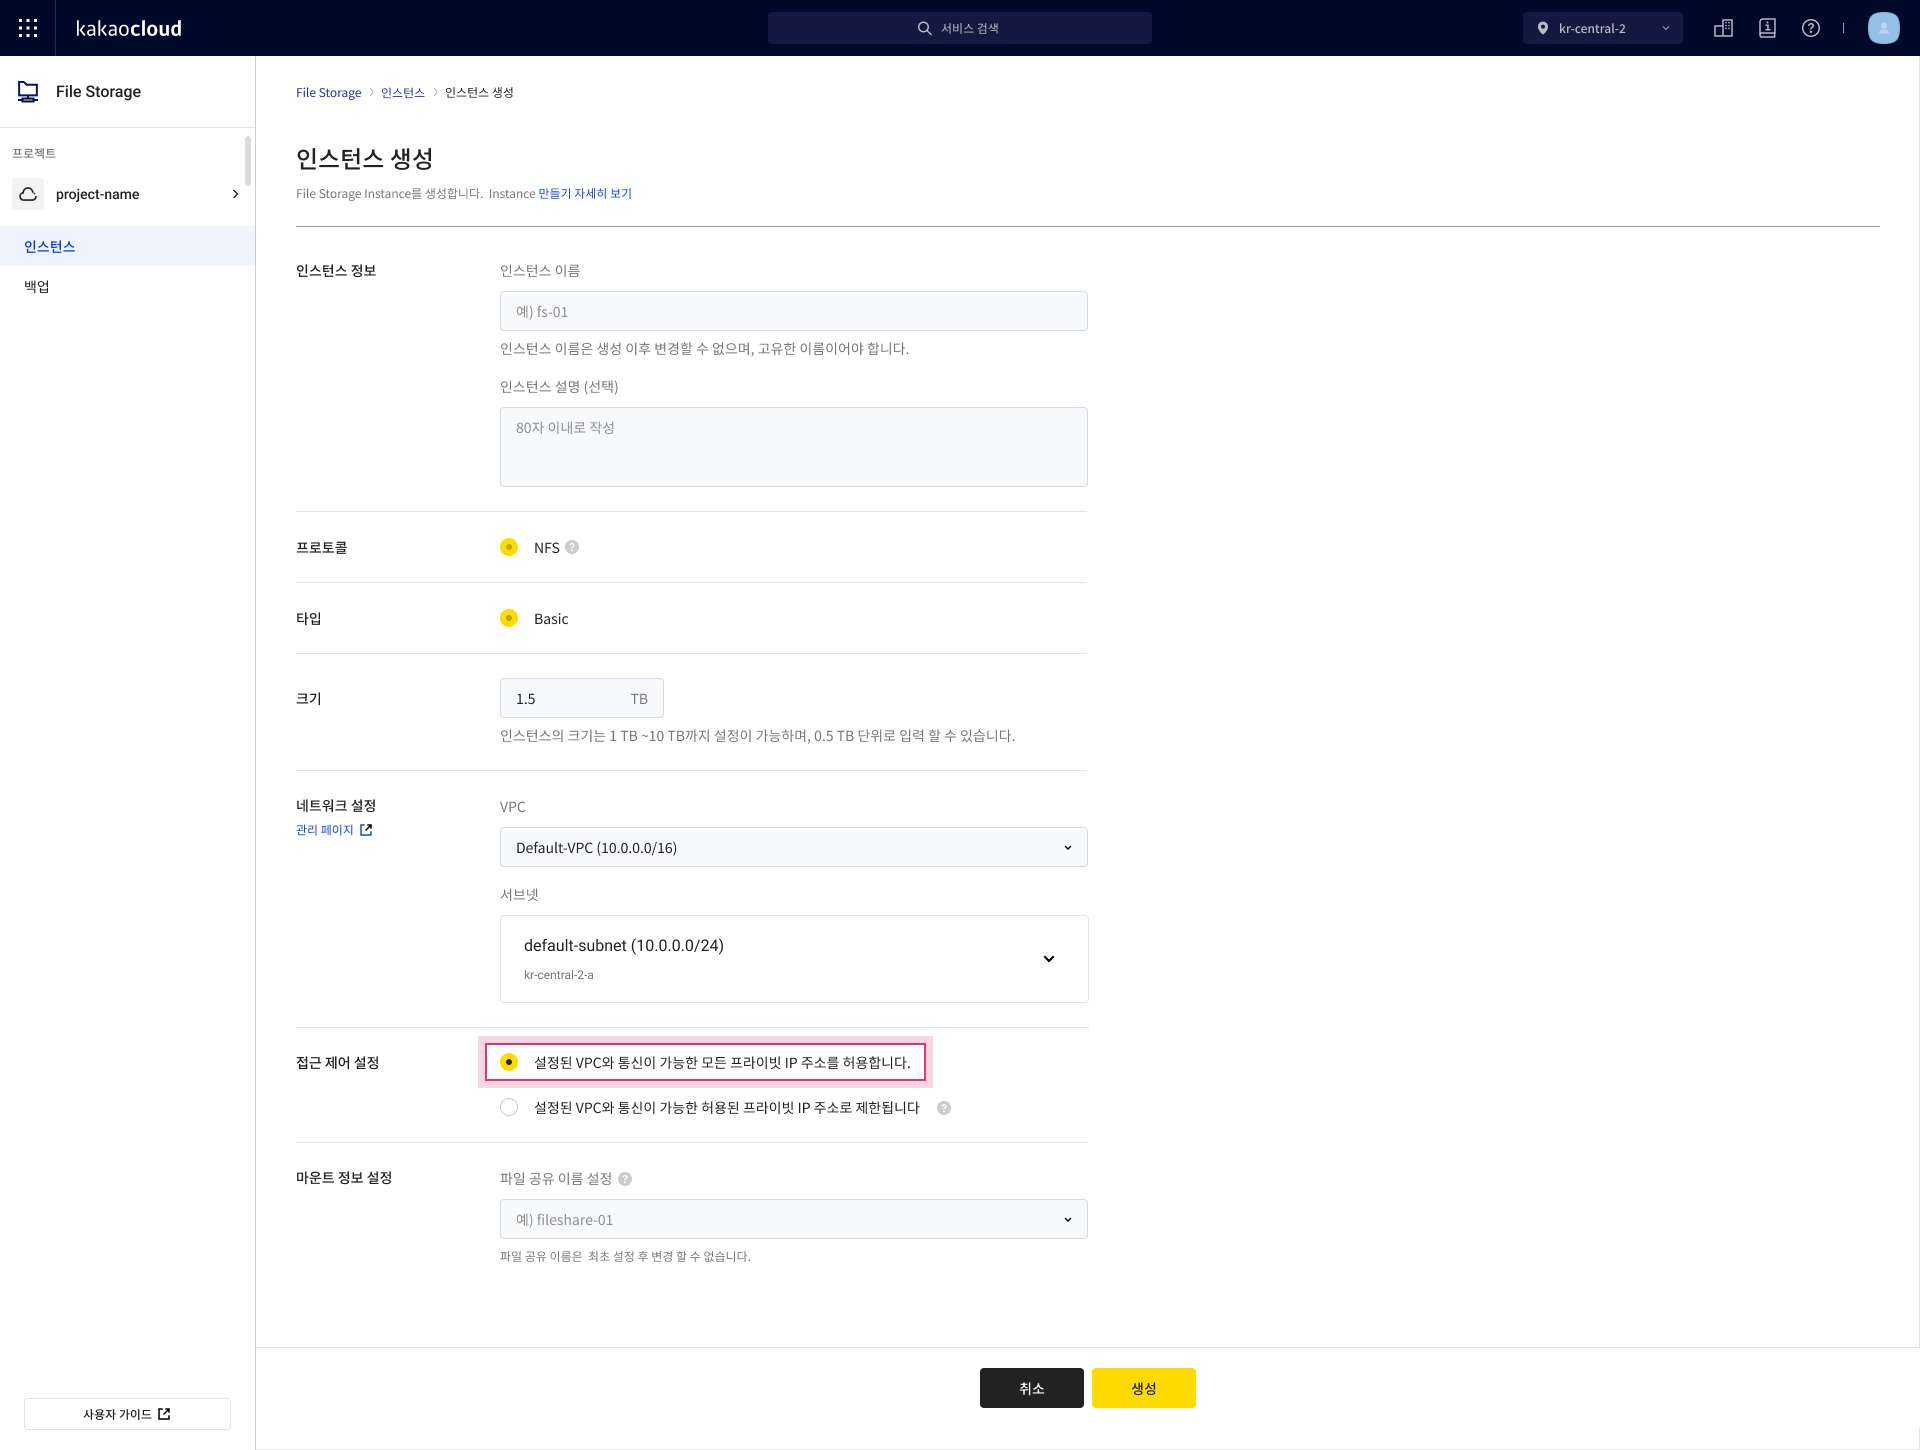 File Storage > Create instance
 -
After creation, check the Mount information and VPC info on the instance detail page.
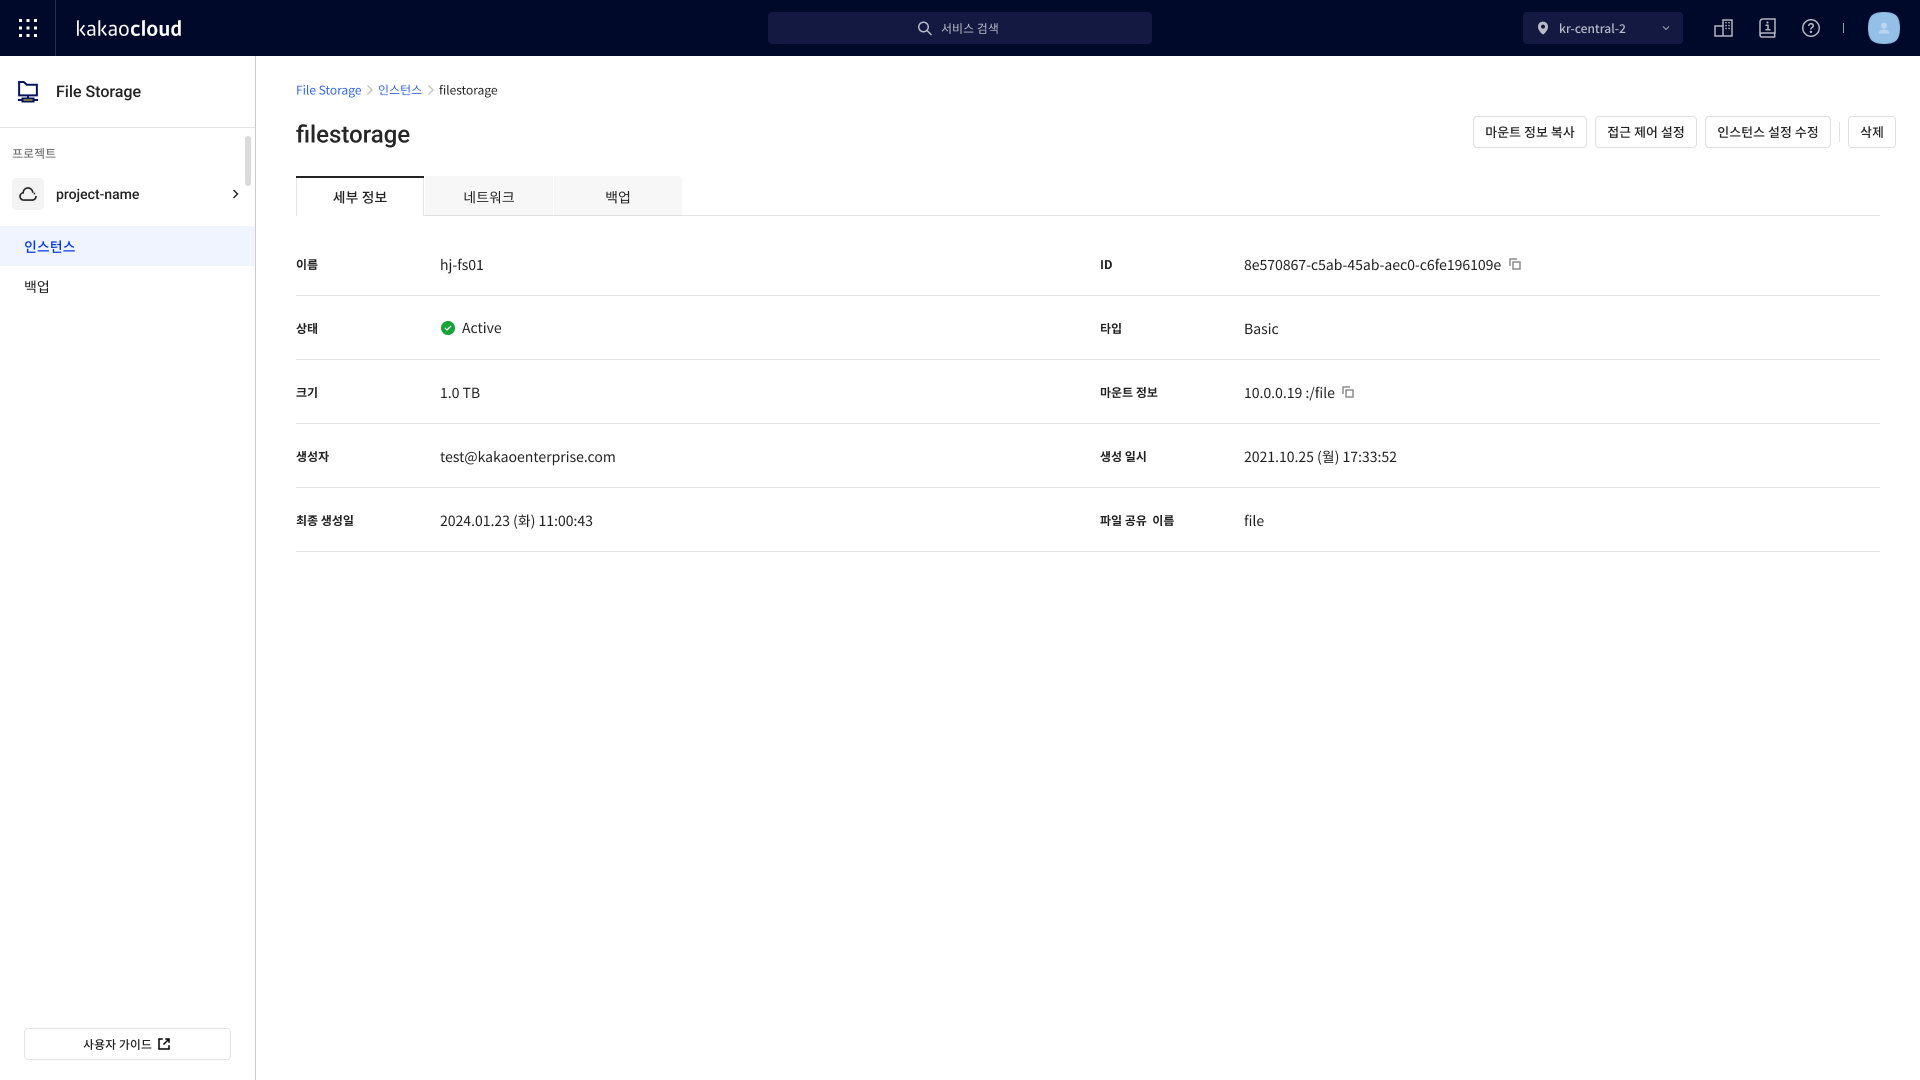 File Storage details page
Step 2. Configure NFS client provisioner
Install the NFS client provisioner to dynamically create persistent volumes using the file storage and PVCs. You can install it using a YAML file or Helm.
Deploy NFS client provisioner with a YAML file
-
Run the following command to install the NFS client provisioner:
Deployment commandkubectl --kubeconfig=$KUBE_CONFIG apply -f https://raw.githubusercontent.com/kakaoenterprise/kakaocloud-tutorials/refs/heads/k8se-public-guides/NFSclientprovisioner/nfs-subdir-external-provisioner.yml -
Download the Deployment YAML and modify it by entering the
File Storage IPandFile Storage Mount Pathfrom the File Storage details page under spec > template > spec > containers > env and volumes.Deployment configuration YAMLapiVersion: apps/v1
kind: Deployment
metadata:
name: nfs-subdir-external-provisioner
labels:
chart: nfs-subdir-external-provisioner-4.0.18
heritage: Helm
app: nfs-subdir-external-provisioner
release: nfs-subdir-external-provisioner
spec:
replicas: 1
strategy:
type: Recreate
selector:
matchLabels:
app: nfs-subdir-external-provisioner
release: nfs-subdir-external-provisioner
template:
metadata:
annotations:
labels:
app: nfs-subdir-external-provisioner
release: nfs-subdir-external-provisioner
spec:
serviceAccountName: nfs-subdir-external-provisioner
containers:
- name: nfs-subdir-external-provisioner
image: "registry.k8s.io/sig-storage/nfs-subdir-external-provisioner:v4.0.2"
imagePullPolicy: IfNotPresent
volumeMounts:
- name: nfs-subdir-external-provisioner-root
mountPath: /persistentvolumes
env:
- name: PROVISIONER_NAME
value: cluster.local/nfs-subdir-external-provisioner
- name: NFS_SERVER
value: [File Storage IP]
- name: NFS_PATH
value: [File Storage Mount Path]
volumes:
- name: nfs-subdir-external-provisioner-root
nfs:
server: [File Storage IP]
path: [File Storage Mount Path] -
Apply the modified YAML using the actual filename:
kubectl --kubeconfig=$KUBE_CONFIG apply -f {your-yaml-file}.yaml
Deploy NFS client provisioner using Helm
You can also install the NFS client provisioner using Helm.
-
Install the Helm client.
- Refer to Helm documentation > Install Helm for OS-specific installation steps.
-
Add the official Helm chart repository:
Add Helm chart repohelm repo add nfs-subdir-external-provisioner https://kubernetes-sigs.github.io/nfs-subdir-external-provisioner/ -
Use the following command to install, replacing placeholders with your File Storage information:
Install NFS client provisionerhelm install --kubeconfig=$KUBE_CONFIG nfs-subdir-external-provisioner nfs-subdir-external-provisioner/nfs-subdir-external-provisioner --set nfs.server=[File Storage IP] --set nfs.path=[File Storage Mount Path]Item Description File Storage IP Network address of the file storage File Storage Mount Path Mount path for the file storage
Step 3. Verify StorageClass and test automatic provisioning
Verify StorageClass
Run the following command to verify the StorageClass after installing the NFS client provisioner:
kubectl --kubeconfig=$KUBE_CONFIG get sc
NAME         PROVISIONER                                     RECLAIMPOLICY   VOLUMEBINDINGMODE   ALLOWVOLUMEEXPANSION   AGE
nfs-client   cluster.local/nfs-subdir-external-provisioner   Delete          Immediate           true                   12m
Create PersistentVolumeClaim and test automatic provisioning
Create a PVC to test automatic provisioning. A pod can declare the PVC and mount it, which will dynamically create the file storage volume and corresponding PV.
For details on using PVCs, refer to the Kubernetes official documentation.
kind: PersistentVolumeClaim
apiVersion: v1
metadata:
  name: test-claim
spec:
  storageClassName: nfs-client
  accessModes:
    - ReadWriteMany
  resources:
    requests:
      storage: 1Mi
Step 4. Allocate file storage
After installing the NFS client provisioner, confirm that the PVC and corresponding file storage volume have been successfully created.
kubectl --kubeconfig=$KUBE_CONFIG get pvc
kubectl --kubeconfig=$KUBE_CONFIG get pv
NAME         STATUS   VOLUME                                     CAPACITY   ACCESS MODES   STORAGECLASS   AGE
test-claim   Bound    pvc-4724b46a-557d-46f9-97a9-dc94225c2d49   1Mi        RWX            nfs-client     13h

NAME                                       CAPACITY   ACCESS MODES   RECLAIM POLICY   STATUS   CLAIM                STORAGECLASS   REASON   AGE
pvc-4724b46a-557d-46f9-97a9-dc94225c2d49   1Mi        RWX            Delete           Bound    default/test-claim   nfs-client              13h