Test video transcoding instance performance
This guide explains how to efficiently transcode videos using KakaoCloud’s video transcoding instance type,
vt1a.
- Estimated time required: 30-60 minutes
- Recommended OS: Ubuntu
- Prerequisites
About this scenario
KakaoCloud provides the vt1a instance type, designed to deliver high performance for real-time video transcoding tasks.
In this scenario, we demonstrate how to efficiently transcode video using the vt1a instance.
We also compare the results with those from other instance types to highlight the performance and advantages of the video-transcoding-optimized vt1a instance.
Before you start
As a prerequisite, configure the VPC, subnet, and security group.
1. Create VPC and subnet
Before creating an instance, you must create a VPC and subnet in which the instance will be created. If you do not have a VPC and subnet, refer to the Create VPC and Create subnet documentation to create them.
2. Create security group
To ensure high security at the instance level, create a security group and add appropriate inbound rules. Refer to the Create security group documentation to create a security group and add the following rules to the inbound rules.
Select the button below to check your current public IP.
| Protocol | Source | Port number | Rule description |
|---|---|---|---|
| TCP | {User Public IP}/32 | 22 | Allow SSH access from the local PC to instances connected to this security group |
Getting started
The detailed steps for using the vt1a instance are as follows.
Step 1. Create instance
-
From the KakaoCloud console, select the Virtual Machine menu under Beyond Compute Service.
-
Go to the Instance menu, and select the [Create instance] button.
-
Create a
vt1ainstance as shown below. This example usesvt1a.4xlarge.Item Configuration Basic info - Name: User-defined
- Count: 1Image Select Ubuntu 22.04 in the Basic tab
- Refer to SDK-supported OS information below.Instance type vt1a.4xlargeVolume - Root volume: Use default value Key pair Select the pre-created key pair from prework Network - VPC: Select the pre-created VPC from prework
- Subnet: Select the pre-created subnet from prework
- Security group: Select the pre-created security group from prework
As of 2024, the latest version Xilinx Video SDK 3.0 operates properly on the OS and kernel versions below.
- Ubuntu 22.04 (Kernel 5.15)
- Ubuntu 20.04.4 (Kernel 5.13)
- Ubuntu 20.04.3 (Kernel 5.11)
- Ubuntu 20.04.1 (Kernel 5.4)
- Ubuntu 20.04.0 (Kernel 5.4)
- Ubuntu 18.04.5 (Kernel 5.4)
Step 2. Associate public IP
Assign and associate a public IP to each created instance for SSH access.
-
From the KakaoCloud console, select the Virtual Machine menu under Beyond Compute Service.
-
Go to the Instance menu, and select [More] > Associate public IP for the created instance.
- If necessary, refer to Create and manage public IP to create a public IP, then choose the assignment method for the public IP.
-
Select the [OK] button to complete the public IP association process for each instance.
Step 3. Connect via SSH
To install the Xilinx Video SDK on the instance, connect and access it through SSH as described below.
-
From the KakaoCloud console, select the Virtual Machine menu under Beyond Compute Service.
-
Go to the Instance menu, and select [More] > Connect via SSH for the created instance to review the command and settings for SSH connection.
-
On your local PC, enter the following command to connect via SSH to each instance. For more details on SSH connections, refer to Connect instance.
ssh -i ${key-pair-name}.pem ubuntu@${public-ip-addr}Parameter Description key-pair-name The name of the private key file for the key pair specified during instance creation public-ip-addr The public IP address associated with the instance
Step 4. Install Xilinx Video SDK
The Xilinx Video SDK is a software stack that enables users to take advantage of hardware-accelerated features in Xilinx video codec units, supporting high-density real-time video transcoding for tasks like live streaming. This SDK includes precompiled versions of FFmpeg and GStreamer, integrating video transcoding plugins for Xilinx devices to support hardware acceleration for video encoding, decoding, and upscaling.
Before running video transcoding examples, install the Xilinx Video SDK by following the steps in the Xilinx Video SDK installation guide.
Step 5. Set up runtime environment
Refer to the Runtime environment setup guide to complete the runtime environment configuration.
You are now ready to run the examples.
Step 6. Run examples
Example 1. ABR transcoding example on multiple devices
The Alveo U30 accelerator card used in the vt1a instance supports accelerated H.264/AVC and H.265/HEVC codecs, compatible with a wide range of end-user devices from older mobile handsets to the latest ones with ultra-high resolution displays. The U30 accelerator card is equipped with two Xilinx devices per card. vt1a.4xlarge, vt1a.8xlarge, and vt1a.32xlarge instances have 1, 2, and 8 U30 accelerator cards, with 2, 4, and 16 devices, respectively. The number of transcodable streams per device is as follows:
| Resolution | Bitrate | Streams |
|---|---|---|
| 4K | 60fps | 1 |
| 1080p | 60fps | 4 |
| 1080p | 30fps | 8 |
| 720p | 30fps | 16 |
This example performs an ABR Ladder transcoding task on an H.264 sample file with a resolution of 4K and a bitrate of 60fps. Since the number of processed streams exceeds what a single device can handle (refer to the table above), two devices are used.
Note: This example is part of a tutorial provided by Xilinx. For more details and additional examples, refer to Xilinx Video SDK Tutorials and Examples.
Example ffmpeg pipeline code
Run the ffmpeg pipeline to transcode a 4K resolution H.264 input file into seven H.265 (HEVC) files with different resolutions and bitrates. The task is performed on two devices (device#0, device#1), with device#0 accelerating the decoding of the input file, downscaling it to 1080p, and copying it to both the host and device#1. Next, device#0 encodes the original input file to 4K with a bitrate of 16M as an H.265 (HEVC) file, while device#1 encodes the 1080p file copied from device#0 to six different resolutions and bitrates as H.265 (HEVC) files. You can download the sample input file from the link below.
   source /opt/xilinx/xcdr/setup.sh
   INPUT_FILE=sample_60sec_3840x2160_60fps_h264.mp4
   ffmpeg -hide_banner -c:v mpsoc_vcu_h264 -lxlnx_hwdev 0 \
   -i ${INPUT_FILE} \
   -max_muxing_queue_size 1024 \
   -filter_complex "[0]split=2[dec1][dec2]; \
   [dec2]multiscale_xma=outputs=1:lxlnx_hwdev=0:out_1_width=1920:out_1_height=1080:out_1_rate=full[scal]; \
   [scal]xvbm_convert[host]; [host]split=2[scl1][scl2]; \
   [scl2]multiscale_xma=outputs=4:lxlnx_hwdev=1:out_1_width=1280:out_1_height=720:out_1_rate=full:
   out_2_width=848:out_2_height=480:out_2_rate=half: \
   out_3_width=640:out_3_height=360:out_3_rate=half: \
   out_4_width=280:out_4_height=160:out_4_rate=half \
   [a][b30][c30][d30]; [a]split[a60][aa];[aa]fps=30[a30]" \
   -map '[dec1]' -c:v mpsoc_vcu_hevc -b:v 16M   -max-bitrate 16M   -lxlnx_hwdev 0 -slices 4 -cores 4 -max_interleave_delta 0 -f mp4 -y /tmp/xil_multidevice_ladder_4k.mp4 \
   -map '[scl1]' -c:v mpsoc_vcu_hevc -b:v 6M    -max-bitrate 6M    -lxlnx_hwdev 1 -max_interleave_delta 0 -f mp4 -y /tmp/xil_multidevice_ladder_1080p60.mp4               \
   -map '[a60]'  -c:v mpsoc_vcu_hevc -b:v 4M    -max-bitrate 4M    -lxlnx_hwdev 1 -max_interleave_delta 0 -f mp4 -y /tmp/xil_multidevice_ladder_720p60.mp4                \
   -map '[a30]'  -c:v mpsoc_vcu_hevc -b:v 3M    -max-bitrate 3M    -lxlnx_hwdev 1 -max_interleave_delta 0 -f mp4 -y /tmp/xil_multidevice_ladder_720p30.mp4                \
   -map '[b30]'  -c:v mpsoc_vcu_hevc -b:v 2500K -max-bitrate 2500K -lxlnx_hwdev 1 -max_interleave_delta 0 -f mp4 -y /tmp/xil_multidevice_ladder_480p30.mp4                \
   -map '[c30]'  -c:v mpsoc_vcu_hevc -b:v 1250K -max-bitrate 1250K -lxlnx_hwdev 1 -max_interleave_delta 0 -f mp4 -y /tmp/xil_multidevice_ladder_360p30.mp4                \
   -map '[d30]'  -c:v mpsoc_vcu_hevc -b:v 625K  -max-bitrate 625K  -lxlnx_hwdev 1 -max_interleave_delta 0 -f mp4 -y /tmp/xil_multidevice_ladder_160p30.mp4
| Parameter | Value | Description |
|---|---|---|
| -i | INPUT_FILE | Input file path. This value is the path and file name of the sample H.264 file for the example. - Example: -i $HOME/videos/sample_4kp60fps.h264 |
| -c:v | mpsoc_vcu_h264, mpsoc_vcu_hevc | Hardware-accelerated decoder or encoder to use. - The value is the accelerated decoder/encoder for H.264, mpsoc_vcu_h264, and the accelerated decoder/encoder for H.265, mpsoc_vcu_hevc. |
| -lxlnx_hwdev | 0, 1, ..., n | Device number to use. Values range from [0, number of cards x2 - 1]. ⚠️ Do not enter a number that exceeds the maximum number of devices for the vt1a instance size, or an error will occur. |
| -b:v | BITRATE_VALUE | Target bitrate for the encoded stream. - Example: -b:v 16M |
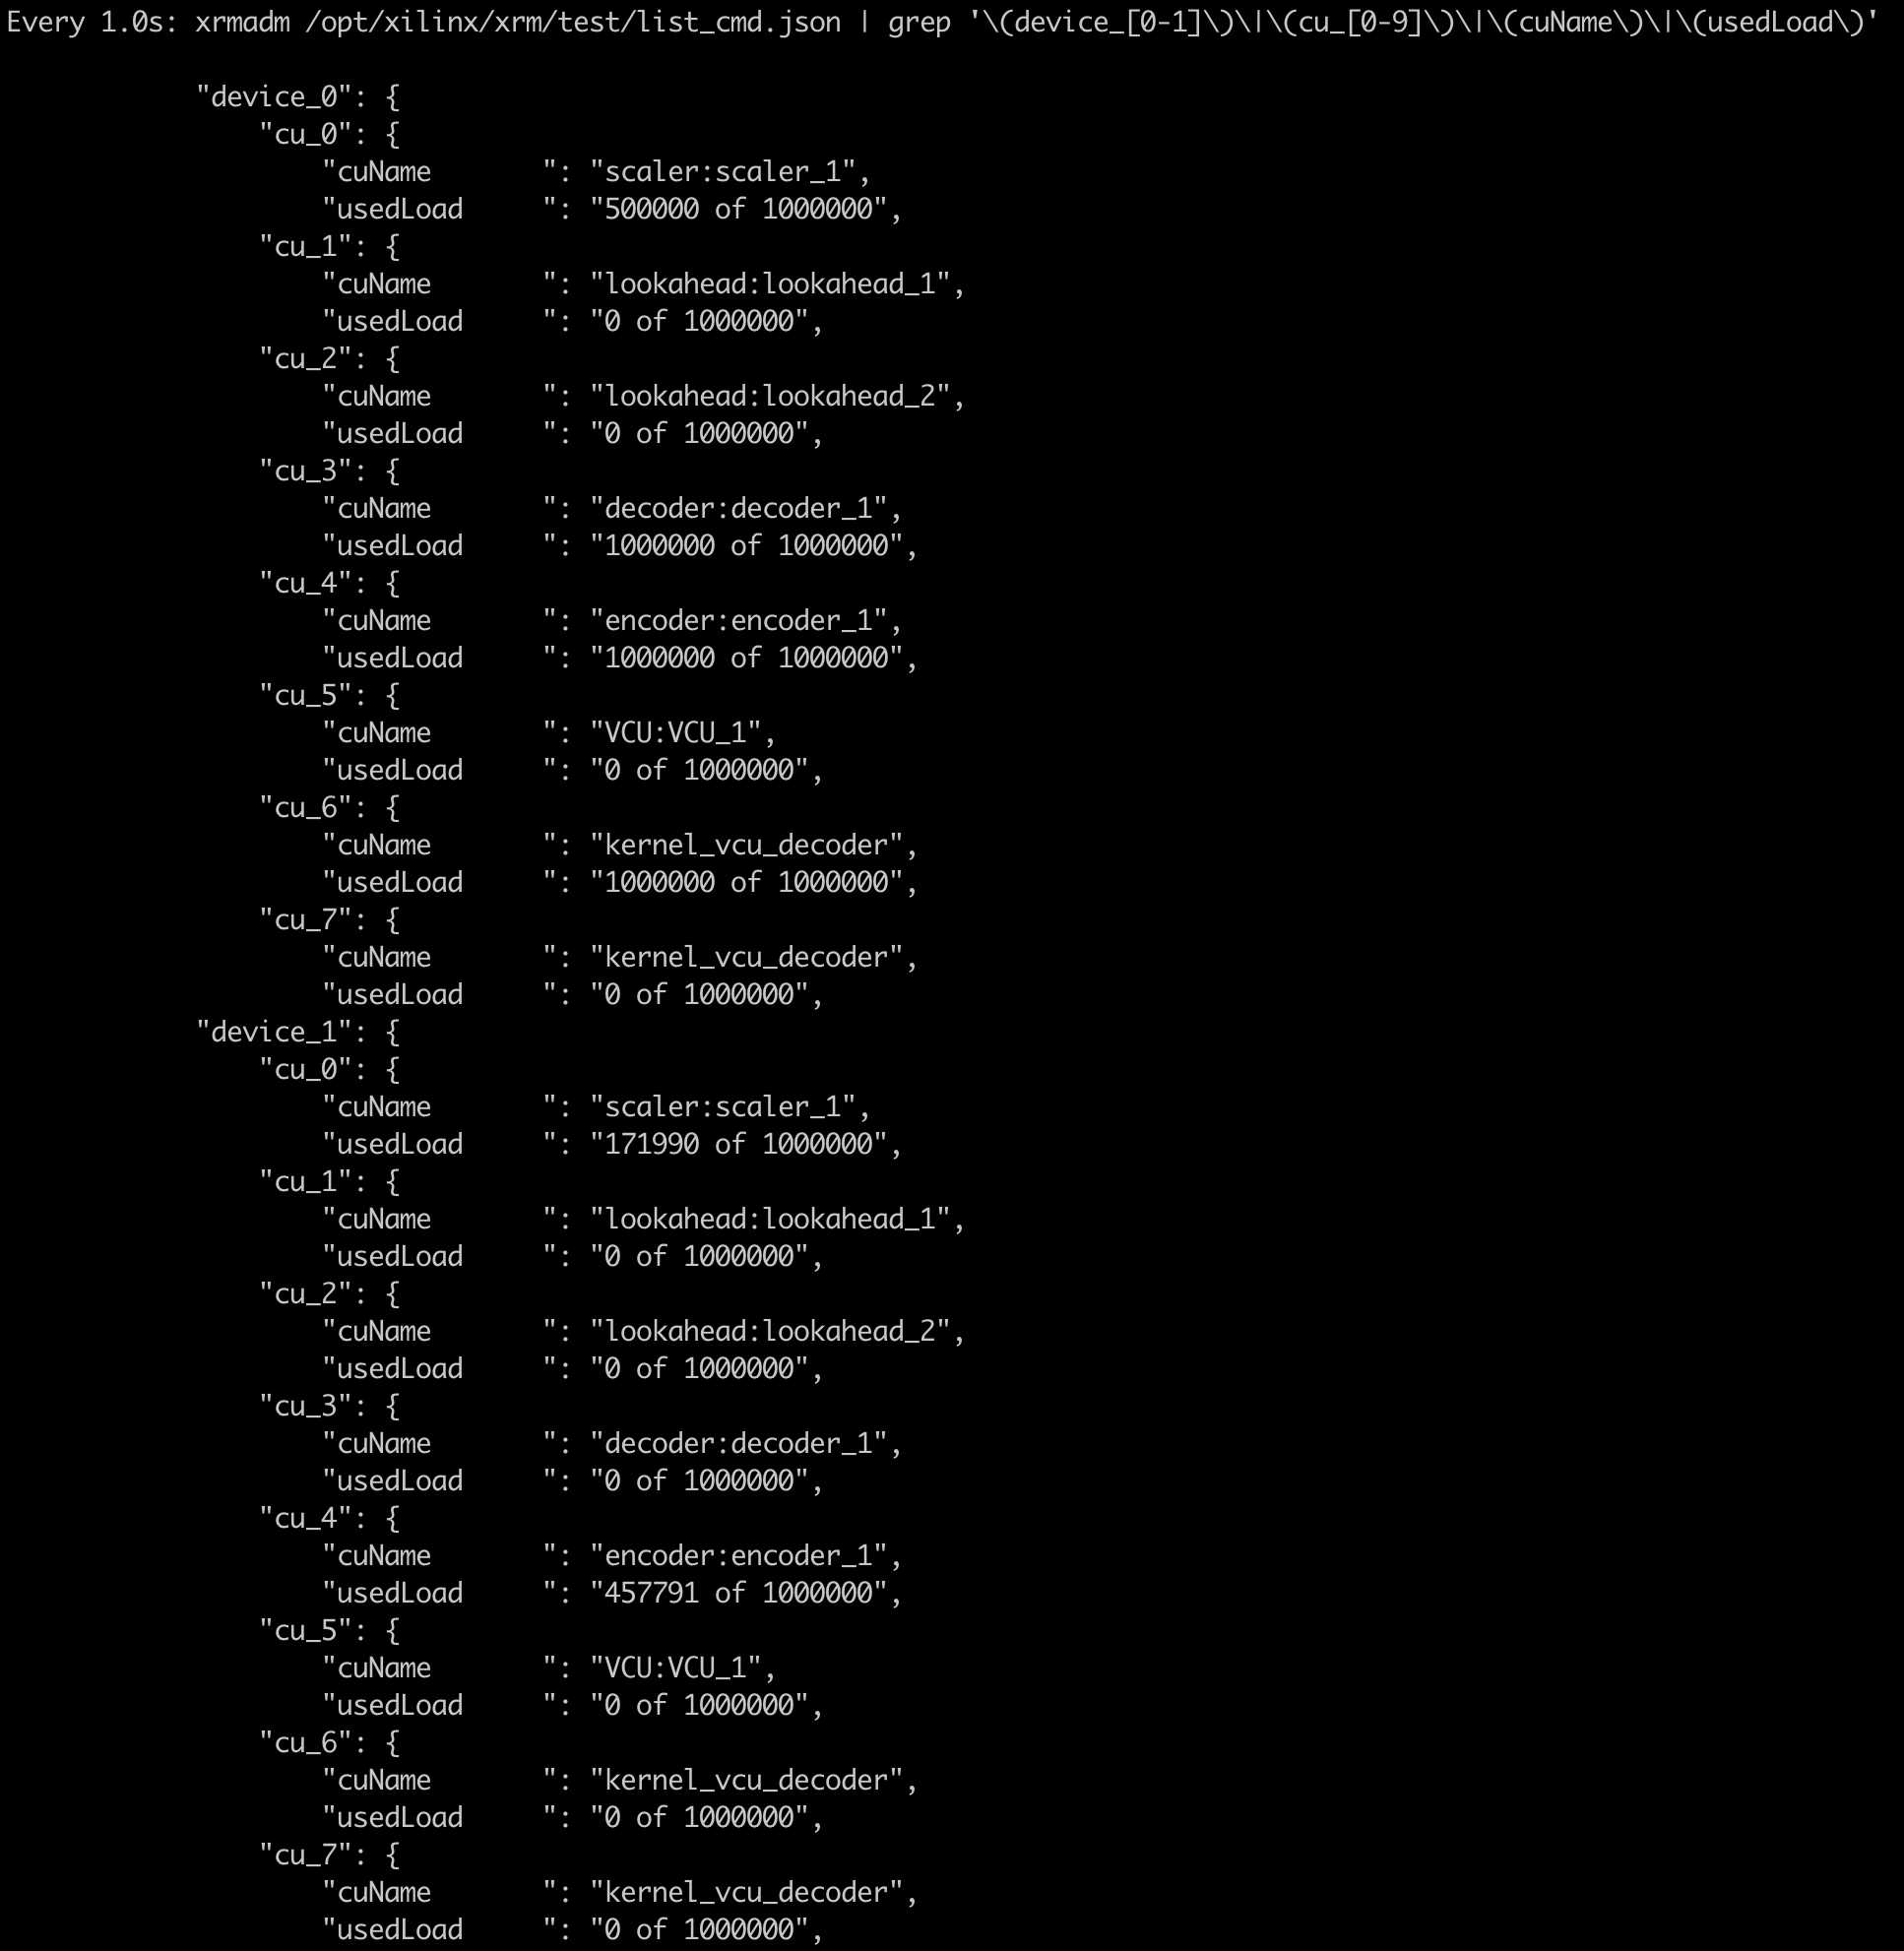
After running this pipeline, you can check the utilization of each device as follows.
source /opt/xilinx/xcdr/setup.sh
check_rsrc_cmd="xrmadm /opt/xilinx/xrm/test/list_cmd.json | grep '(device_[0-1])|(cu_[0-9])|(cuName)|(usedLoad)'"
watch -n 1 $check_rsrc_cmd
Example 2. Verify and compare multi-stream transcoding performance
The vt1a instance can process multiple streams in parallel at the same speed within the device’s processing capacity. In this example, you will measure the time and speed for parallel transcoding tasks on multiple streams, not just a single stream. Then, run the same task on some GPU and VM instances, measure the task completion time for each, and compare the results.
Example script code
#!/bin/bash

if [[ $# -lt 3 ]]; then
	echo "[ERROR] Incorrect arguments supplied."
	echo "Usage: $(basename $0) <vt1|cpu|gpu> <input file path(string)> <the number of input(int)> <the number of vt1's device(int)>"
	exit 1
fi

INSTANCE_TYPE=$1
INPUT_FILE=$2
INPUT_CNT=$3
INPUT_ARR=$(seq 0 $((INPUT_CNT-1)))
DEV_CNT=$4

INPUT_FILE_INFO=`ffprobe -v error -select_streams v:0 -show_entries stream=codec_name,width,height -of default=noprint_wrappers=1:nokey=1 ${INPUT_FILE}`
INPUT_FILE_INFO=($INPUT_FILE_INFO)
INPUT_FILE_W=${INPUT_FILE_INFO[1]}
INPUT_FILE_H=${INPUT_FILE_INFO[2]}
if [ ${INPUT_FILE_H} == '1080' ]; then
 BITRATE="10M"
	AVAIL_FILE_CNT=4
else
	echo "[ERROR] Incorrect arguments supplied."
	echo "given Resolution of Input Video File is NOT 1080p BUT ${INPUT_FILE_W} x ${INPUT_FILE_H}"
	exit 1
fi

if [ ${INSTANCE_TYPE} == 'vt1' ]; then
 source /opt/xilinx/xcdr/setup.sh
	DETECTED_DEV_CNT=`xbutil examine | grep -c xilinx_u30`
	if [[ ${DEV_CNT} -gt ${DETECTED_DEV_CNT} ]]; then
		echo "[ERROR] Incorrect arguments supplied."
		echo "<the number of device(int)> can not be larger than the actual number of devices(${DETECTED_DEV_CNT})"
		exit 1
	fi
else
	DEV_CNT=1
	DETECTED_DEV_CNT=1
fi

function init_dev_arr()
{
 local device_cnt=$1
 local arr_=()
 for a in $(seq 0 $device_cnt)
 do
     arr_[a]=0
 done
 echo ${arr_[@]}
}

DEV_ARR=($(init_dev_arr $DEV_CNT))
for i in ${INPUT_ARR}
do
	OUTPUT_FILE=/tmp/output_hevc_${i}.mp4
	LOG_FILE=logs/log${i}.out
	rm -rf ${OUTPUT_FILE} ${LOG_FILE}

	if [ ${INSTANCE_TYPE} == 'vt1' ]; then
		DEV_IDX=$((i % DEV_CNT))
		if [[ DEV_ARR[$DEV_IDX] -eq $AVAIL_FILE_CNT ]]; then
			echo ">> all device is in use. waiting until devices is available..."
			wait
			echo
			# echo ">> And then, initialize device array"
			DEV_ARR=($(init_dev_arr $DEV_CNT))
			echo
		fi
		cmd="nohup ffmpeg -xlnx_hwdev ${DEV_IDX} -c:v mpsoc_vcu_h264 -i ${INPUT_FILE} -hide_banner -c:v mpsoc_vcu_hevc -b:v ${BITRATE} -max-bitrate ${BITRATE} -max_interleave_delta 0 -profile:v main -y -f mp4 ${OUTPUT_FILE} > ${LOG_FILE} 2>&1 &"
		echo $cmd
		echo
		# eval "$cmd"
		DEV_ARR[$DEV_IDX]=$((DEV_ARR[$DEV_IDX] + 1))
	elif [ ${INSTANCE_TYPE} == 'gpu' ]; then
		cmd="nohup ffmpeg -hwaccel cuda -hwaccel_output_format cuda -c:v h264_cuvid -i ${INPUT_FILE} -hide_banner -c:v hevc_nvenc -b:v ${BITRATE} -maxrate ${BITRATE} -max_interleave_delta 0 -profile:v main -preset p4 -y -f mp4 ${OUTPUT_FILE} > ${LOG_FILE} 2>&1 &"
		echo $cmd
		echo
		# eval "$cmd"
	else
	    N_THREADS=5
		cmd="nohup ffmpeg -c:v h264 -i ${INPUT_FILE} -f mp4 -c:v libx265 -b:v ${BITRATE} -maxrate ${BITRATE} -threads ${N_THREADS} -max_interleave_delta 0 -profile:v main -preset faster -y -f mp4 ${OUTPUT_FILE} > ${LOG_FILE} 2>&1 &"
		echo $cmd
		echo
		# eval "$cmd"
	fi
done

wait
echo
echo "All Done."
Save the code above as multistream.sh and follow the command format below to increase the number of multiple streams up to 32 for each instance type while measuring the total task time.
N_STREAM_ARR=$(seq 1 32)
for N_STREAM in ${N_STREAM_ARR}
do
 # vt1
 N_DEVICE=1
 time bash multistream.sh vt1 sample_60sec_1920x1080_60fps_h264.mp4 ${N_STREAM} ${N_DEVICE}

 # gpu
 time bash multistream.sh gpu sample_60sec_1920x1080_60fps_h264.mp4 ${N_STREAM}

 # cpu
 time bash multistream.sh cpu sample_60sec_1920x1080_60fps_h264.mp4 ${N_STREAM}

 wait
done
| Parameter | Value | Description |
|---|---|---|
| INSTANCE_TYPE | vt1, cpu, gpu | Instance type for the task |
| INPUT_FILE | sample_60sec_1920x1080_60fps_h264.mp4 | Input video file for the task |
| INPUT_CNT | [1, 32] | Total number of streams = number of INPUT_FILE instances to be processed |
| DEV_CNT | [1, 2] | Number of devices to use when working with the vt1a instance |
In this example, gpu corresponds to the gn1i instance type, and cpu corresponds to the c2a instance type. The results are displayed in the graph below.

As the number of multi-stream transcoding tasks increases, the task time increases proportionally for gn1i and c2a instance types. However, for the vt1a instance type, parallel processing occurs up to the maximum number of multi-streams each device can handle, resulting in a relatively smaller increase in task time.