Use NVIDIA GPU work nodes in Kubernetes Engine cluster
This guide explains two methods for creating GPU nodes in a Kubernetes cluster using Kubernetes Engine and utilizing GPUs in workloads.
- Estimated time required: 15 minutes
- Recommended operating system: MacOS, Ubuntu
- Prerequisites
Scenario overview
This tutorial demonstrates how to create an NVIDIA GPU worker node in Kubernetes Engine and utilize GPU resources in two different ways within the cluster.
You can configure a standard GPU worker node using either the GPU Operator or the NVIDIA Device Plugin, or set up a MIG (Multi-Instance GPU)-enabled node to optimize resource utilization.
The key steps include:
- Add a GPU node pool to the Kubernetes cluster
- Install GPU Operator or NVIDIA Device Plugin
- Allocate GPU resources to workloads and verifying execution
- Configure and test a multi-instance GPU environment using MIG
Before you start
Install Helm, a package manager that helps manage Kubernetes packages. With Helm, you can search, share, and use software for Kubernetes. Install the Helm package on your local machine by entering the following command:
- Mac
- Linux(Ubuntu)
-
Install using the Homebrew package manager.
brew install helm -
Verify the installation with the following command.
helm version
# version.BuildInfo{Version:"v3.14.0", GitCommit:"3fc9f4b2638e76f26739cd77c7017139be81d0ea", GitTreeState:"clean", GoVersion:"go1.21.6"}
-
Install using the
curlcommand.curl -fsSL -o get_helm.sh https://raw.githubusercontent.com/helm/helm/main/scripts/get-helm-3
chmod 700 get_helm.sh
./get_helm.sh -
Verify the installation with the following command.
helm version
# version.BuildInfo{Version:"v3.14.0", GitCommit:"3fc9f4b2638e76f26739cd77c7017139be81d0ea", GitTreeState:"clean", GoVersion:"go1.21.6"}
Getting started
This guide explains two methods: creating GPU nodes in a Kubernetes cluster using Kubernetes Engine and utilizing GPUs in workloads.
Type 1. Build NVIDIA GPU work nodes
Type 1 explains how to build NVIDIA GPU work nodes in a Kubernetes cluster.
Step 1. Create an NVIDIA GPU node pool in a Kubernetes cluster
This document does not cover how to create a Kubernetes cluster. You can either create a new cluster or add a GPU node pool to an existing one. Follow these steps to create a Kubernetes node pool in KakaoCloud console.
-
Access the KakaoCloud console.
-
In Kubernetes Engine > Cluster list, select the cluster where you want to proceed or select the [Create Cluster] button.
- If you selected an existing cluster, go to the cluster's Node pool tab, select [Create Node Pool], enter the node pool details, and create the node pool.
- If you clicked [Create Cluster], follow the steps to create a cluster. In Step 2: Node Pool Configuration, enter the node pool details based on the following information.
Node pool type Instance type Number of nodes Volume (GB) GPU p2i.6xlarge 1 100 -
To create a GPU node as a single GPU instance, add the following code to the user script.
sudo nvidia-smi -mig 0
Step 2. Configure NVIDIA GPU work node environment
The NVIDIA GPU work node environment can be configured using either the GPU Operator or the NVIDIA Device Plugin.
Both methods automatically expose and manage GPUs within the cluster, providing essential functionalities for execution.
When you create a GPU work node through a node pool, it comes pre-configured with essential components such as the driver and container runtime.
Option 1. Install GPU Operator
-
Install the GPU Operator using Helm.
helm repo add nvidia https://helm.ngc.nvidia.com/nvidia
helm repo update

helm install gpu-operator nvidia/gpu-operator \
--namespace gpu-operator \
--create-namespace
Once installed, the GPU Operator automatically configures the required components. For more details, refer to the NVIDIA GPU Operator official documentation.
Option 2. Use NVIDIA Device Plugin
-
Create a
RuntimeClassto define the environment for GPU usage.cat <<EOF | kubectl create -f -
apiVersion: node.k8s.io/v1
kind: RuntimeClass
metadata:
name: nvidia
handler: nvidia
EOFThis
RuntimeClassis commonly used across all GPU workloads. -
Install
nvidia-device-plugin.helm repo add nvdp https://nvidia.github.io/k8s-device-plugin
helm repo update
helm install \
--version=0.12.3 \
--namespace nvidia-device-plugin \
--create-namespace \
--generate-name \
nvdp/nvidia-device-plugin \
--set runtimeClassName=nvidia -
Verify that
nvidia-k8s-device-pluginhas been added to the cluster.kubectl get all -A | grep nvidia
# gpu-operator pod/nvidia-container-toolkit-daemonset-ssrwp 1/1 Running 0 64m
# gpu-operator pod/nvidia-cuda-validator-f62c9 1/1 Running 0 64m
# gpu-operator pod/nvidia-dcgm-exporter-vhgd4 1/1 Running 0 64m
# nvidia-device-plugin pod/nvidia-device-plugin-1738819866-24wpl 0/1 ContainerCreating 0 64m
# ... -
Check the node resources to confirm that the GPU has been added.
kubectl describe nodes | grep nvidia
# nvidia.com/gpu:     1
# nvidia.com/gpu:     1
# ... -
Deploy a GPU test pod in the Kubernetes cluster (specifying
runtimeClass).cat <<EOF | kubectl apply -f -
apiVersion: v1
kind: Pod
metadata:
name: gpu-test
spec:
runtimeClassName: nvidia
restartPolicy: OnFailure
containers:
- name: cuda-vector-add
image: "nvidia/samples:vectoradd-cuda10.2"
resources:
limits:
nvidia.com/gpu: 1
EOF -
Verify the execution with the following command.
kubectl get pod/gpu-test
# NAME      READY   STATUS      RESTARTS   AGE
# gpu-test 0/1 Completed 0 2m ``` -
Check the execution logs.
kubectl logs gpu-test
# GPU 0: NVIDIA A100 80GB PCIe ...
# [Vector addition of 50000 elements]
# Copy input data from the host memory to the CUDA device
# CUDA kernel launch with 196 blocks of 256 threads
# Copy output data from the CUDA device to the host memory
# Test PASSED
# Done -
Delete the test pod.
kubectl delete pod/gpu-test
# pod "gpu-test" deleted
Type 2. Build MIG-enabled NVIDIA GPU work nodes
Type 2 explains one of the methods for creating GPU work nodes in a Kubernetes cluster and using MIG. Some GPUs provided by KakaoCloud (e.g., A100) support MIG (Multi-Instance GPU). Users can create Kubernetes cluster nodes as GPU-supported types and use the MIG strategy to utilize resources more efficiently.
The instances providing these GPUs can be found in Instance specifications by type.
Step 1. Add GPU work nodes to the Kubernetes cluster
This document does not cover how to create a K8s cluster. You can either create a new cluster or add a GPU node pool to an existing one.
-
Access the KakaoCloud console.
-
In Kubernetes Engine > Cluster list, select the cluster where you want to proceed or select [Create Cluster].
- If you selected an existing cluster, go to the cluster's Node pool tab, select [Create Node Pool], and enter the required information.
- If you clicked [Create Cluster]*, follow the steps to create a cluster. In Step 2: Node Pool Configuration, enter the node pool details as follows:
Node pool type Instance type Number of nodes Volume (GB) GPU p2i.6xlarge 1 100 -
When creating a GPU node, allow MIG during the node provisioning step and write a script to partition GPU resources into MIG instances. The script below partitions the GPU into seven instances and configures the GPU container runtime.
sudo nvidia-smi -mig 1
sudo nvidia-smi mig -cgi 19,19,19,19,19,19,19 -C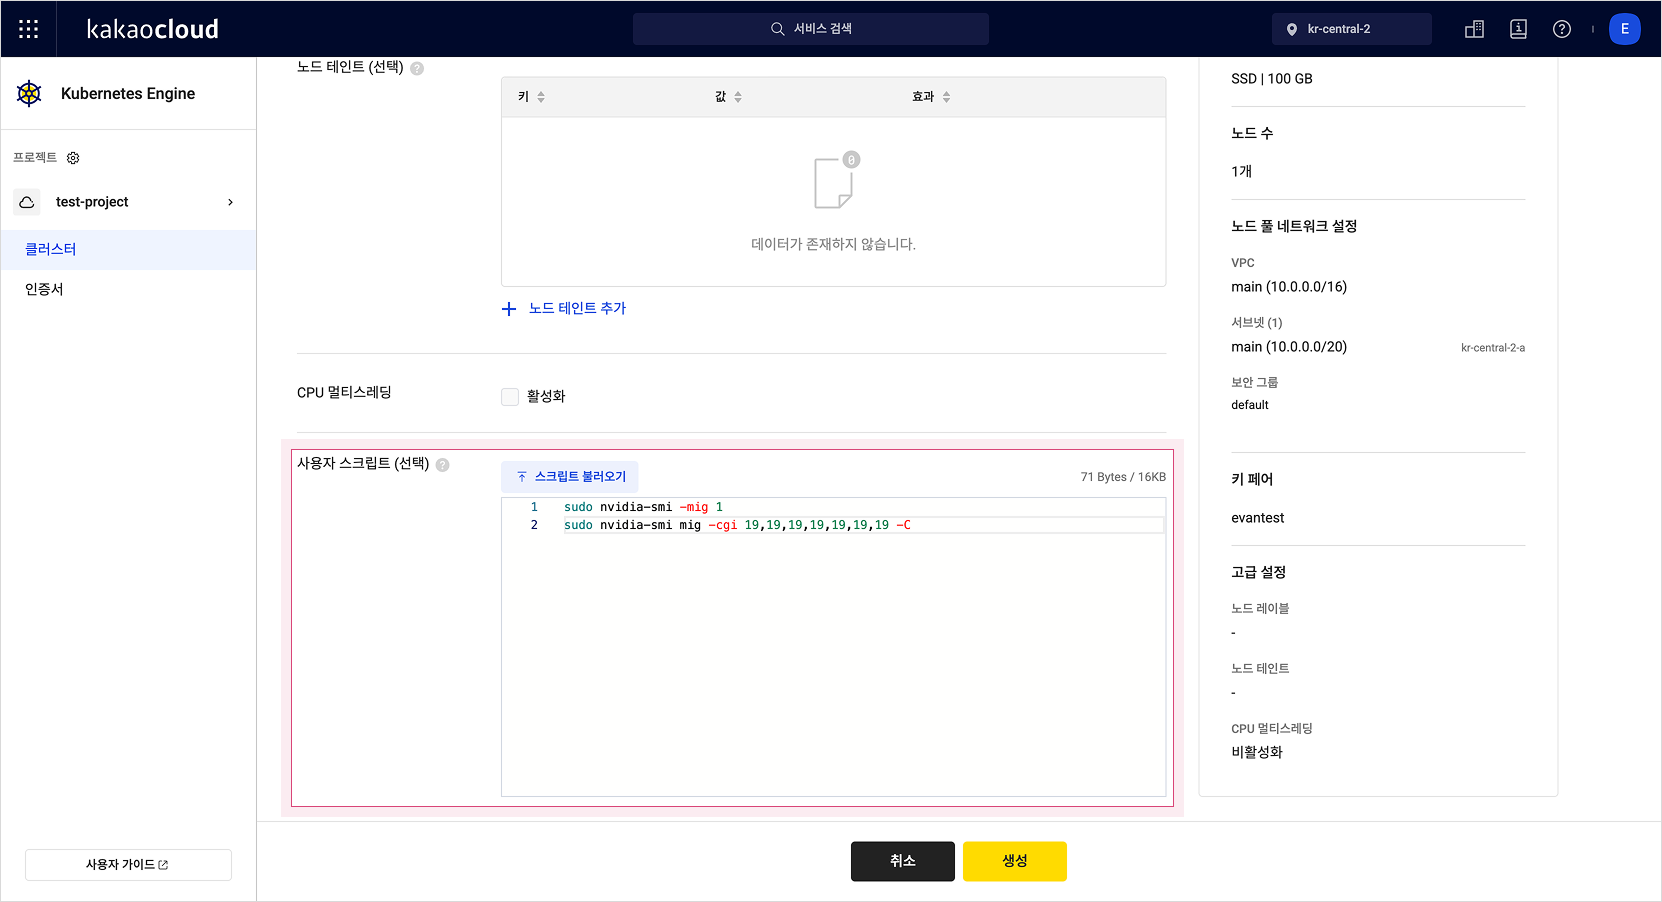
-
Create the node pool.
Step 2. Configure NVIDIA GPU work node environment
After completing Step 1, a GPU node with MIG enabled has been created in the cluster.
-
Create a
RuntimeClassto define the GPU usage environment.cat <<EOF | kubectl create -f -
apiVersion: node.k8s.io/v1
kind: RuntimeClass
metadata:
name: nvidia
handler: nvidia
EOFThis
RuntimeClassis commonly used across all GPU workloads. -
When installing the NVIDIA Device Plugin in the Kubernetes cluster, enable MIG resources using the
migStrategyflag.
This allows a single GPU to be split into multiple independent instances for more efficient utilization.
For more information, refer to NVIDIA/k8s-device-plugin GitHub.helm repo add nvdp https://nvidia.github.io/k8s-device-plugin
helm repo update
helm install \
--version=0.12.3 \
--namespace nvidia-device-plugin \
--create-namespace \
--set compatWithCPUManager=true \
--set migStrategy=mixed \
--generate-name \
nvdp/nvidia-device-plugin \
--set runtimeClassName=nvidia -
After running the Helm command,
nvidia-k8se-device-pluginis deployed to the GPU work node and exposes the GPU to the cluster. Run the following command to check the node resource details and verify that seven MIG instances have been added.kubectl describe nodes | grep nvidia
# nvidia.com/mig-1g.10gb: 7
# nvidia.com/mig-1g.10gb: 7 -
Deploy multiple workloads in the cluster to check GPU scheduling.
for i in $(seq 7); do
cat <<EOF | kubectl apply -f -
apiVersion: v1
kind: Pod
metadata:
  name: mig-example-${i}
spec:
  restartPolicy: Never
  runtimeClassName: nvidia
  containers:
  - name: cuda-container
    image: nvidia/cuda:11.2.2-base-ubuntu20.04
    command: ["nvidia-smi"]
    args: ["-L"]
    resources:
      limits:
        nvidia.com/mig-1g.10gb: 1
  tolerations:
  - key: nvidia.com/gpu
    operator: Exists
    effect: NoSchedule
EOF
done
# pod/mig-example-1 created
# pod/mig-example-2 created
# pod/mig-example-3 created
# pod/mig-example-4 created
# pod/mig-example-5 created
# pod/mig-example-6 created
# pod/mig-example-7 created -
Verify that the created pods have completed successfully.
 kubectl get pods
 # NAME                       READY   STATUS      RESTARTS   AGE
 # mig-example-1   0/1     Completed   0          29s
 # mig-example-2   0/1     Completed   0          26s
 # mig-example-3   0/1     Completed   0          22s
 # mig-example-4   0/1     Completed   0          19s
 # mig-example-5   0/1     Completed   0          15s
 # mig-example-6   0/1     Completed   0          12s
# mig-example-7 0/1 Completed 0 9s -
After completion, check the logs to view the UUID of the MIG that executed each pod.
 for i in $(seq 7); do
 kubectl logs mig-example-${i} | grep MIG
 done
 # MIG 1g.10gb     Device  0: (UUID: MIG-aaaaa)
 # MIG 1g.10gb     Device  0: (UUID: MIG-bbbbb)
 # MIG 1g.10gb     Device  0: (UUID: MIG-ccccc)
 # MIG 1g.10gb     Device  0: (UUID: MIG-aaaaa)
 # MIG 1g.10gb     Device  0: (UUID: MIG-bbbbb)
 # MIG 1g.10gb     Device  0: (UUID: MIG-ddddd)
# MIG 1g.10gb Device 0: (UUID: MIG-eeeee) -
Delete the created example pods.
 for i in $(seq 7); do
 kubectl delete pod mig-example-${i}
 done
 # pod "mig-example-1" deleted
 # pod "mig-example-2" deleted
 # pod "mig-example-3" deleted
 # pod "mig-example-4" deleted
 # pod "mig-example-5" deleted
 # pod "mig-example-6" deleted
 # pod "mig-example-7" deleted