Migrate and replicate data from AWS RDS MySQL to KakaoCloud MySQL
This document describes the process of data migration and replication between AWS RDS MySQL and KakaoCloud MySQL.
- Estimated Time Required: 60 minutes
- Recommended OS: Windows, MacOS
About scenario
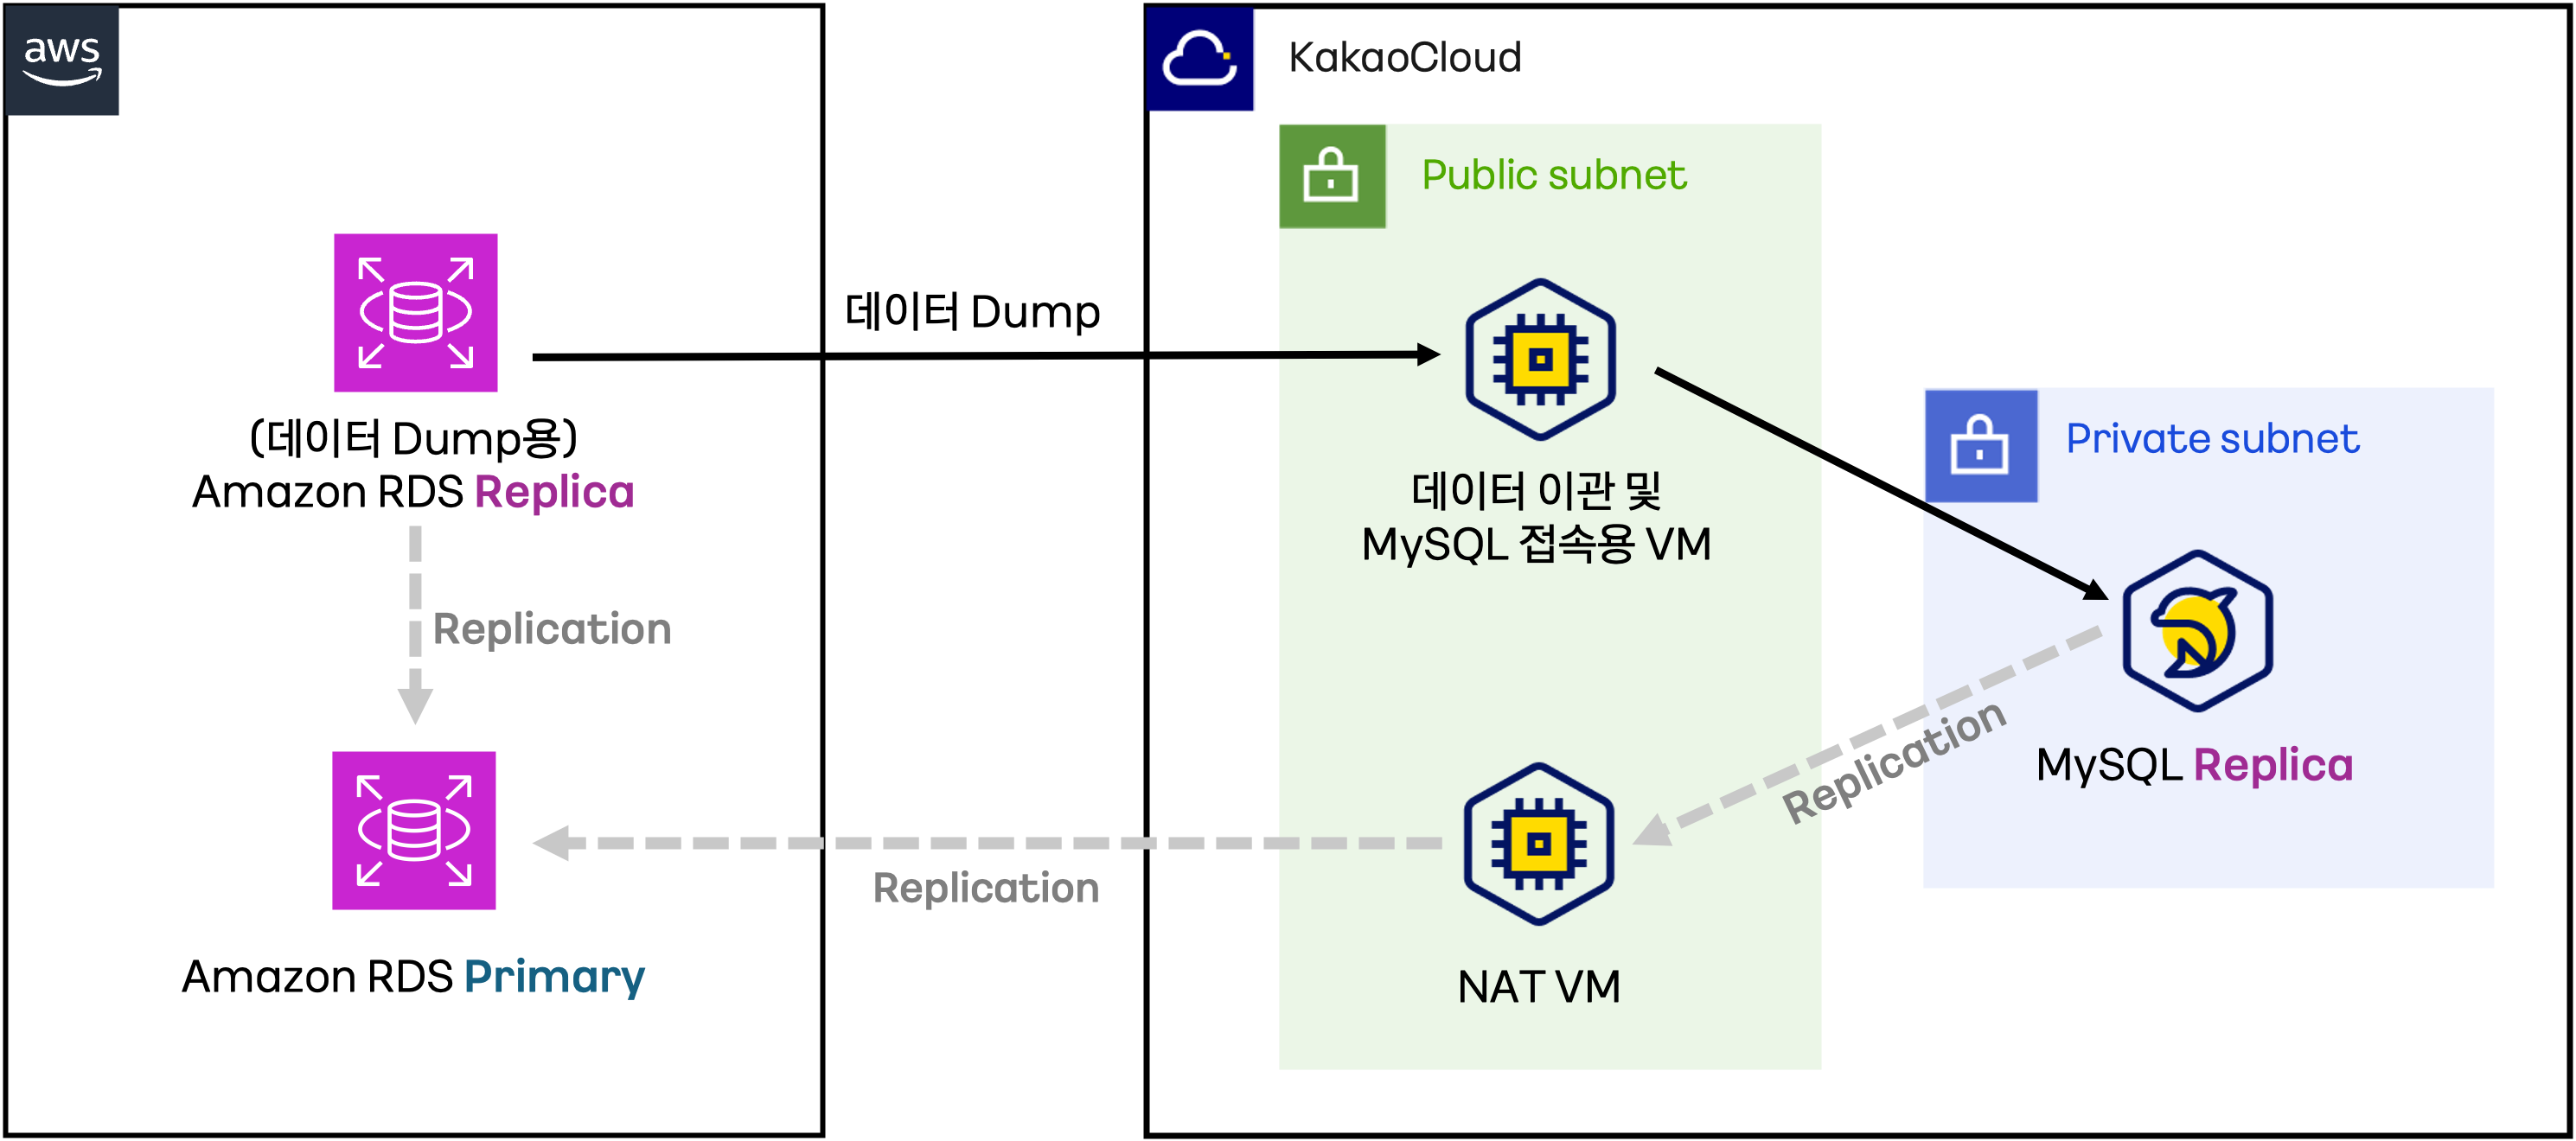
In this scenario, we will explain how to migrate data from AWS RDS MySQL to KakaoCloud MySQL and how to replicate data from KakaoCloud MySQL to AWS RDS MySQL. The main topics covered are:
- Data migration using MySQL Workbench and MySQL Dump
- Data replication using MySQL Replication
Before you start
1. Network environment setup
Before setting up data migration and replication for MySQL on KakaoCloud, you need to configure the network environment. Please refer to the Network Setup Using NAT Instances Across Multiple Availability Zones document to ensure that resources in the private subnet can communicate externally.
2. Security group configuration
Setting up a security group is necessary to block unauthorized external access while allowing required traffic to secure data integrity and facilitate smooth network communication.
Security Group: tutorial-bastion-sg
-
Go to KakaoCloud console > VPC > Security Group. Refer to the table below to create a security group.
Name Description (Optional) tutorial-bastion-sg Security policy for the Bastion host -
Select the [+ Add] button at the bottom and set the inbound rules as follows, then select the [Apply] button.
Check my public IPSelect the button below to check your current public IP.
Inbound Policy to Add Item Value bastion inbound policy 1 Protocol TCPSource IP {USER_PUBLIC_IP}/32Port Number 10000-10010 Policy Description (Optional) bastion inbound policy 1 bastion inbound policy 2 Protocol TCPSource IP {USER_PUBLIC_IP}/32Port Number 81 Policy Description (Optional) bastion inbound policy 2 bastion inbound policy 3 Protocol TCPSource IP {USER_PUBLIC_IP}/32Port Number 22 Policy Description (Optional) bastion inbound policy 3
3. Bastion host configuration
The Bastion host serves as a VM for data migration and MySQL access in the cloud environment, acting as a secure gateway for remote access to cloud instances.
- Go to KakaoCloud console > Beyond Compute Service > Virtual Machine.
- Refer to the table below for items and values to create a VM instance that will act as the Bastion host.
| Category | Item | Setting/Input Value | Note |
|---|---|---|---|
| Basic Information | Name | tutorial-bastion | |
| Count | 1 | ||
| Image | Ubuntu 20.04 | ||
| Instance Type | m2a.large | ||
| Volume | Root Volume | 20 | |
| Key Pair | {USER_KEYPAIR} | ⚠️ The key pair must be securely stored upon creation. Lost keys cannot be recovered and require reissuance. | |
| Network | VPC | tutorial | |
| Subnet | main (10.0.0.0/20) | ||
| Security Group | tutorial-bastion-sg |
4. MySQL database creation
Create a MySQL instance for data migration. KakaoCloud's MySQL is a fully managed database service, allowing you to provision MySQL instances easily through the console without complex installations. Additionally, it can be used safely in a logically isolated network.
-
Go to KakaoCloud console > Data Store > MySQL.
-
In the Instance Group tab, select the [Create Instance Group] button and refer to the instructions to create an instance group.
Category Item Setting/Input Value Note Basic Settings Instance Group Name tutorial-mysql Description Optional MySQL Settings Engine Version Use specified value MySQL Username admin MySQL Password root1234 Instance Availability/Count Single (Primary Instance) Instance Type m2a.large Storage Type/Size 100 Log Storage Type/Size 100 Network Settings VPC tutorial Subnet {VPC_ID}_sn_5 (10.0.64.0/20)⚠️ Use the subnet created in the NAT instance tutorial. Automatic Backup Automatic Backup Option Not used
MySQL data migration
MySQL data migration can be carried out using MySQL Dump or MySQL Workbench.
Data migration occurs over the internet, so internet connectivity must be available between database instances.
1. Using MySQL workbench
MySQL Workbench is an open-source tool that provides SQL development and management within a single integrated development environment for visual database design. This tutorial is based on a Windows instance.
Step 1. Connect to the VM for data migration and MySQL access
-
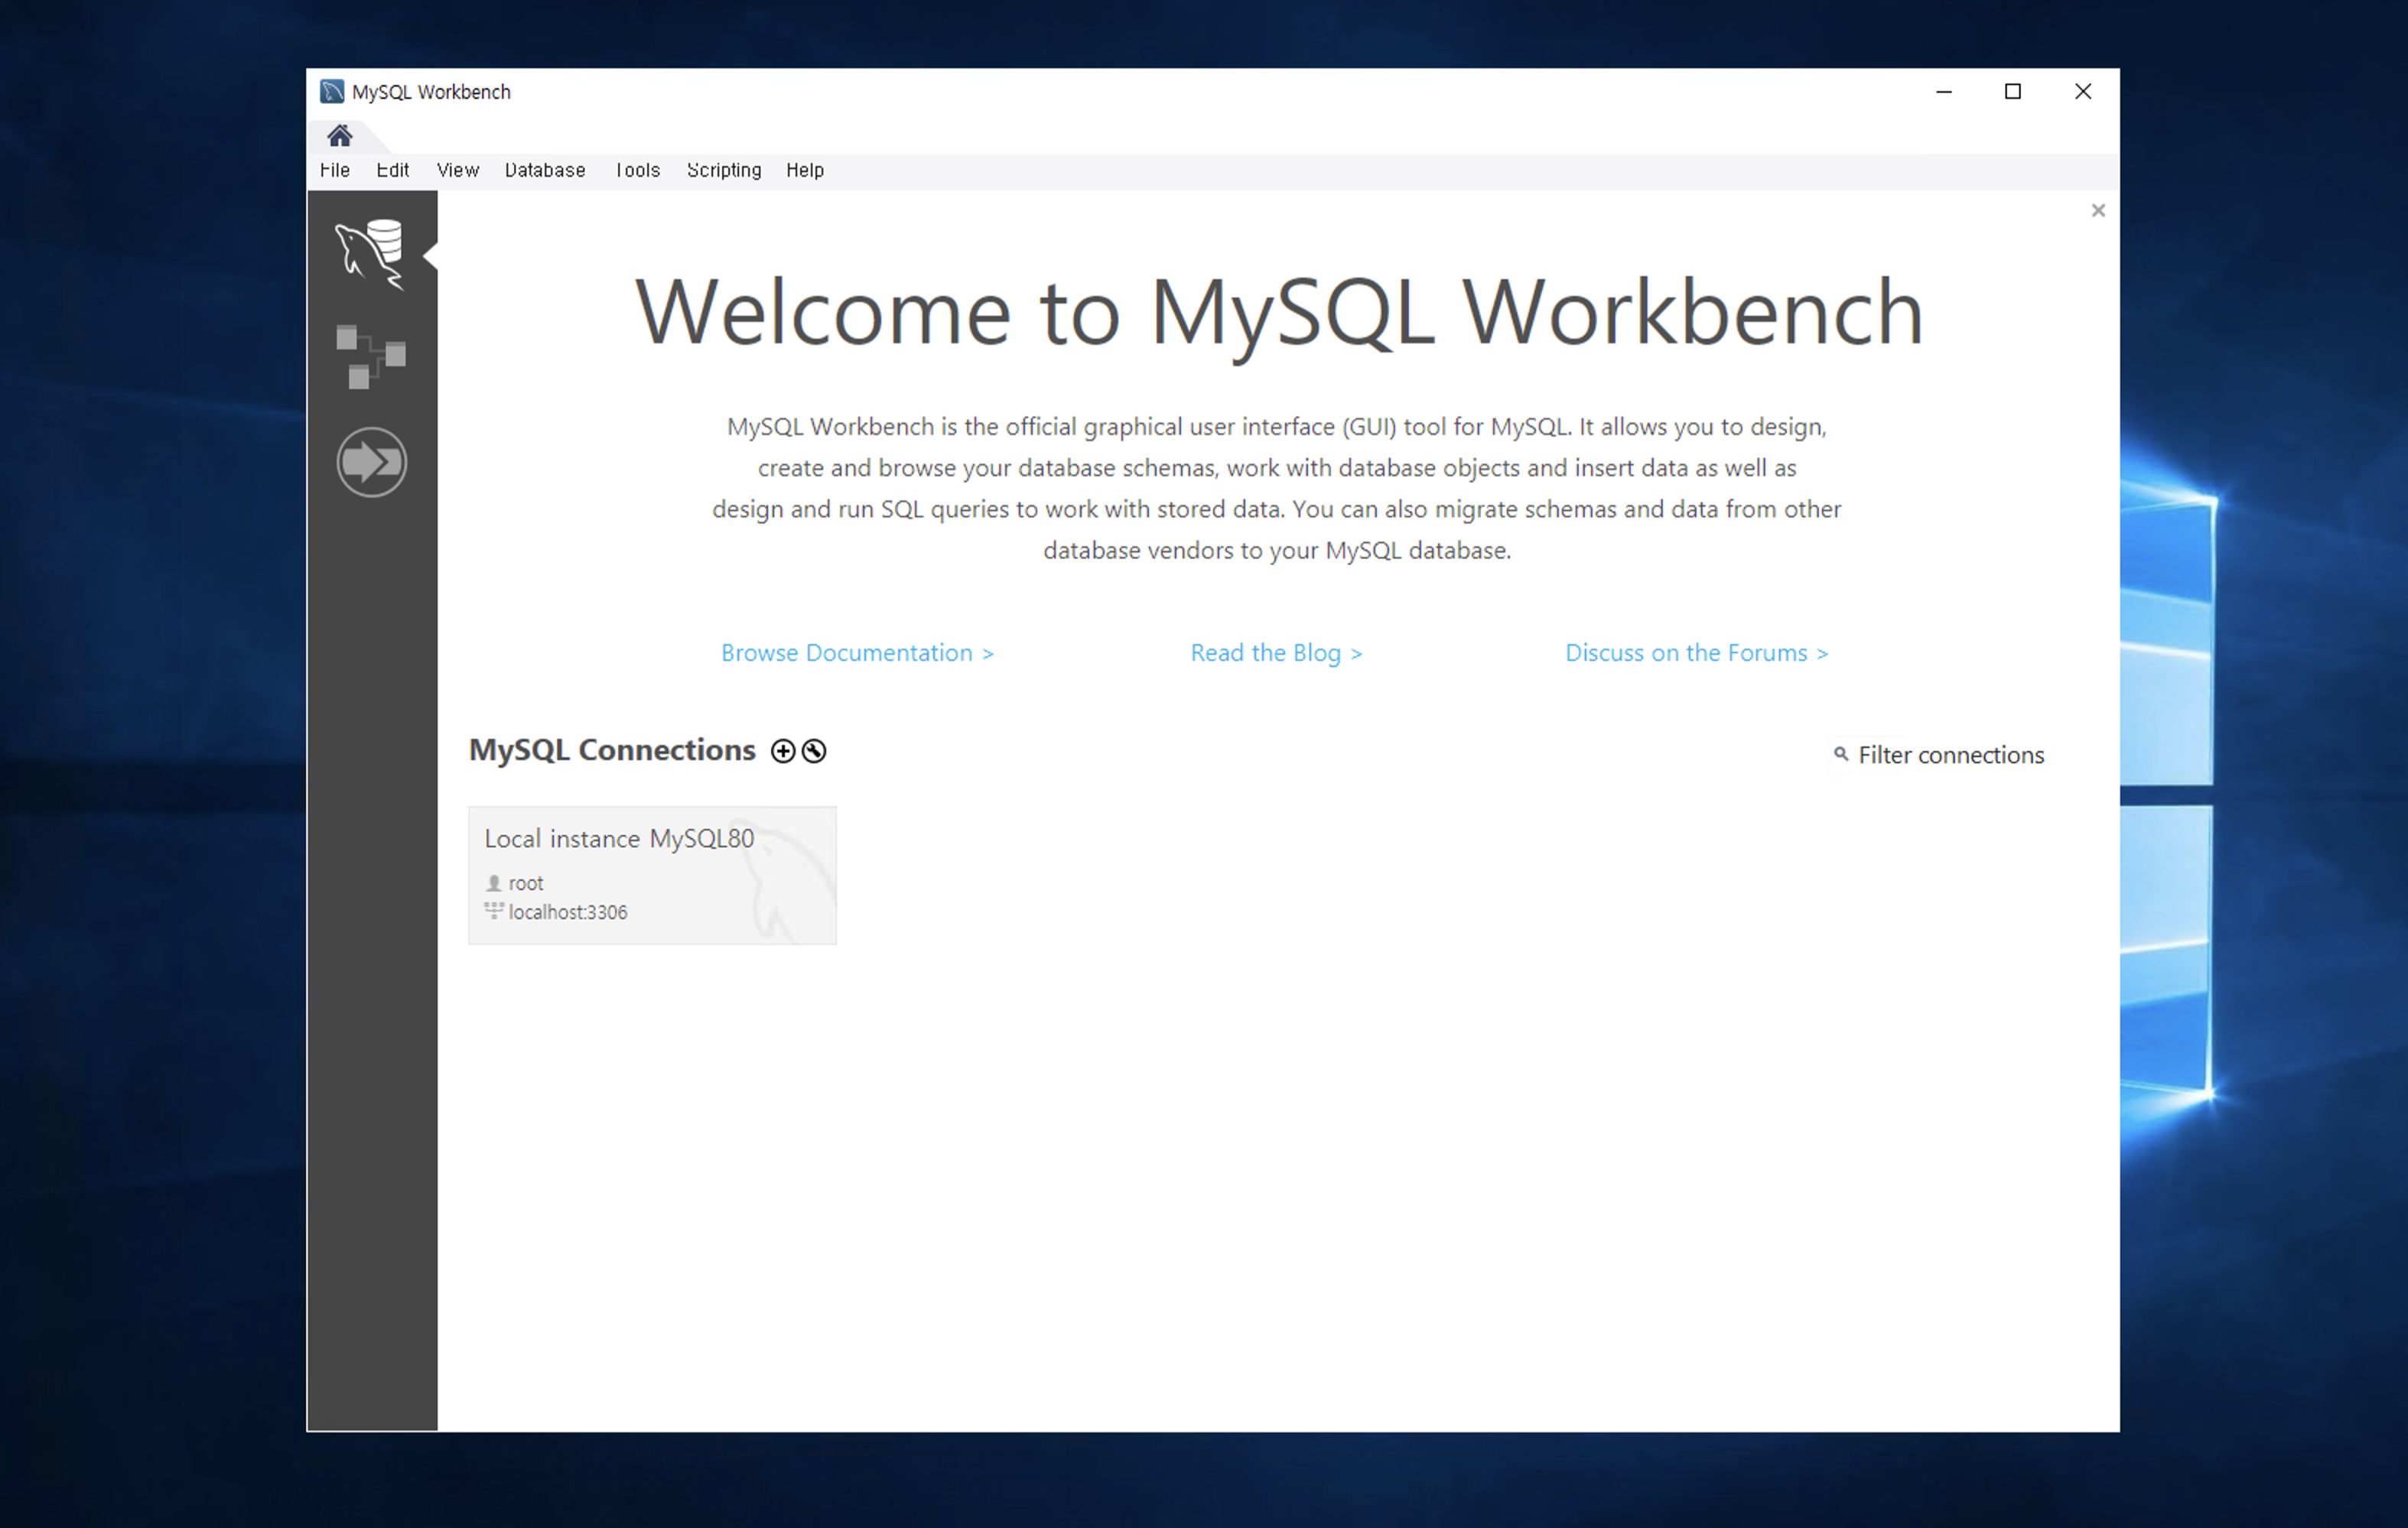
Refer to the Connect to Windows Instance to RDP into the VM instance and install MySQL Workbench.
-
Download and install from the MySQL Workbench Official Download Page.
Step 2. Proceed with data migration
-
Select MySQL Workbench > Database > Migration Wizard to prepare for data migration.
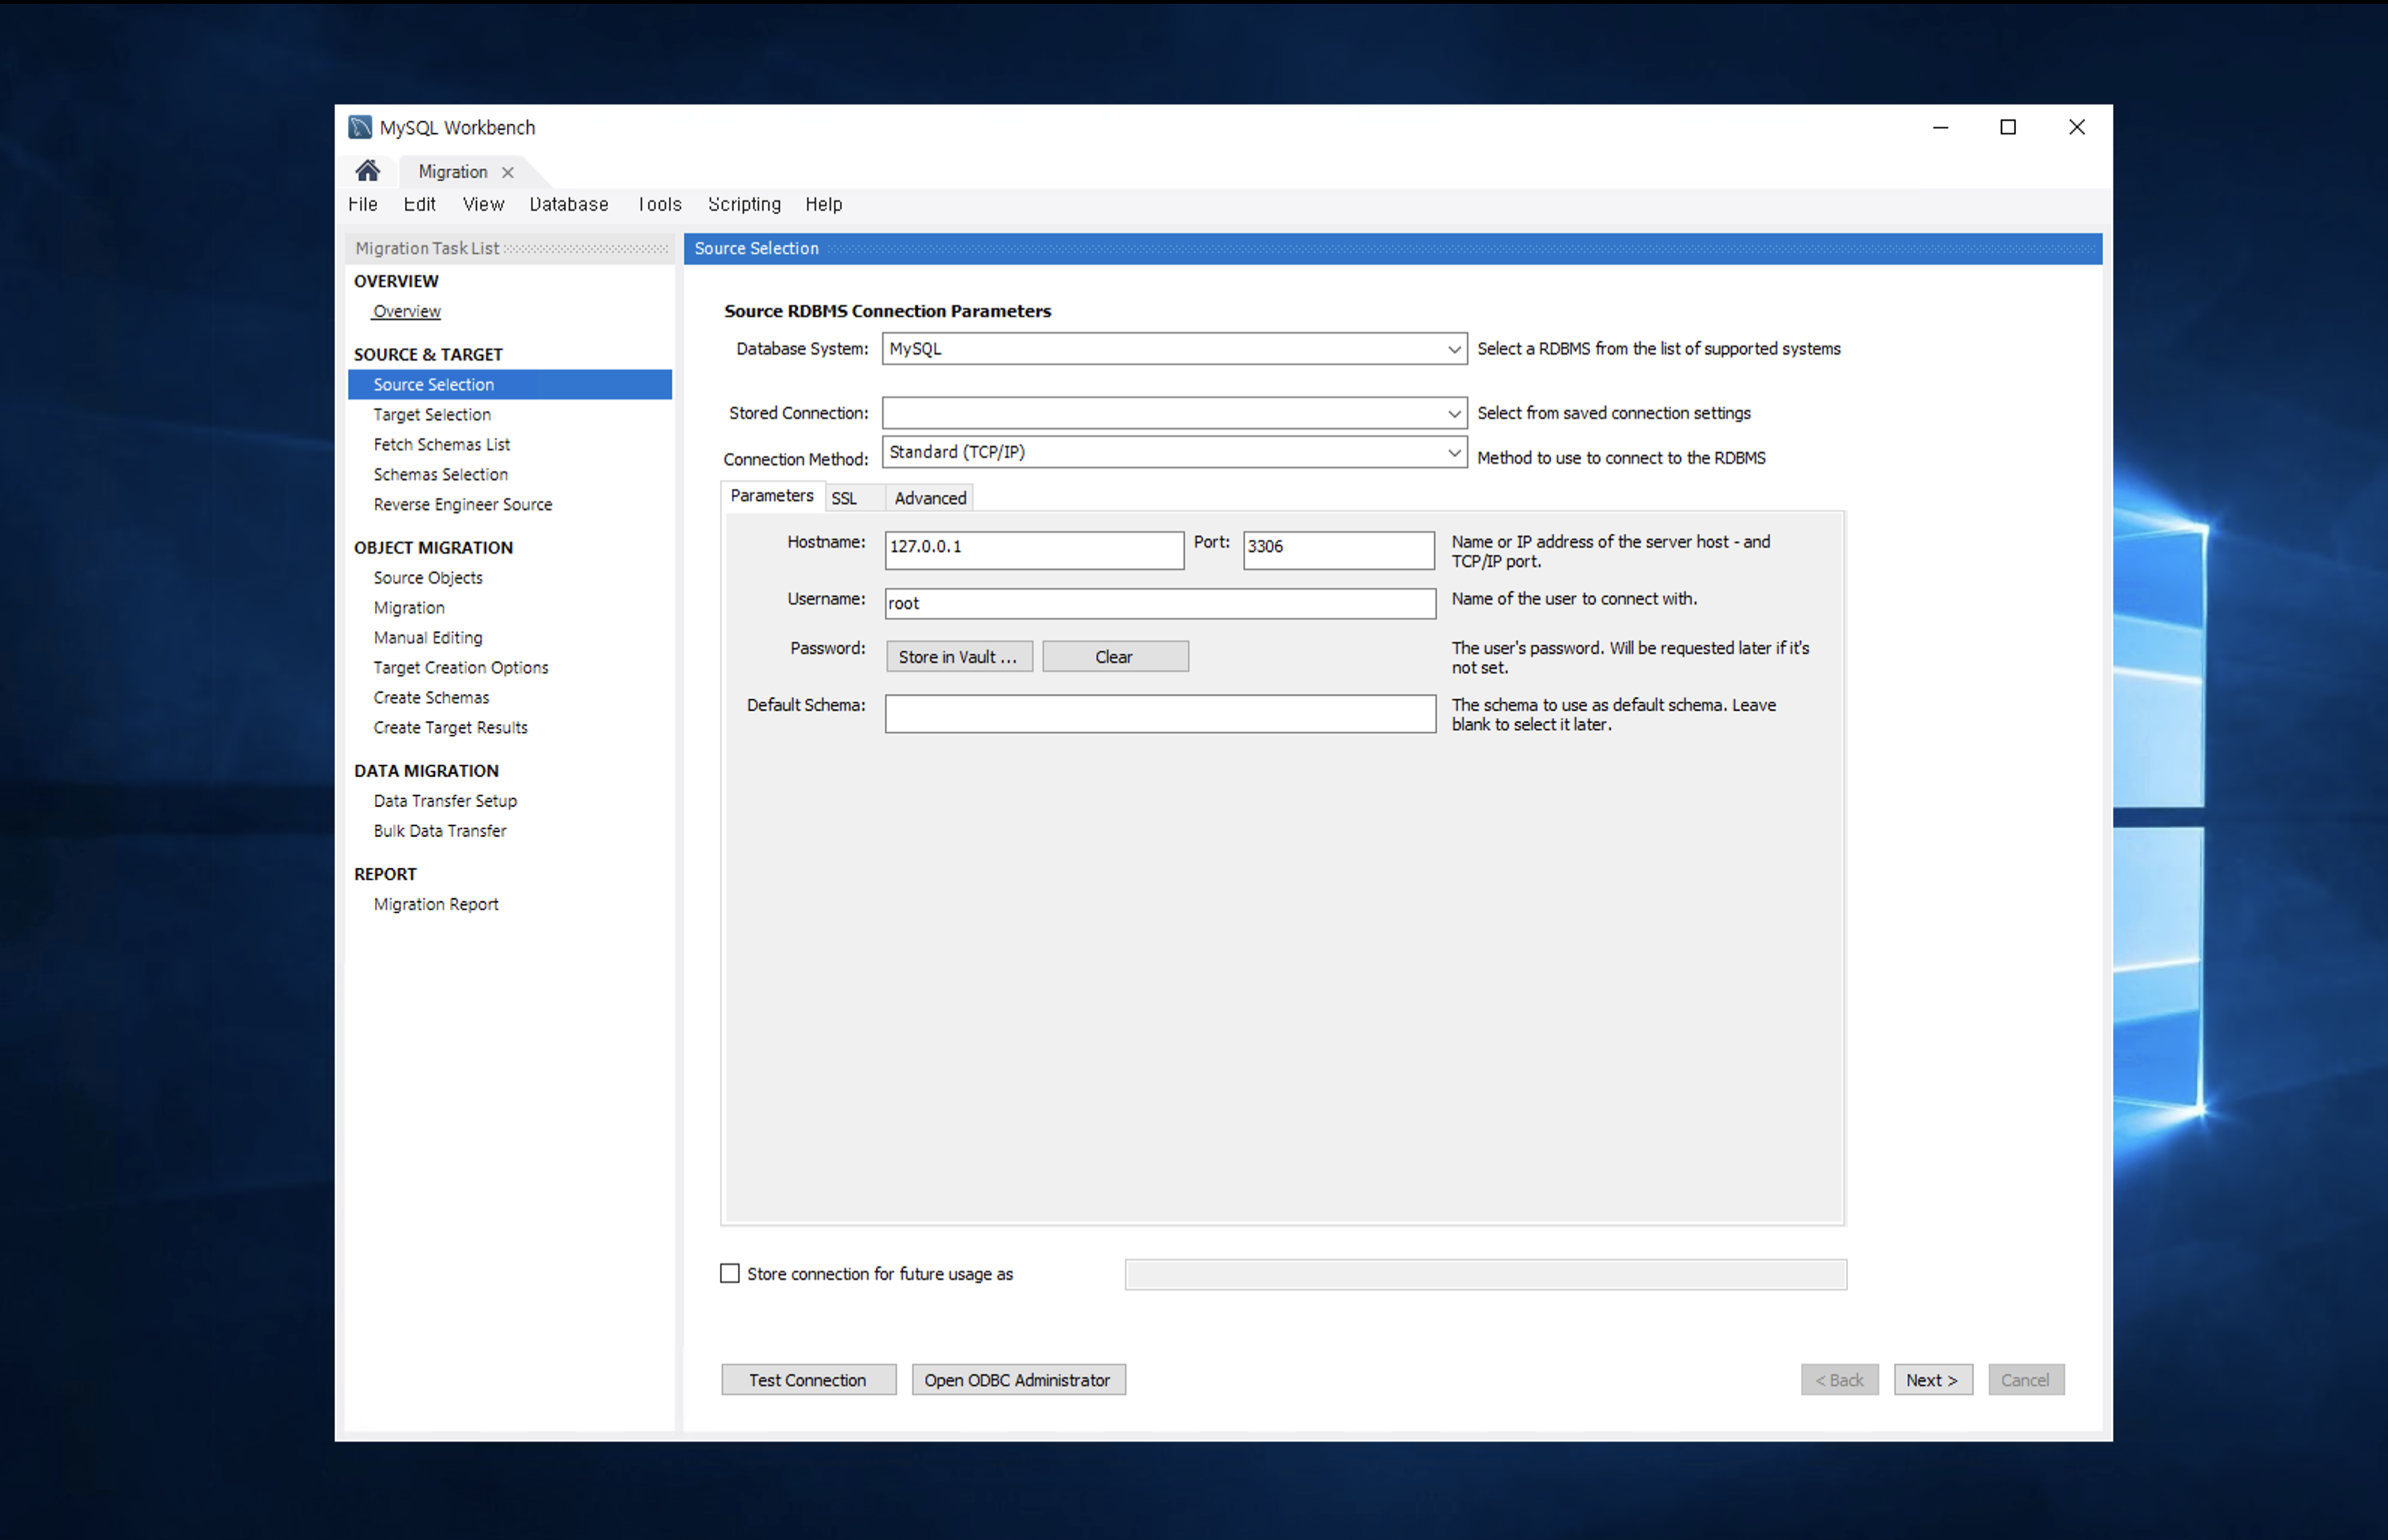
Item Setting/Input Value Note Source Selection Enter access information for AWS Database Server Test Connection for access testing Target Selection Enter access information for KakaoCloud Database Server Test Connection for access testing Schemas Selection Select schemas for migration Choose Library Schemas for this tutorial Source Objects Select target tables Procedures or Functions can be selected Migration Generate scripts for the migration target Target Creation Options Create schemas in the target database and generate SQL script files Create Schemas Start creating tables and monitoring logs Bulk Data Transfer Check final data migration completion logs
The above items are mandatory settings; other items can be set to default values.
Step 3. Verify migration data in KakaoCloud MySQL
-
To connect to the MySQL instance group from the Bastion instance configured in the preparation stage, execute the command to connect to the MySQL instance from the virtual machine instance using the MySQL Client.
# MySQL instance connection command
mysql --user={USER} --password={USER_PASSWORD} --host {ENDPOINT} --port {PORT}
Item Description user {USER}: Database username
- The name of the DB admin account that connects to the MySQL instance.password {USER_PASSWORD}: Initial password for the admin account connecting to the MySQL instance
- The password entered during MySQL creation.host {ENDPOINT}: MySQL endpoint information
- The endpoint associated with the MySQL instance.port {PORT}: The port number set when creating the instance group. -
Check the data integrity of the
booktable in thelibraryschema in KakaoCloud MySQL.
# MySQL instance command
mysql> use library;
Database changed

mysql> select * from book;
2. Utilizing MySQL dump
MySQL Dump is a utility and command used to back up or migrate the data of a database.
Step 1. Dumping AWS RDS data
Use the mysqldump command from the KakaoCloud VM to perform a dump on the AWS RDS MySQL Replica DB. Stop the Replica before executing the dump.
# 1. Connect to KakaoCloud VM
Access the Bastion Server instance.

# 2. Connect to the AWS Read-Only Replica
shell> mysql --user=admin --password=admin1234 --host {aws-rds-read-replica}.ap-northeast-2.rds.amazonaws.com --port 3306

# 3. Stop the replication on the Read-Only Replica
mysql> CALL mysql.rds_stop_replication;
+-------------------------------+
| Message                       |
+-------------------------------+
| Slave is now down or disabled |
+-------------------------------+
1 row in set (3.01 sec)

Query OK, 0 rows affected (3.01 sec)

mysql> exit
Bye

# 4. Dump the Read-Only Replica
shell> mysqldump -h {aws-read-replica}.ap-northeast-2.rds.amazonaws.com \
    -u admin \
    -p \
    --port=3306 \
    --routines \
    --triggers \
    --databases {dump_DATABASE} > aws_source.sql
Enter password: {Enter admin password}
Warning: A partial dump from a server that has GTIDs will by default include the GTIDs of all transactions, even those that changed suppressed parts of the database. If you don't want to restore GTIDs, pass --set-gtid-purged=OFF. To make a complete dump, pass --all-databases --triggers --routines --events.
Warning: A dump from a server that has GTIDs enabled will by default include the GTIDs of all transactions, even those that were executed during its extraction and might not be represented in the dumped data. This might result in an inconsistent data dump.
In order to ensure a consistent backup of the database, pass --single-transaction or --lock-all-tables or --master-data.
mysqldump: Got error: 1049: Unknown database 'erin-database' when selecting the database

# 5. Confirm the dump file creation despite warning messages
shell> ls
aws_source.sql
Step 2. Importing data into KakaoCloud MySQL and setting up replication
Use the dump file created in the KakaoCloud VM to import data into KakaoCloud MySQL.
# Connect to KakaoCloud MySQL
shell> mysql --user={USER} --password={USER_PASSWORD} --host {KAKAOCLOUD-MySQL-ENDPOINT} --port 3306

# Grant permissions
mysql> grant SYSTEM_VARIABLES_ADMIN,REPLICATION_SLAVE_ADMIN on *.* to 'admin'@'%';
Query OK, 0 rows affected (0.00 sec)

mysql> FLUSH PRIVILEGES;
Query OK, 0 rows affected (0.00 sec)

mysql> exit
Bye

# Import the dump file into KakaoCloud MySQL
shell> mysql --user=admin --password=admin1234 --host {kc-mysql-endpoint} --port 3306 < aws_source.sql
mysql: [Warning] Using a password on the command line interface can be insecure.
# Check if the imported data from the dump file is present in KakaoCloud MySQL
MySQL data replication
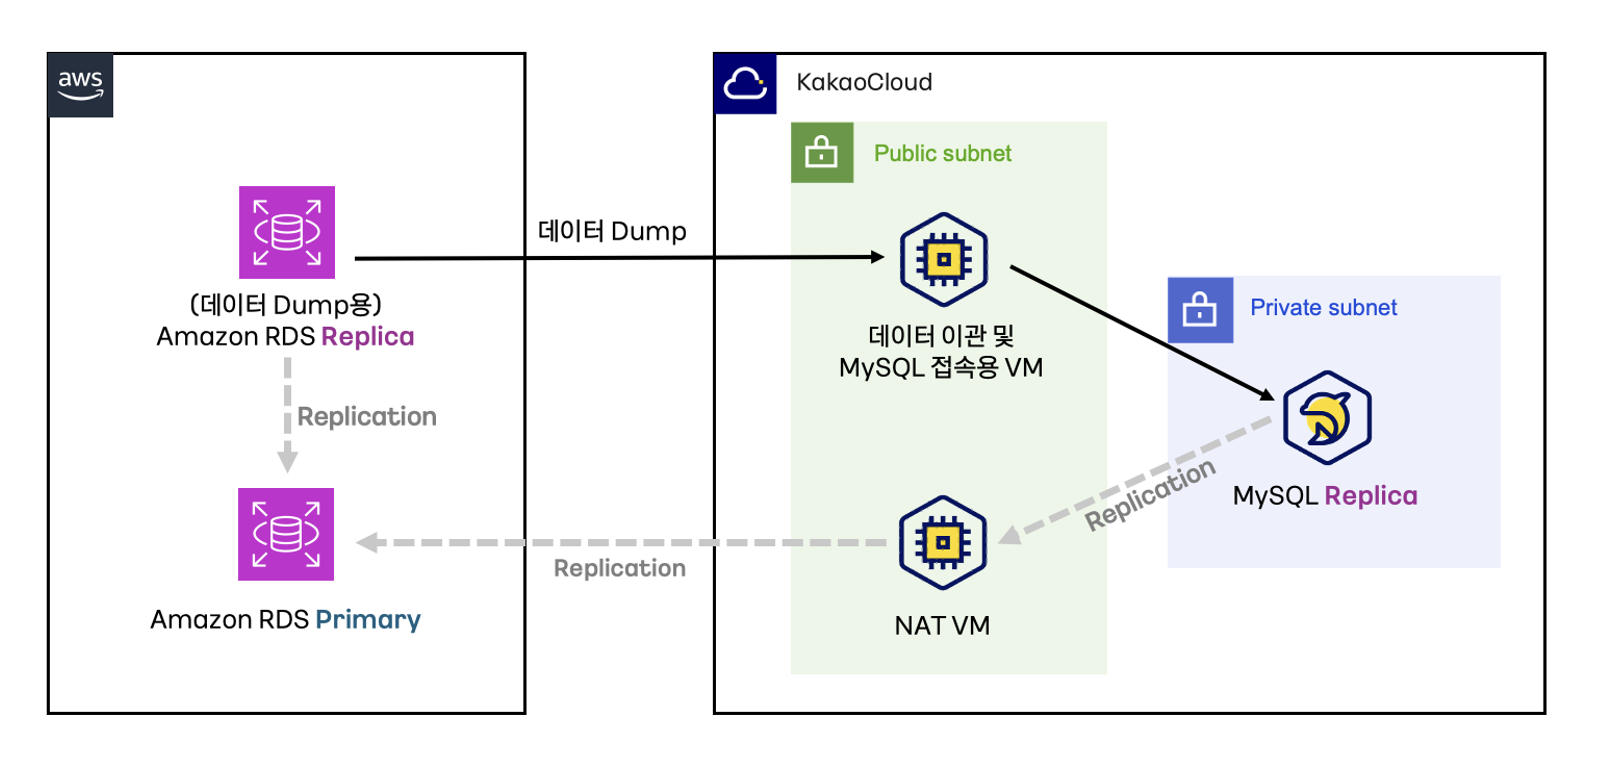
This guide introduces how to migrate and replicate data from KakaoCloud MySQL to AWS RDS MySQL.
Step 1. Port forwarding
To set up KakaoCloud MySQL replication (Chained Replication) on AWS RDS Replica-2, you need to configure a port forwarding environment using a VM for data migration.
- External access port of KakaoCloud VM (e.g., 4306)
- Internal access port via NAT instance (e.g., 3306)
- When connecting via port 4306 externally, it is forwarded to port 3306 through the NAT instance, and data is sent to KakaoCloud MySQL. You can set the external access port to any desired port.
- Public IP and Private IP of KakaoCloud VM
-
Check the Endpoint IP of the KakaoCloud MySQL VM.
shell> nslookup {KakaoCloud_MySQL_ENDPOINT}
...
Address: {MySQL_PRIVATE_IP} -
Access the KakaoCloud VM.
shell> ssh -i {PATH_TO_PRIVATE_KEY} {USERNAME}@{INSTANCE_IP} -
(For Ubuntu) Use the
iptablescommand to install and startiptables-persistent.shell> sudo apt update
shell> sudo apt install iptables-persistent
shell> sudo systemctl start iptables
shell> sudo systemctl status iptables
# Confirm Active status -
Configure the
sshenvironment.shell> sudo vi /etc/ssh/sshd_config
AllowTcpForwarding yes
GatewayPorts yes
# Change the above two to yes and restart
shell> sudo /etc/init.d/ssh restart
Restarting ssh (via systemctl): ssh.service. -
Set up port forwarding in the kernel.
shell> sudo vi /etc/sysctl.conf
net.ipv4.ip_forward=1
shell> sudo sysctl -p /etc/sysctl.conf
net.ipv4.ip_forward = 1 # Output value -
Configure port forwarding in the NAT instance.
# 4306 - This is the port accessed externally. Here, we are using 4306.
shell> sudo iptables -t nat -A PREROUTING -p TCP --dport 4306 -j DNAT --to-destination {KakaoCloud_MySQL_ENDPOINT_IP}:3306
shell> sudo iptables -t nat -A POSTROUTING -p tcp -d {KakaoCloud_MySQL_ENDPOINT_IP} --dport 3306 -j SNAT --to-source {KakaoCloud_VM_PRIVATE_IP} -
Verify the configured values.
shell> sudo iptables -t nat -nL --line-numbers
Chain PREROUTING (policy ACCEPT)
num  target     prot opt source               destination
1    DNAT       tcp  --  0.0.0.0/0            0.0.0.0/0            tcp dpt:4306 to:{KakaoCloud_MySQL_ENDPOINT_IP}:3306 <-- Check

Chain INPUT (policy ACCEPT)
num  target     prot opt source               destination

Chain OUTPUT (policy ACCEPT)
num  target     prot opt source               destination

Chain POSTROUTING (policy ACCEPT)
num  target     prot opt source               destination
1    SNAT       tcp  --  0.0.0.0/0            172.16.16.133        tcp dpt:3306 to:{KakaoCloud_MySQL_ENDPOINT_IP} <-- Check
Step 2. KakaoCloud MySQL data dump and replication setup
-
Perform a database dump of KakaoCloud MySQL using the
mysqldumpcommand on the KakaoCloud VM.shell> mysqldump -h {KakaoCloud_MySQL_ENDPOINT} \
-u admin \
-p \
--port=3306 \
--single-transaction \
--routines \
--triggers \
--databases {dump_DATABASE} > kc_replica.sql
shell> Enter password: {ADMIN PASSWORD}
Warning: A partial dump from a server that has GTIDs will by default include the GTIDs of all transactions, even those that changed suppressed parts of the database. If you don't want to restore GTIDs, pass --set-gtid-purged=OFF. To make a complete dump, pass --all-databases --triggers --routines --events.
# Confirm that the file was created successfully despite the warning message -
Use the generated dump file on the KakaoCloud VM to import data into AWS RDS.
# Connect to AWS RDS
shell> mysql --user={USER} --password={USER_PASSWORD} --host {AWS_RDS_REPLICA_2_ENDPOINT} --port 3306

# Grant permissions
mysql> grant SYSTEM_VARIABLES_ADMIN,REPLICATION_SLAVE_ADMIN on *.* to 'admin'@'%';
Query OK, 0 rows affected (0.01 sec)

mysql>  FLUSH PRIVILEGES;
Query OK, 0 rows affected (0.01 sec)

mysql> exit
Bye

# Import data
mysql> mysql --user=admin --password=admin1234 --host {aws-rds-replica-2-endpoint} < kc_replica.sql
mysql: [Warning] Using a password on the command line interface can be insecure. -
Configure replication from KakaoCloud MySQL instance to AWS RDS.
  # Connect to AWS RDS
shell> mysql --user=admin --password=admin1234 --host {aws-rds-replica-2-endpoint} --port 3306

# Set up replication
mysql> CALL mysql.rds_set_external_master_with_auto_position (
'{KakaoCloud_VM_PUBLIC_IP}'  # <- KakaoCloud VM Public IP
, '4306'          # <- External port for KakaoCloud VM Public
, 'admin'         # <- RDS administrator account
, 'admin1234'     # <- RDS administrator password
, 0               # <- Use of SSL (0 means not used)
, 0               # <- Delay time
);
Query OK, 0 rows affected (0.04 sec)

# Switch AWS RDS MySQL replication setting to auto GTID mode
mysql> CALL mysql.rds_set_master_auto_position (1);
+-----------------------------------------+
| Message                                 |
+-----------------------------------------+
| Master Auto Position has been set to 1. |
+-----------------------------------------+
1 row in set (2.02 sec)

+---------------------------+
| Message                   |
+---------------------------+
| Slave is running normally |
+---------------------------+
1 row in set (2.02 sec)

Query OK, 0 rows affected (2.02 sec)

# Check replication status
mysql> show replica status\G;
*************************** 1. row ***************************
...
ERROR:
No query specified
Step 3. Data replication test
Create a database and table on the KakaoCloud MySQL instance and input data, then check if the data has been replicated correctly to the AWS RDS Replica-2 instance.
Changing DB endpoint and promoting to primary
This section outlines how to promote the Amazon RDS Primary instance to KakaoCloud MySQL instance step by step.
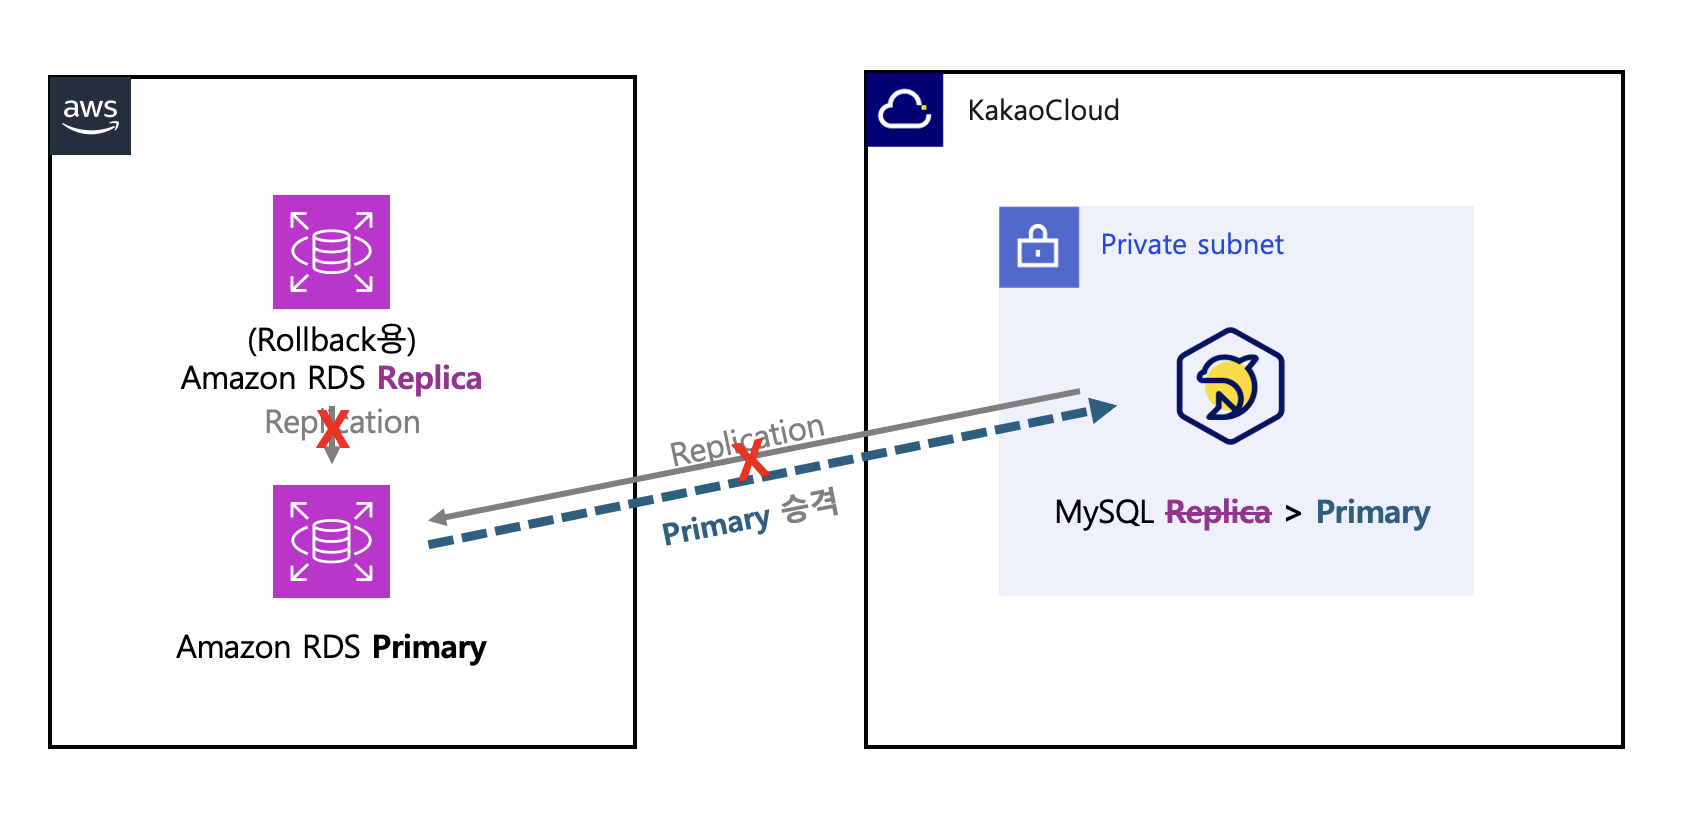
Step 1. Check DB replication transaction status
-
Stop incoming transactions to the AWS RDS Primary DB service to minimize downtime and block transaction entries in the database. Execute the command to view the current process list.
mysql> show processlist;
+----------+----------+---------------------+--------+------------------+----------+---------------------------------------------------------------+------------------+
| Id       | User     | Host                | db     | Command          | Time     | State                                                         | Info             |
+----------+----------+---------------------+--------+------------------+----------+---------------------------------------------------------------+------------------+
|        6 | repluser | 1.1.1.1:10000       | NULL   | Binlog Dump GTID | 59192344 | Master has sent all binlog to slave; waiting for more updates | NULL             |
.....
| 45942707 | root     | localhost           | NULL   | Query            |        0 | starting                                                      | show processlist |
+----------+----------+---------------------+--------+------------------+----------+---------------------------------------------------------------+------------------+ -
Check the synchronization of KakaoCloud's Replica MySQL DB to ensure that
Seconds_Behind_Sourceis0, indicating no replication lag.mysql> show replica status\G;
...
Seconds_Behind_Source : 0 -
Similarly, check the replication status on AWS RDS to ensure that
Seconds_Behind_Sourceis0.mysql> show replica status\G;
...
Seconds_Behind_Source : 0
Step 2. Change MySQL DB endpoint for applications
- Update the database endpoint for all applications connected to the existing AWS RDS Primary DB, directing them to KakaoCloud MySQL.
- Simultaneously, disable the
read_onlysetting on KakaoCloud MySQL DB by running the following command:mysql> set global read_only=0; - To block any transactions on the AWS RDS Primary DB, set the
read_onlyparameter as follows:mysql> set global read_only=1; - Verify that connections to KakaoCloud MySQL are working correctly, and then perform a test transaction to confirm that the functions operate as expected.
Step 3. Detach AWS RDS primary and promote KakaoCloud MySQL instance to primary
- Confirm once again that there are no transactions replicating from AWS RDS to KakaoCloud MySQL.
mysql> show replica status\G;
...
Seconds_Behind_Source : 0 # <- Confirm - To stop replication and detach the AWS RDS Primary, promoting KakaoCloud MySQL to Primary, perform the following steps:
mysql> stop replica;
mysql> reset replica all; - Verify that all changes have been applied correctly and conduct a final check on the service status.