1. Create LLM model serving endpoint
📘 Deploy pretrained models like Kakao’s Kanana and Meta’s Llama 3.2 using KServe and expose them as real-time inference endpoints.
- Estimated time: 30 minutes
- Recommended OS: Ubuntu
About this scenario
In this tutorial, you will use KServe within Kubeflow to create a serving API endpoint for pretrained LLMs such as Kanana by Kakao and Llama 3.2 by Meta. This includes CPU and GPU deployment options.
You’ll learn to implement and manage model serving with KServe and gain a clear understanding of how to operate real-time conversational AI APIs within Kubeflow.
Key topics include:
- Deploying an LLM model endpoint (InferenceService CR) in Kubeflow
- Testing inference and reviewing responses from the deployed endpoint
Supported tools
| Tool | Version | Description |
|---|---|---|
| Jupyter Notebook | 4.2.1 | Web-based development environment that integrates with Kubeflow SDK and various ML frameworks |
| KServe | 0.15.0 | - A model serving tool for fast deployment and updates with high availability and scalability. - Automatically handles common serving tasks such as load balancing, version control, and failure recovery. |
Before you start
Step 1. Set up Kubeflow environment
To reliably serve LLMs on Kubeflow, a node pool with sufficient resources should be prepared.
Refer to the prerequisites to ensure your CPU or GPU-based environment is ready.
Step 2. Pre-checks before starting
Make sure the following configurations are complete to ensure a smooth tutorial experience:
| Item | Checklist |
|---|---|
| Domain and quota settings | - When creating Kubeflow, make sure a domain is assigned (optional). - Refer to the quota configuration guide and leave quotas unset. └ Set quotas may limit resource usage. |
| KServe authentication disabled | - KServe must be configured with Dex authentication disabled. └ For configuration, see Service > Troubleshoot |
Step 3. Deploy ServingRuntime CR
ServingRuntime or ClusterServingRuntime is a Custom Resource (CR) in KServe that defines the runtime used for model inference.
It allows users to create and manage InferenceService CRs by predefining the serving environment.
ServingRuntime setup by Kubeflow version
| Kubeflow Version | Setup Instructions |
|---|---|
| 1.10 | A Hugging Face ServingRuntime CR is pre-installed. No additional action required. |
| 1.9 | You need to manually apply the YAML below. |
Create and apply YAML
Replace <YOUR_NAMESPACE> with your actual namespace (e.g., admin-user) and apply the YAML matching your environment (CPU or GPU).
- For CPU image
- For GPU image
apiVersion: serving.kserve.io/v1alpha1
kind: ServingRuntime
metadata:
  name: kserve-huggingfaceserver
  namespace: <YOUR_NAMESPACE>
spec:
  annotations:
    prometheus.kserve.io/path: /metrics
    prometheus.kserve.io/port: "8080"
  containers:
  - image: kserve/huggingfaceserver:v0.15.0
    name: kserve-container
    resources:
      limits:
        cpu: "1"
        memory: 2Gi
      requests:
        cpu: "1"
        memory: 2Gi
  protocolVersions:
  - v2
  - v1
  supportedModelFormats:
  - autoSelect: true
    name: huggingface
    priority: 1
    version: "1"
apiVersion: serving.kserve.io/v1alpha1
kind: ServingRuntime
metadata:
  name: kserve-huggingfaceserver
  namespace: <YOUR_NAMESPACE>
spec:
  annotations:
    prometheus.kserve.io/path: /metrics
    prometheus.kserve.io/port: "8080"
  containers:
  - image: kserve/huggingfaceserver:v0.15.0-gpu
    name: kserve-container
    resources:
      limits:
        cpu: "1"
        memory: 2Gi
      requests:
        cpu: "1"
        memory: 2Gi
  protocolVersions:
  - v2
  - v1
  supportedModelFormats:
  - autoSelect: true
    name: huggingface
    priority: 1
    version: "1"
After saving the YAML file as huggingface_sr.yaml, run the following command to create the ServingRuntime resource:
$ kubectl apply -f huggingface_sr.yaml
For instructions on how to configure kubectl, refer to the kubectl control setup guide.
In the Kubeflow notebook terminal environment, you can use the kubectl command without a separate kubeconfig.
Getting started
In this hands-on tutorial, you'll serve an LLM model using either the Hugging Face Runtime or a custom model image. The detailed steps for serving LLM models using Kubeflow KServe are as follows.
Step 1. Define and create InferenceService CR
Based on the previously created ServingRuntime CR, you will now define the InferenceService resource to serve your LLM model. This process sets up a real-time inference API within Kubeflow and creates an endpoint that can respond to internal or external requests. You can serve the LLM model using either the Hugging Face serving runtime or a custom model, as shown in the options below.
Option 1. Serve model using Huggingface
InferenceService is the primary resource used in Kubeflow KServe for model serving. Hugging Face-based LLM models such as Kakao's Kanana-Nano-2.1B or Meta's Llama 3.2 can be easily served using this resource.
Below is an example of an InferenceService definition using the Huggingface Serving Runtime:
- Kanana model
- Llama3 model
apiVersion: serving.kserve.io/v1beta1
kind: InferenceService
metadata:
  name: kanana-isvc
spec:
  predictor:
    model:
      modelFormat:
        name: huggingface
      args:
      - --model_name=kanana-nano-inst
      - --model_id=kakaocorp/kanana-nano-2.1b-instruct
      - --dtype=bfloat16
      - --backend=vllm
      # Use GPU
      resources:
        limits:
          cpu: '1'
          memory: '32Gi'
          nvidia.com/mig-1g.10gb: '1'
        requests:
          cpu: '1'
          memory: '2Gi'
          nvidia.com/mig-1g.10gb: '1'
       # Use CPU
       #  limits:
       #    cpu: '6'
       #    memory: '32Gi'
       #  requests:
       #    cpu: '1'
       #    memory: '2Gi'
apiVersion: serving.kserve.io/v1beta1
kind: InferenceService
metadata:
  name: llama-isvc
spec:
  predictor:
    model:
      modelFormat:
        name: huggingface
      args:
      - --model_name=llama3-inst
      - --model_id=meta-llama/Llama-3.2-3B-Instruct
      - --dtype=bfloat16
      - --backend=vllm
      env:
        - name: HF_TOKEN
          valueFrom:
            secretKeyRef:
              name: hf-secret
              key: HF_TOKEN
              optional: false
      resources:
        # GPU uasge
        limits:
          cpu: '1'
          memory: '32Gi'
          nvidia.com/mig-4g.40gb: '1'
        requests:
          cpu: '1'
          memory: '2Gi'
          nvidia.com/mig-4g.40gb: '1'
       # CPU usage
       #  limits:
       #    cpu: '6'
       #    memory: '32Gi'
       #  requests:
       #    cpu: '1'
       #    memory: '2Gi'
If the model repository on Huggingface is access-restricted or private, register your Huggingface access token as a Kubernetes Secret.
apiVersion: v1
kind: Secret
metadata:
    name: hf-secret
type: Opaque
stringData:
    HF_TOKEN: <YOUR_HUGGINGFACE_TOKEN>
For details on how to issue a Huggingface token, refer to the official Huggingface documentation.
Option 2. Serve custom model
This method allows users to implement model logic directly and build it into a Docker image, which is then served using KServe.
In this case, you must subclass the base model class (BaseModel) provided by Python and implement methods such as load() and predict(). The built image will be referenced in the InferenceService resource.
Alternatively, you can serve a model directly from files stored in Object Storage. This method does not require a Docker image, but to enable KServe to access the model files via S3-compatible APIs, you must configure the appropriate Secret and ServiceAccount.
- Download sample files: custom_model_files.zip
- Detailed guide: KServe official documentation
Optional: Object Storage configuration
-
After issuing credentials for using the S3 API, create the
SecretandServiceAccountfrom the Kubeflow notebook environment as follows:kserve-s3-access.yaml exampleapiVersion: v1
kind: Secret
metadata:
name: kserve-s3-secret
annotations:
serving.kserve.io/s3-endpoint: objectstorage.kr-central-2.kakaocloud.com
serving.kserve.io/s3-usehttps: "1"
serving.kserve.io/s3-region: "kr-central-2"
serving.kserve.io/s3-useanoncredential: "false"
type: Opaque
stringData:
AWS_ACCESS_KEY_ID: {S3_ACCESS_KEY} # Enter your issued access key
AWS_SECRET_ACCESS_KEY: {S3_SECRET_ACCESS_KEY} # Enter your issued secret key
---
apiVersion: v1
kind: ServiceAccount
metadata:
name: kserve-s3-sa
secrets:
- name: kserve-s3-secret -
By specifying the S3 model object URL in the
storageUrifield and setting the previously createdserviceAccountNamein theInferenceService, the model will be automatically mounted to the/mnt/models/directory.Inference exampleapiVersion: serving.kserve.io/v1beta1
kind: InferenceService
metadata:
name: <llm-isvc> # e.g., kanana-isvc or llama-isvc
spec:
predictor:
serviceAccountName: kserve-s3-sa # Name of the created ServiceAccount
model:
storageUri: s3://{MODEL_OBJECT_URL} # S3 URI path to the model file
...
This configuration is useful when serving a model without a Docker image, allowing you to leverage a shared model storage location.
Custom model serving implementation
You will serve Meta's Llama 3.1 Instruct model by writing a custom model class and building it as a Docker image for deployment via KServe.
-
Below is an example of how to implement inference logic for KServe using the Hugging Face pipeline.
Inference scriptimport argparse
import logging
import os
from typing import Dict, Union
from PIL import Image
import base64
import io
import numpy as np
import kserve
import torch
from transformers import pipeline
logging.basicConfig(level=logging.INFO, format="%(asctime)s - %(name)s - %(levelname)s - %(message)s")
huggingface_key = "<YOUR_HUGGINGFACE_TOKEN>"
os.environ["HUGGING_FACE_TOKEN"] = huggingface_key
class CustomLlmModel(kserve.Model):
def __init__(self, name: str):
super().__init__(name)
self.name = name
self.ready = False
self.tokenizer = None
self.model = None
self.pipe = None
self.load()
def load(self):
model_id = "meta-llama/Llama-3.1-8B-Instruct"
self.pipe = pipeline(
"text-generation",
model=model_id,
torch_dtype=torch.bfloat16,
device_map="auto",
token=huggingface_key,
)
logging.info(f"cuda is available: {torch.cuda.is_available()}")
self.ready = True
def predict(self,
request: Dict,
headers: Dict[str, str] = None) -> Dict:
logging.info("request : ")
logging.info(request)
question = "What is the capital of France?"
if request["question"]:
question = request["question"]
message = [
{"role": "user", "content": question},
]
outputs = self.pipe(
message,
max_new_tokens=100
)
answer = outputs[0]["generated_text"][-1]
logging.info(answer)
return {"answer": outputs[0]["generated_text"][-1]}
parser = argparse.ArgumentParser(parents=[kserve.model_server.parser])
parser.add_argument(
"--model_name", help="The name that the model is served under.", default="llama3-inst"
)
args, _ = parser.parse_known_args()
if __name__ == "__main__":
model = CustomLlmModel(args.model_name)
kserve.ModelServer().start([model]) -
Configure the Dockerfile as shown below.
Build script(Dockerfile)ARG PYTHON_VERSION=3.9
ARG BASE_IMAGE=python:${PYTHON_VERSION}-slim-bullseye
ARG VENV_PATH=/prod_venv
FROM ${BASE_IMAGE} as builder
# Install Poetry
ARG POETRY_HOME=/opt/poetry
ARG POETRY_VERSION=1.4.0
ARG KSERVE_VERSION=0.15.0
RUN python3 -m venv ${POETRY_HOME} && ${POETRY_HOME}/bin/pip install poetry==${POETRY_VERSION}
ENV PATH="$PATH:${POETRY_HOME}/bin"
# Activate virtual env
ARG VENV_PATH
ENV VIRTUAL_ENV=${VENV_PATH}
RUN python3 -m venv $VIRTUAL_ENV
ENV PATH="$VIRTUAL_ENV/bin:$PATH"
COPY custom_model/pyproject.toml custom_model/poetry.lock custom_model/
RUN cd custom_model && poetry install --no-root --no-interaction --no-cache
COPY custom_model custom_model
RUN cd custom_model && poetry install --no-interaction --no-cache
FROM ${BASE_IMAGE} as prod
# Activate virtual env
ARG VENV_PATH
ENV VIRTUAL_ENV=${VENV_PATH}
ENV PATH="$VIRTUAL_ENV/bin:$PATH"
RUN useradd kserve -m -u 1000 -d /home/kserve
COPY --from=builder --chown=kserve:kserve $VIRTUAL_ENV $VIRTUAL_ENV
COPY --from=builder custom_model custom_model
USER 1000
ENTRYPOINT ["python", "-m", "custom_model.model"] -
Build and push the image using the following command based on the files you created.
Docker build commands$ cd sample_kserve_custom_model
# Option1 : Use Docker CLI
$ sudo docker buildx build --progress=plain -t <YOUR_CUSTOM_MODEL_IMG>:<YOUR_CUSTOM_MODEL_TAG> -f Dockerfile .
# Option2 : Use Makefile
$ make docker-build-custom-model
## Or
$ make docker-push-custom-model -
(Optional) Depending on the Object Storage integration described earlier, below is an example configuration of a
Secret,ServiceAccount, andInferenceService.apiVersion: v1
kind: Secret
metadata:
name: kserve-s3-secret
annotations:
serving.kserve.io/s3-endpoint: objectstorage.kr-central-2.kakaocloud.com
serving.kserve.io/s3-usehttps: "1"
serving.kserve.io/s3-region: "kr-central-2"
serving.kserve.io/s3-useanoncredential: "false"
type: Opaque
stringData:
AWS_ACCESS_KEY_ID: {S3_ACCESS_KEY}
AWS_SECRET_ACCESS_KEY: {S3_SECRET_ACCESS_KEY}
---
apiVersion: v1
kind: ServiceAccount
metadata:
name: kserve-s3-sa
secrets:
- name: kserve-s3-secret -
Based on the built image or the Object Storage path, configure the
InferenceServiceas shown below.InferenceService exampleapiVersion: serving.kserve.io/v1beta1
kind: InferenceService
metadata:
name: custom-llama-model
spec:
predictor:
timeout: 600
containers:
- name: kserve-container
image: "<YOUR_DOCKER_REGISTRY_URI>/test-kserve-llama-model:v0.0.1"
env:
- name: HUGGING_FACE_TOKEN
value: {YOUR HUGGINGFACE TOKEN}
resources:
# Use GPU
limits:
cpu: "6"
memory: "24Gi"
nvidia.com/mig-4g.40gb: "1"
requests:
cpu: '1'
memory: '2Gi'
nvidia.com/mig-4g.40gb: "1"
# Use CPU
# limits:
# cpu: "6"
# memory: "24Gi"
# requests:
# cpu: '1'
# memory: '2Gi'
Step 2. Deploy from Kubeflow dashboard
You can deploy the InferenceService resource you created from the Kubeflow dashboard.
-
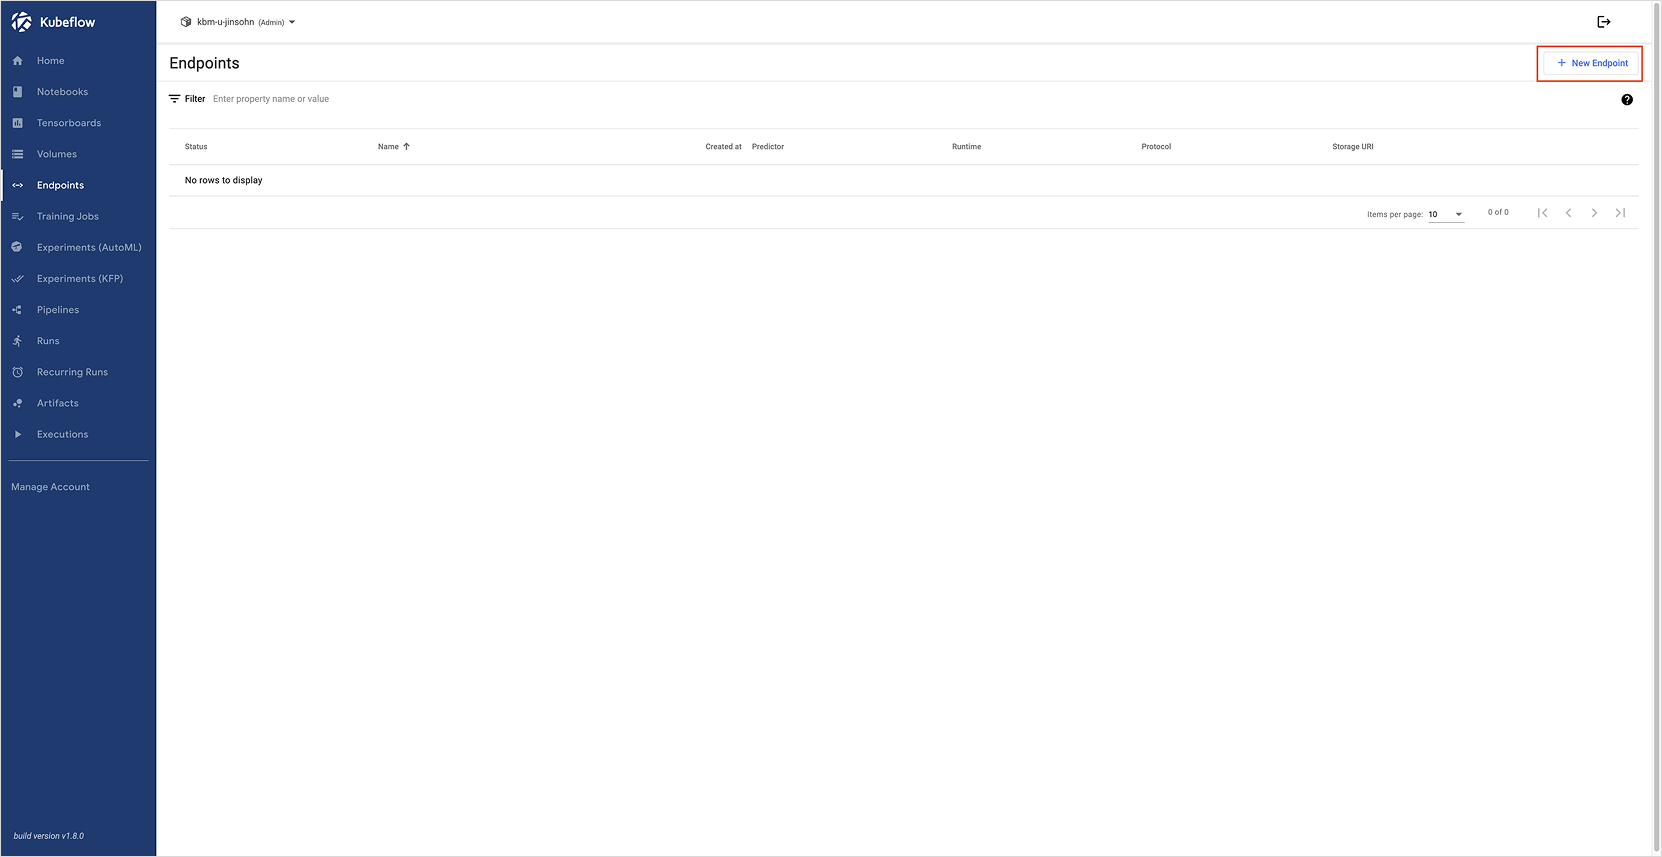
Open the Kubeflow dashboard and click Endpoints in the left menu to go to the Endpoint list page.
-
Click the New Endpoint button at the top right to open the creation page.
-
On the Endpoint creation page, paste the YAML code of your
InferenceServicefrom the previous step into the input field, then click the CREATE button at the bottom. The model serving Endpoint will be created.
Step 3. Test endpoint response
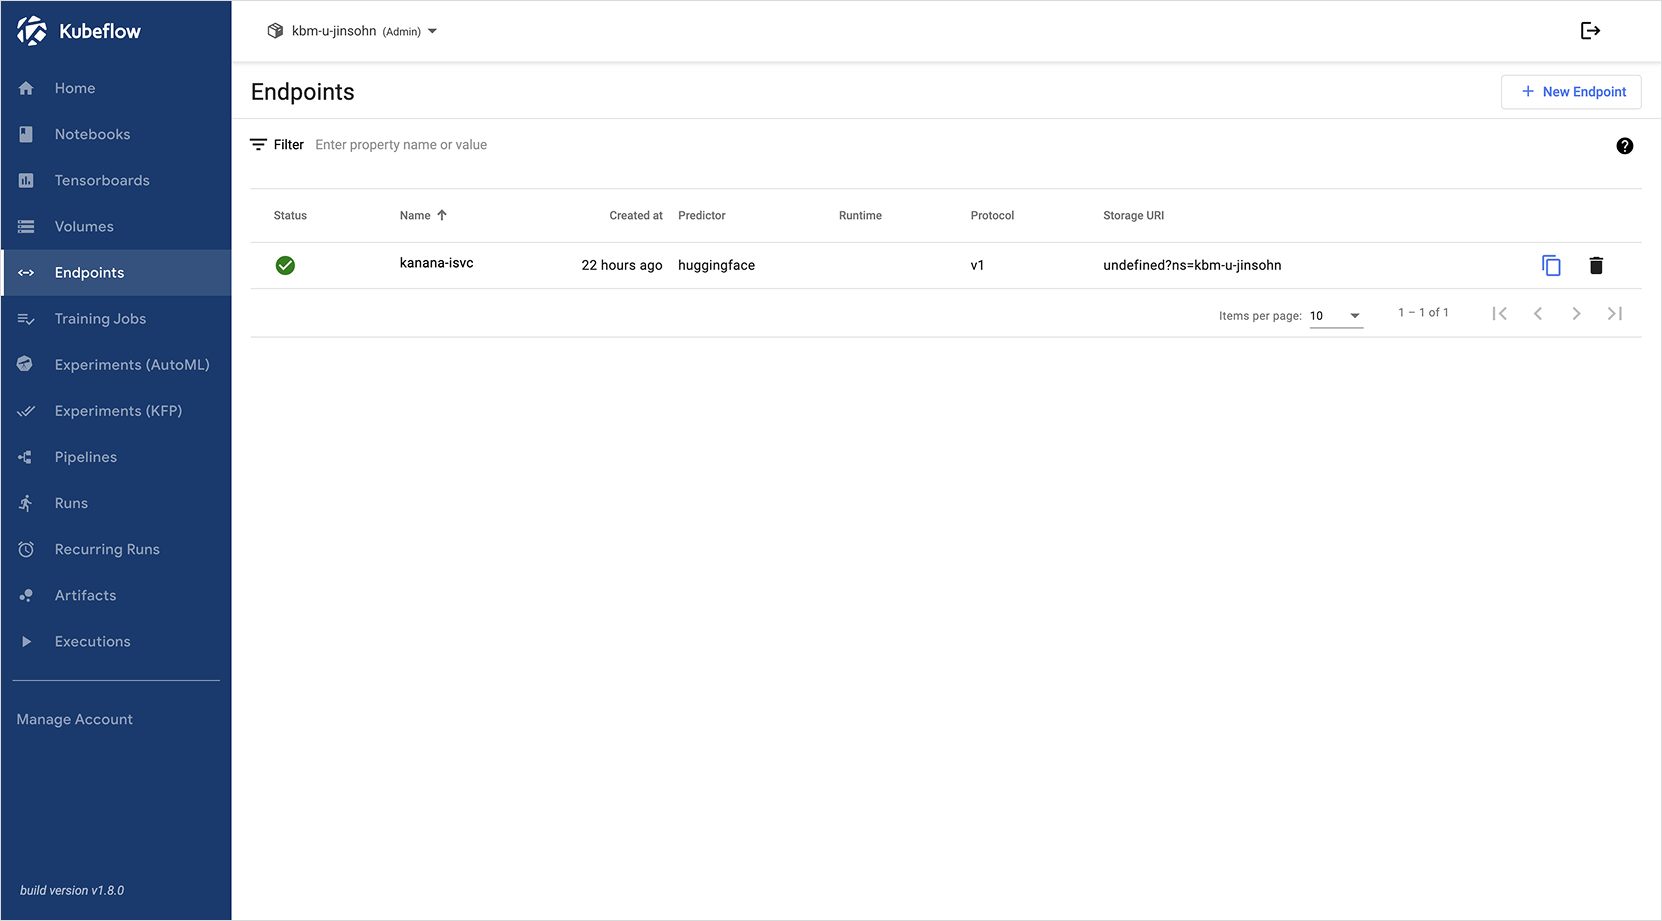
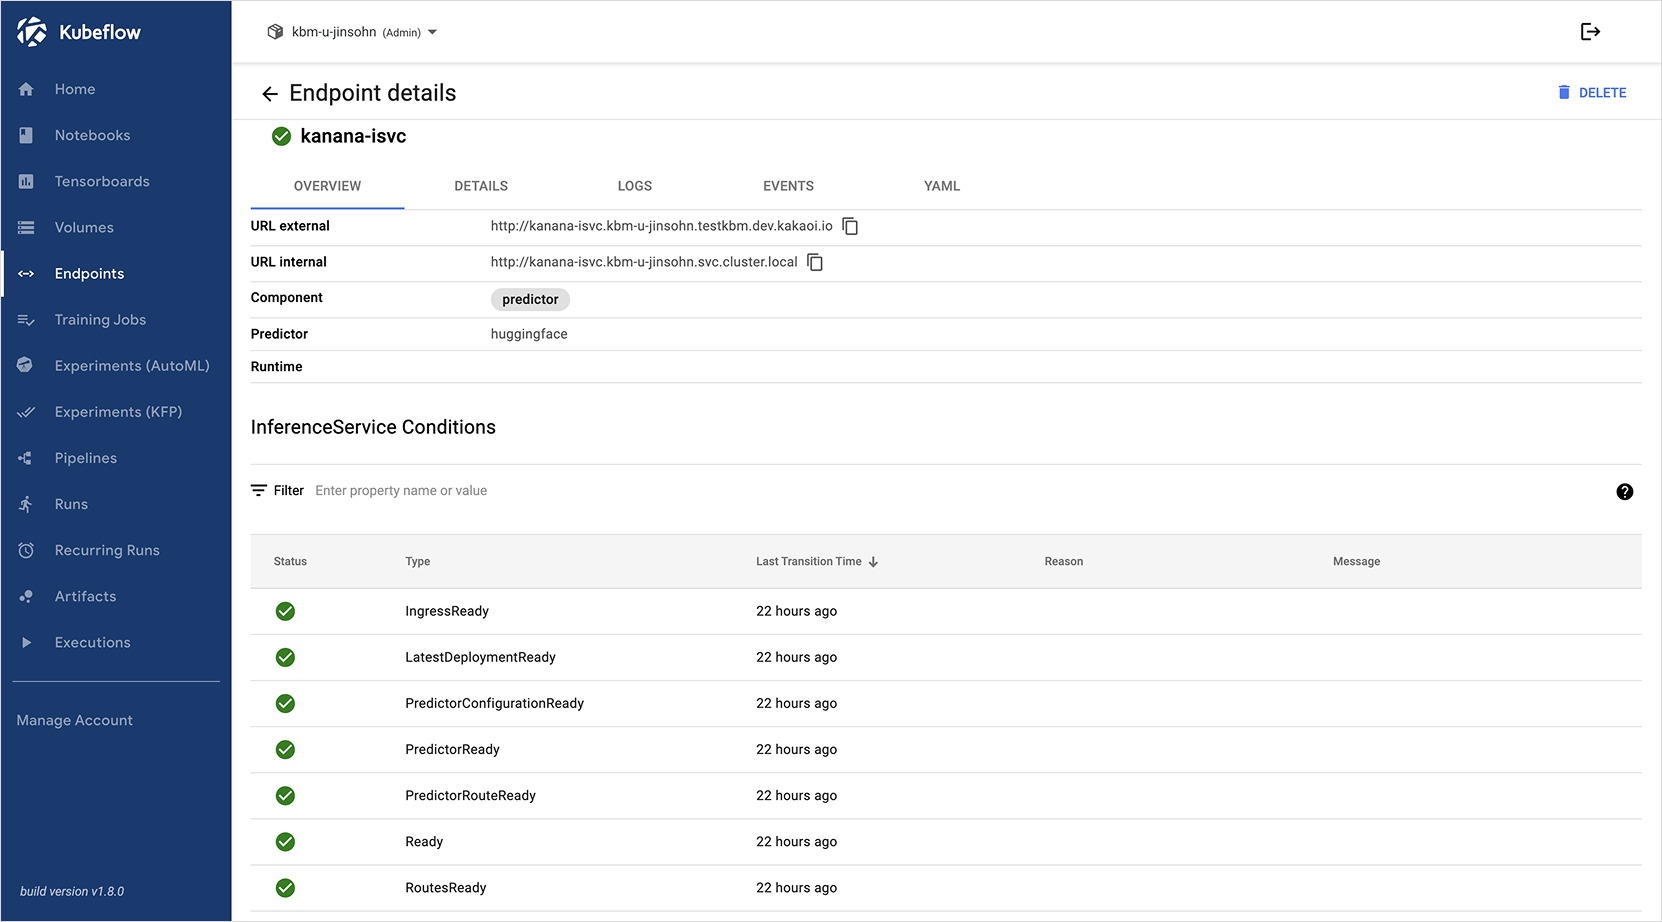
Once the Endpoint (InferenceService) has been successfully created, you can send prompts to it and perform inference requests to verify the response.
In this step, we assume that the Kanana (kanana-nano-base) and Llama 3.2 (llama3-inst) models have been deployed under the names kanana-isvc and llama-isvc, respectively. You can test the response using either curl or Python code.
Use the curl command or Python’s requests and Langchain libraries to test the actual response from the created endpoint.
- Before proceeding, make sure KServe authentication is disabled for the serving API.
- For details, refer to the Troubleshooting documentation.
Method 1. Test using curl
Open a terminal on your local machine or server and run the following code. Set the ISVC_NAME variable to the target model (llama-isvc or kanana-isvc).
export ISVC_NAME=kanana-isvc  # or llama-isvc
export NAMESPACE=<your-namespace>
export KUBEFLOW_PUBLIC_DOMAIN=<your-kubeflow-domain>

curl --insecure --location 'https://${KUBEFLOW_PUBLIC_DOMAIN}/openai/v1/completions' \
--header 'Host: ${ISVC_NAME}.${NAMESPACE}.${KUBEFLOW_PUBLIC_DOMAIN}' \
--header 'Content-Type: application/json' \
--data '{
    "model": "kanana-nano-base",  # or llama3-inst
    "prompt": "Tell me about Kakao Enterprise",
    "stream": false,
    "max_tokens": 100
}'
The NAMESPACE variable is the user namespace (e.g., starting with kbm-u/ or kbm-g/), and KUBEFLOW_PUBLIC_DOMAIN is the domain connected when the Kubeflow was created.
Make sure to replace both variables with the actual values for your environment.
{
  "id": "c37b34de-a647-4d88-b891-c0fe8a1ee291",
  "object": "text_completion",
  "created": 1742535948,
  "model": "kanana-nano-base" or "llama3-inst"
  "choices": [
    {
      "index": 0,
      "text": "\nKakao Enterprise is an IT service company launched by Kakao in May 2020, offering software and business solutions...",
      "logprobs": null,
      "finish_reason": "length",
      "stop_reason": null,
      "prompt_logprobs": null
    }
  ],
  "usage": {
    "prompt_tokens": 15,
    "total_tokens": 115,
    "completion_tokens": 100,
    "prompt_tokens_details": null
  },
  "system_fingerprint": null
}
Method 2. Test using Python packages
In a Python environment such as Jupyter Notebook, you can use the langchain and requests packages to send inference requests.
- Kubeflow internal environment(Notebook)
- External environment
from langchain_openai import ChatOpenAI
import os

isvc_name = "<Endpoints(Inference Service) name>"
namespace = "<your namespace>"
model_name = "<Model name specified in InferenceService>"

llm_svc_url = f"http://{isvc_name}.{namespace}.svc.cluster.local/"

llm = ChatOpenAI(
    model_name=model_name,
    base_url=os.path.join(llm_svc_url,'openai','v1'),
    openai_api_key="empty" #
)

input_text = "Tell me about Kakao Enterprise"
llm.invoke(input_text)
# "\nKakao Enterprise is a subsidiary of Kakao that provides enterprise software and services. ..."
# Install the appropriate packages for your Python version
## pip install langchain-openai

isvc_name = "<InferenceService name>"
namespace = "<your namespace>"
host = "<Kubeflow domain>"
model_name = "<model name>"
base_url = f"https://{host}"

# Set up HTTP client
client = httpx.Client(
    base_url=base_url,
    headers={
        "Host": f"{isvc_name}.{namespace}.{host}",
        "Content-Type": "application/json"
    },
    verify=False
)

# Create LLM client
llm = OpenAI(
    model_name=model_name,
    base_url=os.path.join(base_url, "openai", "v1"),
    openai_api_key="empty",
    http_client=client  # add client
)

# Test
input_text = "Tell me about Kakao Enterprise"
output_response = llm.invoke(
    input_text
)
print(output_response)
Below is an example response after sending a prompt to the generated Endpoint.
Kakao Enterprise is a subsidiary of Kakao and a comprehensive IT service company based on various digital technologies, including AI and cloud computing. Below is a detailed explanation of its key features and roles:
### Key Features
1. **AI and Cloud Solutions**:
   - **AI Assistant**: Offers personalized services through 'Kakao i', an assistant built with Kakao's AI technology.
   - **Cloud Services**: Provides cloud infrastructure to help businesses efficiently manage their IT resources.
2. **Data Analytics and Insights**:
   - **Data Analytics Solutions**: Analyzes various enterprise data to provide insights that support decision-making.
   - **Intelligent Customer Management**: Provides AI-based customer service and management solutions to enhance customer satisfaction.