2. Fine-tune LLM model
📘 This guide covers the complete workflow, from fine-tuning pretrained models to performing inference.
- Estimated duration: 60 minutes
- Recommended operating system: Ubuntu
About this scenario
This guide describes the process of fine-tuning pretrained models of Kakao’s Kanana and Meta Llama 3.2 in a GPU environment using Jupyter Notebook within a Kubeflow environment. Users can create domain-specific LLMs using KakaoCloud technical documentation data, perform model storage, and test inference.
The main contents are as follows:
- Creating a GPU-based notebook instance
- Preprocessing and tokenizing training data
- Performing LLM fine-tuning using PEFT or Unsloth
- Saving the tuned model and uploading it to Object Storage
- Confirming model inference results through tests
Supported tools
| Tool | Version | Description |
|---|---|---|
| Jupyter Notebook | 4.2.1 | Web-based development environment supporting integration with various ML frameworks and Kubeflow SDK |
| PEFT | latest | Huggingface library for efficient fine-tuning of pretrained LLMs - Also used for LoRA fine-tuning of Kanana models |
| Unsloth | 2025.3 | QLoRA-based fine-tuning tool optimized for Llama3 |
Before you start
1. Prepare Kubeflow environment
To fine-tune LLM models on Kubeflow, you need a GPU node environment with the specifications below. First, prepare an environment with a GPU node pool configured by referring to the prerequisites.
2. Create Object Storage bucket
Create an Object Storage bucket to save the fine-tuned models. The bucket you create will be used later as the reference path for model files when serving models.
- For detailed instructions on bucket creation, refer to Object Storage bucket creation and management.
- If you already selected KakaoCloud Object Storage during Kubeflow creation, you can use the automatically created bucket in the format
kubeflow-{kubeflow id}.
3. Prepare training dataset
Perform step-by-step fine-tuning exercises in a GPU environment using KakaoCloud technical documentation, specifically Kubeflow service guides and tutorial texts, as training data. Download the sample data below.
- Training data download: sample_train_data.csv
Getting started
This scenario explains how to fine-tune pretrained models based on Kakao’s Kanana and Meta Llama 3 using LoRA or QLoRA techniques. LoRA is implemented using Huggingface’s PEFT library, while QLoRA is implemented using Unsloth, optimized for Llama3. Kanana models are compatible with PEFT and Transformers, enabling LoRA-based fine-tuning.
Both methods have strengths in parameter efficiency and low resource usage, allowing you to select according to your environment and objectives.
For more information about each technique, see the official Hugging Face PEFT documentation and official Unsloth documentation.
Step 1. Create Jupyter Notebook instance
Create a GPU-based notebook instance for fine-tuning exercises in the Kubeflow dashboard.
-
In the Kubeflow dashboard, select the Notebooks tab.
-
Click the [New Notebook] button in the upper-right corner to create a new instance.
-
Enter the following information:
- Notebook Image: select
kc-kubeflow/jupyter-pytorch-cuda-full:v1.8.0.py311.1a - Minimum Notebook specifications: enter at least 3 vCPUs and 6GB memory
- GPU connection: select Number of GPUs as 1, GPU Vendor as
NVIDIA MIG - 1g.10gb
- Notebook Image: select
-
After entering the configuration, click the [LAUNCH] button to create the instance.
Step 2. Install packages and verify GPU connection
Install the Python packages required for fine-tuning and verify that GPU resources are correctly connected.
-
Install the required packages by running the commands corresponding to your chosen method below.
- PEFT
- Unsloth
! pip install transformers peft datasets! pip install transformers unsloth datasets Pillow==9.1.0 -
Run the following code to check whether the GPU driver and CUDA environment are properly configured.
Verify PyTorch GPU environmentimport os
import torch
os.environ["NVIDIA_VISIBLE_DEVICES"] = "0"
os.environ["CUDA_VISIBLE_DEVICES"] = "0"
print(torch.__version__)
print(torch.version.cuda)
print(torch.backends.cudnn.version())
print(torch.cuda.is_available())If the GPU is properly connected, it will output
Trueas shown below.Example output2.6.0+cu124
12.4
90100
True
Step 3. Load pre-trained model
Download the pre-trained model files for both models from the specified model_name path on the Hugging Face Model Hub, and load the model and tokenizer. Depending on the selected method (PEFT or Unsloth), use the following commands to load the model for the GPU environment.
- PEFT
- Unsloth
import torch
from transformers import AutoModelForCausalLM, AutoTokenizer

Load base model for fine-tuning
model_name = "kakaocorp/kanana-nano-2.1b-base" # or "meta-llama/Llama-3.1-8B"
base_model = AutoModelForCausalLM.from_pretrained(
    model_name,
    torch_dtype=torch.bfloat16,
    trust_remote_code=True
).to("cuda")

# Load tokenizer
tokenizer = AutoTokenizer.from_pretrained(model_name, padding_side="left")
# Tokenizer settings: For llama-type models, specify the pad_token as shown below
tokenizer.pad_token = tokenizer.eos_token
from unsloth import FastLanguageModel

model_name = "unsloth/Meta-Llama-3.1-8B-bnb-4bit"

# Set maximum sequence length (RoPE scaling is automatically supported internally)
max_seq_length = 4096

# None for auto detection.
dtype = (
	None
)

model, tokenizer = FastLanguageModel.from_pretrained(
 	model_name=model_name,
 	max_seq_length=max_seq_length,
 	dtype=dtype,
 	load_in_4bit=True # Use 4-bit quantization to reduce memory usage
)
==((====))==  Unsloth 2025.3.11: Fast Llama3 patching. Transformers: 4.50.3.
   \\   /|    NVIDIA A100 80GB PCIe MIG 1g.10gb. Num GPUs = 1. Max memory: 9.5 GB. Platform: Linux.
O^O/ \_/ \    Torch: 2.6.0+cu124. CUDA: 8.0. CUDA Toolkit: 12.4. Triton: 3.2.0
\        /    Bfloat16 = TRUE. FA [Xformers = 0.0.29.post3. FA2 = True]
 "-____-"     Free license: http://github.com/unslothai/unsloth
Unsloth: Fast downloading is enabled - ignore downloading bars which are red colored!
Step 4. Prepare dataset
After uploading the provided training data in CSV format to the notebook environment, use the Huggingface Datasets library to load the dataset, then preprocess and tokenize it into a format suitable for LLM training.
-
Upload the
sample_train_data.csvfile to your local notebook environment, then load it using the Huggingface Datasets library.Load CSV filefrom datasets import Dataset
dataset = Dataset.from_csv('sample_train_data.csv')
datasetExample outputGenerating train split:
111/0 [00:00<00:00, 7271.09 examples/s]
Dataset({
features: ['Unnamed: 0', 'instruction', 'output', 'input'],
num_rows: 111
}) -
Convert the instruction-input-output columns of the training data into Alpaca-style prompt format suitable for LLM training.
To do this, define a preprocessing function (formatting_prompts_func) and apply it to the dataset to generate the text inputs required for model training.def formatting_prompts_func(examples):
alpaca_prompt = """Below is an instruction that describes a task, paired with an input that provides further context. Write a response that appropriately completes the request.
### Instruction:
{}
### Input:
{}
### Response:
{}"""
instructions = examples["instruction"]
inputs = examples["input"]
outputs = examples["output"]
EOS_TOKEN = tokenizer.eos_token # Must add EOS_TOKEN
texts = []
for instruction, input, output in zip(instructions, inputs, outputs):
# Must add EOS_TOKEN, otherwise your generation will go on forever!
text = alpaca_prompt.format(instruction, input, output) + EOS_TOKEN
texts.append(text)
return { "text" : texts, }
dataset = dataset.map(formatting_prompts_func, batched = True,)
dataset = dataset.remove_columns(['Unnamed: 0'])
datasetExample outputMap: 100% 111/111 [00:00<00:00, 5646.33 examples/s]
Dataset({
features: ['instruction', 'output', 'input', 'text'],
num_rows: 111
}) -
For LoRA or QLoRA-based fine-tuning, both Kakao Kanana-Nano-2.1B and Meta Llama 3.2 models require a tokenized input dataset.
The following code is an example of a preprocessing function that converts text data into a training format using a Hugging Face tokenizer.Tokenization preprocessing functiondef tokenize_function(examples):
tokens = tokenizer(examples["text"], padding=True, return_tensors="pt")
tokens["labels"] = tokens["input_ids"]
return tokens
dataset = dataset.map(tokenize_function, batched=True, remove_columns=["text"])
Step 5. Train model
Fine-tune the pretrained LLM using either the LoRA or QLoRA method. In this step, you will convert the model structure, configure training parameters, and run the actual training process.
1. Convert model structure and configure training
Depending on the method used (PEFT or Unsloth), convert the pretrained model into a LoRA or QLoRA format and set the necessary training parameters. You can check the configuration for each method in the tabs below.
- PEFT model conversion
- Unsloth model conversion
-
Use the
get_peft_modelfunction from the PEFT library to create a LoRA-basedPeftModeland perform fine-tuning.from peft import LoraConfig, get_peft_model
lora_config = LoraConfig(
task_type="CAUSAL_LM",
r=8,
lora_alpha=32,
lora_dropout=0.1,
target_modules=[
"q_proj",
"k_proj",
"v_proj"]
)
model = get_peft_model(base_model, lora_config) -
Use the
TrainerandTrainingArgumentsclasses from the Transformers library to configure the necessary hyperparameters for training.
| output_dir | Path to save the model |
|---|---|
| num_train_epochs | Number of training epochs |
| per_device_train_batch_size | Batch size per device |
| gradient_accumulation_steps | Gradient accumulation steps (memory efficient) |
| evaluation_strategy | Evaluation strategy ("no", "epoch", "steps") |
| save_strategy | Save strategy ("no", "epoch", "steps") |
| save_steps | Save interval (in steps) |
| learning_rate | Learning rate |
| weight_decay | Weight decay |
| logging_steps | Logging interval (in steps) |
| fp16 | Use mixed precision (set to False for CPU) |
from transformers import Trainer, TrainingArguments

trainer = Trainer(
    model=model,
    train_dataset=dataset,
    args=TrainingArguments(
        per_device_train_batch_size = 2,
        gradient_accumulation_steps = 4,
        warmup_steps = 5,
        max_steps = 60,
        learning_rate = 2e-4,
        bf16 = True,
        logging_steps = 1,
        weight_decay = 0.01,
        lr_scheduler_type = "linear",
        seed = 1234,
        output_dir = "outputs",
        report_to = "none"
    )
)
-
Use the
get_peft_modelfunction fromunsloth.FastLanguageModelto create a PeftModel and fine-tune the model using that instance.model = FastLanguageModel.get_peft_model(
model,
r=16, # Any positive number such as 8, 16, 32, 64, or 128 is recommended
lora_alpha=32, # Set the LoRA alpha value
lora_dropout=0.05, # Supports dropout
target_modules=[
"q_proj",
"k_proj",
"v_proj",
"o_proj",
"gate_proj",
"up_proj",
"down_proj",
], # Specify target modules
bias="none", # Supports bias
# Use True or "unsloth" to reduce VRAM usage by 30% and support 2x larger batch sizes for long context
use_gradient_checkpointing="unsloth",
random_state=1234,
use_rslora=False,
loftq_config=None
) -
Configure key training parameters such as batch size, gradient accumulation steps, learning rate, and logging interval.
| output_dir | Path to save the model |
|---|---|
| num_train_epochs | Number of training epochs |
| per_device_train_batch_size | Batch size per device |
| gradient_accumulation_steps | Gradient accumulation steps (memory efficient) |
| evaluation_strategy | Evaluation strategy ("no", "epoch", "steps") |
| save_strategy | Save strategy ("no", "epoch", "steps") |
| save_steps | Save interval (in steps) |
| learning_rate | Learning rate |
| weight_decay | Weight decay |
| logging_steps | Logging interval (in steps) |
| fp16 | Use mixed precision (set to False for CPU) |
from trl import SFTTrainer
from transformers import TrainingArguments
from unsloth import is_bfloat16_supported

trainer = SFTTrainer(
    model = model,
    tokenizer = tokenizer,
    train_dataset = dataset,
    dataset_text_field = "text",
    max_seq_length = max_seq_length,
    dataset_num_proc = 2,
    packing = False, # Training with short sequences can speed up the process by up to 5 times.
    args = TrainingArguments(
        per_device_train_batch_size = 2,
        gradient_accumulation_steps = 4,
        warmup_steps = 5,
        max_steps = 60,
        learning_rate = 2e-4,
        bf16 = True,
        logging_steps = 1,
        optim = "adamw_8bit",
        weight_decay = 0.01,
        lr_scheduler_type = "linear",
        seed = 1234,
        output_dir = "outputs",
        report_to = "none", # This can be used when utilizing logging tools such as WandB.
    )
)
2. Check GPU memory before training
Before starting model training, check the current GPU memory status to assess resource usage.
# Code to display current memory status
gpu_stats = torch.cuda.get_device_properties(0)  # Retrieve GPU properties

start_gpu_memory = round(
    torch.cuda.max_memory_reserved() / 1024 / 1024 / 1024, 3
)  # Calculate reserved GPU memory at initialization
max_memory = round(
    gpu_stats.total_memory / 1024 / 1024 / 1024, 3
)  # Calculate maximum GPU memory
print(
    f"GPU = {gpu_stats.name}. Max memory = {max_memory} GB."
)  # Display GPU name and maximum memory
print(f"{start_gpu_memory} GB of memory reserved.")  # Output reserved GPU memory
GPU = NVIDIA A100 80GB PCIe MIG 1g.10gb. Max memory = 9.5 GB.
9.252 GB of memory reserved.
3. Run model training
Execute model training using the configured Trainer instance.
# Train model
trainer.train()
Step	Training Loss
1	0.441900
2	0.440900
3	0.372000
4	0.435600
5	0.281700
6	0.328600
7	0.300900
8	0.263100
9	0.319700
10	0.238000
11	0.296800
12	0.305000
13	0.211000
14	0.272500
15	0.150800
16	0.143300
17	0.179500
18	0.166800
19	0.138900
20	0.169000
21	0.174700
22	0.219700
23	0.185800
24	0.174700
25	0.153700
26	0.145200
27	0.160600
28	0.183200
29	0.105200
30	0.096700
31	0.105100
32	0.087900
33	0.073600
34	0.086600
35	0.079100
36	0.078400
37	0.091000
38	0.082200
39	0.086900
40	0.099400
41	0.121900
42	0.078300
43	0.061300
44	0.055300
45	0.053300
46	0.059000
47	0.050900
48	0.062600
49	0.057600
50	0.058700
51	0.053400
52	0.065500
53	0.061800
54	0.057600
55	0.077700
56	0.075800
57	0.054700
58	0.047000
59	0.043600
60	0.054600
4. Display status after training
After model training is completed, display GPU memory usage and training duration.
# Final memory and time statistics
used_memory = round(
    torch.cuda.max_memory_reserved() / 1024 / 1024 / 1024, 3
)  # Calculate peak reserved memory in GB
used_memory_for_lora = round(
    used_memory - start_gpu_memory, 3
)  # Calculate memory used for LoRA in GB
used_percentage = round(
    used_memory / max_memory * 100, 3
)  # Percentage of peak memory used
lora_percentage = round(
    used_memory_for_lora / max_memory * 100, 3
)  # Percentage used for LoRA
print(
    f"{trainer_stats.metrics['train_runtime']} seconds used for training."
)  # Training time in seconds
print(
    f"{round(trainer_stats.metrics['train_runtime']/60, 2)} minutes used for training."
)  # Training time in minutes
print(
    f"Peak reserved memory = {used_memory} GB."
)  # Peak reserved memory in GB
print(
    f"Peak reserved memory for training = {used_memory_for_lora} GB."
)  # Reserved memory for training in GB
print(
    f"Peak reserved memory % of max memory = {used_percentage} %."
)  # Memory usage percentage
print(
    f"Peak reserved memory for training % of max memory = {lora_percentage} %."
)  # LoRA usage percentage
379.7191 seconds used for training.
6.33 minutes used for training.
Peak reserved memory = 9.252 GB.
Peak reserved memory for training = 0.0 GB.
Peak reserved memory % of max memory = 97.389 %.
Peak reserved memory for training % of max memory = 0.0 %.
Step 6. Save model
Save the fine-tuned model to Object Storage. The saved model will be used later for deployment or inference.
- PEFT
- Unsloth
The fine-tuned PEFT model can be saved either as LoRA adapter weights only or as a fully merged model.
1. Save LoRA adapter weights only
model_dir = "kanana-2-1b-kcdocs-adapt" # or "llama-3-8b-it-kcdocs-adapt"

model.save_pretrained(model_dir)
2. Merge with base model and save
If using for Huggingface-based serving, save the merged model and tokenizer using merge_and_unload().
model_dir = "kanana-2-1b-kcdocs" # or "llama-3-8b-it-kcdocs"

# Merge with base model and save
model = model.merge_and_unload()

model.save_pretrained(model_dir)
# Save tokenizer for Huggingface serving
tokenizer.save_pretrained(model_dir)
3. Load adapter weights into base model
Alternatively, load the base model first and then apply the LoRA adapter weights.
import torch
from transformers import AutoModelForCausalLM
from peft import PeftModel

# 1. Load base model
model_id = "kakaocorp/kanana-nano-2.1b-instruct" # or "unsloth/Meta-Llama-3.1-8B-bnb-4bit"

base_model = AutoModelForCausalLM.from_pretrained(
    model_id,
    torch_dtype=torch.bfloat16,
    trust_remote_code=True
).to("cuda")

adapter_dir = "kanana-2-1b-kcdocs-adapt" # or "llama-3-8b-it-kcdocs-adapt"

# 2. Apply adapter weights to base model
model = PeftModel.from_pretrained(base_model, adapter_dir)
4. Load merged model directly
Load the saved merged model directly for inference.
model_dir = "kanana-2-1b-kcdocs" # or "llama-3-8b-it-kcdocs"

base_model = AutoModelForCausalLM.from_pretrained(
    model_dir,
    torch_dtype=torch.bfloat16,
    trust_remote_code=True
).to("cuda")
The fine-tuned Unsloth model can be saved not only as a regular model but also as a merged model for VLLM or in GGUF format.
1. Save model and tokenizer together
model_dir = "kanana-2-1b-kcdocs" # or "llama-3-8b-it-kcdocs"

model.save_pretrained(model_dir)
2. Save merged model for VLLM (16bit)
To optimize for inference, save a 16-bit merged model for use with VLLM.
# Save 16-bit merged model for VLLM
model.save_pretrained_merged("model", tokenizer, save_method = "merged_16bit")
3. Save in GGUF format
Save the model in GGUF format for lightweight inference environments (e.g., runtimes supporting GGUF).
# Save as GGUF file
model.save_pretrained_gguf("Llama-3.2-3B-Instruct-kcdocs-gguf", tokenizer, quantization_method = "f16")
4. Load fine-tuned model
Load the saved model using FastLanguageModel in an optimized format such as 4-bit.
from unsloth import FastLanguageModel

model_dir = "kanana-2-1b-kcdocs" # or "llama-3-8b-it-kcdocs"

max_seq_length = 4096
dtype = None
load_in_4bit = True

model, tokenizer = FastLanguageModel.from_pretrained(
    model_name=model_dir,
    max_seq_length=max_seq_length,
    dtype=dtype,
    load_in_4bit=load_in_4bit,
)

FastLanguageModel.for_inference(model)

# Ready for inference
#text_streamer = TextStreamer(tokenizer)
#_ = model.generate(**inputs, streamer = text_streamer, max_new_tokens = 64)
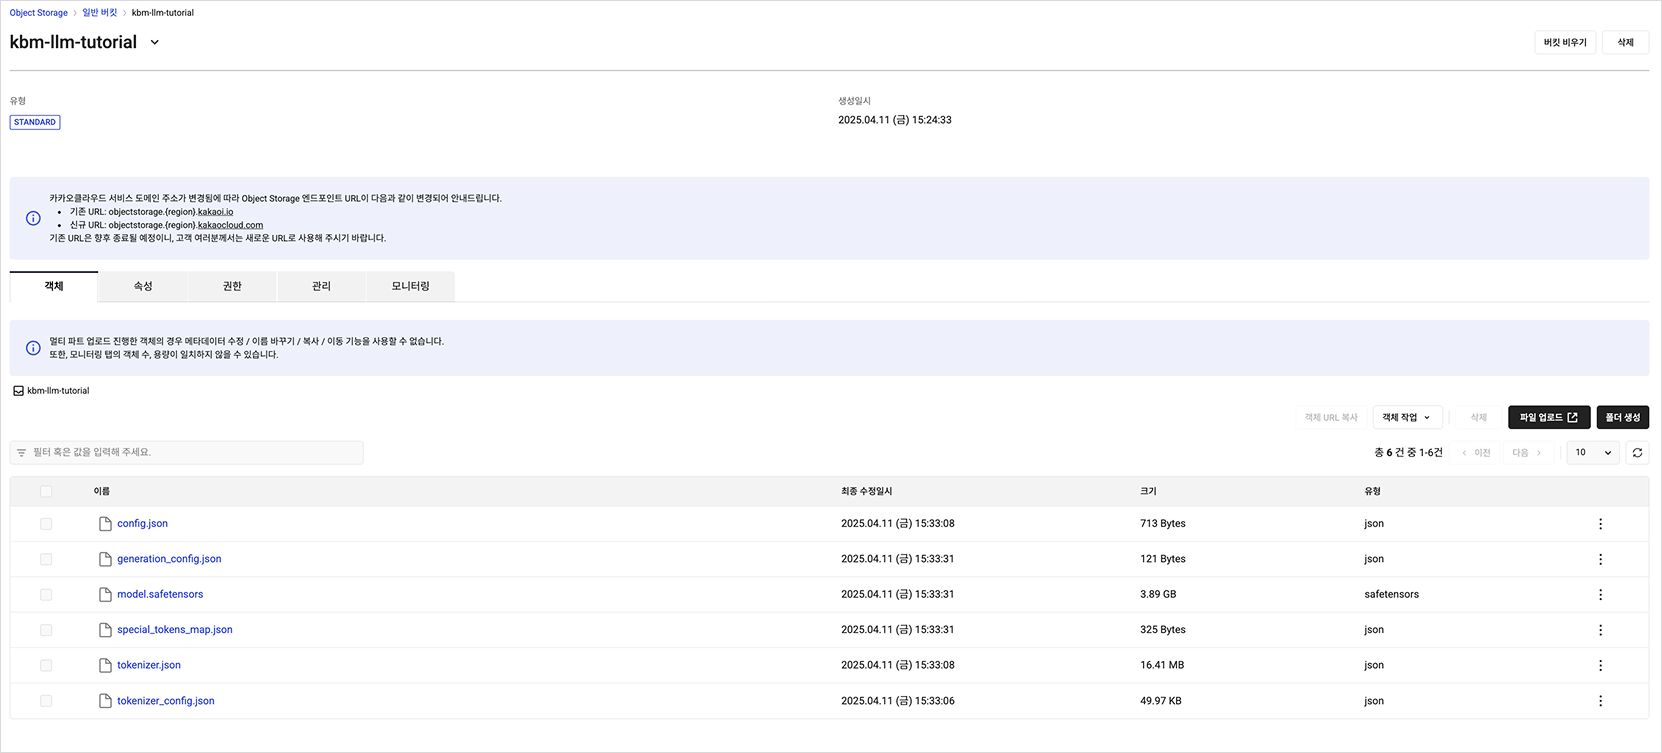
5. Upload files to Object Storage
Upload all files in the fine-tuned model directory (model_dir) to your KakaoCloud Object Storage bucket.
- Refer to S3 > Authentication > Using temporary credentials for S3 requests to issue and use EC2 credentials.
- See Using Object Storage with the S3 API > Type 2. Python SDK (Boto3) Example for details.
import boto3

# Enter issued EC2 credentials
AWS_ACCESS_KEY_ID = '<YOUR EC2 CREDENTIAL ACCESS KEY>'
AWS_SECRET_ACCESS_KEY = '<YOUR EC2 CREDENTIAL SECRET KEY>'
ENDPOINT = "https://objectstorage.kr-central-2.kakaocloud.com"


# boto client
client = boto3.client(
    region_name="kr-central-2",
    endpoint_url=ENDPOINT,
    aws_access_key_id=AWS_ACCESS_KEY_ID,
    aws_secret_access_key=AWS_SECRET_ACCESS_KEY,
    service_name="s3"
)

# Create bucket (if needed)
bucket_name = "kbm-llm-tutorial"
client.create_bucket(Bucket=bucket_name)


# Upload files to bucket
from glob import glob
file_paths = glob(f"{model_dir}/*")
object_names = [f.split("/")[-1] for f in file_paths]

for file_name, object_name in zip(file_paths, object_names):
    print(file_name)
    client.upload_file(
        Filename=file_name,
        Bucket=bucket_name,
        Key=object_name
    )

response = client.list_buckets()
./kbm-llm-tutorial/tokenizer_config.json
./kbm-llm-tutorial/tokenizer.json
./kbm-llm-tutorial/config.json
./kbm-llm-tutorial/model.safetensors
./kbm-llm-tutorial/generation_config.json
./kbm-llm-tutorial/special_tokens_map.json
Step 7. Run inference on trained model
Load the fine-tuned model and perform inference to generate responses for given input prompts. The following example demonstrates how to validate the model's output.
Example 1: "Recommend an AI platform."
from transformers import TextStreamer

text_streamer = TextStreamer(tokenizer)

inputs = tokenizer(
[
    alpaca_prompt.format(
        "Recommend an AI platform.",  # instruction
        "",  # input (leave blank if not applicable)
        "",  # output (leave blank for generation)
    )
], return_tensors = "pt").to("cuda")

_ = model.generate(**inputs, streamer=text_streamer, max_new_tokens=2048, use_cache=False)
<bos>Below is an instruction that describes a task, paired with an input that provides further context. Write a response that appropriately completes the request.

### Instruction:
Recommend an AI platform.

### Input:


### Response:
KakaoCloud's AI service provides the open-source platform Kubeflow, which helps users easily build and run machine learning workflows.<eos>
Example 2: "Tell me how to create Kubeflow on KakaoCloud."
inputs = tokenizer(
[
    alpaca_prompt.format(
        "Tell me how to create Kubeflow on KakaoCloud.", # instruction
        "", # input
        "", # output
    )
], return_tensors = "pt").to("cuda")

_ = model.generate(**inputs, streamer=text_streamer, max_new_tokens=2048, use_cache=False)
<bos>Below is an instruction that describes a task, paired with an input that provides further context. Write a response that appropriately completes the request.

### Instruction:
Tell me how to create Kubeflow on KakaoCloud.

### Input:


### Response:
To create Kubeflow on KakaoCloud, go to the KakaoCloud Console, navigate to **Container Pack > Kubeflow**, and click [Create Kubeflow] to configure the basic settings and quotas. After the Kubeflow instance is created, set up the `kubectl` configuration file and access the Kubeflow dashboard to create your user namespace.<eos>
Example 3: "Tell me the key features of KakaoCloud Kubeflow."
inputs = tokenizer(
[
    alpaca_prompt.format(
        "Tell me the key features of KakaoCloud Kubeflow." # instruction
        "", # input
        "", # output
    )
], return_tensors = "pt").to("cuda")


_ = model.generate(**inputs, streamer=text_streamer, max_new_tokens=2048, use_cache=False)
<bos>Below is an instruction that describes a task, paired with an input that provides further context. Write a response that appropriately completes the request.

### Instruction:
Tell me the key features of KakaoCloud Kubeflow.

### Input:


### Response:
KakaoCloud Kubeflow provides key features for data preprocessing, model training, and model serving.
It supports fast and easy ML model development by offering a consistent interface and a high level of abstraction for developers. <eos>
Example 4: "Explain Katib in Kubeflow."
inputs = tokenizer(
[
    alpaca_prompt.format(
        "Explain Katib in Kubeflow.",  # instruction
        "",  # input
        "",  # output
    )
], return_tensors = "pt").to("cuda")

_ = model.generate(**inputs, streamer=text_streamer, max_new_tokens=2048, use_cache=False)
<bos>Below is an instruction that describes a task, paired with an input that provides further context. Write a response that appropriately completes the request.

### Instruction:
Explain Katib in Kubeflow.

### Input:


### Response:
Katib in Kubeflow is a tool for A/B testing and hyperparameter optimization provided within the Kubeflow platform.<eos>