2. Tune model hyperparameters
📈 This section explains the hyperparameter tuning process in the traffic prediction model tutorial.
- Estimated time: 40 minutes
- Recommended OS: MacOS, Ubuntu
About this scenario
In this tutorial, you will automatically optimize the hyperparameters of a traffic prediction model using Kubeflow Katib. You will go through the entire process including writing the tuning code, building the Docker image, configuring and running the experiment, and reviewing the results.
To use Katib, the following components are required:
- A Python script (
tune.py) that trains a model using input hyperparameters - A Docker image and dependency file (
requirements.txt) to run the script - An Experiment YAML configuration file (
katib-experiment.yaml) that defines the experiment execution
Before you start
This tutorial assumes you have completed the previous tutorial, Traffic prediction tutorial (Part 1). In particular, the preprocessed dataset (nlb-sample.csv) for model training must be ready, and the environment must have Kubeflow Katib enabled.
Prerequisites
| Item | Description |
|---|---|
| Kubeflow environment | Must include Katib functionality |
| PVC configuration | Data must be mounted to the /dataset path as dataset-pvc |
| Container registry | You can use a public registry or KakaoCloud Container Registry |
Getting started
Step 1. Write tuning code and build image
1. Write tuning code
Create a file named tune.py for hyperparameter tuning and enter the code below.
This code is based on the GradientBoosting model used in the previous tutorial and trains the model by combining several parameters: n_estimators, learning_rate, max_depth, and subsample.
The dataset is split into five folds, and cross-validation is used to evaluate the performance of each combination.
The Mean Absolute Error (MAE) measured in each iteration is averaged and printed, which is used as the evaluation metric for the Katib experiment.
import argparse
import pandas as pd
from sklearn.ensemble import GradientBoostingRegressor
from sklearn.model_selection import cross_val_score

parser = argparse.ArgumentParser()
parser.add_argument('--n_estimators', type=int, default=100)
parser.add_argument('--learning_rate', type=float, default=0.1)
parser.add_argument('--max_depth', type=int, default=3)
parser.add_argument('--subsample', type=float, default=1.0)
parser.add_argument('--data_version', type=str, default='sample')
parser.add_argument('--random_state', type=int, default=1234)

if __name__ == "__main__":
    args = parser.parse_args()
    df = pd.read_csv(f'/dataset/nlb-{args.data_version}.csv') # Path to preprocessed dataset

    model = GradientBoostingRegressor(
        n_estimators=args.n_estimators,
        learning_rate=args.learning_rate,
        max_depth=args.max_depth,
        subsample=args.subsample,
        random_state=args.random_state
    )

    X = df[['x1', 'x2', 'x3', 'x4']]
    y = df['y']

    scores = cross_val_score(model, X, y, cv=5, scoring='neg_mean_absolute_error')
    mae = -scores.mean()
    print("MAE=%f" % mae)
The training dataset nlb-sample.csv must be located at the /dataset path.
This file is the result generated from the previous tutorial, and you can use it in the Katib experiment by mounting dataset-pvc to this path.
2. Build tuning image
Since Katib runs user-defined container images to perform experiments, you need to build a Docker image that includes tune.py and push it to a container registry.
-
Prepare
tune.py,requirements.txt, andDockerfilein the same directory.DockerfileFROM python:3.10.0-slim
WORKDIR /app
COPY requirements.txt /app/requirements.txt
COPY tune.py /app/tune.py
RUN pip install -r requirements.txt
RUN rm requirements.txt
CMD ["python", "/app/tune.py"]Requirements.txtpandas==2.2.2
numpy==2.1.1
scikit-learn==1.5.1
scipy==1.14.1 -
In the terminal, use the command below to build the Docker image and push it to a container registry accessible from your cluster.
docker build -t <your-registry>/lb-pred-model.edu .
docker push <your-registry>/lb-pred-model.edu
Using public imageIf building a container image and registering it to a registry is difficult, you can use a public image provided by KakaoCloud.
- Image path:
bigdata-150.kr-central-2.kcr.dev/kc-kubeflow/lb-pred-model:edu
- Image path:
This image includes the tune.py script and all required libraries.
If your dataset is mounted to the /dataset path, the image can be used as-is.
It is useful when you want to quickly start the Katib experiment without building your own image.
:::
Step 2. Set up experiment
To perform hyperparameter tuning with Katib, you need to define a katib-experiment.yaml file that includes the experiment objective, parameter ranges, execution environment, and other related configurations.
- IMAGE: Enter the path to the Docker image you want to use.
- IMAGE_SECRET: Required only when using a private registry. You can omit this field if you are using a public image.
Refer to KakaoCloud documentation on Registry authentication and management for details.
apiVersion: kubeflow.org/v1beta1
kind: Experiment
metadata:
  name: lb-gbr-tune
spec:
  objective:
    type: minimize
    goal: 0.0
    objectiveMetricName: MAE
  metricCollectorSpec:
    collector:
      kind: StdOut
  parallelTrialCount: 2
  maxTrialCount: 10
  maxFailedTrialCount: 3
  algorithm:
    algorithmName: random
  parameters:
    - name: n_estimators
      parameterType: int
      feasibleSpace:
        min: "50"
        max: "200"
    - name: learning_rate
      parameterType: double
      feasibleSpace:
        min: "0.01"
        max: "0.2"
    - name: max_depth
      parameterType: int
      feasibleSpace:
        min: "2"
        max: "10"
    - name: subsample
      parameterType: double
      feasibleSpace:
        min: "0.5"
        max: "1.0"

  trialTemplate:
    primaryContainerName: training-container
    trialParameters:
      - name: n_estimators
        description: "Number of estimators"
        reference: "n_estimators"
      - name: learning_rate
        description: "Learning rate"
        reference: "learning_rate"
      - name: max_depth
        description: "Maximum depth of the trees"
        reference: "max_depth"
      - name: subsample
        description: "Subsample ratio"
        reference: "subsample"
    trialSpec:
      apiVersion: batch/v1
      kind: Job
      spec:
        template:
          metadata:
            annotations:
              sidecar.istio.io/inject: 'false'
          spec:
            containers:
              - name: training-container
                image: {{IMAGE}}
                command:
                  - "python"
                  - "/app/tune.py"
                args:
                  - "--n_estimators"
                  - "${trialParameters.n_estimators}"
                  - "--learning_rate"
                  - "${trialParameters.learning_rate}"
                  - "--max_depth"
                  - "${trialParameters.max_depth}"
                  - "--subsample"
                  - "${trialParameters.subsample}"
                resources:
                  requests:
                    cpu: '0.5'
                    memory: 1Gi
                  limits:
                    cpu: '1'
                    memory: 2Gi
                volumeMounts:
                  - name: dataset
                    mountPath: /dataset
            imagePullSecrets:
              - name: {IMAGE_SECRET}
            restartPolicy: Never
            volumes:
              - name: dataset
                persistentVolumeClaim:
                  claimName: dataset-pvc
Description of key fields
| Field | Description |
|---|---|
spec.objective | The target metric to optimize (maximize or minimize). Must be printed from the image. |
spec.parameters | Specifies the hyperparameters to explore, including their types and ranges. |
trialTemplate.trialParameters | Declares the hyperparameters used in the experiment. These appear as input fields in the Katib UI. |
trialTemplate.trialSpec | Specifies the pod configuration for running the experiment. |
Step 3. Run experiment
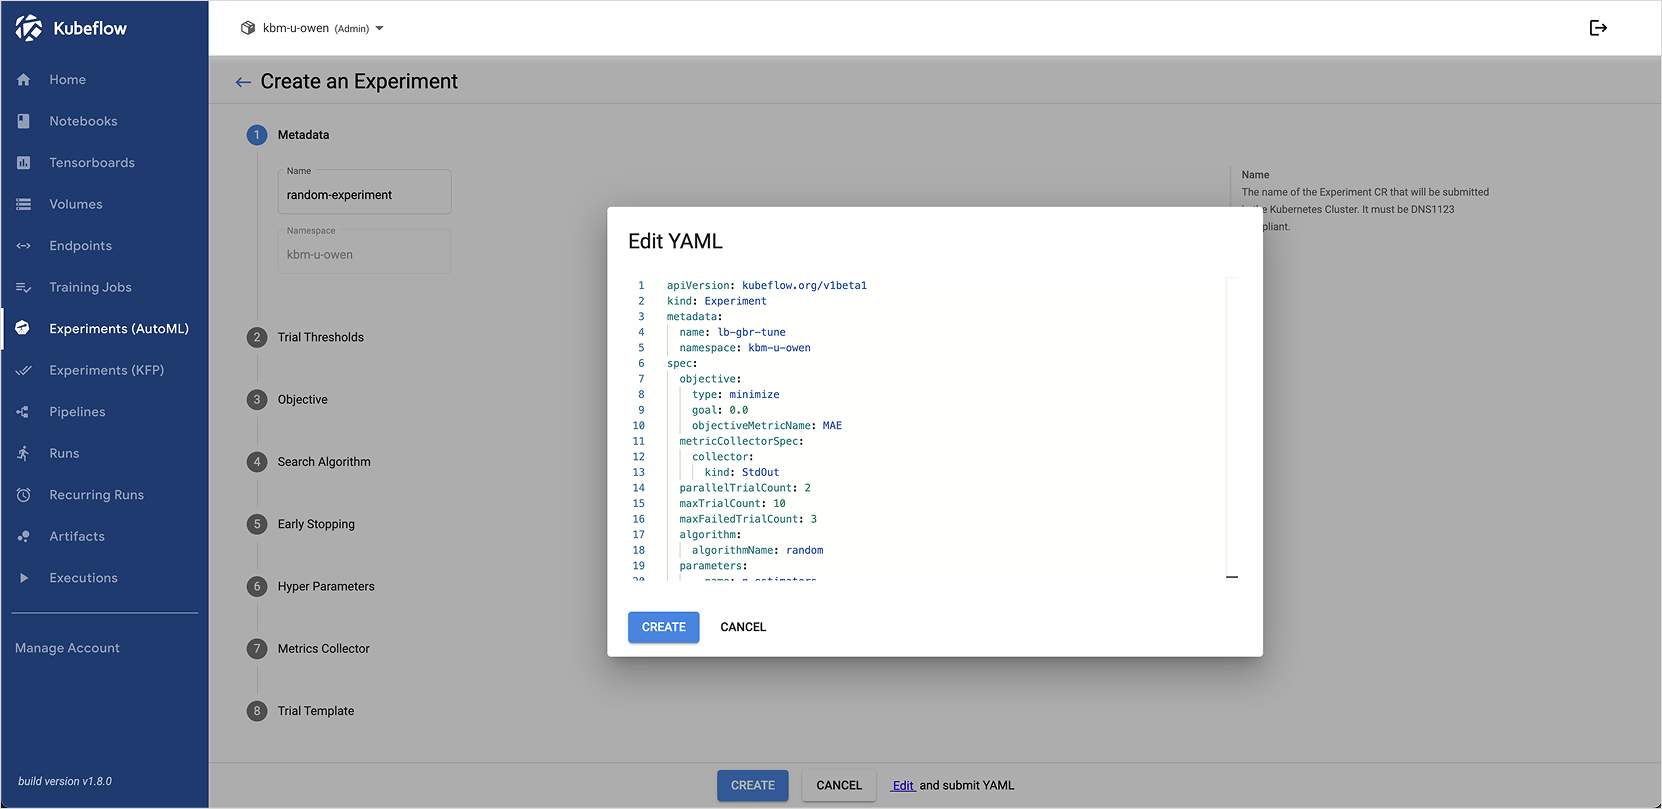
Follow the steps below to create a Katib experiment from the Kubeflow dashboard:
- Go to the Kubeflow dashboard and select the Experiments (AutoML) menu on the left.
- Click the [+ New Experiment] button, then click the Edit button at the bottom center.
- Paste the contents of the
katib-experiment.yamlfile created in the previous step, and click CREATE.
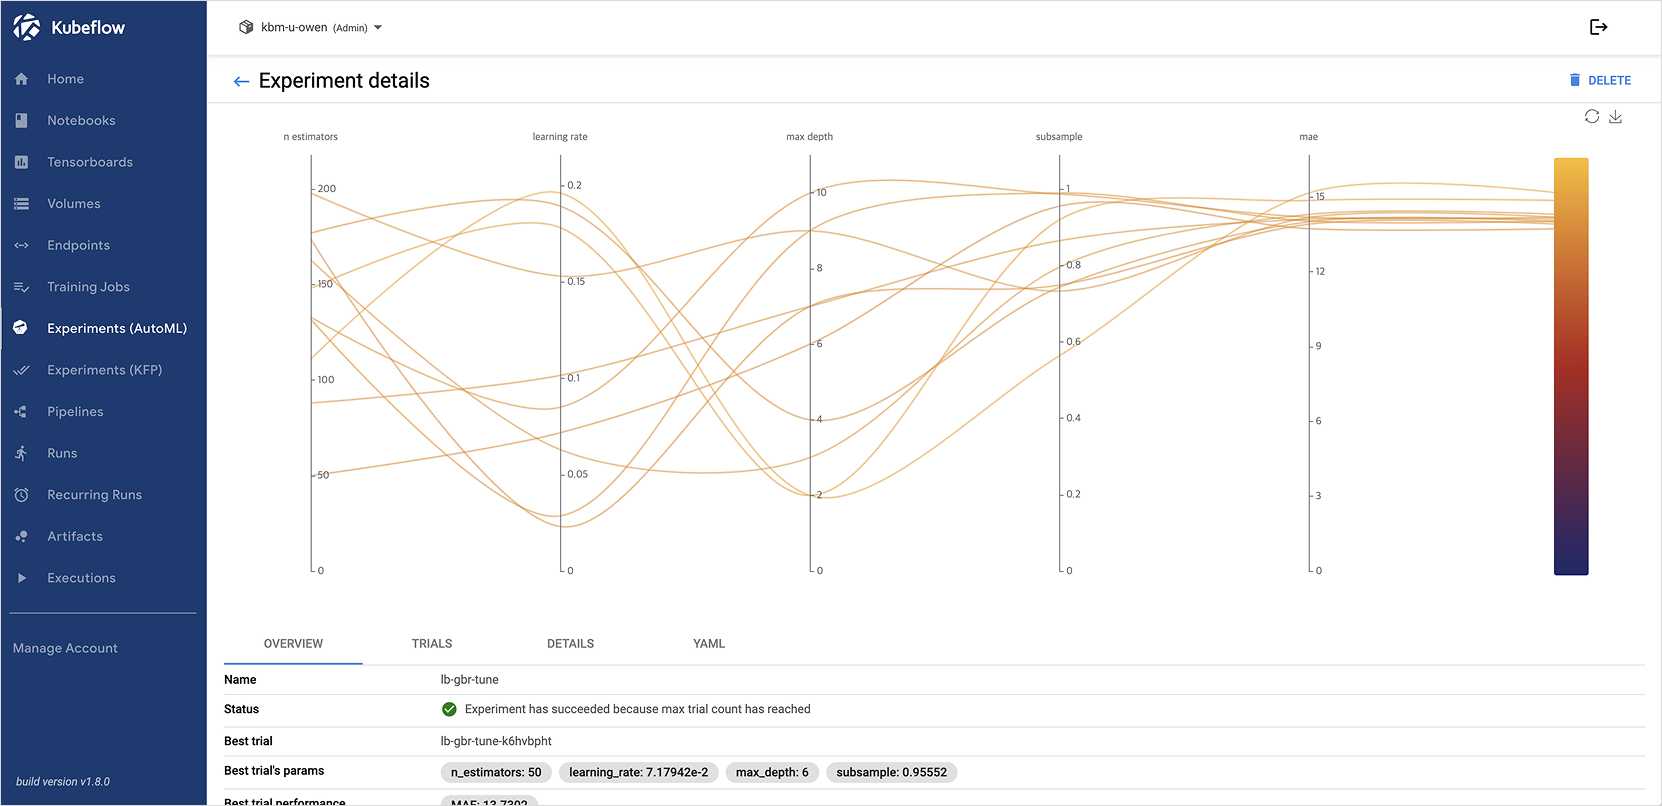
Step 4. Check tuning results
After the experiment is created, click lb-gbr-tune to view the tuning results.
Katib automatically logs the parameter combinations and evaluation results of each trial, allowing you to easily identify the best-performing configuration.