Connect multiple VPCs using Transit Gateway
KakaoCloud enables centralized management of inter-VPC traffic using Transit Gateway.
- Estimated time: 60 minutes
- Recommended OS: MacOS, Ubuntu
- Prerequisites:
- Key pair for VM access
- Project Admin permissions
Introduce scenario
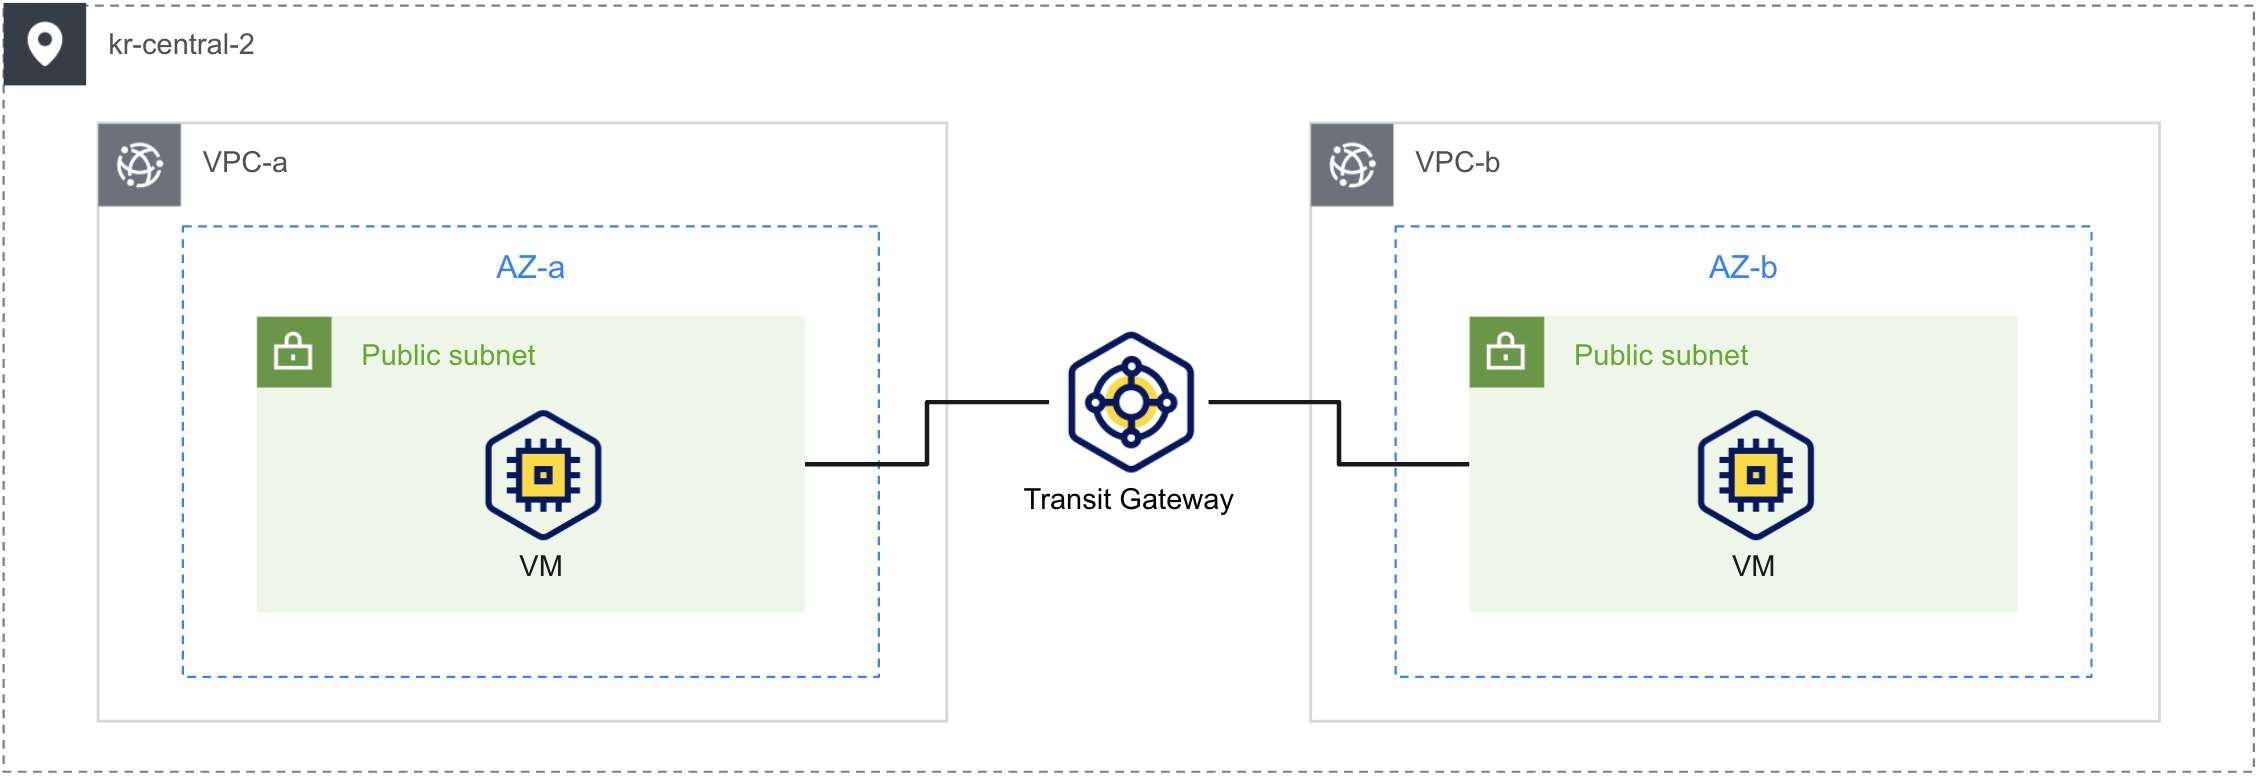
This scenario demonstrates creating two VPCs and connecting them using Transit Gateway. Details are as follows:
- Create two VPCs for connection. Each VPC uses one AZ and the default public subnet.
- Create a Transit Gateway and add the two VPCs as Attachments.
- Configure static routing on the Transit Gateway. Add a policy to route packets destined for specific VPC CIDRs to the corresponding VPC.
- Configure subnet route policies. Use the default public subnet and add a policy to route packets destined for the other VPC to the Transit Gateway. This enables connection to the destination VPC via the Transit Gateway.
- Create VM instances in each subnet and verify connectivity using the
pingcommand.
The following is the architecture diagram for the scenario:
Getting started
Step 1. Create VPCs and subnets
VPC provides a logically isolated virtual network space, enabling flexible resource management in KakaoCloud. See the VPC documentation for more details.
-
Access the KakaoCloud console > VPC, and select the [Create VPC] button.
-
Refer to the table below to create
vpc-a. Modify theVPC IP CIDRbased on your environment as needed, and ensure all relevant values in the scenario are adjusted accordingly.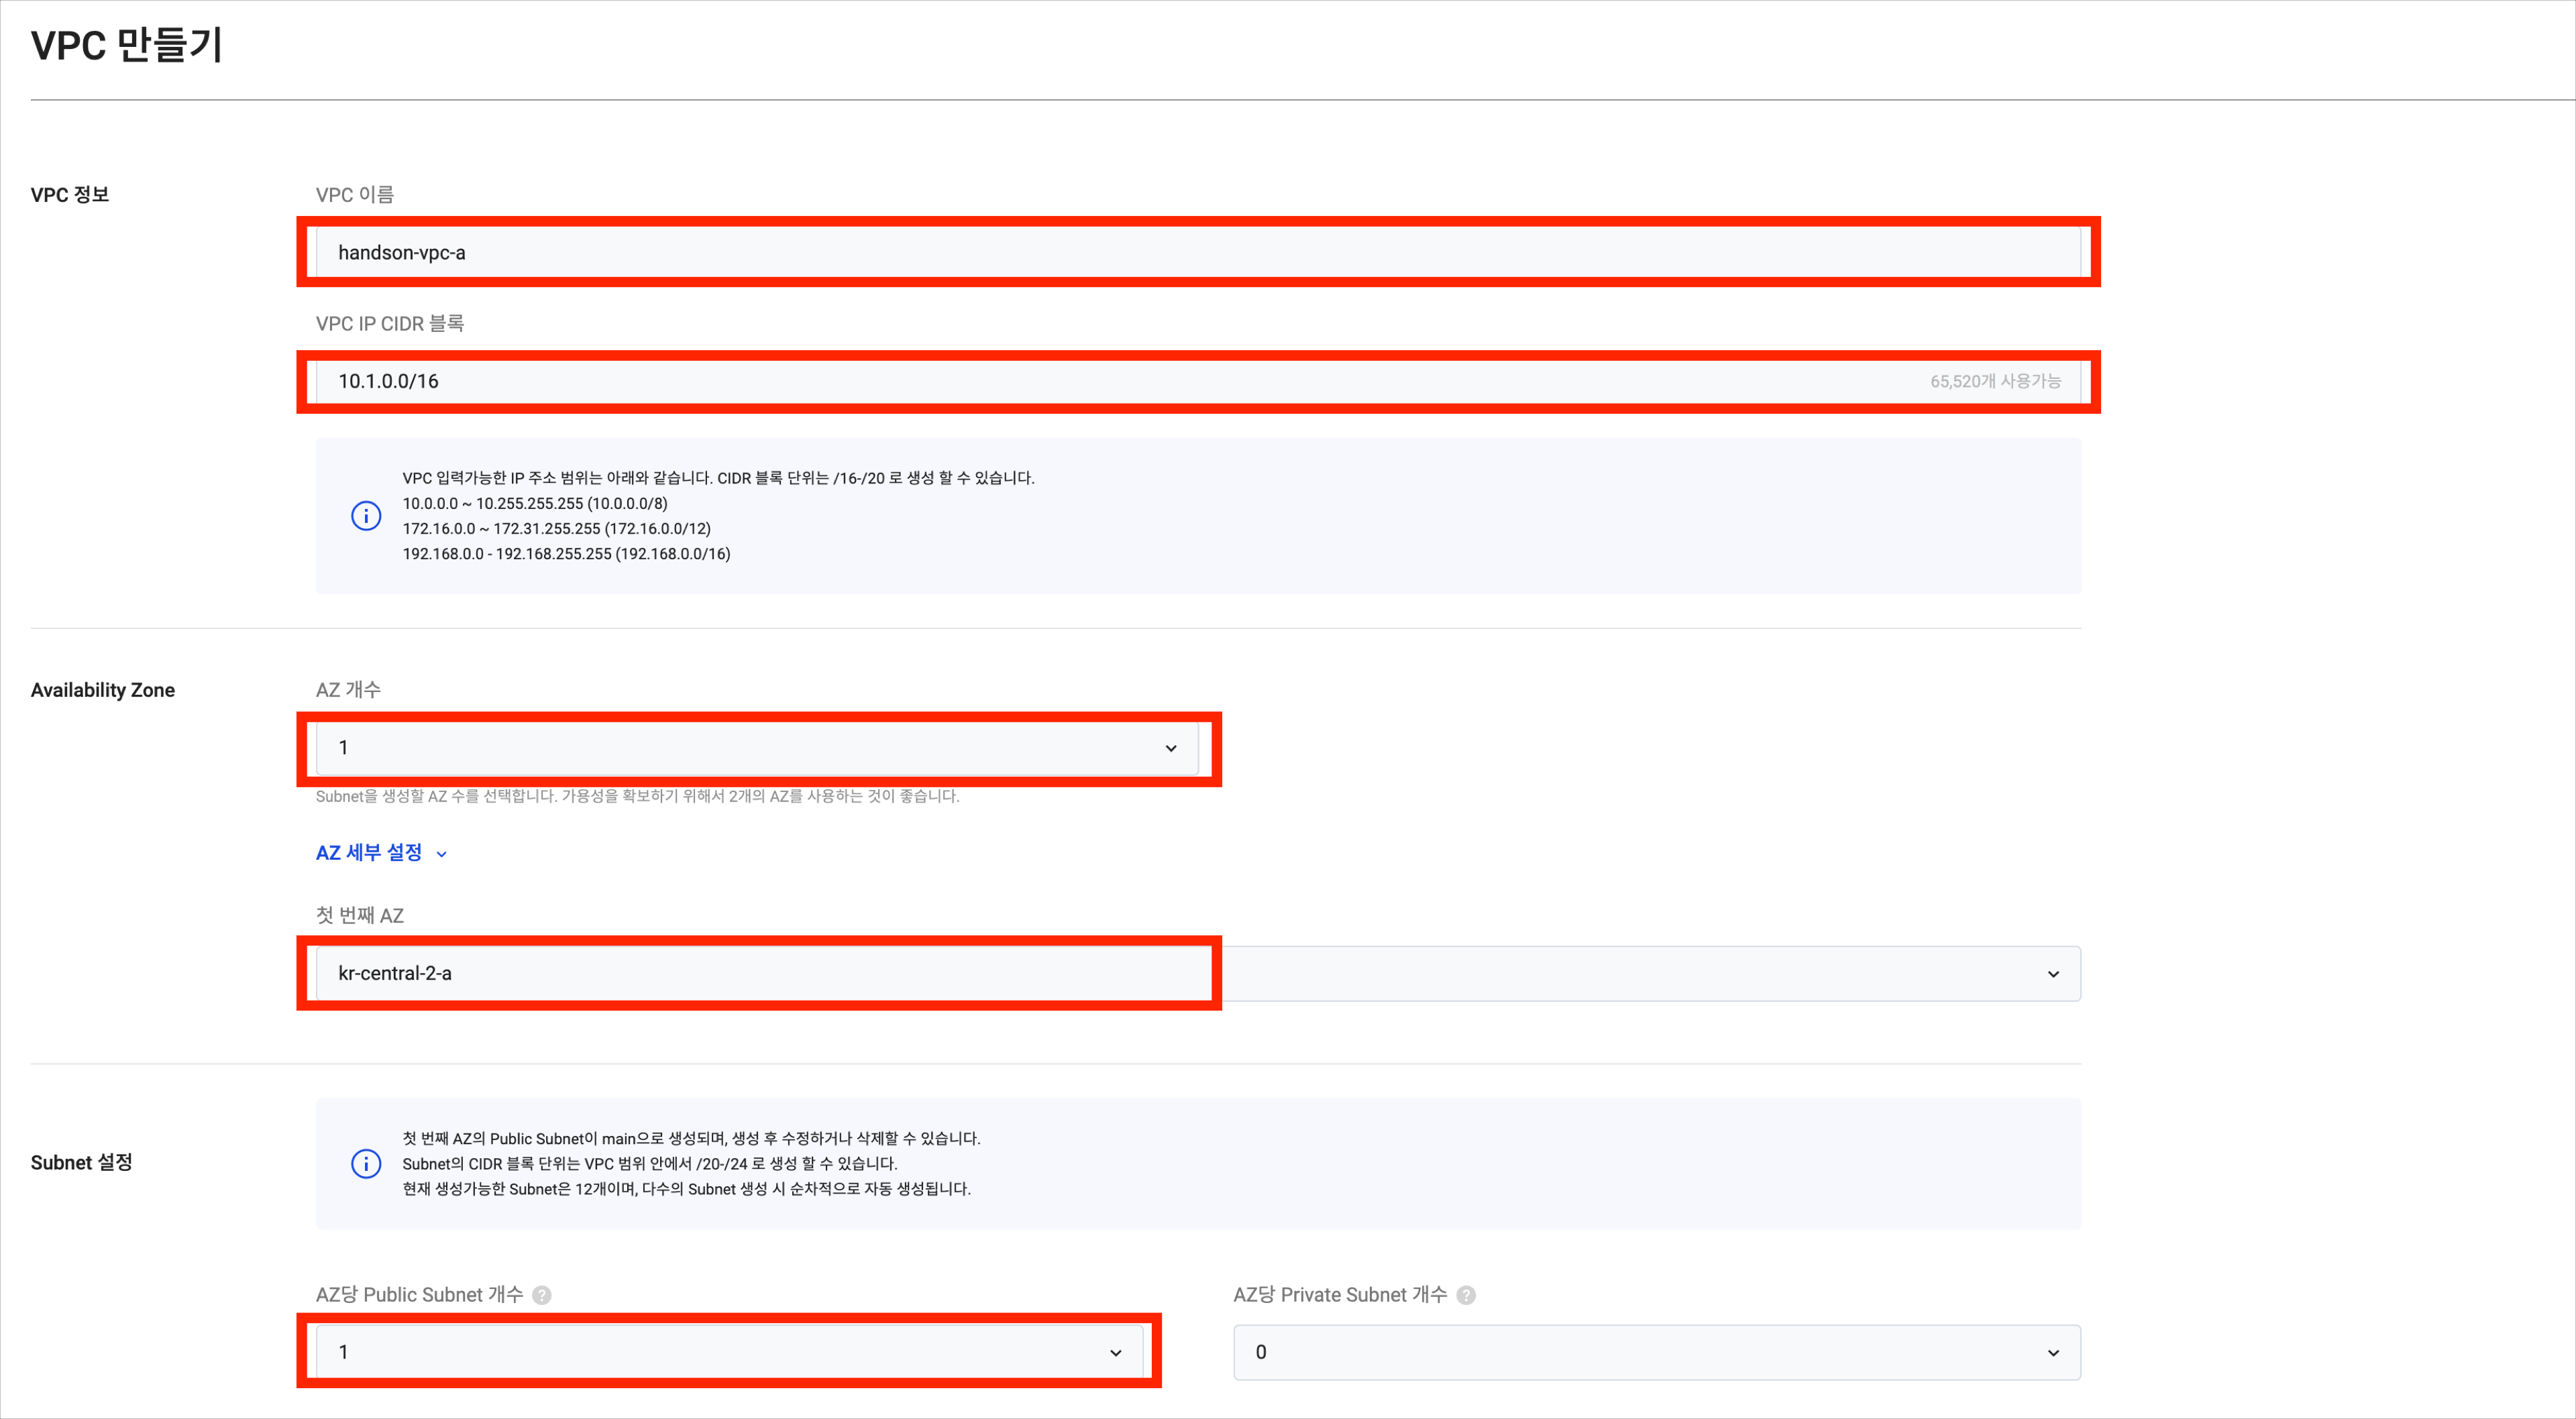
Item Sub-item Value VPC info VPC name handson-vpc-a VPC IP CIDR block 10.1.0.0/16 Availability zone Number of zones 1 First AZ kr-central-2-a Subnet settings Public subnets per AZ 1 Private subnets per AZ 0 -
Refer to the table below to create
vpc-b.cautionEnsure the CIDR range of each VPC is unique to avoid conflicts that prevent communication. For instance, if VPC A uses
10.1.0.0/16, set VPC B to10.2.0.0/16.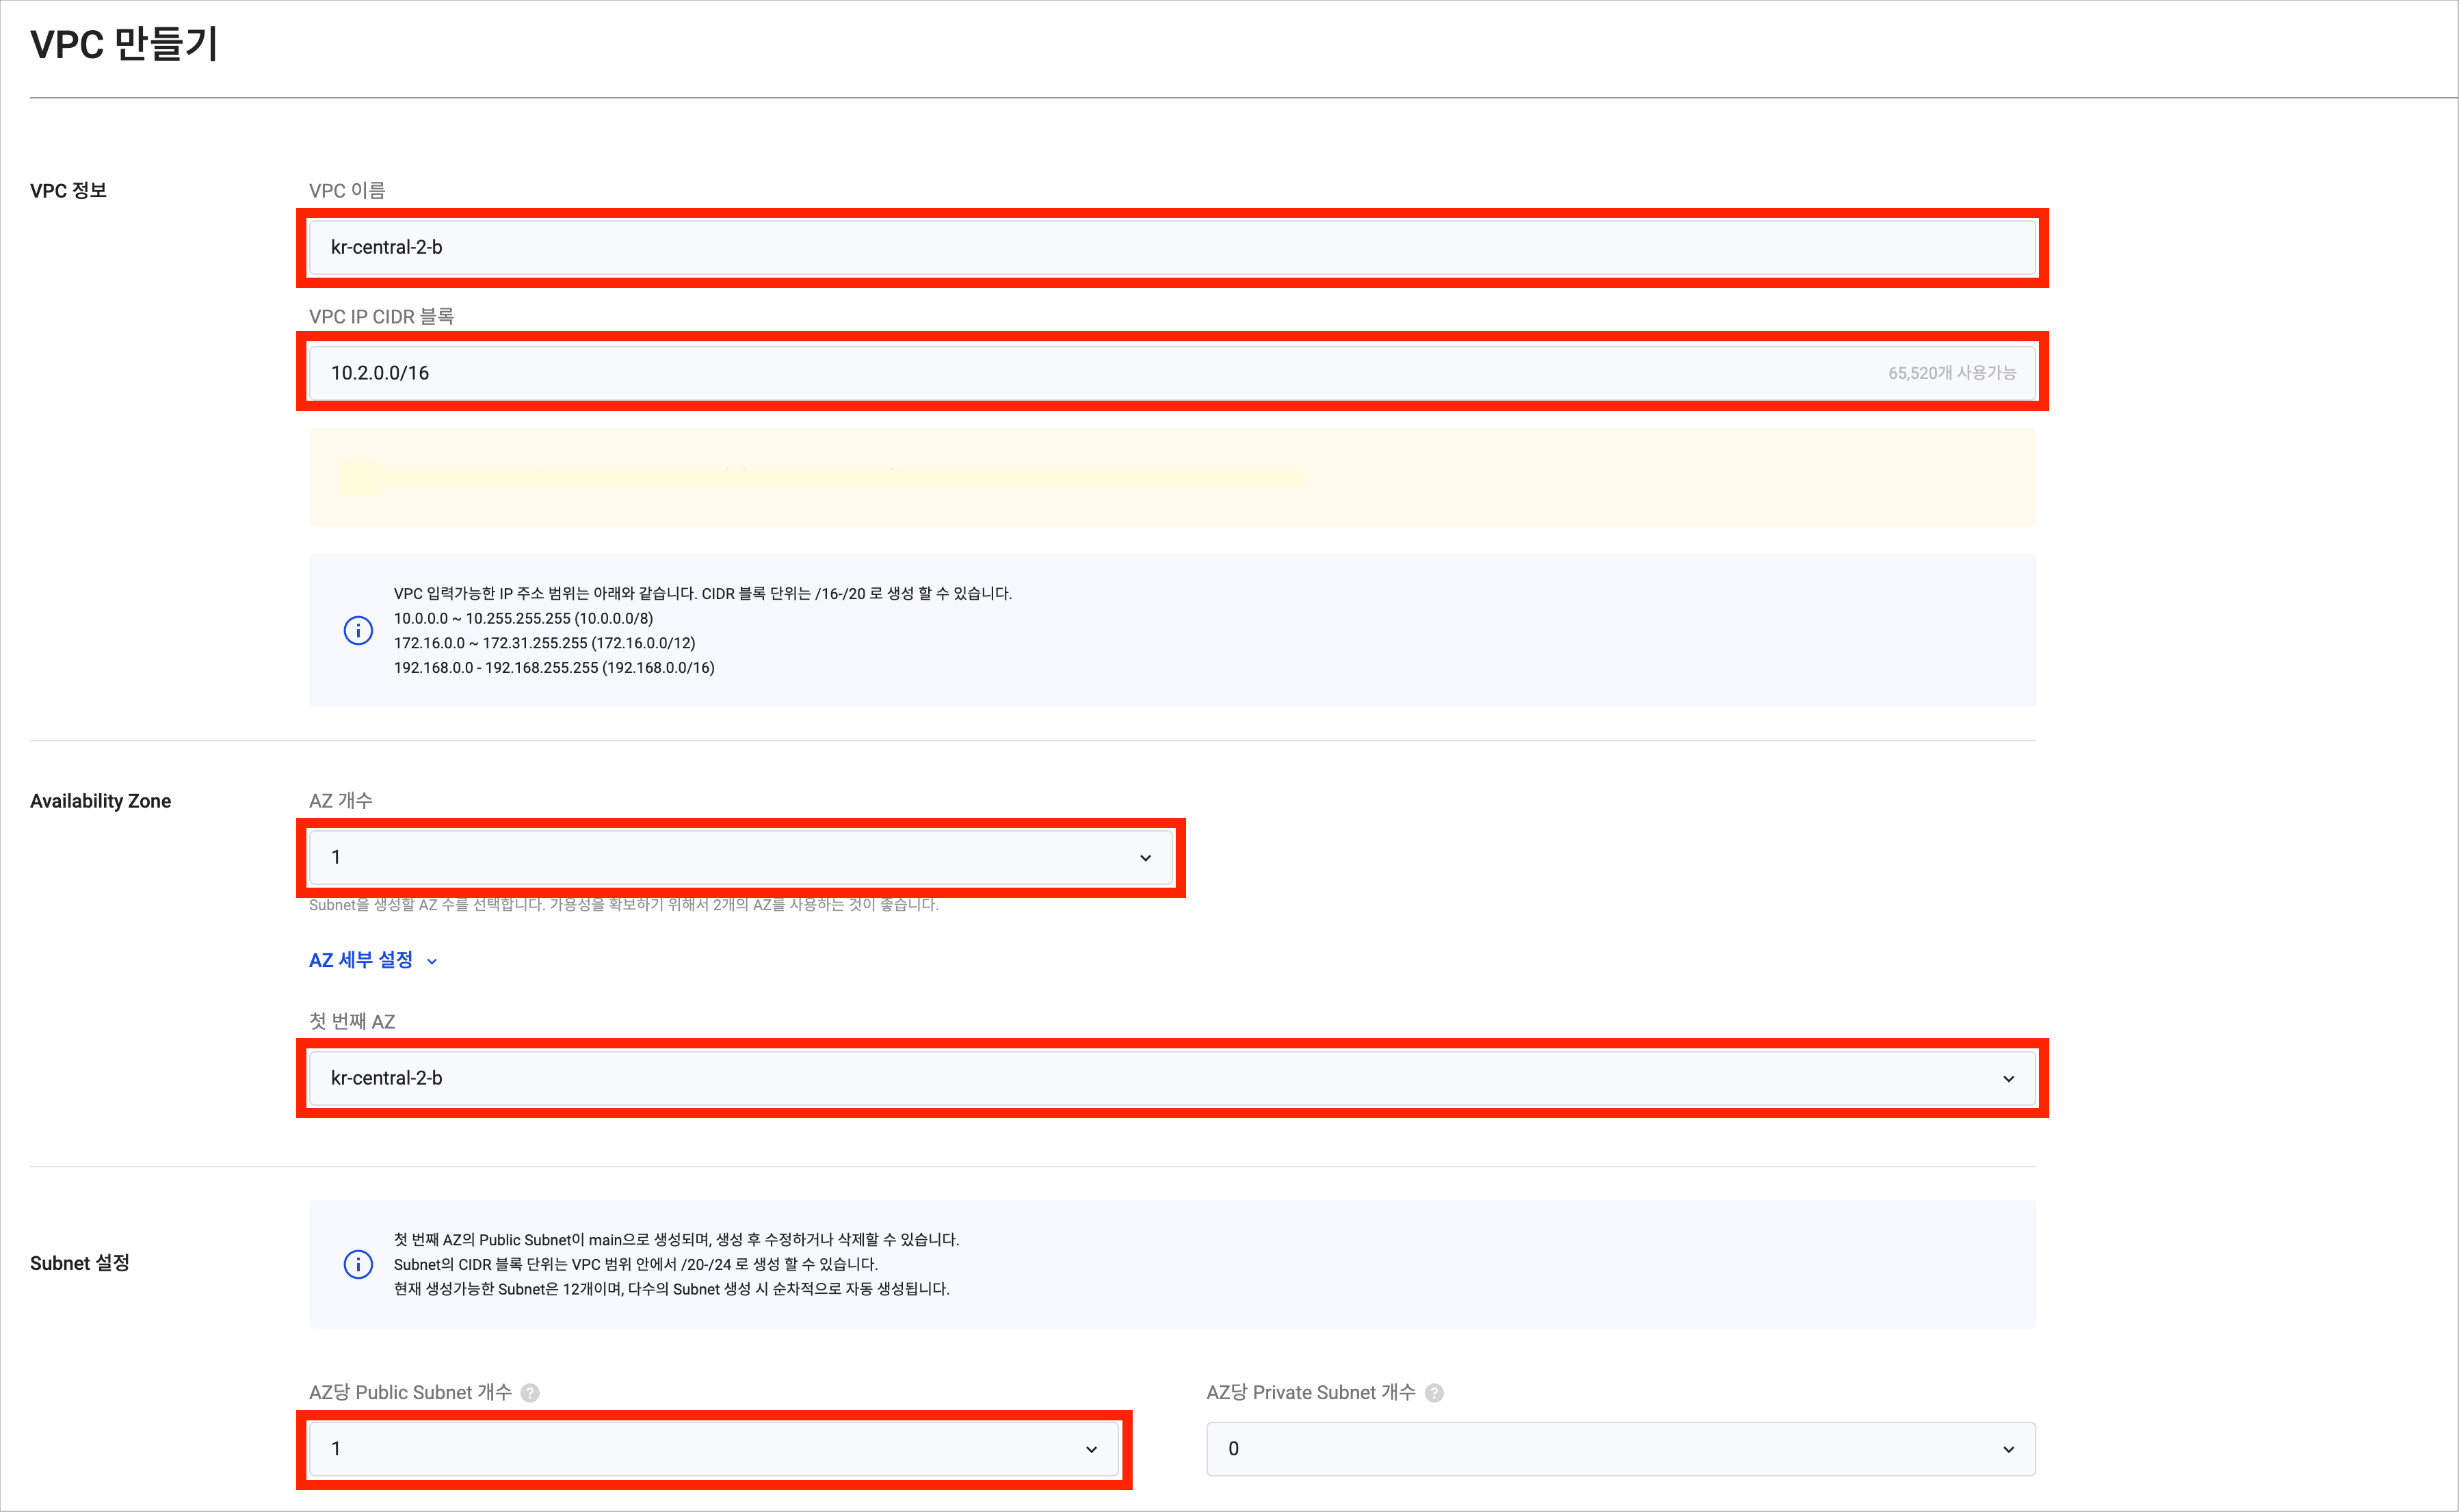
Item Sub-item Value VPC info VPC name handson-vpc-b VPC IP CIDR block 10.2.0.0/16 Availability zone Number of zones 1 First AZ kr-central-2-b Subnet settings Public subnets per AZ 1 Private subnets per AZ 0 -
Go to KakaoCloud console > VPC > Subnets to confirm the created network resources.

Step 2. Create and configure Transit Gateway
Transit Gateway simplifies inter-VPC and VPC-to-on-premises traffic management. See the Transit Gateway documentation for more details.
1. Create Transit Gateway
-
Access KakaoCloud console > Transit Gateway, and select the [Create Transit Gateway] button.
-
Enter the following information based on the table and image below:
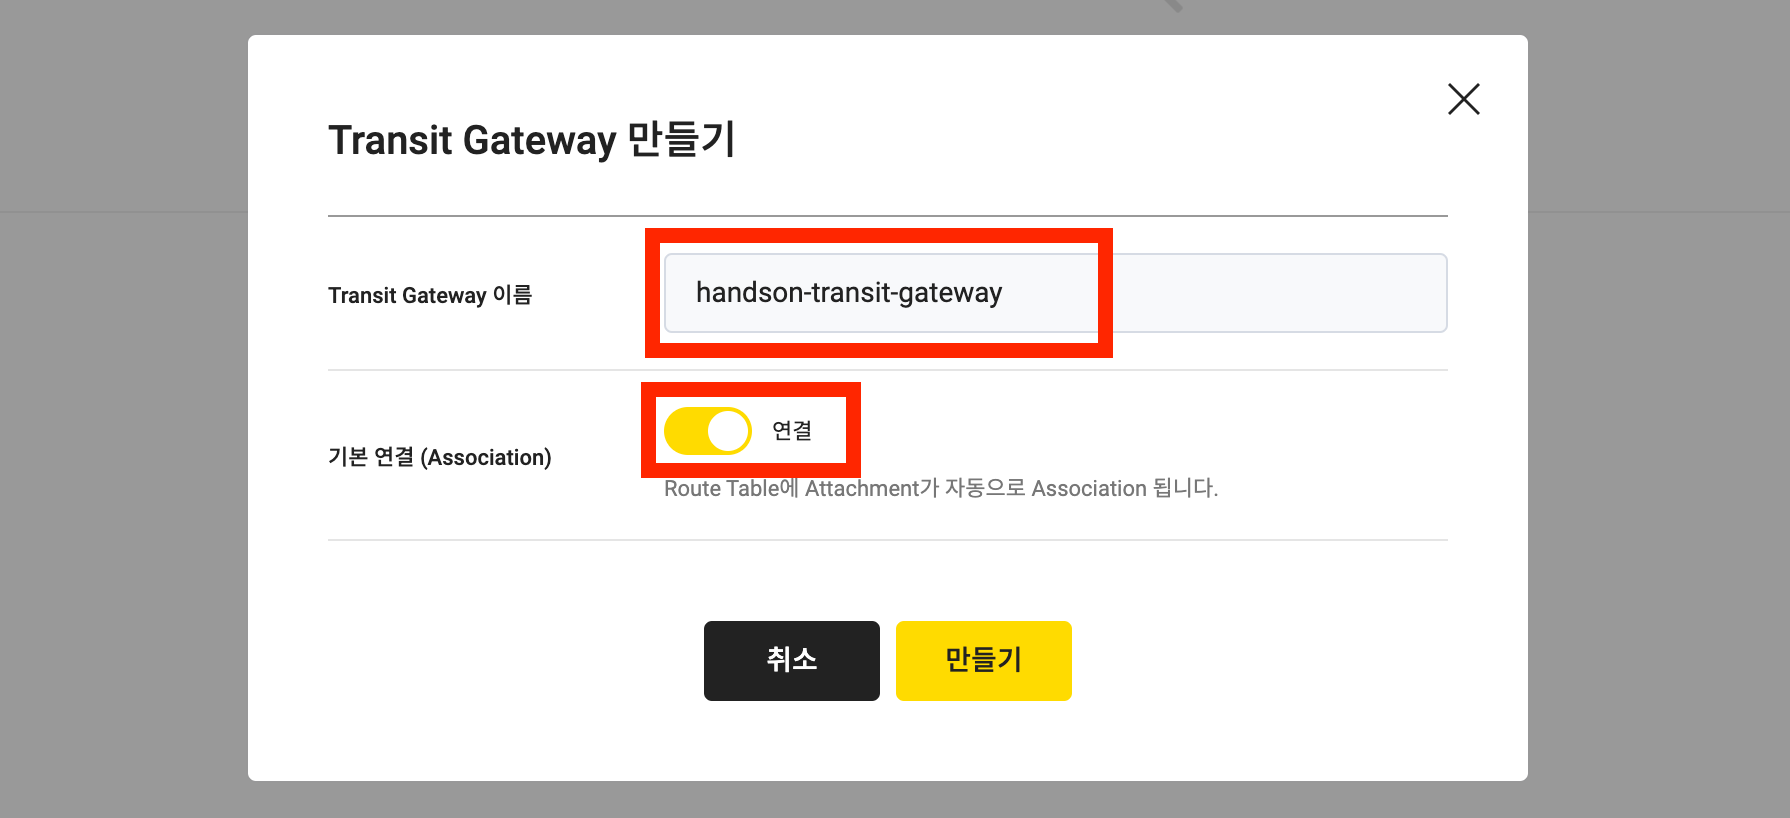
Item Description Transit Gateway name handson-transit-gateway Default connection (Association) Connection Shared acceptance settings Manual -
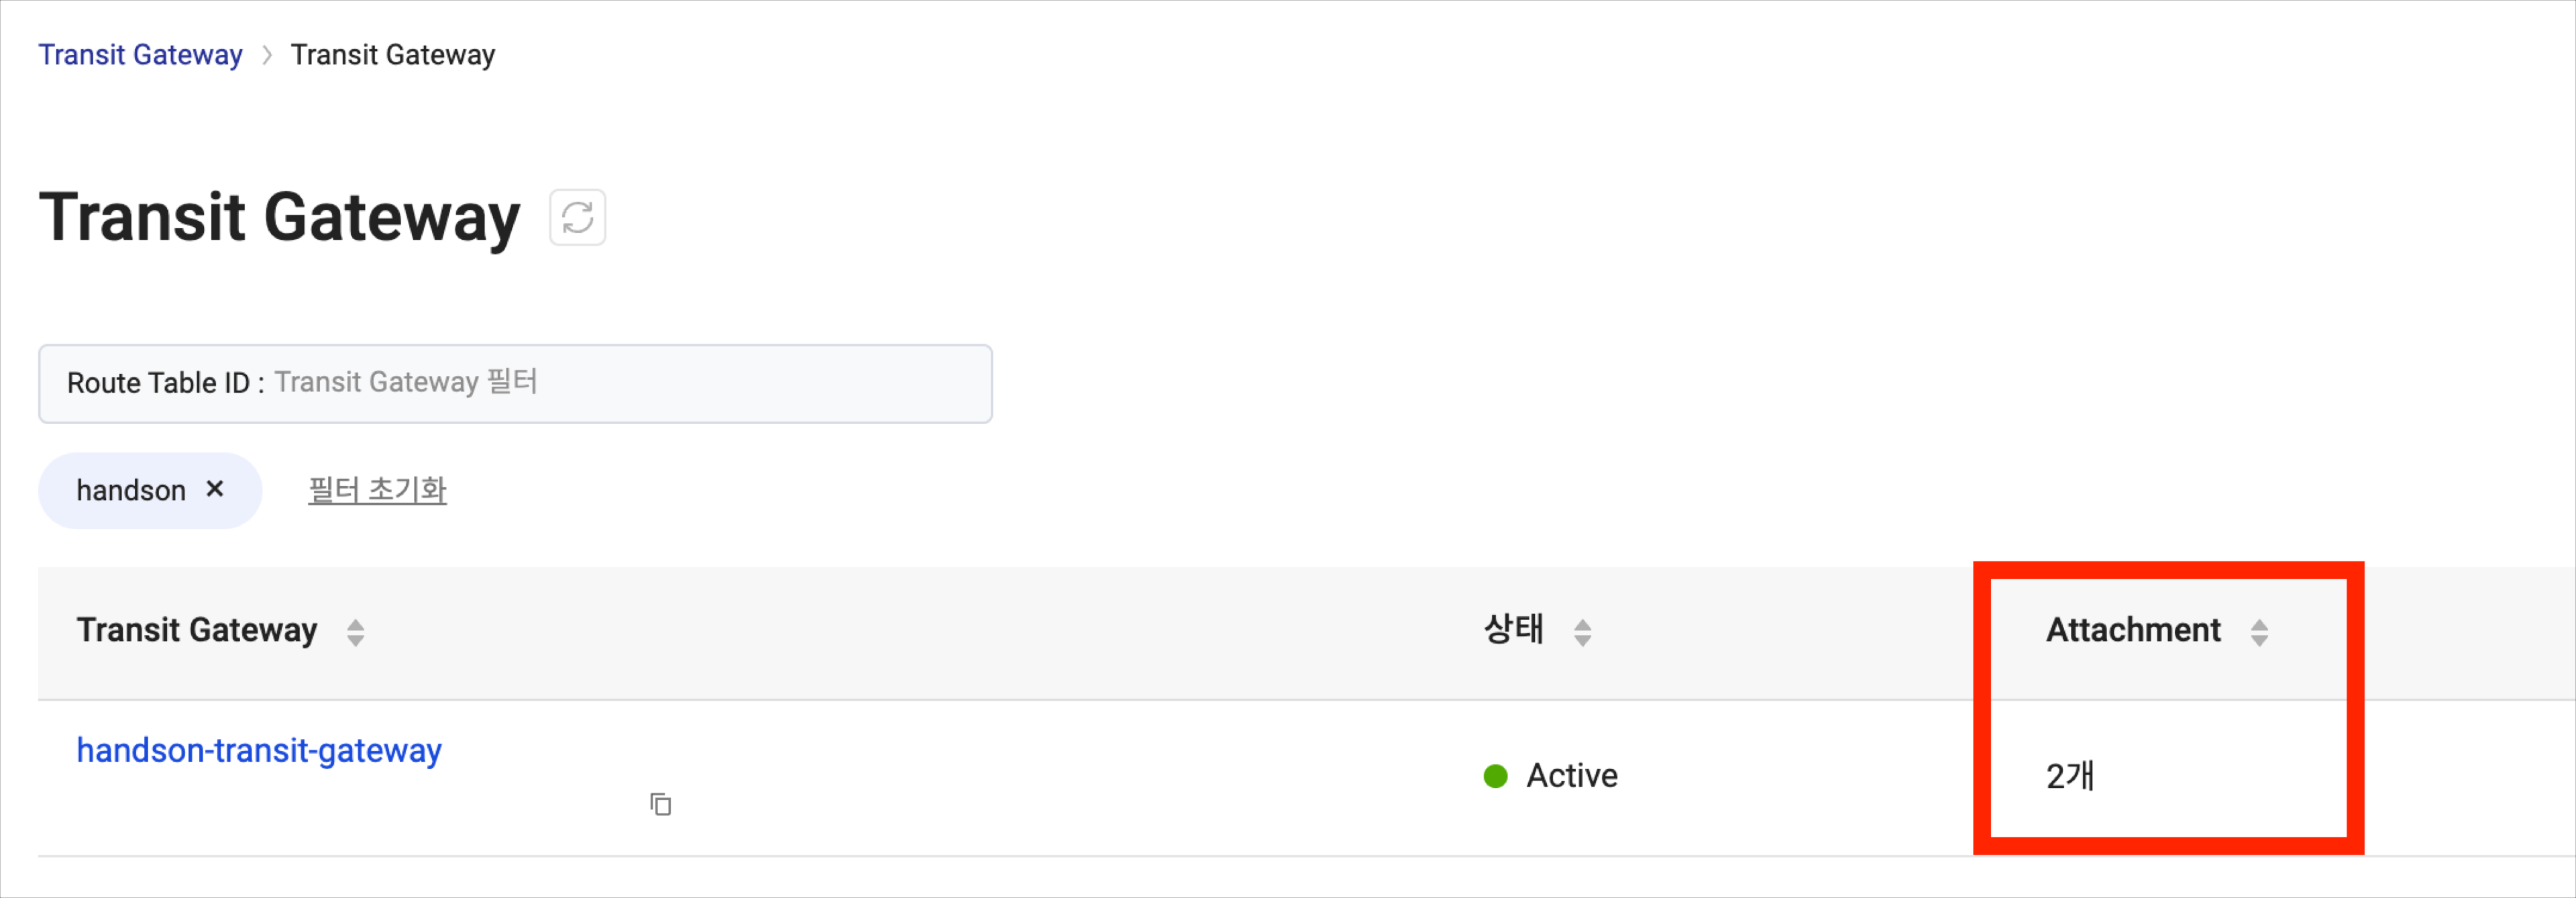
Verify that the resource has been created successfully.

2. Create Attachments
-
In the Attachment menu, select [Create Attachment], and create an Attachment for
handson-vpc-ausing the table below:Item Description Resource handson-vpc-a Subnet kr-central-2-a -
Similarly, create an Attachment for
handson-vpc-b:Item Description Resource handson-vpc-b Subnet kr-central-2-b -
Confirm that both Attachments have been added successfully.
3. Configure transit gateway routing
-
Go to the KakaoCloud console > Networking > Transit Gateway > Routing table menu.
-
Select the default connection routing table linked during transit gateway creation.
-
In the Routing tab, select the [Add static routing] button and add the following static routing. This adds a rule to route traffic with destination
10.1.0.0/16tohandson-vpc-athrough the transit gateway.Item Value Destination 10.1.0.0/16 Target handson-vpc-a -
Select the [Add static routing] button again to add a rule for routing traffic with destination
10.2.0.0/16tohandson-vpc-bthrough the transit gateway.Item Value Destination 10.2.0.0/16 Target handson-vpc-b -
Verify that the configurations have been added as planned.
Step 3. Configure subnet route policies
-
Go to KakaoCloud console > Networking > VPC > Routing Table, and check the list of routing tables.
-
Update the routing table for the main subnet in
handson-vpc-a:Item Value Destination 10.2.0.0/16 Target type Transit Gateway Target name handson-transit-gateway -
Update the routing table for the main subnet in
handson-vpc-b:Item Value Destination 10.1.0.0/16 Target type Transit Gateway Target name handson-transit-gateway -
Confirm that the routing is Active.
Step 4. Create instances and verify connectivity
-
Go to KakaoCloud console > Virtual Machine > Instances, and create one instance in each VPC using the table below:
Item Details Instance 1 Instance 2 Name handson-instance-a handson-instance-b Number 1 1 Image Ubuntu 20.04 Ubuntu 20.04 Instance type m2a.large m2a.large Volume Root volume, 20GB SSD Root volume, 20GB SSD Key pair {Your key pair}{Your key pair}Network VPC handson-vpc-a handson-vpc-b Subnet Main subnet of handson-vpc-a Main subnet of handson-vpc-b Security group {See below}{See below} -
Add the following security group policies for connectivity:
Policy Inbound Inbound Outbound Protocol ICMP TCP ALL Source 10.0.0.0/8 {Your public IP}/320.0.0.0/0 Port - 22 - Description ping ssh all infoTo find your public IP address, visit WhatIsMyIP.com.
-
Assign public IPs to the instances and access them via SSH:
ssh ubuntu@{INSTANCE_PUBLIC_IP} -i {KEY_PAIR} -
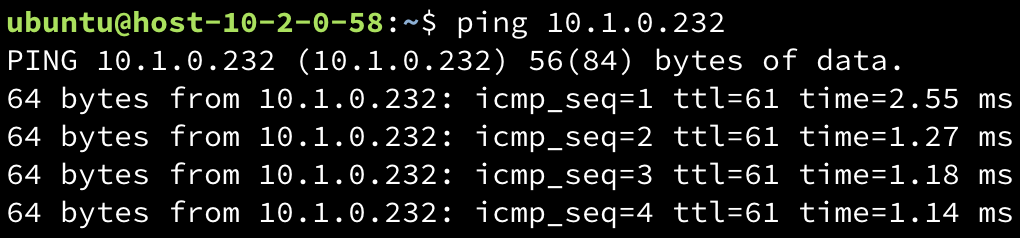
Verify connectivity by using the ping command to test between instances in the two VPCs. Below is an example:
Ping from instance-a to instance-bping {INSTANCE_PRIVATE_IP}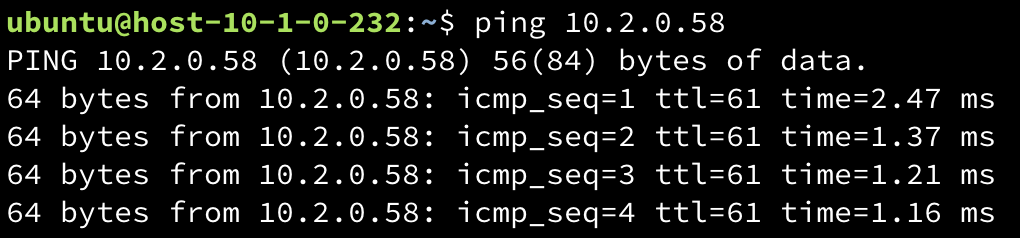
The following image shows the result of using
pingfrominstance-binvpc-btoinstance-ainvpc-a.