Ingest Cloud Trail logs into Splunk Enterprise
This guide explains how to collect and analyze Cloud Trail logs stored in Object Storage using Splunk Enterprise.
- Estimated time: 40 minutes
- Recommended operating system: macOS, Ubuntu
- Prerequisites:
Scenario overview
This scenario provides a detailed guide on how to ingest Cloud Trail logs stored in Object Storage into Splunk Enterprise. This setup enables real-time monitoring and analysis, allowing users to visualize system health and detect anomalies quickly for proactive incident response.
Key topics covered in this tutorial:
- Setting up Splunk Enterprise
- Configuring Splunk Universal Forwarder: Installing and configuring the Forwarder agent to forward log files to Splunk Enterprise
- Automating log storage: Creating an automation script that stores Cloud Trail logs from Object Storage to a specific directory monitored by the Forwarder agent
- Ensuring automatic download of missing logs in case of errors
- Registering background processes: Scheduling the script to run as a background process every hour
- Verifying logs in Splunk Enterprise
- Splunk Enterprise: A data analytics platform for enterprises that collects and analyzes various log data in real-time, enabling proactive monitoring and anomaly detection.
- Splunk Universal Forwarder: A lightweight data collection agent that collects logs and data from remote servers and forwards them to the Splunk Indexer. This allows automatic retrieval of logs from Object Storage and transmission to Splunk Enterprise for real-time analysis and search.
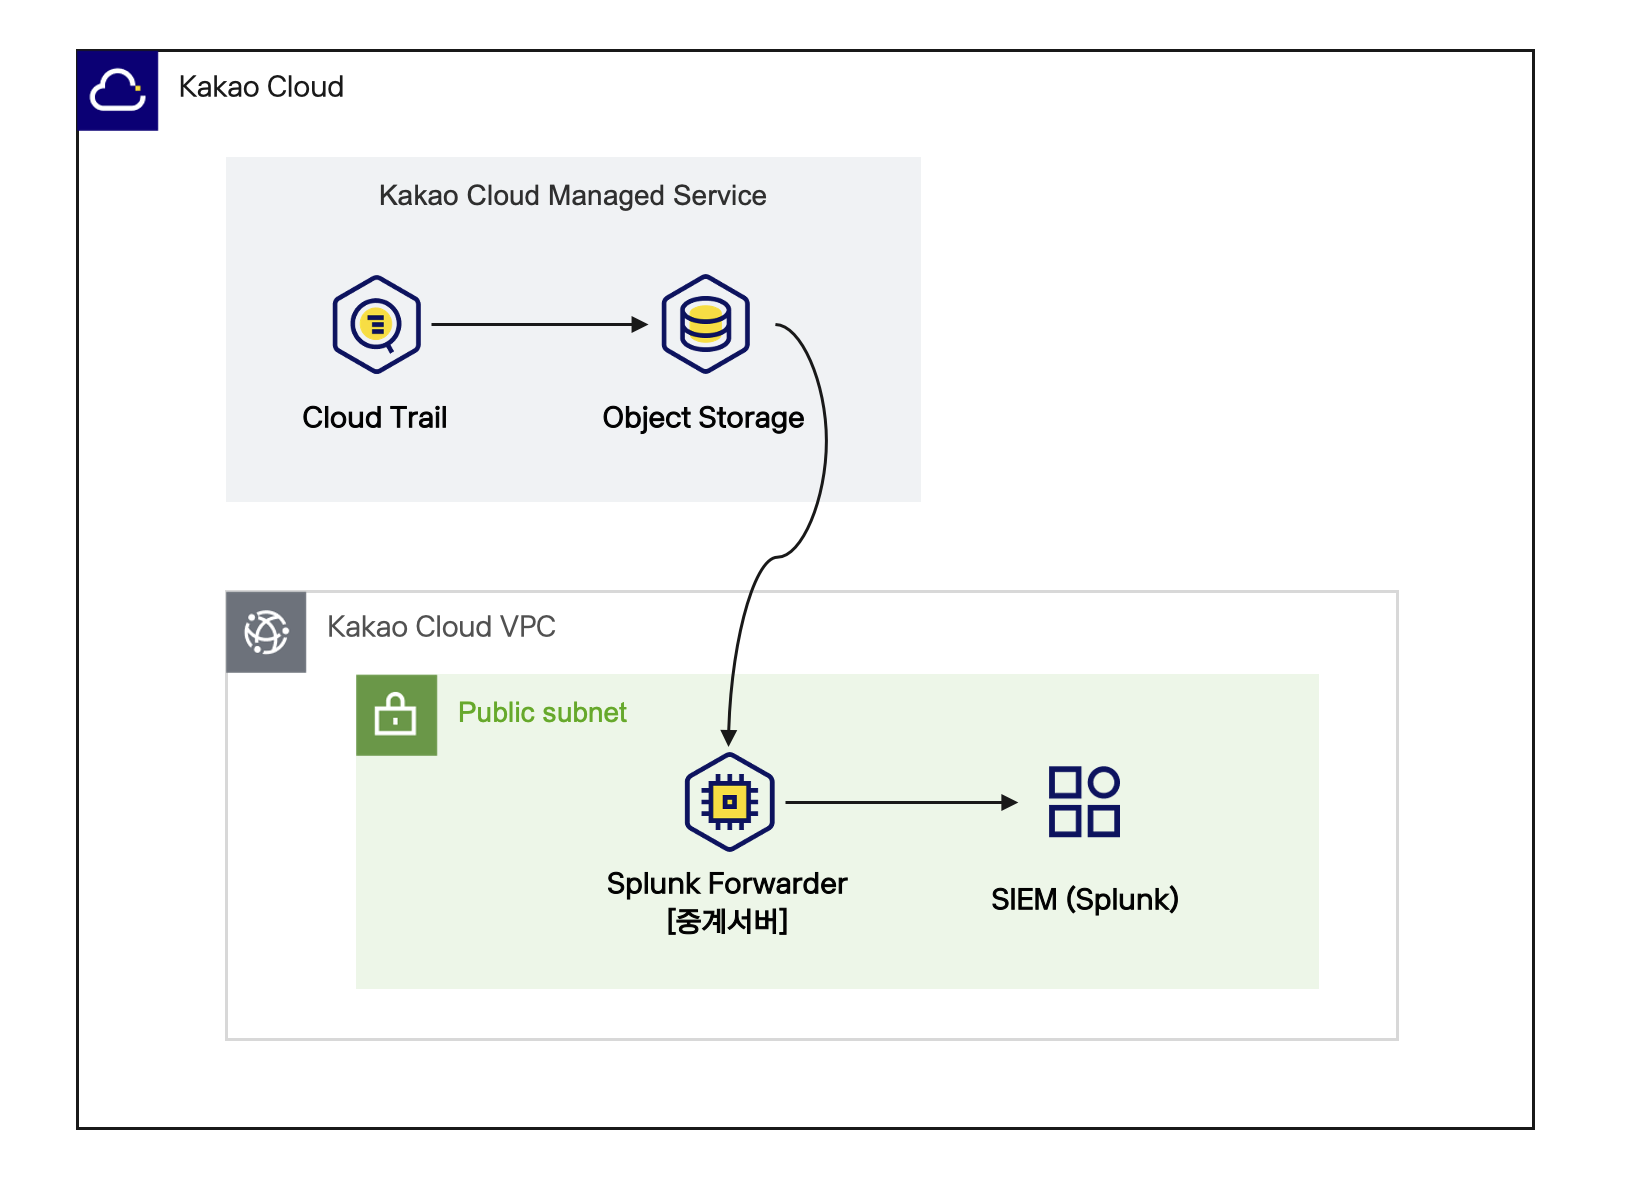 Architecture Diagram
Before you start
This section outlines the necessary preparatory steps for setting up the Splunk server, configuring the Forwarder agent, and setting up log processing.
1. Creating an Object Storage bucket and enabling Cloud Trail log storage
To utilize Cloud Trail logs, you first need to create an Object Storage bucket where logs will be stored. This bucket serves as the repository for Cloud Trail logs, which will later be forwarded to Splunk for analysis. Additionally, configure the Cloud Trail log storage feature to ensure logs are automatically stored in Object Storage.
2. Setting up the network environment
Configure a VPC and subnets to enable seamless communication between the Splunk Enterprise server and the Forwarder agent.
VPC and Subnet: tutorial
-
Go to KakaoCloud console > Networking > VPC.
-
Select the [+ Create VPC] button and configure the VPC and subnet as follows:
Category Item Value VPC Info VPC Name tutorial VPC IP CIDR Block 10.0.0.0/16 Availability Zone Number of AZs 1 First AZ kr-central-2-a Subnet Configuration Public Subnet per AZ 1 kr-central-2-a Public Subnet IPv4 CIDR Block: 10.0.0.0/20 -
After confirming the topology, select the Create button.
- The subnet status will change from
Pending Create>Pending Update>Active. Ensure the status isActivebefore proceeding.
- The subnet status will change from
3. Configuring security groups
Configure security groups to restrict external access while allowing necessary traffic for secure communication between the Splunk server and the Forwarder agent.
Security Group: tutorial-splunk-sg
-
Go to KakaoCloud console > VPC > Security Groups and create a security group with the following settings:
Name Description (Optional) tutorial-splunk-sg Security policy for the Splunk server -
Select [+ Add Rule] and configure inbound rules as follows:
Inbound Rule Item Value splunk inbound policy 1 Protocol TCPSource {Your Public IP}/32Port Number 22 Description (Optional) Allow SSH Access splunk inbound policy 2 Protocol TCPSource {Your Public IP}/32Port Number 8000 Description (Optional) Allow Splunk Enterprise Web Access
Security Group: tutorial-forwarder-sg
-
Go to KakaoCloud console > VPC > Security Groups and create a security group with the following settings:
Name Description (Optional) tutorial-forwarder-sg Security policy for the Forwarder server -
Select [+ Add Rule] and configure inbound rules as follows:
Inbound Rule Item Value forwarder inbound policy 1 Protocol TCPSource {Your Public IP}/32Port Number 22 Description (Optional) Allow SSH Access
Getting started
This section sets up an environment for collecting and analyzing log data using Splunk Enterprise and the Forwarder. Each step includes creating a Splunk instance, configuring the Forwarder, and writing an automated log transfer script.
Step 1. Setting up a splunk instance
Create an instance to install Splunk Enterprise and configure the basic environment for log collection and analysis.
-
Download the free trial Splunk Enterprise license from the Splunk official website. In this example, select Linux >
.tgzfile and select thecopy wget link. -
Create an instance for the Splunk Enterprise server using the KakaoCloud Virtual Machine service.
Splunk instance: tutorial-splunk
-
Go to KakaoCloud console > Beyond Compute Service > Virtual Machine.
-
Refer to the table below to create a VM instance for the Splunk Enterprise server.
Category Item Value Note Basic Info Name tutorial-splunk Quantity 1 Image Ubuntu 24.04 Instance Type m2a.large Volume Root Volume 50 Key Pair {USER_KEYPAIR}⚠️ Store the key pair securely when created.
Lost keys cannot be recovered, and reissuance is required.Network VPC tutorial Security Group tutorial-splunk-sgNetwork Interface 1 New Interface Subnet main (10.0.0.0/20) IP Allocation Automatic -
Associate a public ip with the created Splunk instance.
-
-
Connect to the created Splunk instance via ssh and install Splunk Enterprise using the commands below.
# download
enter the wget command copied from step 1

# extract the downloaded file
tar xvzf splunk-9.4.0-6b4ebe426ca6-linux-amd64.tgz

# start the splunk server
sudo ./splunk/bin/splunk start --accept-license
# at this point, enter the username and password for login.

# example of normal output
waiting for web server at http://127.0.0.1:8000 to be available............ done


if you get stuck, we're here to help.
look for answers here: http://docs.splunk.com

the splunk web interface is at http://host-172-16-0-32:8000 -
Open a browser, go to
http://{splunk_instance_public_ip}:8000, and log in with the username and password set when starting the Splunk server. -
On the Splunk Enterprise page, go to Settings > Forwarding and receiving > Data Receiving, select the New Receiving Port button, and create port 9997 (see the image below).
 Reference Image
Step 2. Setting Up the Forwarder Instance
To facilitate easy forwarding of logs stored in Object Storage, install the Splunk Universal Forwarder agent. In this tutorial, this agent server is referred to as the Forwarder Instance.
-
Create the Forwarder Instance.
Forwarder Instance: tutorial-forwarder
-
Go to KakaoCloud console > Beyond Compute Service > Virtual Machine.
-
Refer to the table below to create a VM instance for the Forwarder agent.
Category Item Value Note Basic Info Name tutorial-forwarder Quantity 1 Image Ubuntu 24.04 Instance Type m2a.large Volume Root Volume 50 Key Pair {USER_KEYPAIR}⚠️ Store the key pair securely when created.
Lost keys cannot be recovered, and reissuance is required.Network VPC tutorial Security Group tutorial-forwarder-sgNetwork Interface 1 New Interface Subnet main (10.0.0.0/20) IP Allocation Automatic -
Associate a Public IP with the created Forwarder instance.
-
-
Connect to the Forwarder instance via SSH and install the Universal Forwarder agent by referring to the Splunk official documentation.
-
Configure the Forwarder to send log data to the Splunk Enterprise server using the following settings.
# Create a directory to store files that will be forwarded to Splunk Enterprise
sudo mkdir /home/ubuntu/cloudtrail/processed_data

# Configure Splunk to monitor log files within this directory
sudo /home/ubuntu/splunkforwarder/bin/splunk add monitor /home/ubuntu/cloudtrail/processed_data/

# Set up log data forwarding to Splunk Enterprise server
sudo /home/ubuntu/splunkforwarder/bin/splunk add forward-server ${SPLUNK_PRIVATE_IP}:${SPLUNK_PORT}
환경변수 설명 SPLUNK_PRIVATE_IP🖌︎ Splunk Instance Private IP SPLUNK_PORT🖌︎ Splunk Receiving Port 9997
- When Splunk Universal Forwarder is working properly, all log files stored in the
processed_datadirectory are automatically sent to the Splunk server. - Network issues may temporarily interrupt communication between the Forwarder and Splunk server. In this case, log files may not be sent to the server or reflected properly. Check the
/splunkforwarder/var/log/splunk/splunkd.logfile to identify the time when communication was interrupted. This file contains detailed information about connection issues between the Forwarder and the server. - If log files were not sent due to a communication failure, copy the log files back to the
processed_datadirectory. Splunk Forwarder will automatically detect this and resend the missing logs to the server. - Even if logs are lost due to network issues, recovery is possible if the original data is stored in the
processed_datadirectory for subsequent action.
- Verify that the settings applied correctly. The file below is the
outputs.conffile of the Splunk Universal Forwarder, containing settings for the target server to send data to.
$ sudo cat /home/ubuntu/splunkforwarder/etc/system/local/outputs.conf

# Example output
[tcpout]
defaultGroup = default-autolb-group

[tcpout:default-autolb-group]
server = $(SPLUNK_PRIVATE_IP:: Splunk Instance Private IP ):$(SPLUNK_PORT:: Splunk Receiving Port 9997)

[tcpout-server://$(SPLUNK_PRIVATE_IP:: Splunk Instance Private IP ):$(SPLUNK_PORT:: Splunk Receiving Port 9997)
- Add the following inbound rules to the security group (tutorial-splunk-sg) for the Splunk instance.
Security Group: tutorial-splunk-sg
- Go to KakaoCloud console > VPC > Security Groups. Refer to the table below to create a security group.
| Name | Description (Optional) |
|---|---|
| tutorial-splunk-sg | Splunk server security policy |
- Select the [+ Add] button at the bottom, configure the inbound rules as shown below, and select [Apply].
| Inbound Rule | Item | Value |
|---|---|---|
| splunk inbound policy 3 | Protocol | TCP |
| Source | {Forwarder Server Private IP}/32 | |
| Port | 9997 | |
| Description (Optional) | Port for collecting logs from UF |
Step 3. Creating an Automated Log Storage Script
The Cloud Trail log storage feature saves logs as a single file in an Object Storage bucket every hour. This tutorial provides a script that reads these logs using the Splunk Universal Forwarder agent and transmits them to the Splunk Enterprise server automatically.
- When the script first runs, it compares the log files in Object Storage with the local log files on the Forwarder agent and downloads files.
- It downloads the most recently modified file from Object Storage and decompresses it.
- The decompressed file is converted into a list of JSON objects and stored in the
processed_datadirectory, and the JSON object list is sent to Splunk as events. - If an error occurs, the script automatically checks for missing log files and downloads them.
- Note: Steps 2-4 are repeated every hour at the 10th minute.
-
Prepare the Python environment to run the script on the Forwarder instance.
python3 --version

sudo apt update
sudo apt install -y python3-venv python3-pip

python3 -m venv myenv
source myenv/bin/activate

pip install --upgrade pipinfoThis tutorial uses AWS CLI to access Object Storage, so a separate Python SDK such as boto3 is not required.
-
To use AWS CLI in the automated script, install and configure AWS CLI first.
Install AWS CLI# Update packages and install required tools
sudo apt update
sudo apt install -y curl unzip
# Download AWS CLI 2.15.41
curl -sSL "https://awscli.amazonaws.com/awscli-exe-linux-x86_64-2.15.41.zip" -o awscliv2.zip
# Extract and install
unzip -q awscliv2.zip
sudo ./aws/install --update
# Verify installation
aws --versioncautionThe recommended AWS CLI versions compatible with KakaoCloud Object Storage are 2.15.x to 2.22.x. This guide uses version
2.15.41as an example.Verify the S3 API credentials issued in the preparation steps, and configure AWS CLI using the following command:
Configure AWS CLIaws configureAWS Access Key ID: ${CREDENTIAL_ACCESS_KEY}
AWS Secret Access Key: ${CREDENTIAL_SECRET_ACCESS_KEY}
Default region name: kr-central-2
Default output format: json환경변수 설명 CREDENTIAL_ACCESS_KEY🖌︎ Access key required for S3 API usage CREDENTIAL_SECRET_ACCESS_KEY🖌︎ Secret access key required for S3 API usage -
Set the server time to Korea Standard Time (KST) and perform NTP-based synchronization for accurate log collection and event time ordering.
# Change timezone to Korea (Seoul)
sudo timedatectl set-timezone Asia/Seoul

# Install chrony and force synchronization
sudo apt-get update && sudo apt-get install -y chrony
sudo systemctl restart chrony
sudo chronyc -a makestep

# Check time (KST)
date -
Open the script file.
Open script filesudo vi /home/ubuntu/cloudtrail/script.py -
Modify the variables in the script below to create an automated script.
infoThe IAM endpoint URL and Object Storage endpoint URL in the script below can be changed when private endpoints are provided in the future.
import os, json, gzip, subprocess, datetime, time, logging

# === User-defined variables ===
# Object Storage bucket name where Cloud Trail logs are stored
BUCKET_NAME = "<BUCKET_NAME>"

# Download and processed log storage paths
DOWNLOAD_DIR = "/home/ubuntu/cloudtrail"
PROCESSED_DIR = os.path.join(DOWNLOAD_DIR, "processed_data")

# Checkpoint file to prevent duplicate ingestion
CHECKPOINT_FILE = "/home/ubuntu/cloudtrail/.checkpoint"

# Prepare log directories
os.makedirs(PROCESSED_DIR, exist_ok=True)

# Log file settings
logging.basicConfig(
    filename="/home/ubuntu/cloudtrail/process_log.log",
    level=logging.INFO
)

def log(level, message):
    """Write timestamp, level, and message to the log file."""
    now = datetime.datetime.now().strftime("%Y-%m-%d %H:%M:%S")
    logging.info(f"{now} [{level}] {message}")

def get_checkpoint():
    if not os.path.exists(CHECKPOINT_FILE):
        return None
    with open(CHECKPOINT_FILE, "r") as f:
        return f.read().strip()

def update_checkpoint(file_name):
    with open(CHECKPOINT_FILE, "w") as f:
        f.write(file_name)

def list_s3_files():
    """
    View file list in the Object Storage bucket.
    - Uses the recursive option to include subpaths.
    - Based on the actual Cloud Trail storage format (.gz).
    """
    cmd = [
        "aws", "--endpoint-url", "https://objectstorage.kr-central-2.kakaocloud.com",
        "s3", "ls", f"s3://{BUCKET_NAME}/", "--recursive"
    ]
    result = subprocess.run(cmd, stdout=subprocess.PIPE, text=True)

    files = [
        line.split()[-1]
        for line in result.stdout.splitlines()
        if line.endswith(".gz")
    ]
    return sorted(files)

def download_file(file_name):
    """Download the specified log file from Object Storage."""
    local_path = os.path.join(DOWNLOAD_DIR, os.path.basename(file_name))
    cmd = [
        "aws", "--endpoint-url", "https://objectstorage.kr-central-2.kakaocloud.com",
        "s3", "cp", f"s3://{BUCKET_NAME}/{file_name}", local_path
    ]
    subprocess.run(cmd, check=True)
    log("INFO", f"Downloaded {file_name}")
    return local_path

def process_file(file_path):
    """Convert the downloaded .gz file to a JSON file."""
    try:
        output_file = os.path.join(
            PROCESSED_DIR,
            os.path.basename(file_path).replace(".gz", ".json")
        )

        with gzip.open(file_path, "rt") as f_in, open(output_file, "w") as f_out:
            data = [json.loads(line) for line in f_in]
            json.dump(data, f_out, indent=4)

        if len(data) == 0:
            log("WARN", f"{output_file} processed but contains 0 records")
        else:
            log("SUCCESS", f"Processed {output_file} ({len(data)} records)")

    except Exception as e:
        log("ERROR", f"Processing failed: {e}")

def run():
    """
    Main execution function.
    - Views the latest log file in the bucket.
    - Prevents duplicate processing by using a checkpoint.
    """
    files = list_s3_files()
    if not files:
        log("ERROR", "No .gz files found in bucket.")
        return

    last_file = get_checkpoint()

    # Select only files that have not been processed yet.
    new_files = [f for f in files if last_file is None or f > last_file]

    if not new_files:
        log("INFO", "No new files to process.")
        return

    latest_file = new_files[-1]
    file_path = download_file(latest_file)
    process_file(file_path)
    update_checkpoint(latest_file)

if __name__ == "__main__":
    # Infinite loop: run every hour.
    while True:
        run()
        log("INFO", "Waiting for next run...")
        time.sleep(3600)
Recommended settingPrevent duplicate log ingestion
We recommend using a checkpoint file to record the most recently processed file so that the Forwarder does not ingest the same log repeatedly.CHECKPOINT_FILE = "/home/ubuntu/cloudtrail/.checkpoint"
def update_checkpoint(file_name):
"""Record the processed file name in the checkpoint."""
with open(CHECKPOINT_FILE, "w") as f:
f.write(file_name)
def already_processed(file_name):
"""Check whether the file has already been processed."""
if not os.path.exists(CHECKPOINT_FILE):
return False
with open(CHECKPOINT_FILE, "r") as f:
last_file = f.read().strip()
return last_file == file_nameExample run function modification
def run():
    files = list_s3_files()
    if not files:
        log("ERROR", "No .gz files found in bucket.")
        return
    latest_file = files[-1]
    if already_processed(latest_file):
        log("INFO", f"Already processed {latest_file}, skipping.")
        return
    file_path = download_file(latest_file)
    process_file(file_path)
    update_checkpoint(latest_file)
Adding this logic prevents the same log file from being repeatedly ingested into Splunk.
Step 4. Run background process
-
Add appropriate permissions to the script and log file.
# Create a log file
sudo touch /home/ubuntu/cloudtrail/process_log.log
# Set permissions for the log file
sudo chmod 666 /home/ubuntu/cloudtrail/process_log.log
# Set execute permissions for the script file
sudo chmod +x /home/ubuntu/cloudtrail/script.py -
Run the script as a background process.
nohup python3 /home/ubuntu/cloudtrail/script.py > /dev/null 2>&1 & -
Check the results.
-
The script generates the latest log file in JSON format in the
/home/ubuntu/cloudtrail/processed_datadirectory every hour at the 10th minute. -
Use
ls /home/ubuntu/cloudtrail/processed_datato verify that log files are created. -
Use
tail -f /home/ubuntu/cloudtrail/process_log.logto check the script execution status and log output.Example: /home/ubuntu/cloudtrail/process_log.log file contentINFO:root:Local directory files: ['trail_XXXX-XX-XX-XX.gz', 'trail_XXXX-XX-XX-XX.gz', ...]
INFO:root:Object Storage files: ['trail_XXXX-XX-XX-XX.gz', 'trail_XXXX-XX-XX-XX.gz', ...]
INFO:root:Files to download: []
[INFO] Main script started
[INFO] {'/home/ubuntu/cloudtrail/trail_XXXX-XX-XX-XX.gz'}
[SUCCESS] {'processed_data/trail_XXXX-XX-XX-XX.json'}
[INFO] Main script finished
[INFO] Waiting for next run...
-
Step 5. Check Logs in Splunk Enterprise
Access the Splunk Enterprise web UI and log in to check the CloudTrail logs.
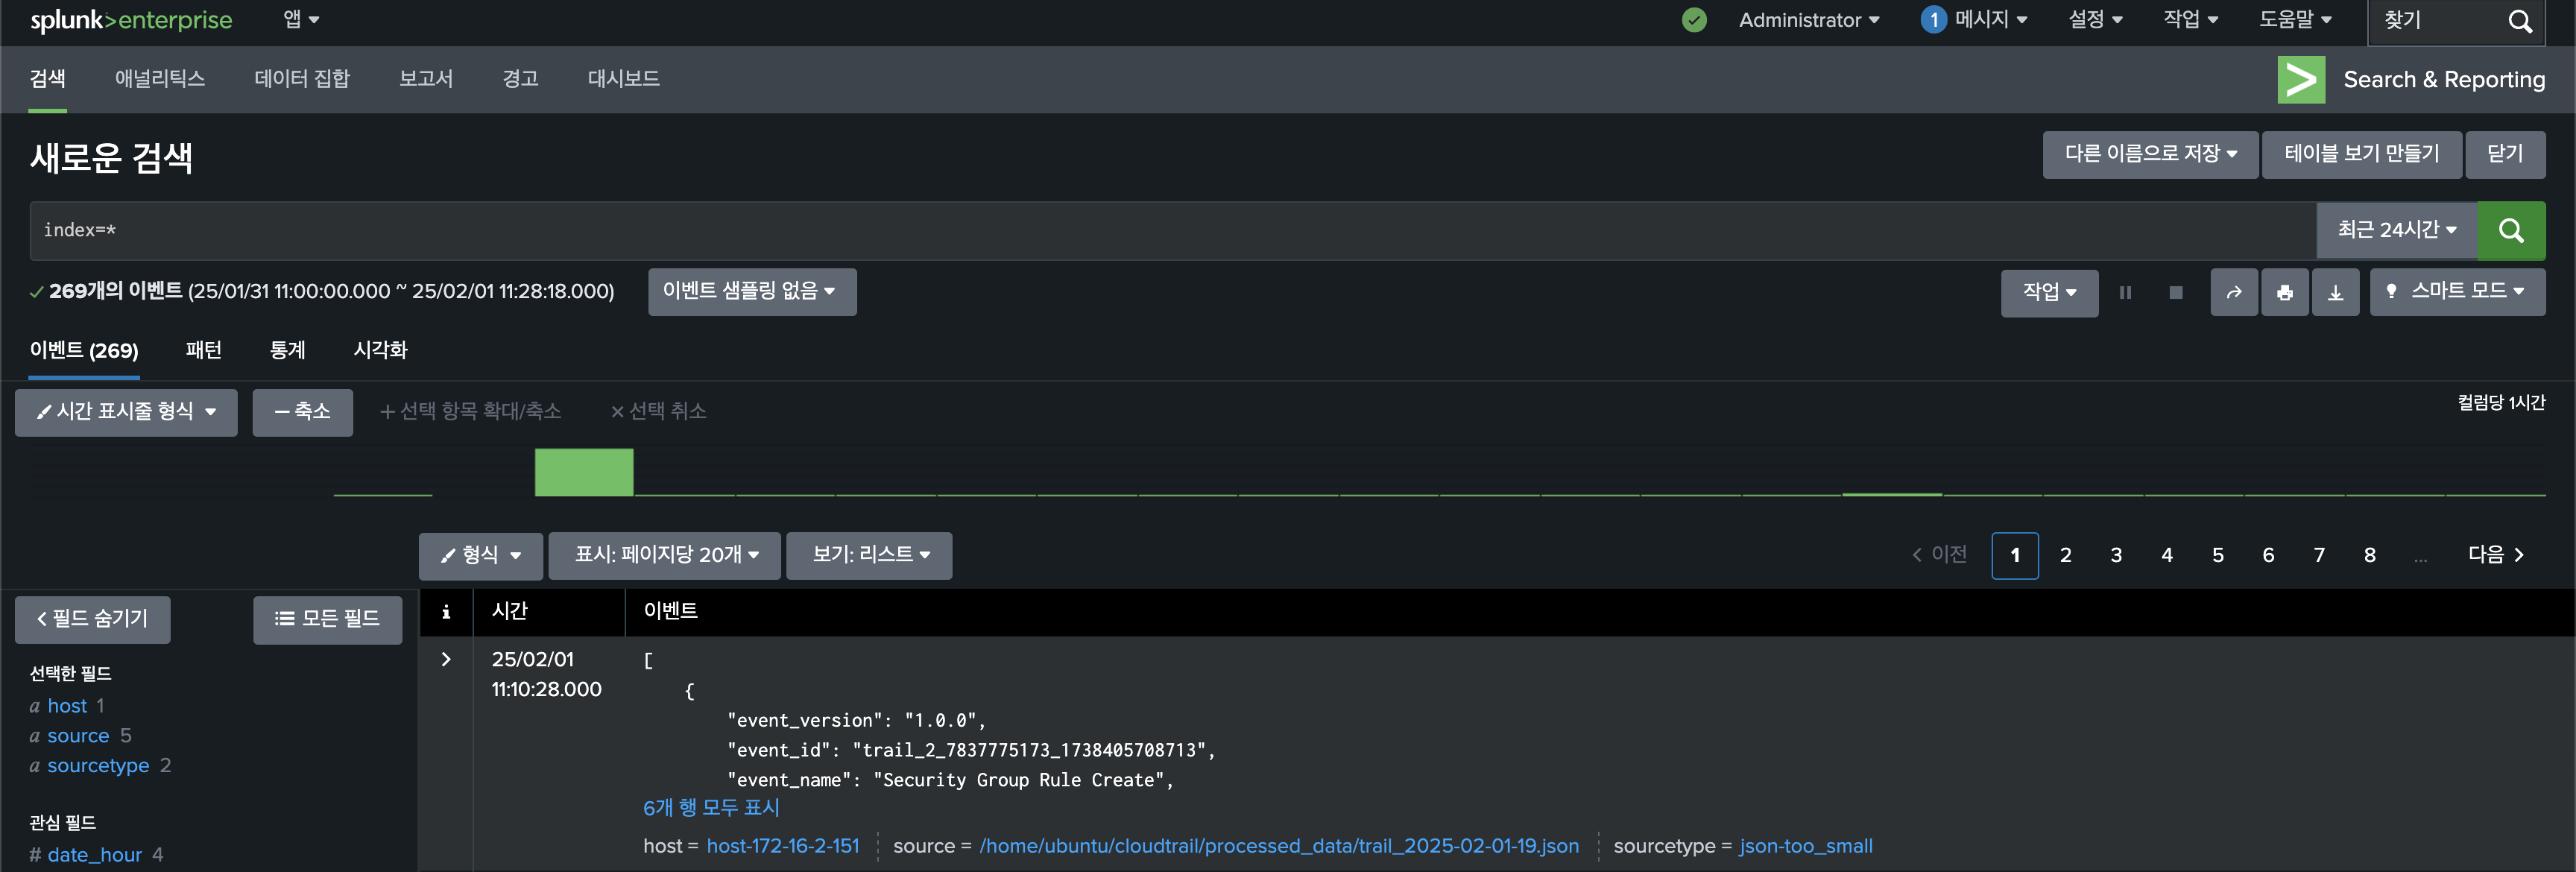
Example