Build GitOps in KakaoCloud Kubernetes Environment
This is a tutorial scenario for building a simple GitOps environment using various open sources based on Kubernetes.
- Estimated time: 50 minutes
- Prerequisites
- Access Key
- GitHub environment
- Deploy Kubernetes cluster with Kubernetes Engine
About this scenario
GitOps is basically a way to manage and automate the configuration of infrastructure and applications using Git repositories. It ensures that changes in code and the state of the deployment environment are always in sync.
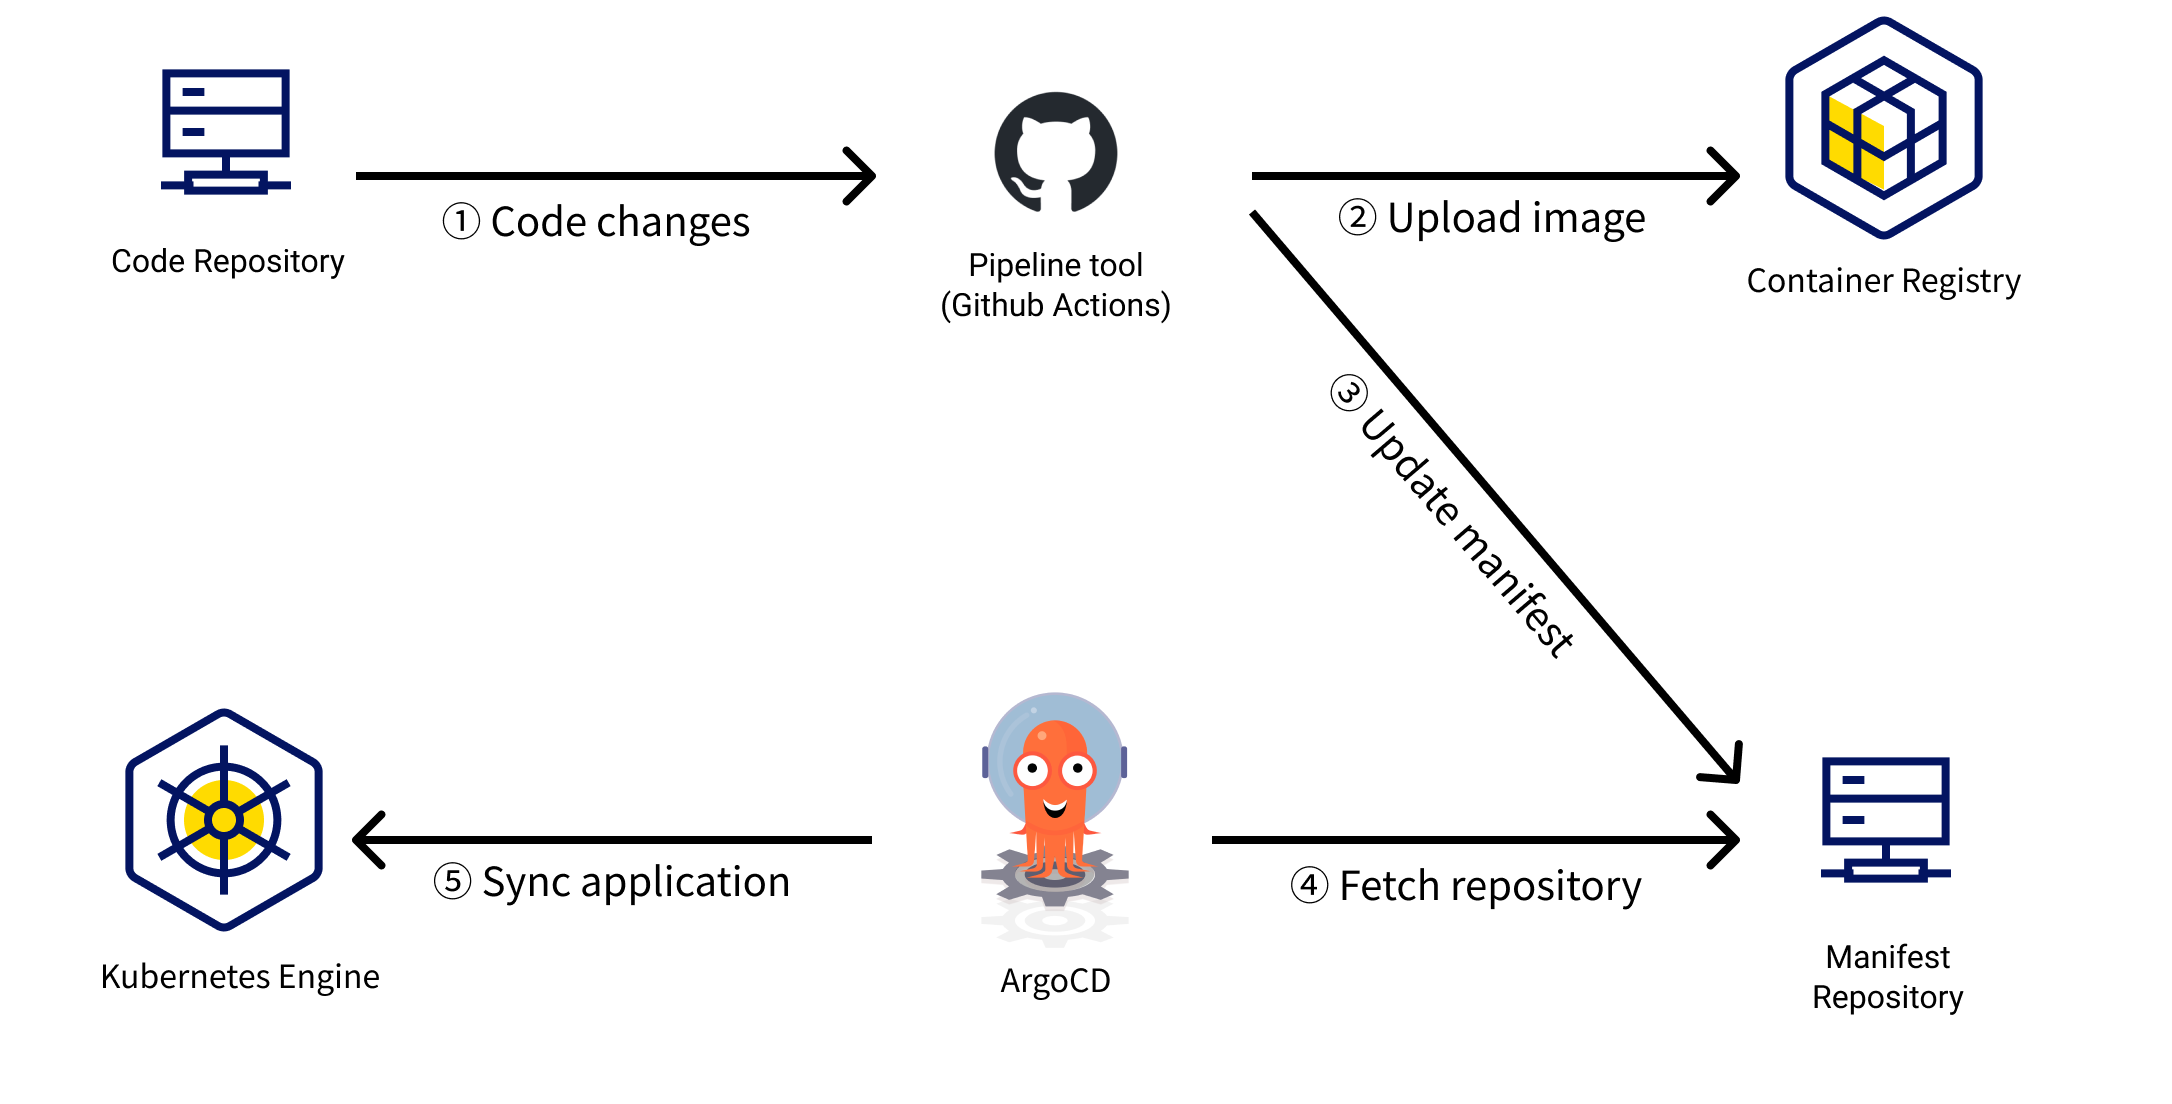
In this tutorial, we will set up a simple GitOps workflow within the KakaoCloud Kubernetes environment. This process is divided into several main steps.

- Build and Containerize Code: Run the pipeline task when the code is updated.
- Upload Image: Convert the source code into a containerized application using the pipeline tool. The generated container image is pushed to KakaoCloud Container Registry.
- Update Manifest: Information about the uploaded container image is updated in the Git repository that manages the deployment manifest. This step integrates the new image details into the deployment configuration.
- Detect Code Update: ArgoCD monitors changes in the Git repository that contains the deployment manifest. 5. Automated deployment using ArgoCD: When updates are detected, ArgoCD automatically applies these changes to the infrastructure, ensuring that the latest application version is deployed without manual intervention.
Prerequisite
Create Container Registry
You can use Container Registry to store and utilize container images to be deployed to Kubernetes.
-
Create a Repository (hereinafter referred to as CR Repository) by going to KakaoCloud console> Container Registry.
Category Repository settings Public Private Repository name tutorial Tag overwrite Possible Image scan Automatic -
Check the Repository created in Container Registry.
Create Kubernetes cluster
Create a Kubernetes cluster required for the practice. Refer to the Set up Kubernetes cluster with Kubernetes Engine guide and proceed to Step 2.
Getting started
Step 1. Clone example project
This tutorial introduces Git usage examples based on the public GitHub. You can proceed with the tutorial by accessing GitHub.
-
Refer to the table below to create a repository (hereinafter referred to as Git Repository) in the user GitHub environment.
Information Value Name kakaocloud-library Public Public -
Run the terminal to clone the example project.
git clone -b kakaocloud-library https://github.com/kakaoenterprise/kakaocloud-tutorials -
Move the working directory to the cloned project folder.
cd kakaocloud-tutorials -
Update the remote repository information of the cloned example project to the previously created Git repository.
git remote remove origin
git remote add origin https://github.com/${GIT_USERNAME}/kakaocloud-library
git branch -M main
git push -u origin main
Environment Variable Description GIT_USERNAME🖌︎ GitHub user name -
Upload the example project contents to your Git repository.
- Authentication for your Git environment is required for this task.
git push
Step 2. Create manifest repository for deployment
-
Create a repository in your GitHub environment by referring to the table below.
Information Value Name deploy-manifests Public Private -
Create a services.yaml file with the data below and add it. Create a service with the namespace kakaocloud-library and a load balancer type.
./services.yamlapiVersion: v1
kind: Namespace
metadata:
name: kakaocloud-library
---
apiVersion: v1
kind: Service
metadata:
name: client
namespace: kakaocloud-library
spec:
type: LoadBalancer
ports:
- port: 80
targetPort: 80
selector:
app: client
---
apiVersion: v1
kind: Service
metadata:
name: server
namespace: kakaocloud-library
spec:
type: ClusterIP
ports:
- port: 8080
targetPort: 8080
selector:
app: server -
Create a deployment file for deploying the front-end application.
./deployment-client.yamlapiVersion: apps/v1
kind: Deployment
metadata:
name: client
spec:
replicas: 2
revisionHistoryLimit: 3
selector:
matchLabels:
app: client
template:
metadata:
labels:
app: client
spec:
containers:
- image: CLIENT_IMAGE:TAG
name: kakaocloud-library-client
ports:
- containerPort: 80
env:
- name: SERVER_ENDPOINT
value: "http://server.kakaocloud-library.svc.cluster.local:8080"
imagePullSecrets:
- name: kc-tutorial-cr -
Create a deployment file for deploying the backend application.
./deployment-server.yamlapiVersion: apps/v1
kind: Deployment
metadata:
name: server
spec:
replicas: 2
revisionHistoryLimit: 3
selector:
matchLabels:
app: server
template:
metadata:
labels:
app: server
spec:
containers:
- image: SERVER_IMAGE:TAG
name: kakaocloud-library-server
ports:
- containerPort: 8080
env:
- name: PROFILE
value: "local"
- name: SERVER_PORT
value: "8080"
imagePullSecrets:
- name: kc-tutorial-cr
Step 3. Build and set up pipeline tools
-
Write down the Secret information to be used for running GitHub-Actions. Go to the cloned kakaocloud library repository page. Go to the Repo management page > Settings tab.

-
Go to Security > Secrets and variables > Actions menu. You can manage the environment variables and Secret information to be used in actions in that menu. Check the table below and add new Repository secrets information.
infoIt is safe to set only the permissions for the tasks required for security when generating GitHub's Personal Access Token (hereinafter referred to as PAT). If you are issuing a PAT for this tutorial, you will need access to a Private Git Repository. Create a PAT by setting up those permissions.
Name Secret PROJECT_NAME Project name in KakaoCloud console ACCESS_KEY Access key ACCESS_SECRET_KEY User security access key REPOSITORY_NAME Container repository name USERNAME GitHub user name EMAIL GitHub user email PAT GitHub's Personal Access Token -
Create a GitHub-Actions configuration file in the Git Repository named
kakaocloud-libraryin the user Git environment. Create a .github/workflows/action-client.yaml file in the Repo root path and copy and paste the contents below..github/workflows/action-client.yamlname: KakaoCloud-tutorial-client
run-name: kakaoCloud tutorial client workflow
on:
push:
paths:
- 'client/**'
jobs:
build-and-push-image:
runs-on: ubuntu-latest
steps:
- name: Set up Qemu
uses: docker/setup-qemu-action@v2
- name: Login KakaoCloud
uses: docker/login-action@v2
with:
registry: ${{ secrets.PROJECT_NAME }}.kr-central-2.kcr.dev
username: ${{ secrets.ACCESS_KEY }}
password: ${{ secrets.ACCESS_SECRET_KEY }}
- uses: actions/checkout@v3
- name: Build and Push
uses: docker/build-push-action@v4
with:
file: ./client/deploy/Dockerfile
context: ./client
push: true
tags: ${{ secrets.PROJECT_NAME }}.kr-central-2.kcr.dev/${{ secrets.REPOSITORY_NAME }}/kakaocloud-library-client:${{ github.sha }}
update-deployment-file:
runs-on: ubuntu-latest
needs: build-and-push-image
steps:
- name: Checkout deploy-manifests repository
uses: actions/checkout@v3
with:
repository: ${{ secrets.USERNAME }}/deploy-manifests
token: ${{ secrets.PAT }}
- name: Install yq
run: sudo snap install yq
- name: Update image in deployment file
run: |
yq e '.spec.template.spec.containers[0].image = "${{ secrets.PROJECT_NAME }}.kr-central-2.kcr.dev/${{ secrets.REPOSITORY_NAME }}/kakaocloud-library-client:${{ github.sha }}"' ./deployment-client.yaml -i
- name: Commit and Push changes
run: |
git config --global user.email "${{ secrets.EMAIL }}"
git config --global user.name "${{ secrets.USERNAME }}"
git add .
git commit -m "Update deployment-client.yaml"
git remote set-url origin https://${{ secrets.PAT }}@github.com/${{ secrets.USERNAME }}/deploy-manifests
git push --set-upstream origin HEAD -
Create a GitHub-Actions configuration file in the Git Repository named
kakaocloud-libraryin your Git environment. Create a .github/workflows/action-server.yaml file and copy and paste the contents below. The contents below are as follows..github/workflows/action-server.yamlname: KakaoCloud-tutorial-server
run-name: kakaoCloud tutorial server workflow
on:
push:
paths:
- 'server/**'
jobs:
build-and-push-image:
runs-on: ubuntu-latest
steps:
- name: Set up Qemu
uses: docker/setup-qemu-action@v2
- name: Login KakaoCloud
uses: docker/login-action@v2
with:
registry: ${{ secrets.PROJECT_NAME }}.kr-central-2.kcr.dev
username: ${{ secrets.ACCESS_KEY }}
password: ${{ secrets.ACCESS_SECRET_KEY }}
- uses: actions/checkout@v3
- name: Build and Push
uses: docker/build-push-action@v4
with:
file: ./server/deploy/Dockerfile
context: ./server
push: true
tags: ${{ secrets.PROJECT_NAME }}.kr-central-2.kcr.dev/${{ secrets.REPOSITORY_NAME }}/kakaocloud-library-server:${{ github.sha }}
update-deployment-file:
runs-on: ubuntu-latest
needs: build-and-push-image
steps:
- name: Checkout deploy-manifests repository
uses: actions/checkout@v3
with:
repository: ${{ secrets.USERNAME }}/deploy-manifests
token: ${{ secrets.PAT }}
- name: Install yq
run: sudo snap install yq
- name: Update image in deployment file
run: |
yq e '.spec.template.spec.containers[0].image = "${{ secrets.PROJECT_NAME }}.kr-central-2.kcr.dev/${{ secrets.REPOSITORY_NAME }}/kakaocloud-library-server:${{ github.sha }}"' ./deployment-server.yaml -i
- name: Commit and Push changes
run: |
git config --global user.email "${{ secrets.EMAIL }}"
git config --global user.name "${{ secrets.USERNAME }}"
git add .
git commit -m "Update deployment-server.yaml"
git remote set-url origin https://${{ secrets.PAT }}@github.com/${{ secrets.USERNAME }}/deploy-manifests
git push --set-upstream origin HEAD -
Trigger a Push event to the Repo and check the results. It may take some time to check the results.
- (Typical case of triggering an event) Create a README.md file in the
./serverand./clientdirectories to check the results and reflect it in the Repo.

- (Typical case of triggering an event) Create a README.md file in the
Check build result
-
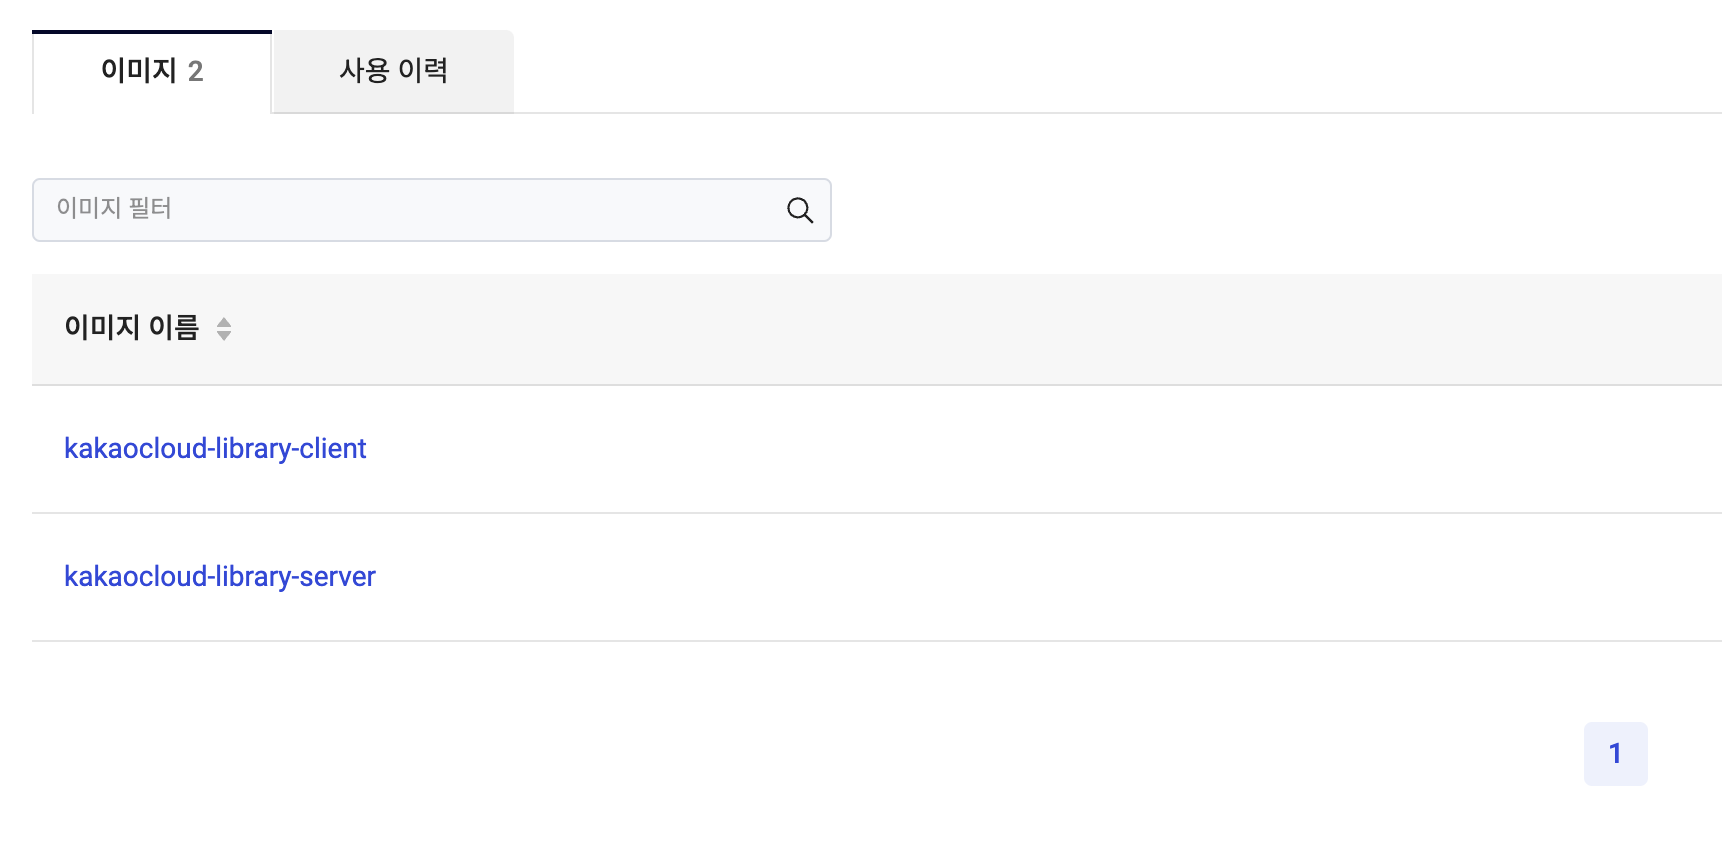
Check whether the image has been uploaded in the KakaoCloud console> Container Registry menu.
-
Check the added container image and tag information in the console.

Step 4. Add Container Registry Authentication Secret
-
Container Registry authentication information is required to use a private Container Registry in a Kubernetes cluster. Check the information below and add the Container Registry authentication information ‘kc-tutorial-cr’.
kubectl create namespace kakaocloud-library
kubectl create -n kakaocloud-library secret docker-registry kc-tutorial-cr \
--docker-server=${cloud project name}.kr-central-2.kcr.dev \
--docker-username=${access key ID} \
--docker-password=${secret access key} \
--docker-email=${user email}
Environment variables description cloud project name🖌︎ Enter the cloud project name access key ID🖌︎ Enter the access ID secret access key🖌︎ Enter the secret access key user email🖌︎ Enter the user's email
Step 5. Build ArgoCD
-
Install ArgoCD on your Kubernetes cluster.
kubectl create namespace argocd
kubectl apply -n argocd -f https://raw.githubusercontent.com/argoproj/argo-cd/release-2.8/manifests/install.yaml -
Deploy the ArgoCD project by entering the GitHub repository address and GitHub credentials.
cat <<EOF | kubectl apply -f -
apiVersion: v1
kind: Secret
metadata:
  name: private-repo
  namespace: argocd
  labels:
    argocd.argoproj.io/secret-type: repository
stringData:
  url: https://github.com/${GITHUB_USERNAME}/deploy-manifests
  username: ${GITHUB_USERNAME}
  password: ${GITHUB_PAT}

---

apiVersion: argoproj.io/v1alpha1
kind: Application
metadata:
  name: kakaocloud-library
  namespace: argocd
spec:
  project: default
  source:
    repoURL: https://github.com/${GITHUB_USERNAME}/deploy-manifests
    targetRevision: HEAD
    path: ./
  destination:
    server: https://kubernetes.default.svc
    namespace: kakaocloud-library
  syncPolicy:
    automated:
      prune: true
      selfHeal: true
      allowEmpty: false
    syncOptions:
      - CreateNamespace=true
EOF
Environment variables description GITHUB_USERNAME🖌︎ GitHub user name GITHUB_PAT🖌︎ Personal access token of Github
Step 6. Check the deployment results
-
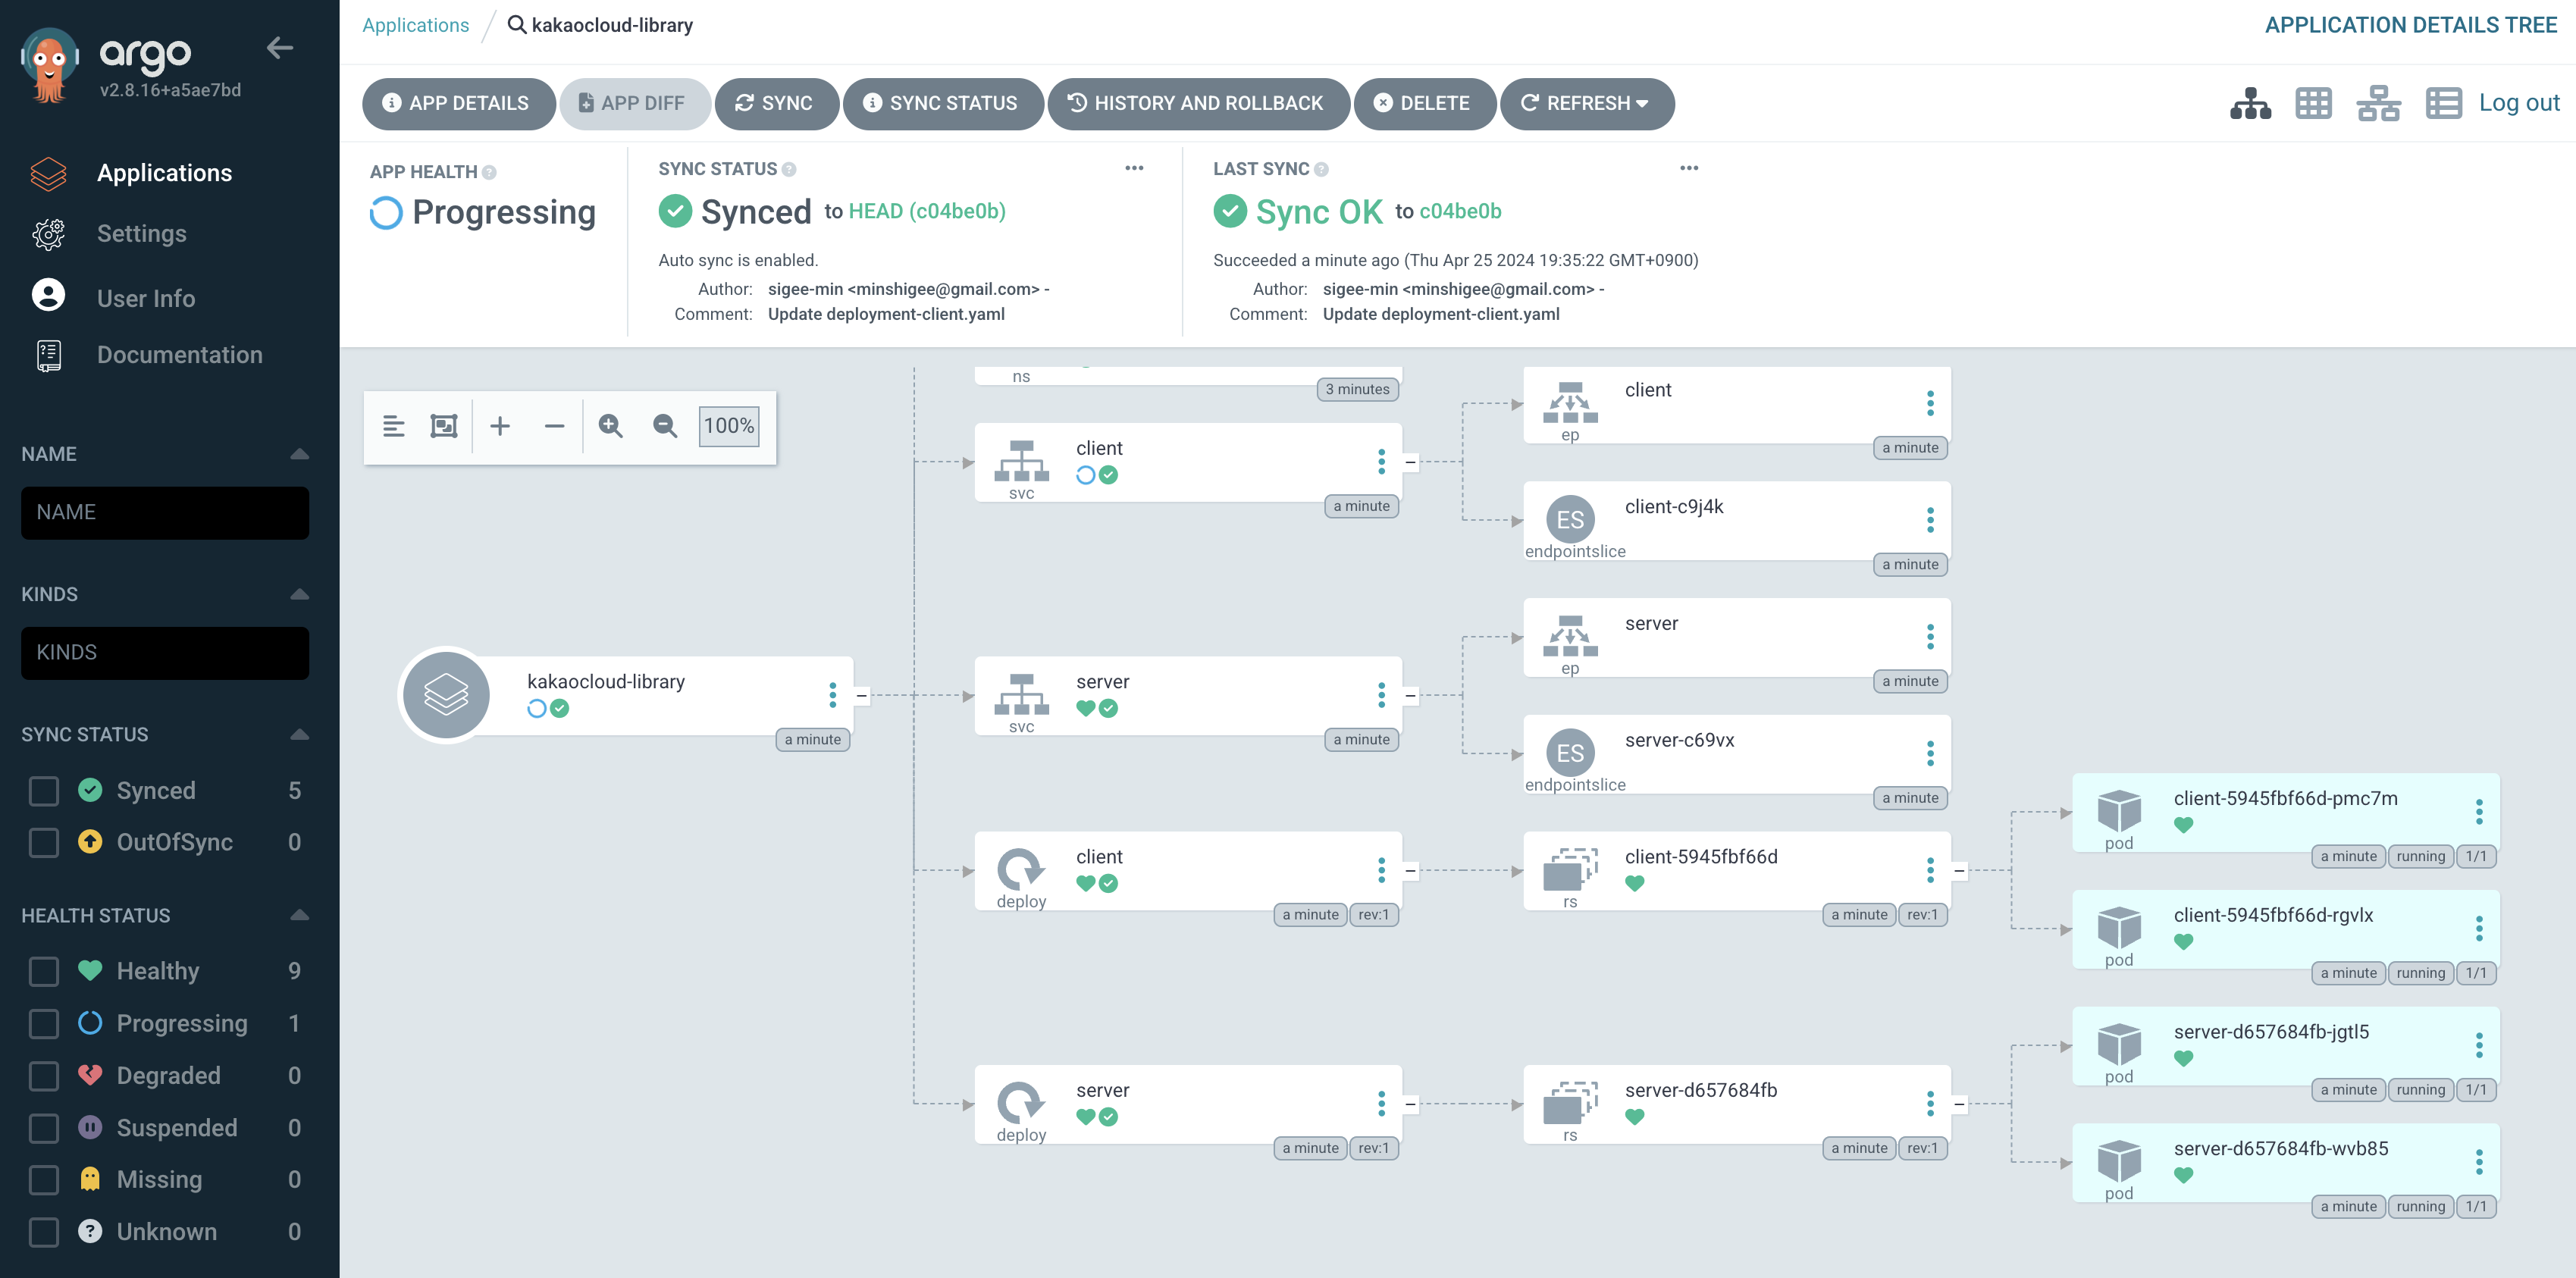
ArgoCD can check the deployed workload through the web management page. Port forwarding is performed to access the management page. Forward the user localhost 8080 port inbound to the port used to access the ArgoCD management page.
kubectl port-forward svc/argocd-server -n argocd 8080:443& -
Access localhost port 8080 in the browser.
open http://localhost:8080 -
ID and password are required for authentication. Enter the command below to check the password of the default administrator account.
kubectl -n argocd get secret argocd-initial-admin-secret -o jsonpath="{.data.password}" | base64 -d; echo- Administrator ID: admin
- Administrator password: (Output result)
-
Check the deployed workload through the ArgoCD web page.

-
Access the Load Balancer service in the KakaoCloud console. Assign a public IP to the created load balancer and access it with the created public IP to check the deployed service.