Manage object/file
This document describes how to manage objects and files within a bucket in the Object Storage service.
View object list
You can view the list of existing objects in a bucket along with their basic information.
-
Go to KakaoCloud console > Beyond Storage Service > Object Storage.
-
In the Standard bucket menu, select the bucket to view its object list.
-
In the Object tab, check the listed objects.
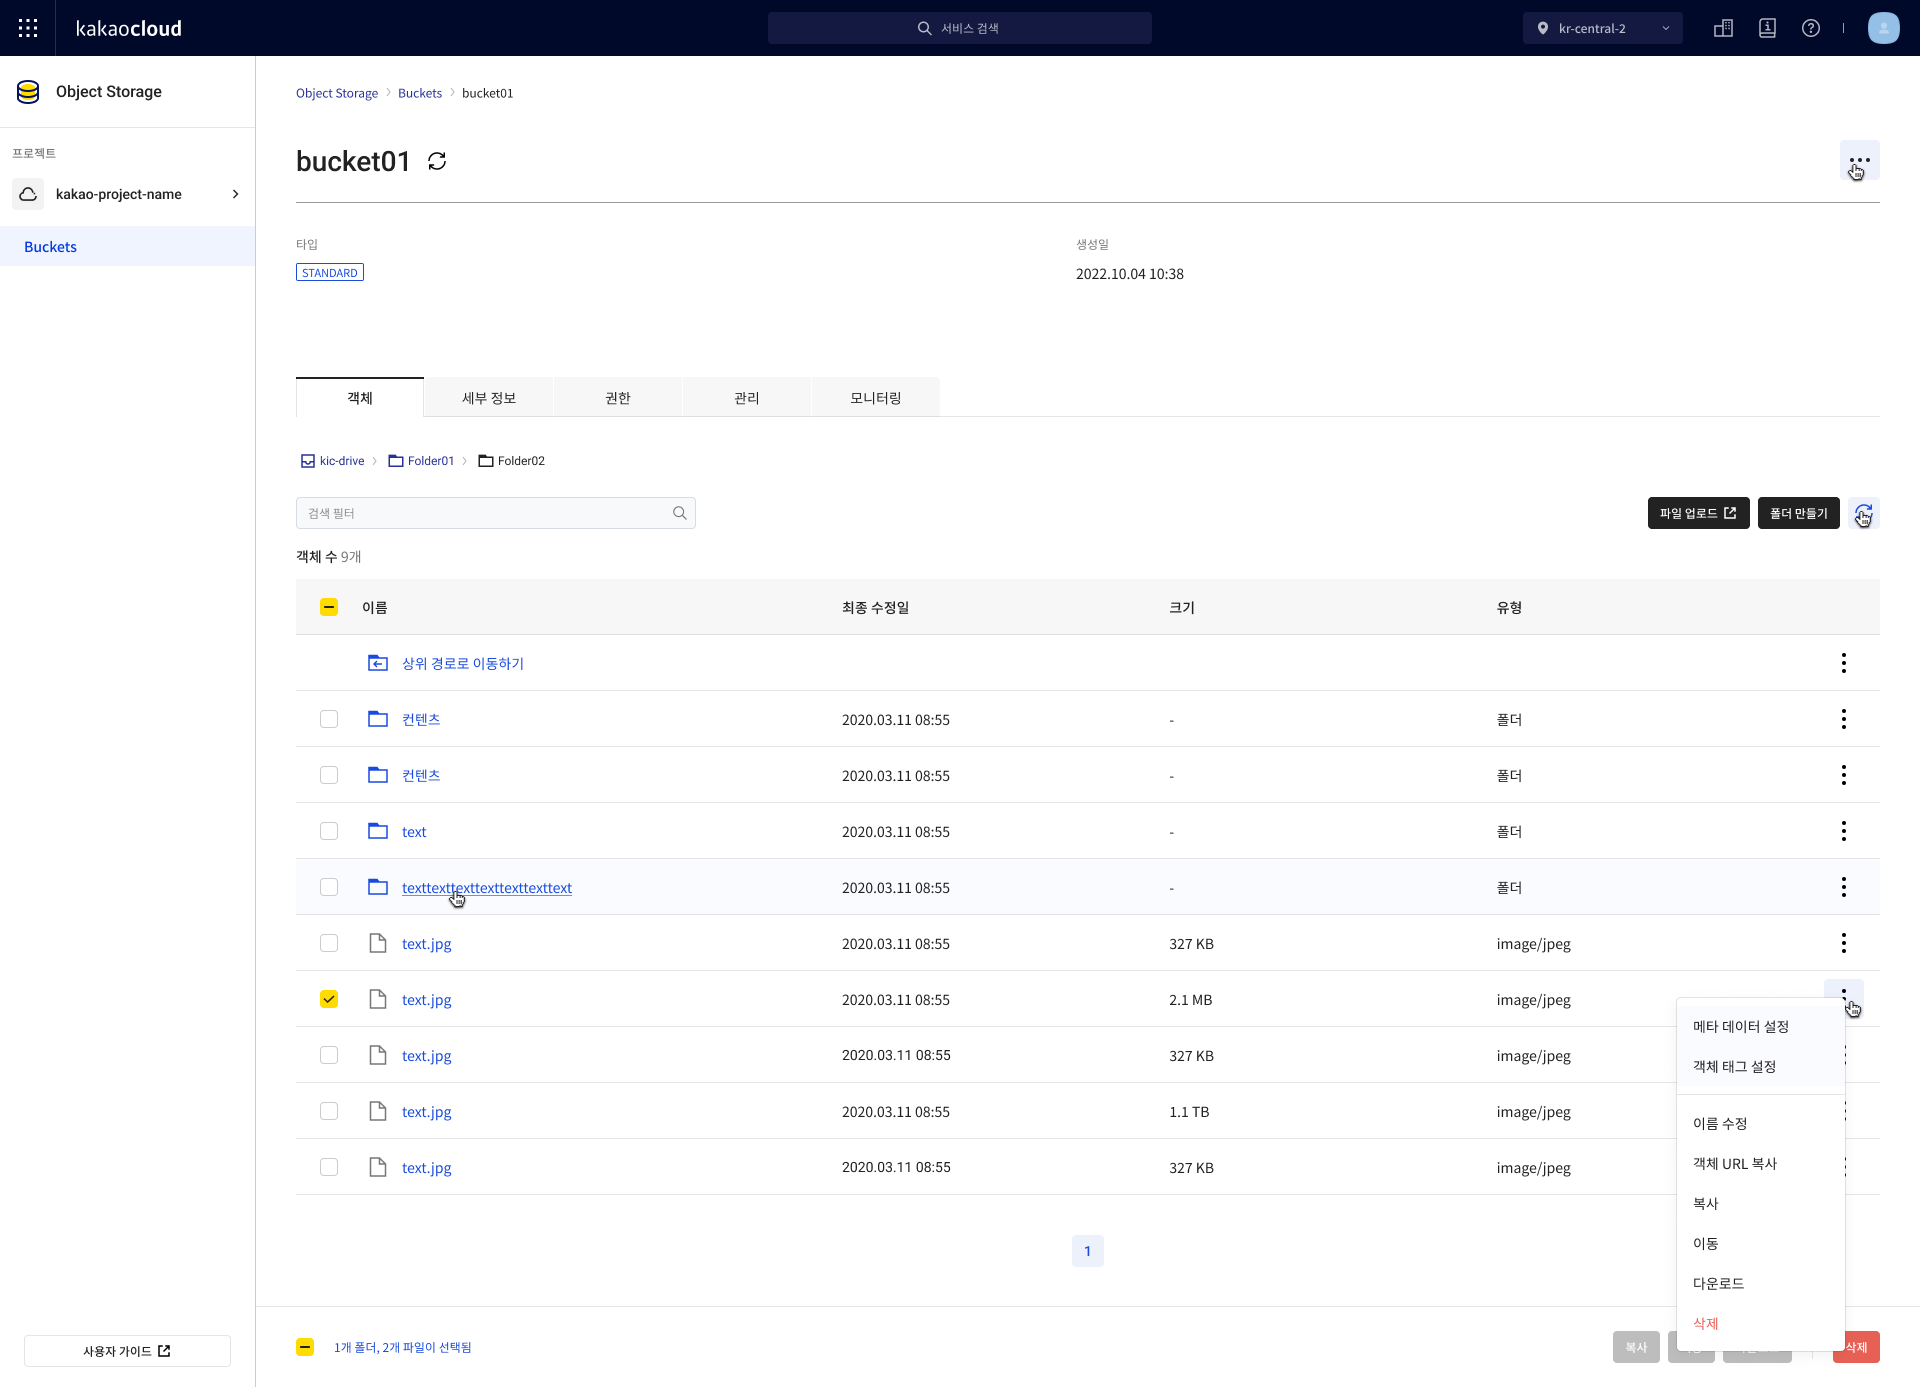
Field Description Name File name Last modified Timestamp of the last modification
- If the file is overwritten, this reflects the latest upload timeSize File size Type Object type [More] icon Set metadata: Add or remove metadata
Set object tag: Add or remove object tags
Rename: Change the file name
Object URL: Copy object URL to clipboard
Copy: Copy file
Move: Move file to another location
Download: Download file
Delete: Delete file
Search object
You can search for a specific object using filters based on object name or absolute path.
Only one filter can be applied at a time. The search filter persists across refresh, navigation, or back actions.
-
Go to KakaoCloud console > Beyond Storage Service > Object Storage.
-
Select the target bucket in the Standard bucket menu.
-
In the Object tab, use the Object filter to select either Object name or Absolute path, enter a prefix or path, and press Enter.
Field Description Absolute path Full path, independent of the user's current location Object name Name of the object to search
- All objects with the prefix will be returnedBack Navigate by user history, not folder hierarchy
Upload file
Files are stored in Object Storage in the form of objects (key-value structure) and included in buckets (containers for objects). To upload a file (object) to a bucket:
Create folder (optional)
If you want to organize files by folder, you can create a folder.
- Go to KakaoCloud console > Beyond Storage Service > Object Storage.
- Select the bucket in the Standard bucket menu.
- In the Object tab, select the [Create folder] button.
- In the Create folder popup, enter the information and select [Create].
Upload file
You can upload files to a bucket.
- Maximum number of files per upload: 1,000
- Maximum size per file: 50 GB
- Maximum number of simultaneous transfers: 5
- Files over 100MB are uploaded using SLO multipart upload
- Resume upload is not supported
Incomplete or corrupted uploads can only be deleted.
Multipart uploaded objects do not support rename, copy, or move.
-
Go to KakaoCloud console > Beyond Storage Service > Object Storage.
-
Select the bucket in the Standard bucket menu.
-
In the Object tab, select the [Upload file] button.
-
In the Upload file panel, select [Add file] or [Add folder], upload the object, and configure its settings.
-
After uploading and configuring the object, select [Upload] and check the result.
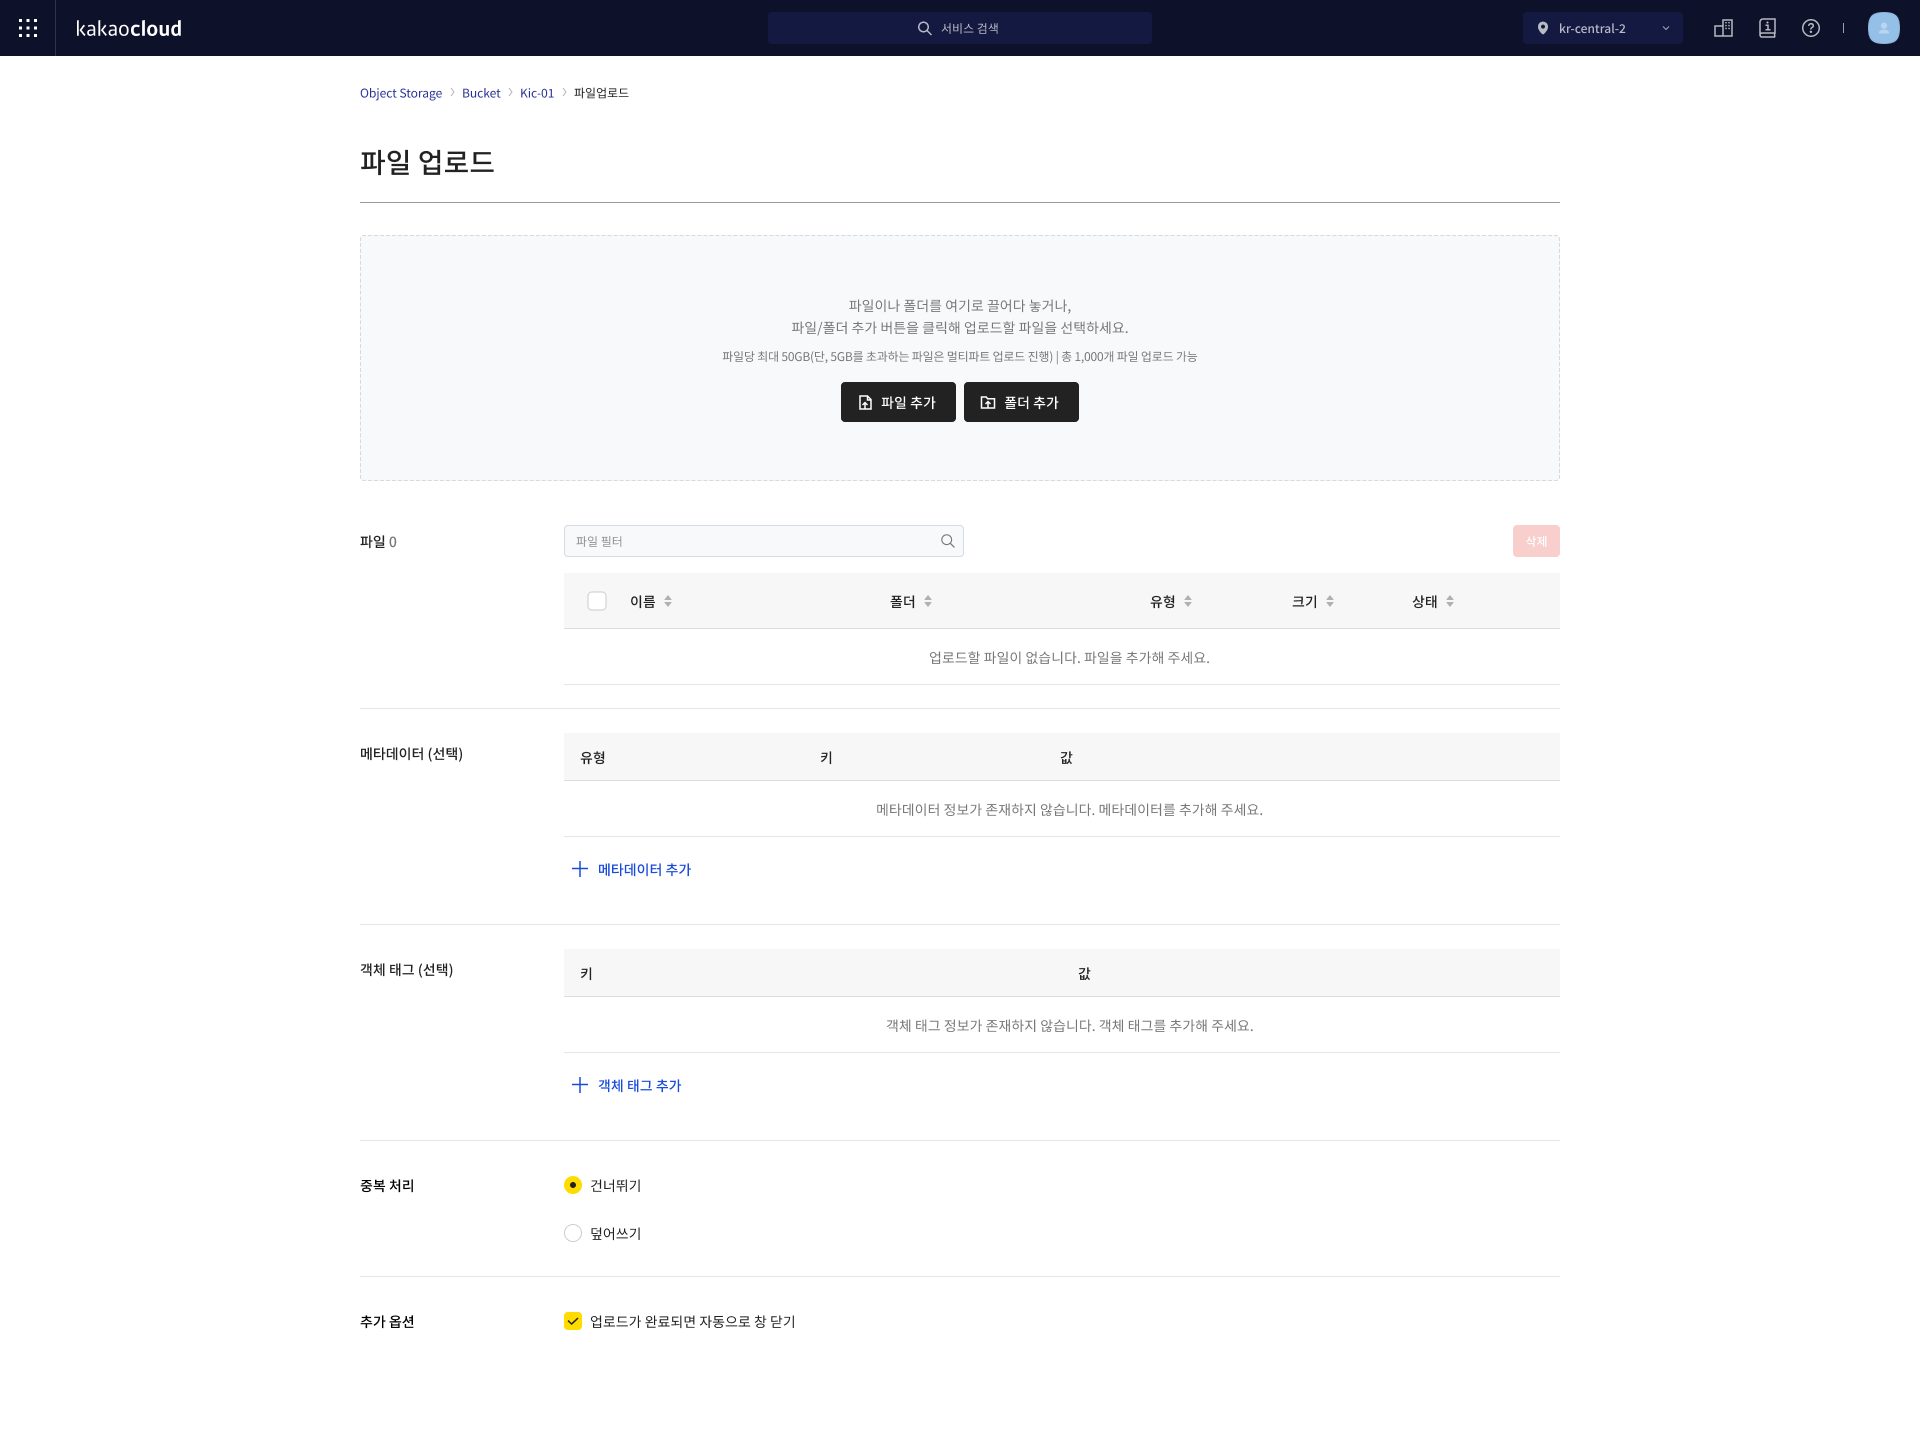
Field Description Note ① Add object [Add file] button Upload individual files [Add folder] button Upload a folder and all nested files ② Configure object File File list to upload Metadata (optional) Select [Add metadata] to set object metadata.
Refer to Set metadata
- Type: Define type
ㄴ System-defined: Informs system metadata
ㄴ User-defined: Use custom key-value pairs
- Key: Unique identifier
- Value: Value for the selected keyObject tag (optional) Key-value pair tags
- Key: Tag key
- Value: Tag valueOverwrite options Define behavior for duplicate objects
- Skip: Skip duplicates
- Overwrite: Replace duplicatesAdditional options Automatically close upload panel after upload
For objects over 100MB, tags cannot be added during upload. Please add tags after the upload is complete. (Set object tag)
More features
You can manage various object settings using the [More] icon.
- Go to KakaoCloud console > Beyond Storage Service > Object Storage.
- Select the bucket containing the object in the Standard bucket menu.
- In the Object tab, find the object and select the [More] icon to perform the following actions:
Set metadata
Metadata is categorized into system-defined (providing information to Object Storage) and user-defined (custom data used for classification or processing).
- In the Object tab, select the [More] icon for the object > Set metadata.
- Enter the type, key, and value, then select Save.
| Field | Description |
|---|---|
| Type | Select from system-defined or user-defined metadata types - System-defined: Automatically set when uploading, key cannot be edited - User-defined: Custom key-value pairs added by users |
| Key | Unique identifier If type is system-defined: - Content-Type: MIME type - Content-Disposition: Content display behavior - Content-Encoding: Encoding method - Cache-Control: Caching policy - Content-Language: Preferred language If type is user-defined: Key prefix varies by protocol: - X-Object-Meta-{key_name} for Swift- X-amz-Meta-{key_name} for S3 |
| Value | Value associated with the selected key |
| [Trash] icon | Delete this metadata item |
Set object tag
Tags help categorize objects. Each tag consists of a key-value pair, with a maximum of 10 unique tags per object.
- In the Object tab, select the [More] icon for the object > Set object tag.
- Enter the key and value, then select Save.
| Field | Description |
|---|---|
| Key | Unique key for categorization (no duplicates, max 10) |
| Value | Value for the selected key |
| [Trash] icon | Delete this tag |
Rename
- In the Object tab, select the [More] icon > Rename.
- Modify the object name and select Save.
Copy object URL
You can view the public URL for each file in a public bucket.
URL structure: https://{region-name}.kakaocloud.com/v1/{project-ID}/{bucket-name}/{object-key}
- Select the [More] icon > Copy object URL.
- The URL is copied to your clipboard.
Copy
You can copy objects to a different bucket or path.
- Select the [More] icon > Copy.
- Select the destination bucket and path, then select Copy.
Copy availability by encryption settings
| Source encryption | Destination encryption | Available |
|---|---|---|
| Enabled | Enabled | Yes |
| Enabled | Disabled | Yes |
| Disabled | Enabled | Yes |
| Disabled | Disabled | Yes |
Move
You can move objects to another bucket.
- Select the [More] icon > Move.
- Select the destination bucket and path, then select Move.
Move availability by encryption settings
| Source encryption | Destination encryption | Available |
|---|---|---|
| Enabled | Enabled | Yes |
| Enabled | Disabled | Yes |
| Disabled | Enabled | Yes |
| Disabled | Disabled | Yes |
Download
- Select the [More] icon > Download.
- The object will be downloaded via your browser.
Delete object
- Select the [More] icon > Delete.
- Confirm the objects and select [Delete].
Once deleted, objects cannot be recovered. Proceed with caution.
Check details of object
You can view detailed information of an object.
-
Go to KakaoCloud console > Beyond Storage Service > Object Storage.
-
Select the relevant bucket in the Standard bucket menu.
-
In the Object tab, select the object's link.
-
On the Object details page, review the information.
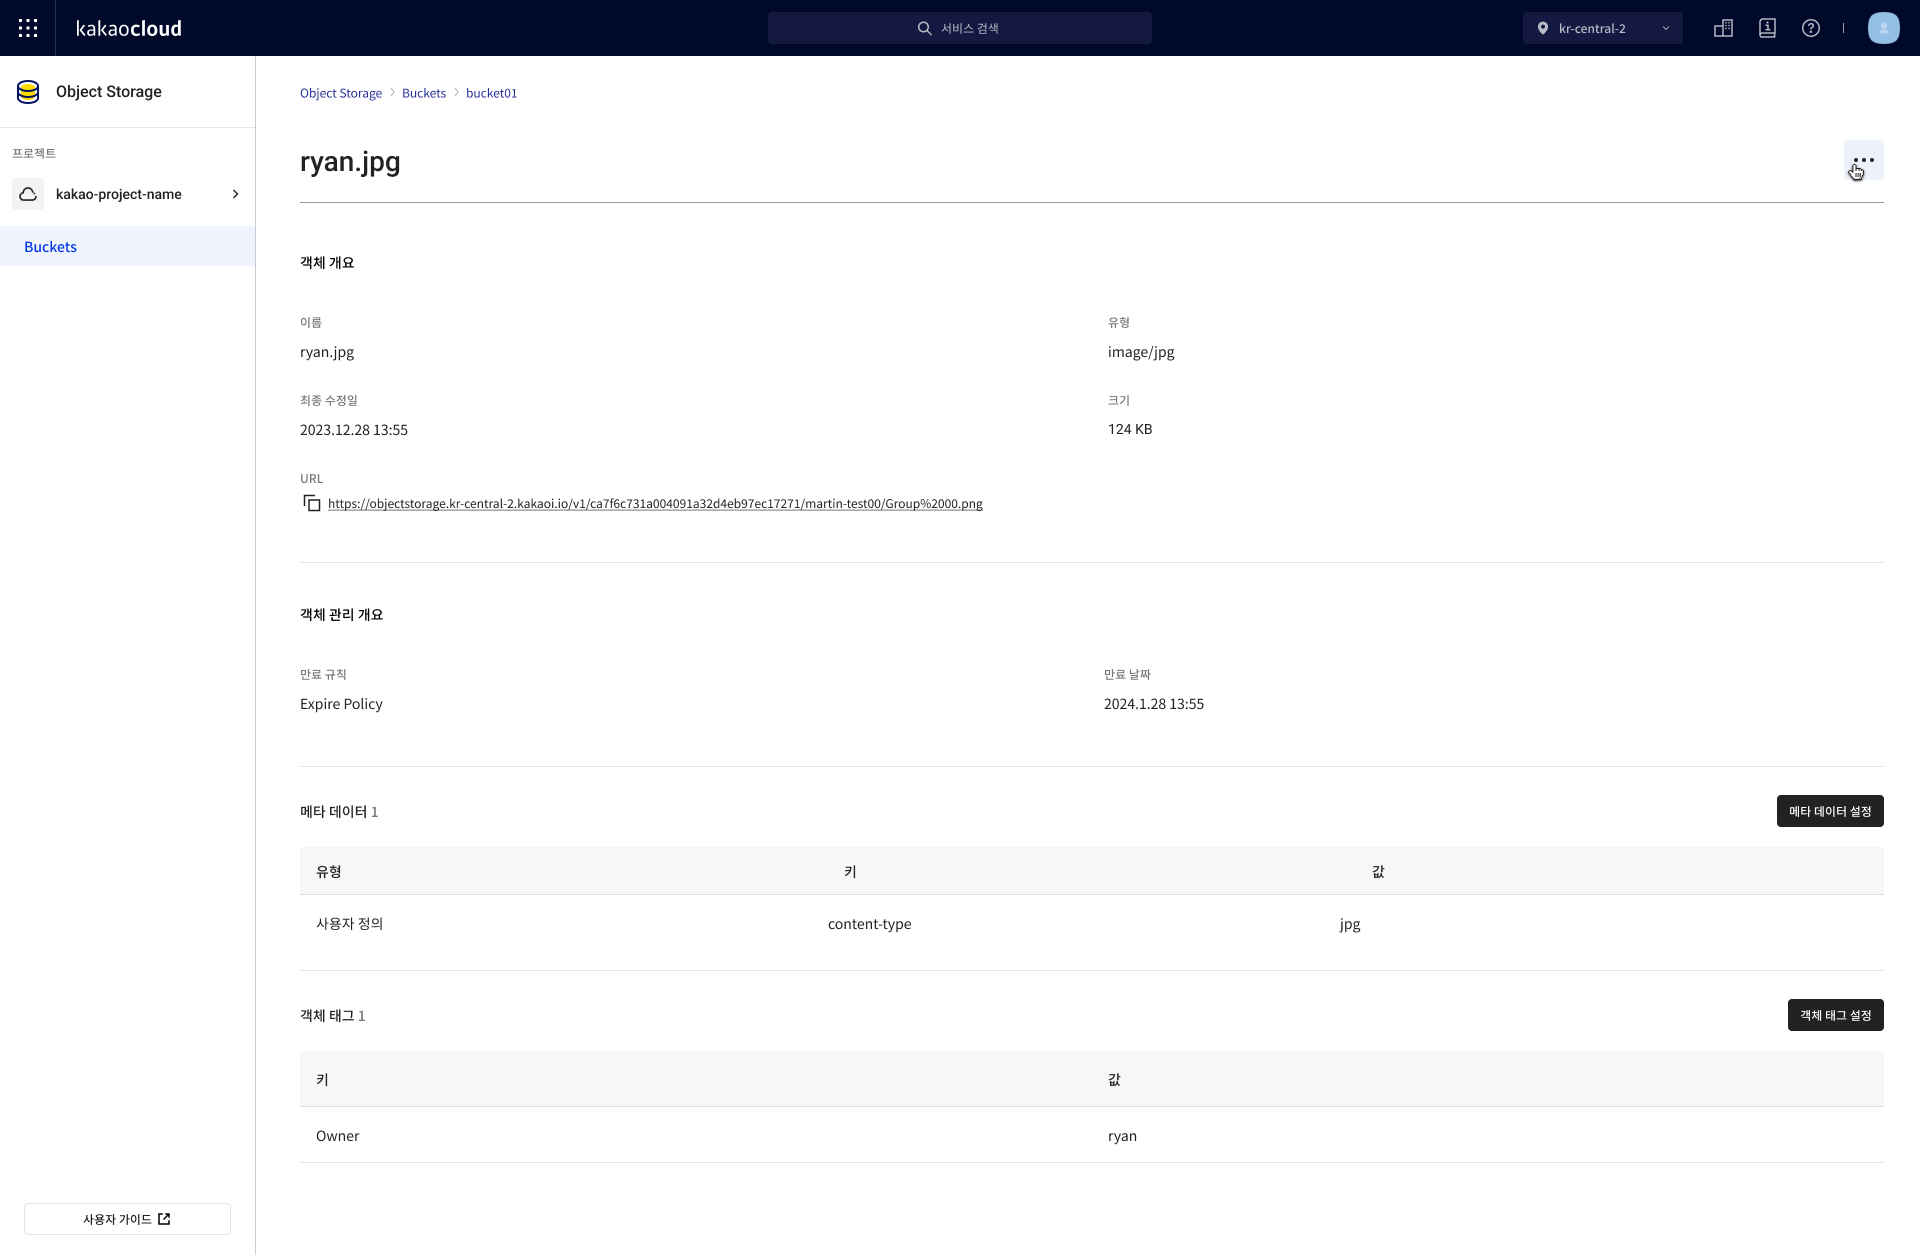
Section Field Description Object overview Name Object file name Type Object type Last modified Last modified timestamp Size Object size URL Object URL Management overview Expiry policy Lifecycle policy name Expiry date Object expiration date per lifecycle policy
- Deletion occurs sequentially after expiration. Delays may happen but the object will be eventually deleted.Metadata Metadata information of the object Object tags Tag information of the object