4. Build model pipeline
📈 This tutorial explains how to build an automated pipeline for the traffic prediction model.
- Estimated time: 60 minutes
- Recommended OS: MacOS, Ubuntu
About this scenario
In this tutorial, you will use Kubeflow Pipelines (KFP) to automate the entire machine learning pipeline workflow. It walks through how to organize and run the entire process — data loading → feature engineering → hyperparameter tuning → model evaluation and registration → serving update — as a single pipeline.
Key concepts of KFP
Kubeflow Pipelines (KFP) is a framework that allows you to define and automate machine learning workflows based on Docker containers. You can define pipelines using the Python SDK and execute them through the KFP backend.
| Term | Description |
|---|---|
| Pipeline | A unit that defines the entire ML workflow, consisting of multiple components |
| Component | A unit that performs a step in the workflow, such as preprocessing or model training |
| Experiment | A logical workspace where you can run the same pipeline multiple times with different settings |
| Run | A single execution instance of a pipeline within an experiment |
| Artifact | Output generated by each component after execution (e.g., model file, evaluation score, logs) |
For more detailed explanations, refer to the official Kubeflow documentation.
Getting started
⚠️ This tutorial assumes that you have completed the previous Traffic Prediction tutorials (Parts 1, 2, and 3).
Step 1. Design workflow
We will build a full machine learning workflow — from data collection to model serving — using Kubeflow Pipelines. However, in this tutorial, we assume that the model R&D has already been completed, so data analysis and model development steps are omitted.
Workflow steps covered in this tutorial
| Step | Task | Description |
|---|---|---|
| 1 | Data preprocessing | Aggregate raw data and save as CSV |
| 2 | Feature engineering | Use cyclic encoding for time and day-of-week information to generate input features |
| 3 | Hyperparameter tuning (with Katib) | Search for optimal model parameters using Katib |
| 4 | Model evaluation | Evaluate prediction accuracy (MAE) using the test set and store results |
| 5 | Model registration | Register the model file in Model Registry |
| 6 | Model deployment | Serve the model via InferenceService |
Set execution cycle
The current model is designed to predict traffic by time and day of the week. The pipeline execution cycle is set to one week. When the pipeline runs, it uses data from the last five weeks — with four weeks for training and one week for evaluation, based on the execution date.
- Pipeline execution date: May 6, 2025, 00:00
- Training + validation dataset: April 1–28, 2025 (4 weeks)
- Evaluation dataset: April 29–May 5, 2025 (1 week)
Step 2. Build pipeline
Use the Python SDK of Kubeflow Pipelines (KFP) to define and run the pipeline in a JupyterLab environment.
1. Environment setup
-
In your Jupyter Notebook, install the KFP SDK using the following command:
!pip install kfp==2.9.0 --quiet -
Download and upload the dataset for this tutorial:
- nlb-raw.txt
- Upload the file to the directory mounted as
dataset-pvc:/home/jovyan/dataset/
2. Define components
In KFP, components are written using decorators from the dsl package. Each component is defined as a function, and all required libraries must be imported inside the function.
Based on the stages designed earlier, define each component in the JupyterLab environment. Before creating the components, import the necessary modules and define the base image as shown below:
import kfp
from kfp import kubernetes
from kfp import dsl
from kfp.dsl import Output, Input, Dataset

LB_BASE_IMAGE="bigdata-150.kr-central-2.kcr.dev/kc-kubeflow/jupyter-scipy:v1.8.0.py311.1a"
-
Data preprocessing: Aggregate raw log data into 30-minute intervals and generate a structured dataset.
@dsl.component(base_image=LB_BASE_IMAGE)
def preprocessing(
    source_data: str,
    data_mnt_path: str,
    start_date: str,
    eval_date: str,
    raw_data: Output[Dataset]
):
    import json
    import pandas as pd
    import os

    # file path
    file_path = os.path.join(data_mnt_path, source_data)

    json_data = []
    # load nlb dataset
    with open(file_path) as f:
        for line in f:  # read each line of JSON text
            # load json data
            data = json.loads(line)  # convert JSON string to Python dict
            # append to raw_data
            json_data.append(data)

    raw_df = pd.json_normalize(json_data)  # convert key:value to tabular format (DataFrame)
    # floor time to 30-minute intervals
    log_time_sr = pd.to_datetime(raw_df['time'], format='%Y/%m/%d %H:%M:%S:%f').dt.floor('30min')

    # count logs per 30-minute interval, store as dictionary
    log_count_dict = log_time_sr.dt.floor('30min').value_counts(dropna=False).to_dict()

    # generate time range (30-minute frequency)
    time_range = pd.date_range(start=start_date, end=eval_date , freq='30min')

    # create DataFrame with time and log count
    df = pd.DataFrame({'datetime': time_range})
    df['count'] = df['datetime'].apply(lambda x: log_count_dict.get(x, 0))

df.to_csv(raw_data.path, index=False)- Assumes that the raw data is in a single file.
- Uses KFP’s
Outputobject to pass the path where the preprocessed data will be stored. - The output file is saved to
raw_data.pathand can be used by the next component.
-
Featurization: Encode time/day features using periodic functions to build the feature set.
@dsl.component(base_image=LB_BASE_IMAGE)
def featurization(
    data_version: str,
    eval_date: str,
    data_mnt_path: str,
    raw_data: Input[Dataset]
):
    import pandas as pd
    import numpy as np
    import os

    df = pd.read_csv(raw_data.path, parse_dates=['datetime'])

    time_sr = df['datetime'].apply(lambda x: x.hour * 2 + x.minute // 30)
    dow_sr = df['datetime'].dt.dayofweek

    dataset = pd.DataFrame()
    dataset['datetime'] = df['datetime']  # for convenience in later steps

    # time-based features
    dataset['x1'] = np.sin(2*np.pi*time_sr/48)
    dataset['x2'] = np.cos(2*np.pi*time_sr/48)
    # day-of-week features
    dataset['x3'] = np.sin(2*np.pi*dow_sr/7)
    dataset['x4'] = np.cos(2*np.pi*dow_sr/7)

    # target variable (label)
    dataset['y'] = df['count']

    train_df = dataset[dataset['datetime'] < eval_date]
    test_df = dataset[dataset['datetime'] >= eval_date]

    train_df.to_csv(os.path.join(data_mnt_path, f'nlb-{data_version}.csv'), index=False)
test_df.to_csv(os.path.join(data_mnt_path, f'nlb-{data_version}-test.csv'), index=False)- The transformed dataset is split into a training+validation set and a test set based on the evaluation date.
- Each set is saved as a file with the data version name under the mounted volume directory (configured in the pipeline).
-
Hyperparameter tuning (tuning_with_katib): Use Katib to search for optimal hyperparameters and train the model.
@dsl.component(base_image=LB_BASE_IMAGE, packages_to_install=['kubeflow-katib', 'scikit-learn==1.3.0'])
def tunning_with_katib(
    data_mnt_path: str,
    model_mnt_path: str,
    artifact_mnt_path: str,
    katib_exp_name: str,
    model_version: str,
    data_version: str
):
    import os
    import ast
    import joblib, json

    import pandas as pd
    from sklearn.ensemble import GradientBoostingRegressor

    import kubeflow.katib as katib

    katib_client = katib.KatibClient()

    katib_exp = katib_client.get_experiment(katib_exp_name)
    katib_exp.metadata.name += f'-d{data_version}'
    exp_name = katib_exp.metadata.name
    katib_exp.metadata.resource_version = None

    container_spec = katib_exp.spec.trial_template.trial_spec['spec']['template']['spec']['containers'][0]
    container_spec['args'].append('--data_version')
    container_spec['args'].append(data_version)

    katib_client.create_experiment(katib_exp)
    katib_client.wait_for_experiment_condition(name=exp_name)

    optim_params = katib_client.get_optimal_hyperparameters(exp_name)
    print(optim_params)

    params = {param.name: ast.literal_eval(param.value) for param in optim_params.parameter_assignments}

    df = pd.read_csv(os.path.join(data_mnt_path, f'nlb-{data_version}.csv'))
    print("read df")
    X = df[['x1', 'x2', 'x3', 'x4']]
    y = df['y']

    model = GradientBoostingRegressor(**params)
    model.fit(X, y)
    print("Model train")

    model_dir = os.path.join(model_mnt_path, model_version)
    os.makedirs(model_dir, exist_ok=True)
    joblib.dump(model, os.path.join(model_dir, 'model.joblib'))
    print("Dump to model")

    artifact_dir = os.path.join(artifact_mnt_path, model_version)
    os.makedirs(artifact_dir, exist_ok=True)
    with open(os.path.join(artifact_dir, 'param.json'), 'w') as f:
json.dump(params, f)- Hyperparameter tuning is not done directly inside the component, but through a Katib client that executes a pre-created AutoML experiment.
- The data version is added as an argument to the container spec before running the experiment.
- The model is trained using the training+validation dataset and the best hyperparameters from Katib.
- The trained model is saved to the model volume, and the parameter information is saved to the artifact volume.
-
Evaluate model (evaluate-model): Evaluate the model based on MAE using the test dataset
@dsl.component(base_image=LB_BASE_IMAGE, packages_to_install=['scikit-learn==1.3.0'])
def evaluate_model(
    data_mnt_path: str,
    model_mnt_path: str,
    artifact_mnt_path: str,
    model_version: str,
    data_version: str
):
    import os
    import joblib
    import json

    import pandas as pd
    from sklearn.metrics import mean_absolute_error

    df = pd.read_csv(os.path.join(data_mnt_path, f'nlb-{data_version}-test.csv'))
    X = df[['x1', 'x2', 'x3', 'x4']]
    real = df['y']

    model_dir = os.path.join(model_mnt_path, model_version)
    model = joblib.load(f'/{model_dir}/model.joblib')

    pred = model.predict(X)

    mae = mean_absolute_error(real, pred)
    # you can add more metrics (e.g. mse, r2, etc.)
    metrics = {'mae': mae}
    print(f"MAE: {mae}")

    artifacts_path = os.path.join(artifact_mnt_path, model_version)
    with open(os.path.join(artifacts_path, 'score.json'), 'w') as f:
json.dump(metrics, f)- The evaluation score (MAE) is saved to the artifact volume.
-
Register model (push_to_registry): Register the model file in the Model Registry
@dsl.component(base_image=LB_BASE_IMAGE, packages_to_install=['model-registry==0.2.7a1'])
def push_to_registry(
    model_registry_host: str,
    model_registry_port: int,
    mr_author: str,
    model_name: str,
    model_version: str,
    model_pvc: str
):
    from model_registry import ModelRegistry

    if not model_registry_host.startswith("http"):
        model_registry_host = f"http://{model_registry_host}"

    registry = ModelRegistry(
        server_address=model_registry_host,  # default: http://model-registry-service.kubeflow.svc.cluster.local
        port=model_registry_port,
        author=mr_author,
        is_secure=False
    )
    registry.register_model(
        model_name,
        f"pvc://{model_pvc}/{model_version}/model.joblib",
        model_format_name="joblib",
        model_format_version="1",
        version=model_version
)- The PVC path where the model was saved in the previous step is passed as a parameter for registration.
-
Model deployment (update_kserve): Create or update an InferenceService using KServe
@dsl.component(base_image=LB_BASE_IMAGE, packages_to_install=['model-registry==0.2.7a1', 'kserve==0.13.1'])
def update_kserve(
    model_registry_host: str,
    model_registry_port: int,
    mr_author: str,
    model_name: str,
    model_version: str
):
    from model_registry import ModelRegistry
    from kubernetes import client
    import kserve

    if not model_registry_host.startswith("http"):
        model_registry_host = f"http://{model_registry_host}"

    registry = ModelRegistry(
        server_address=model_registry_host, # default: http://model-registry-service.kubeflow.svc.cluster.local
        port=model_registry_port,
        author=mr_author,
        is_secure=False
    )

    model = registry.get_registered_model(model_name)
    print("Registered Model:", model, "with ID", model.id)

    version = registry.get_model_version(model_name, model_version)
    print("Model Version:", version, "with ID", version.id)

    art = registry.get_model_artifact(model_name, model_version)
    print("Model Artifact:", art, "with ID", art.id)

    isvc = kserve.V1beta1InferenceService(
        api_version=kserve.constants.KSERVE_GROUP + "/v1beta1",
        kind=kserve.constants.KSERVE_KIND,
        metadata=client.V1ObjectMeta(
            name=model_name,
            labels={
                "modelregistry/registered-model-id": model.id,
                "modelregistry/model-version-id": version.id,
            },
        ),
        spec=kserve.V1beta1InferenceServiceSpec(
            predictor=kserve.V1beta1PredictorSpec(
                sklearn=kserve.V1beta1SKLearnSpec(
                    args=[f'--model_name={model_name}'],
                    storage_uri=art.uri
                )
            )
        ),
    )
    ks_client = kserve.KServeClient()
    try:
        ks_client.get(model_name)
        ks_client.replace(model_name,isvc)
    except: # assumption: not found err
ks_client.create(isvc)- Retrieves model metadata from the registered model registry using the provided version information.
- Creates an InferenceService using the KServe SDK.
- If the service already exists, it replaces it with the newly trained model.
3. Define pipeline
Combine all components into a single pipeline definition. Use the after() method to specify the execution order between components, and mount the necessary PVCs to each component.
@dsl.pipeline(name="Load Prediction Model Pipeline")
def lb_model_pipeline(
    source_data: str,
    start_date: str,
    eval_date: str,
    dataset_pvc: str='dataset-pvc',
    # Use a fixed mount path instead of passing it as a variable, as shown below
    model_pvc: str='model-pvc',
    artifact_pvc: str='artifact-pvc',
    katib_exp_name: str='lb-gbr-tune',
    mr_host: str='model-registry-service.kubeflow.svc.cluster.local',
    mr_port: int=8080,
    mr_author: str='user',
    model_name: str='lb-predictor'
):
    # step1: Load dataset
    load_dataset_task = preprocessing(
        source_data=source_data,
        data_mnt_path='/dataset',
        start_date=start_date,
        eval_date=eval_date
    )
    kubernetes.mount_pvc(
        load_dataset_task,
        pvc_name=dataset_pvc,
        mount_path='/dataset'
    )

    # step2: Featurization
    featurization_task = featurization(
        data_version=start_date,
        eval_date=eval_date,
        data_mnt_path='/dataset',
        raw_data=load_dataset_task.outputs['raw_data']
    )
    featurization_task.after(load_dataset_task)

    kubernetes.mount_pvc(
        featurization_task,
        pvc_name=dataset_pvc,
        mount_path='/dataset'
    )

    # step3: Tunning
    tunning_model_task = tunning_with_katib(
        katib_exp_name=katib_exp_name,
        model_version=start_date,
        data_version=start_date,
        data_mnt_path='/dataset',
        model_mnt_path='/model',
        artifact_mnt_path='/artifact'
    )
    tunning_model_task.after(featurization_task)

    kubernetes.mount_pvc(
        tunning_model_task,
        pvc_name=dataset_pvc,
        mount_path='/dataset'
    )
    kubernetes.mount_pvc(
        tunning_model_task,
        pvc_name=model_pvc,
        mount_path='/model'
    )
    kubernetes.mount_pvc(
        tunning_model_task,
        pvc_name=artifact_pvc,
        mount_path='/artifact'
    )

    # step4: Evaluation
    evaluate_model_task = evaluate_model(
        model_version=start_date,
        data_version=start_date,
        data_mnt_path='/dataset',
        model_mnt_path='/model',
        artifact_mnt_path='/artifact'
    )
    evaluate_model_task.after(tunning_model_task)

    kubernetes.mount_pvc(
        evaluate_model_task,
        pvc_name=dataset_pvc,
        mount_path='/dataset'
    )
    kubernetes.mount_pvc(
        evaluate_model_task,
        pvc_name=model_pvc,
        mount_path='/model'
    )
    kubernetes.mount_pvc(
        evaluate_model_task,
        pvc_name=artifact_pvc,
        mount_path='/artifact'
    )

    # step5: Regist model
    regist_model_task = push_to_registry(
        model_name=model_name,
        model_version=start_date,
        model_pvc=model_pvc,
        model_registry_host=mr_host,
        model_registry_port=8080,
        mr_author=mr_author
    )
    regist_model_task.after(evaluate_model_task)

    kubernetes.mount_pvc(
        regist_model_task,
        pvc_name=artifact_pvc,
        mount_path='/artifact'
    )

    # step6: Update svc
    update_task = update_kserve(
        model_name=model_name,
        model_version=start_date,
        model_registry_host=mr_host,
        model_registry_port=mr_port,
        mr_author=mr_author,

    )
    update_task.after(regist_model_task)
- Define the pipeline using the
pipelinedecorator from thedslmodule. - Inside the function, create each component and define their dependencies using the
after()method. - For components that require PVCs, mount the PVCs created in the setup step.
4. Compile pipeline
Now run the predefined pipeline. Execute the code below to compile the pipeline into a YAML file.
The compiled YAML file can be uploaded via the KFP UI to create an Experiment and Run.
import kfp
kfp.compiler.Compiler().compile(lb_model_pipeline, "lb-pipeline.yaml")
Step 3. Run pipeline
In the Kubeflow dashboard, upload the compiled YAML file and create an Experiment and Run to execute the pipeline.
-
Access the Kubeflow dashboard and select the Pipelines menu on the left.
-
Click the [+ Upload pipeline] button, then click [Upload a file] to upload the compiled pipeline YAML file.
-
Select the Experiments (KFP) menu on the left.
-
Click the [+ Create experiment] button and enter a name to create a new experiment.
-
Select the Runs menu on the left.
-
Click the [+ Create run] button and specify the pipeline and experiment name configured in the previous steps.
Field Value source_data nlb-raw.txt start_date 2024-04-01 eval_date 2024-04-29 -
Click the [Start] button to run the pipeline.
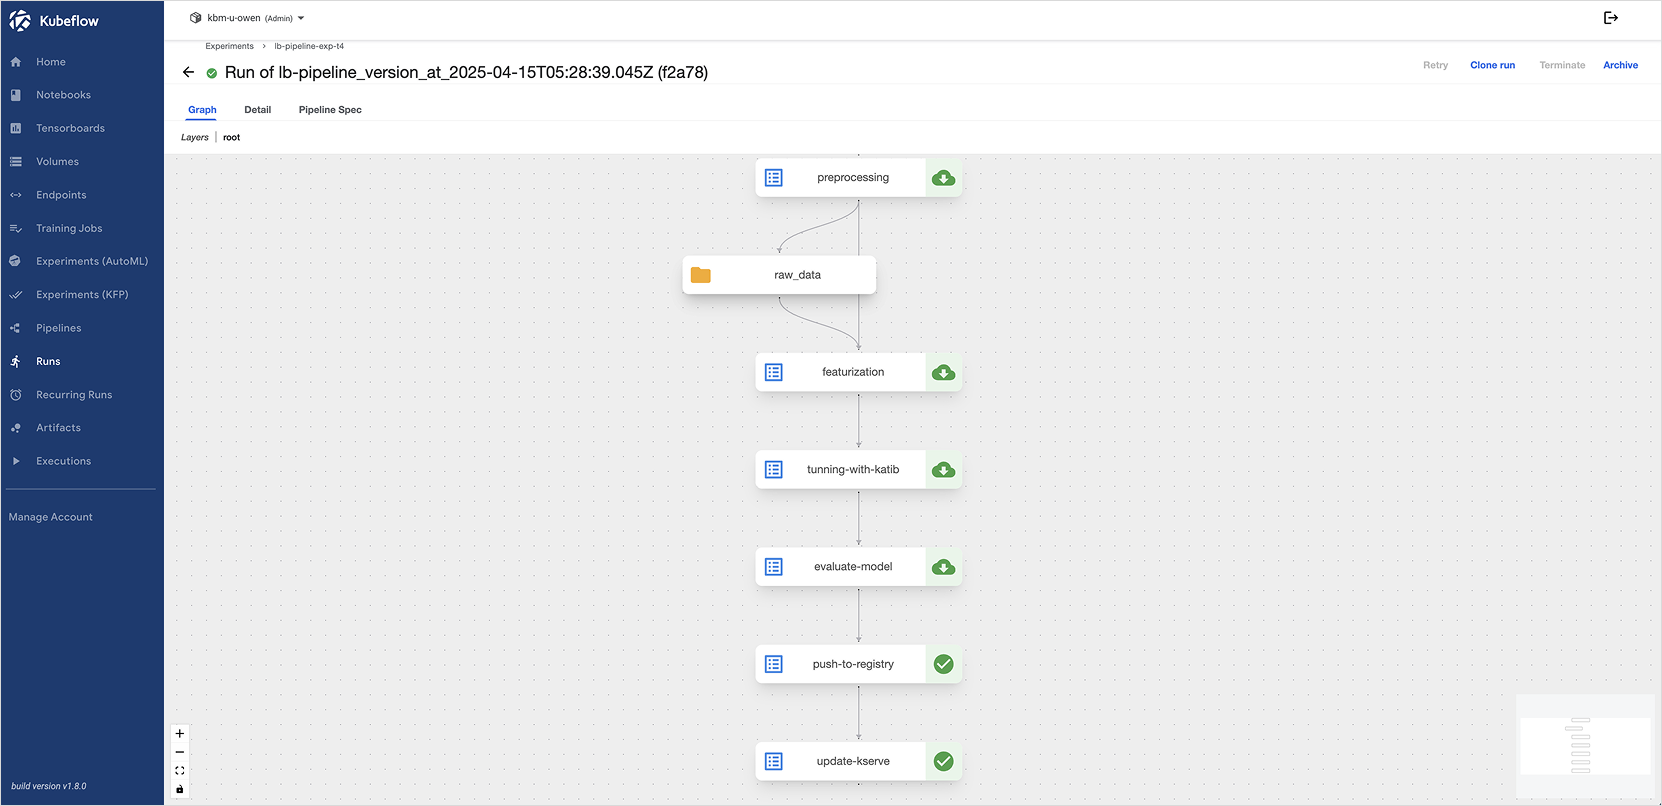
-
You can view the execution status, logs, and input/output results of each component on the Runs menu.