1. Kafka를 통한 메시지 처리
🗒️ Kafka 환경을 구축하여 메시지를 송수신하는 과정을 설명합니다.
- 예상 소요 시간: 30분
- 권장 운영 체제: Ubuntu
- IAM 권한: 프로젝트 관리자 역할 보유
시나리오 소개
카카오클라우드 Advanced Managed Kafka 서비스는 완전 관리형 Kafka 클러스터를 제공하여, 복잡한 브로커 관리나 인프라 운영 부담없이 안정적인 데이터 스트리밍 환경을 구축할 수 있습니다.
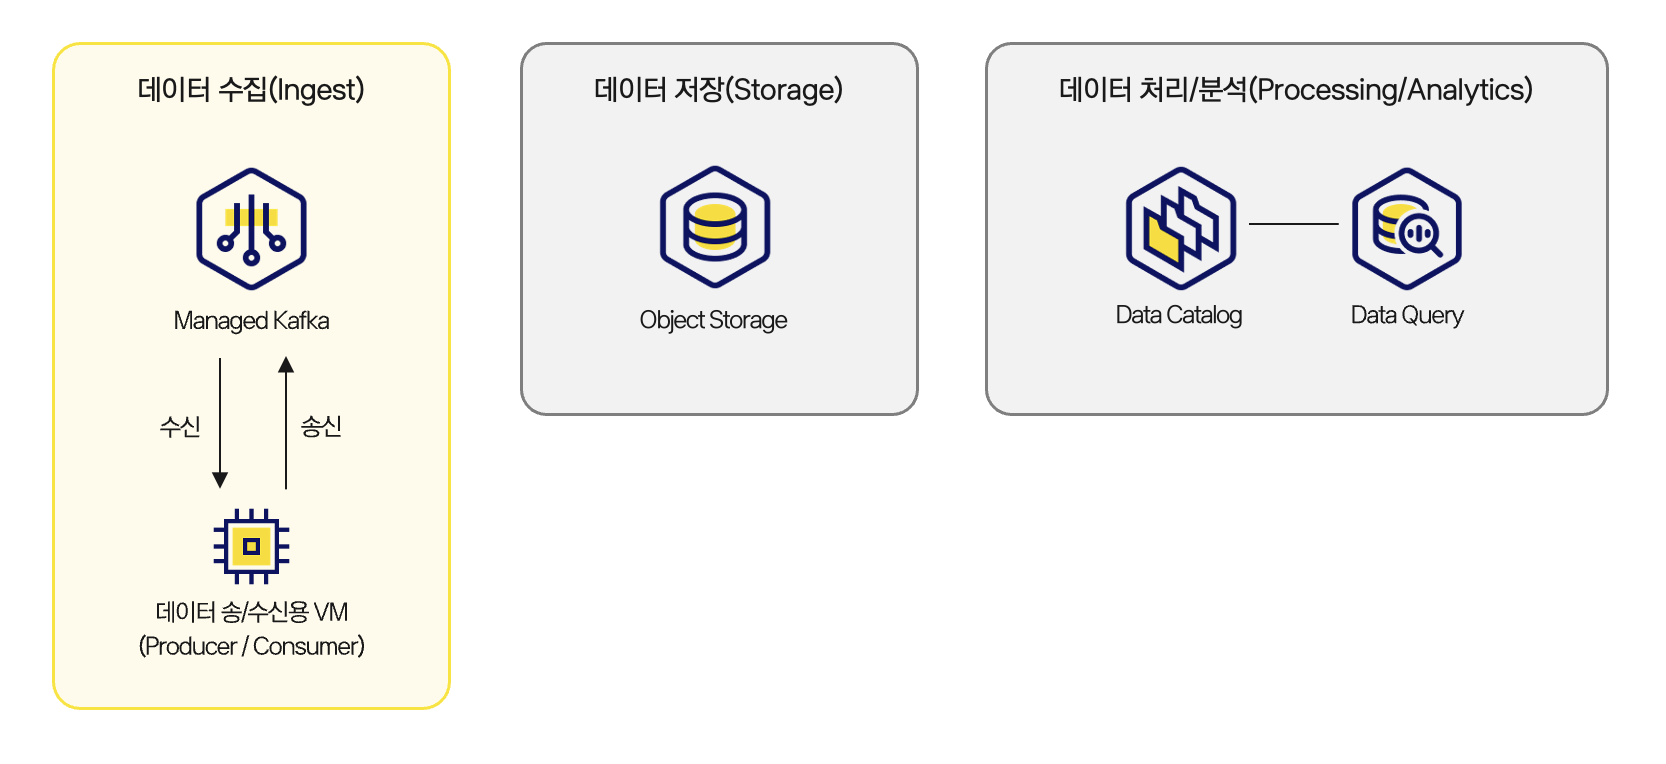
이 튜토리얼은 실시간 데이터 파이프라인의 시작점으로, Kafka 프로듀서와 컨슈머로 메시지를 송수신하며 실시간 데이터 수집(Ingest) 기반을 마련합니다. 이후 단계에서는 수신 데이터를 저장·분석하는 흐름으로 확장됩니다.
주요 내용은 아래와 같습니다.
- Advanced Managed Kafka 클러스터 생성 및 접속 환경 설정
- 토픽 생성 및 프로듀서/컨슈머를 활용한 메시지 송수신
 아키텍처
아키텍처
시작하기 전에
Advanced Managed Kafka를 생성하고 접근하기 위해 필요한 네트워크와 보안 그룹을 설정합니다.
1. 네트워크 구성
-
카카오클라우드 콘솔 > Beyond Networking Service > VPC 메뉴로 이동합니다.
-
우측의 [VPC 생성] 버튼을 클릭하여 새로운 VPC를 생성합니다.
VPC: tutorial-amk-vpc
- VPC 생성 정보를 아래와 같이 입력합니다.
구분 항목 입력값 VPC 정보 VPC 이름 tutorial-amk-vpc VPC IP CIDR 블록 10.0.0.0/16 Availability Zone 가용 영역 개수 2 첫 번째 AZ kr-central-2-a 두 번째 AZ kr-central-2-b 서브넷 설정 가용 영역당 퍼블릭 서브넷 개수 1 가용 영역당 프라이빗 서브넷 개수 0 kr-central-2-a 퍼블릭 서브넷 IPv4 CIDR 블록 10.0.0.0/20 kr-central-2-b 퍼블릭 서브넷 IPv4 CIDR 블록 10.0.16.0/20 -
하단의 [생성] 버튼을 클릭합니다.
안내이 튜토리얼에서는 두 개의 가용 영역에 퍼블릭 서브넷을 생성하지만, 실제 메시지 송수신 과정 실습에서는 kr-central-2-a 한 개의 가용 영역만 사용합니다. 운영 환경에서는 고가용성을 위해 다중 AZ 구성을 권장합니다.
2. 보안 그룹 설정
-
카카오클라우드 콘솔 > Beyond Networking Service > VPC 메뉴에서 보안 그룹을 선택합니다.
-
우측의 [보안 그룹 생성] 버튼을 클릭하여 새로운 보안 그룹을 생성합니다.
보안 그룹: tutorial-amk-sg
-
보안 그룹 이름과 설명을 아래와 같이 입력합니다.
이름 설명(선택) tutorial-amk-sg Kafka 클러스터 보안정책 -
하단의 [추가] 버튼을 클릭 후, 인바운드 규칙을 아래와 같이 설정하고 [생성] 버튼을 클릭합니다.
항목 설정값 비고 프로토콜 TCP 출발지 0.0.0.0/0 ⚠️ 전체 접근 허용 (실제 운영 환경에서는 제한 권장) 포트 번호 9092 Kafka 기본 포트값 정책 설명(선택) cluster inbound policy 1
보안 그룹: tutorial-vm-sg
-
보안 그룹 이름과 설명을 아래와 같이 입력합니다.
이름 설명(선택) tutorial-vm-sg Kafka용 VM 인스턴스 보안정책 -
하단의 [추가] 버튼을 클릭 후, 인바운드 조건을 아래와 같이 설정하고 [생성] 버튼을 클릭합니다.
나의 퍼블릭 IP 확인하기다음 버튼을 클릭하면 현재 사용 중인 나의 퍼블릭 IP를 확인할 수 있습니다.
항목 설정값 비고 프로토콜 TCP 출발지 {사용자 퍼블릭 IP}/32포트 번호 22 SSH 접근을 위한 포트 번호 정책 설명(선택) ssh inbound policy
-
3. Advanced Managed Kafka 클러스터 생성
Advanced Managed Kafka 클러스터를 생성합니다. 클러스터 생성 시 네트워크 및 보안 그룹 설정, 가용 영역 설정, 브로커 설정 등이 포함됩니다.
-
카카오클라우드 콘솔 > Analytics > Advanced Managed Kafka 메뉴로 이동합니다.
-
우측의 [클러스터 생성] 버튼을 클릭한 후, 다음과 같이 클러스터를 설정합니다.
기본 설정
항목 설정값 클러스터 이름 tutorial-amk-cluster Kafka 버전 3.7.1 포트 9092 인스턴스 유형
항목 설정값 인스턴스 유형 r2a.2xlarge 네트워크 설정
항목 설정값 비고 VPC tutorial-amk-vpc 사전 작업에서 생성한 VPC 서브넷 main (10.0.0.0/20) 사전 작업에서 생성한 서브넷 보안 그룹 tutorial-amk-sg 사전 작업에서 설정한 보안 그룹 브로커 구성 설정
항목 설정값 비고 지정된 가용 영역 수 1 네트워크 설정 시 선택한 서브넷의 가용 영역에 기반 브로커 수 1 - 가용 영역당 배포되는 브로커 수 볼륨 타입 / 크기 - 볼륨 타입: SSD
- 볼륨 크기: 50GB최대 IOPS 3000 - 볼륨 크기에 따라 최대 IOPS 자동 지정
- 볼륨 크기 50GB인 경우 최대 IOPS는 3000안내튜토리얼에서는 기본 설정값을 사용합니다. 운영 환경에서는 브로커 수, 볼륨 크기, IOPS를 워크로드에 맞게 조정하는 것을 권장합니다.
-
[생성] 버튼을 클릭합니다.
-
생성한 클러스터의 상태가
Starting→Creating→Active로 변경되는 것을 확인합니다.
-Active상태가 되기 전이라도 클러스터 상세 페이지의 브로커 탭에서 생성 진행 상황을 확인할 수 있습니다.
4. Kafka 부트스트랩 서버 접근용 VM 생성
Advanced Managed Kafka 클러스터를 생성했다면 Kafka 부트스트랩 서버에 접근하기 위한 VM을 생성합니다.
-
카카오클라우드 콘솔 > Virtual Machine 메뉴로 이동합니다.
-
우측의 [인스턴스 생성] 버튼을 클릭한 후, 다음과 같이 VM 인스턴스를 생성합니다.
구분 항목 설정값 비고 기본 정보 이름 tutorial-amk-vm 개수 1 이미지 기본 Ubuntu 24.04 인스턴스 유형 m2a.large 볼륨 루트 볼륨 10GB / SSD 키 페어 {USER_KEYPAIR}키 페어 생성 또는 사용한 키 페어를 선택 네트워크 VPC tutorial-amk-vpc 사전 작업에서 생성한 VPC 서브넷 main (10.0.0.0/20) 사전 작업에서 생성한 서브넷 유형 새 인터페이스 기본 설정 IP 할당 방식 자동 기본 설정 보안 그룹 tutorial-vm-sg 사전 작업에서 설정한 보안 그룹 주의- 키 페어는 최초 1회 생성하여 잘 저장해두세요. 잃어버린 키는 복구할 수 없습니다.
시작하기
본격적인 Kafka 사용 환경 구성 및 메시지 송수신을 위한 세부 작업을 진행합니다.
Step 1. VM 인스턴스 접근 설정
앞서 생성한 VM 인스턴스에 퍼블릭 IP를 부여한 뒤, 로컬 환경에서 SSH로 접속합니다.
 퍼블릭 IP 확인
-
카카오클라우드 콘솔 > Virtual Machine 메뉴로 이동합니다.
-
인스턴스 탭에서 위에서 생성했던
tutorial-amk-vm인스턴스 이름을 클릭합니다. -
우측의 [인스턴스 작업] 버튼을 클릭 후 [퍼블릭 IP 연결] 버튼을 클릭합니다.
-
퍼블릭 IP 연결 창에서 별도 수정 없이 [확인] 버튼을 클릭합니다.
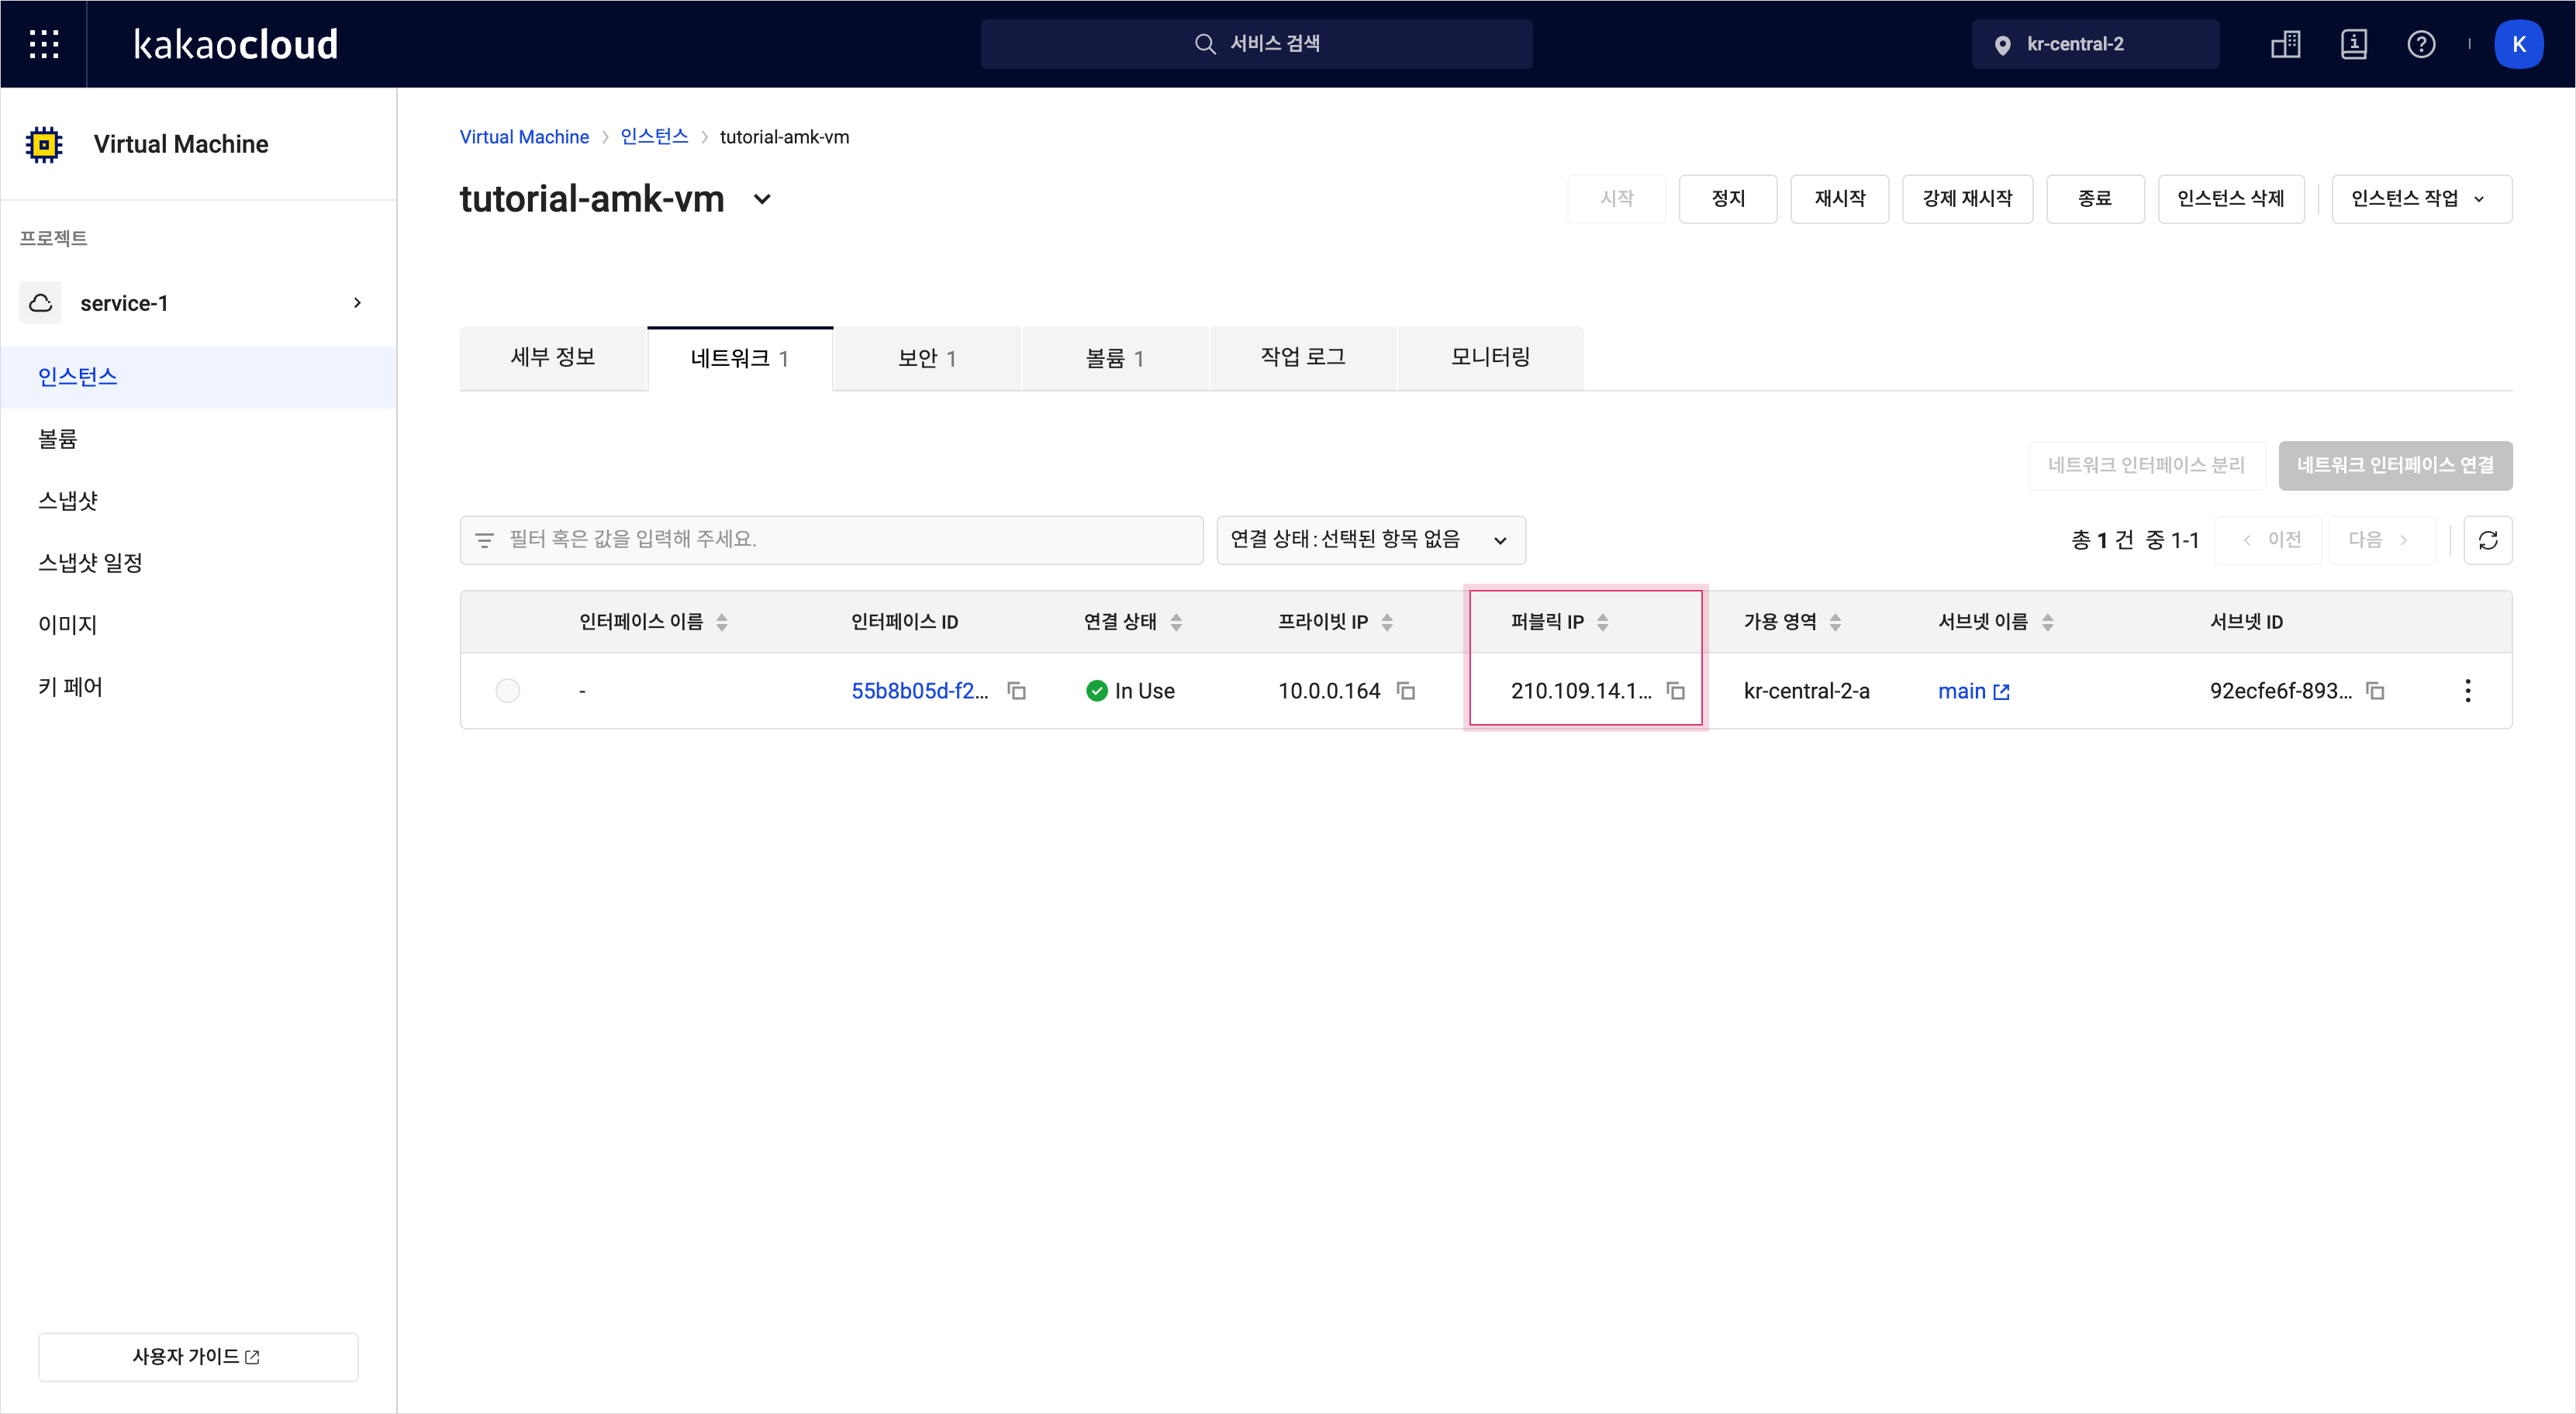
- 연결된 퍼블릭 IP는 인스턴스 목록 또는 인스턴스 이름을 클릭하여 이동한 인스턴스 상세 페이지의 네트워크 탭에서 확인할 수 있습니다.
-
로컬 환경에서 터미널 실행 후
cd명령어를 사용하여 키 페어 파일을 다운로드 받은 폴더로 이동합니다.- 키 파일을 최초 생성해서 사용했다면 기본적으로 다운로드 폴더에 저장됩니다.
cd ~/Downloads -
키 페어 읽기 권한을 부여하기 위해 다음 명령어를 실행하고 비밀번호를 입력합니다.
sudo chmod 400 ${PRIVATE_KEY}.pem환경변수 설명 PRIVATE_KEY🖌︎ 키 페어 파일명 -
SSH 접근을 위해 다음 명령어를 실행합니다.
ssh -i ${PRIVATE_KEY}.pem ubuntu@${TUTORIAL-AMK-VM_PUBLIC_IP}환경변수 설명 PRIVATE_KEY🖌︎ 키 페어 파일명 TUTORIAL-AMK-VM_PUBLIC_IP🖌︎ VM > 인스턴스 탭에서 생성해 둔 `tutorial-amk-vm` 인스턴스 클릭 후, 네트워크 탭에서 확인 가능 안내SSH를 이용한 인스턴스 접속이 정상적이지 않을 경우, 문제 해결 가이드를 통해 문제를 해결할 수 있습니다.
Step 2. Kafka 사용 환경 설정
접근한 VM 인스턴스에 Kafka를 사용할 수 있는 환경을 설정하는 작업을 진행합니다. 터미널에서 이어서 다음 명령어들을 실행합니다.
1. Java 설치 및 환경 변수 설정
Kafka 실행에는 JDK가 필요합니다. OpenJDK 21을 설치하고 환경 변수를 등록합니다.
sudo apt update
sudo apt install -y openjdk-21-jdk

cat << EOF | sudo tee -a /etc/profile
export JAVA_HOME=/usr/lib/jvm/java-21-openjdk-amd64
export PATH=\$JAVA_HOME/bin:\$PATH
export CLASSPATH=\$CLASSPATH:\$JAVA_HOME/lib/ext:\$JAVA_HOME/lib/tools.jar
EOF

source /etc/profile
2. Kafka 바이너리 패키지 다운로드 및 압축 해제
Apache 공식 사이트에서 Kafka 바이너리 패키지를 다운로드하고 압축을 해제합니다. 이 문서에서는 임의로 Kafka 3.7.1 버전을 설치합니다.
curl https://archive.apache.org/dist/kafka/3.7.1/kafka_2.13-3.7.1.tgz -o kafka_2.13-3.7.1.tgz
tar -xzf kafka_2.13-3.7.1.tgz
rm kafka_2.13-3.7.1.tgz
mv kafka_2.13-3.7.1 kafka
- Kafka 버전별 다운로드는 Apache Kafka 아카이브에서 확인할 수 있습니다.
- Kafka 바이너리 패키지 다운로드와 관련된 자세한 설명은 Apache Kafka Quickstart를 참고하세요.
- Advanced Managed Kafka가 지원하는 버전은 지원 중인 Apache Kafka 버전에서 확인하세요.
Step 3. 토픽 생성 및 조회
Kafka 설치가 완료되면 설치한 Kafka 폴더로 이동하여 토픽을 생성하고 조회할 수 있습니다.
-
터미널에서 이어서
cd명령어를 사용하여 Kafka 폴더로 이동합니다.cd kafka -
이동한 Kafka 폴더에서 토픽을 생성합니다.
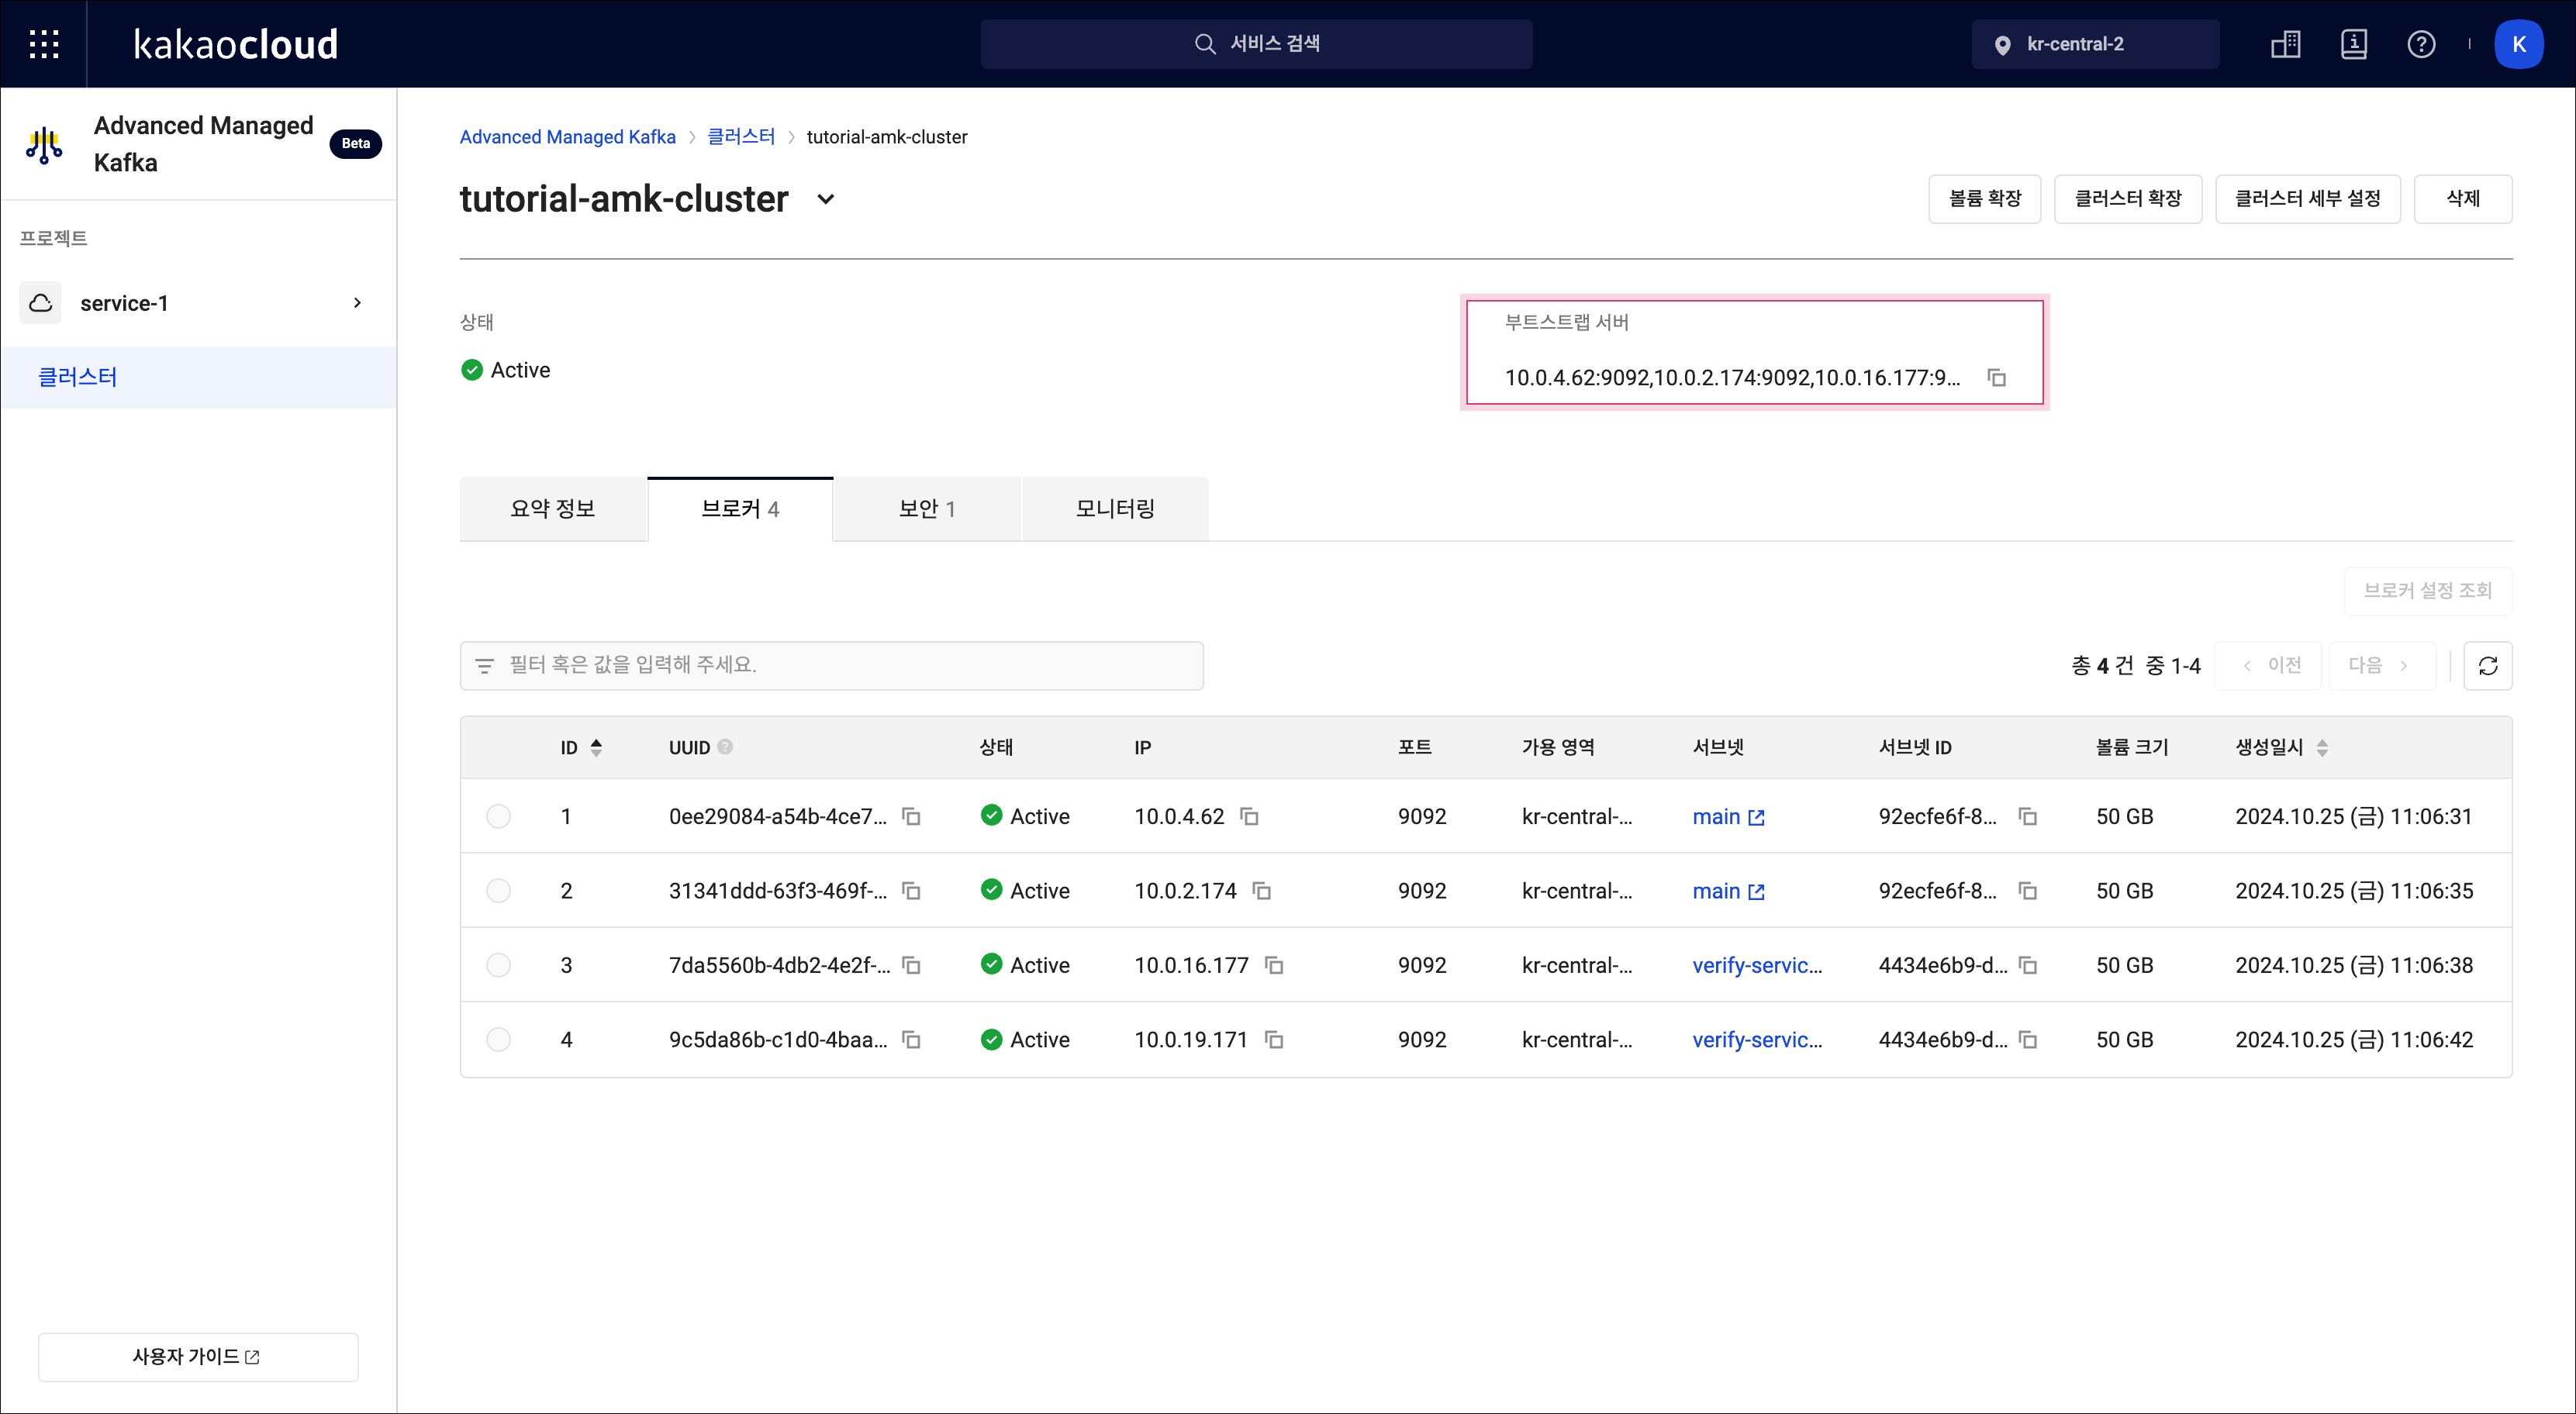
bin/kafka-topics.sh --create --topic ${TOPIC_NAME} --bootstrap-server ${HOST:PORT}환경변수 설명 TOPIC_NAME🖌︎ 토픽 이름 지정 / 예시: tutorial-topic HOST:PORT🖌︎ Advanced Managed Kafka > `tutorial-amk-cluster` 상세 페이지에서 부트스트랩 서버 정보 복사 가능  부트스트랩 서버 IP 확인
 -
토픽이 생성되었으면 토픽 상세 조회를 위해 아래 명령어를 실행합니다.
bin/kafka-topics.sh --describe --topic ${TOPIC_NAME} --bootstrap-server ${HOST:PORT}환경변수 설명 TOPIC_NAME🖌︎ 조회할 토픽 이름 / 예시: tutorial-topic HOST:PORT🖌︎ Advanced Managed Kafka > `tutorial-amk-cluster` 클상세 페이지에서 부트스트랩 서버 정보 복사 가능
Step 4. 프로듀서 클라이언트 실행
토픽을 생성했다면 프로듀서를 실행해 메시지를 전송합니다. 실행 결과로 >가 출력되었다면 다음 단계를 진행해 주세요.
bin/kafka-console-producer.sh --topic ${TOPIC_NAME} --bootstrap-server ${HOST:PORT}
| 환경변수 | 설명 |
|---|---|
| TOPIC_NAME🖌︎ | 프로듀서가 데이터를 송신할 토픽 이름 / 예시: tutorial-topic |
| HOST:PORT🖌︎ | Advanced Managed Kafka > `tutorial-amk-cluster` 상세 페이지에서 부트스트랩 서버 정보 복사 가능 |
Step 5. 컨슈머 클라이언트 실행
프로듀서와 컨슈머 간 메시지 송수신을 확인할 수 있도록 새로운 터미널에서 컨슈머 클라이언트를 실행합니다.
-
새 터미널 창을 열어
cd명령어를 사용하여 키 페어 파일을 다운로드 받은 폴더로 이동합니다.cd ~/Downloads -
SSH 접근을 위해 다음 명령어를 실행합니다.
ssh -i ${PRIVATE_KEY}.pem ubuntu@${TUTORIAL-AMK-VM_PUBLIC_IP}환경변수 설명 PRIVATE_KEY🖌︎ 키 페어 파일명 TUTORIAL-AMK-VM_PUBLIC_IP🖌︎ VM > `tutorial-amk-vm` 상세 페이지의 네트워크 탭에서 확인 가능 -
cd명령어를 사용하여 Kafka 폴더로 이동합니다.cd kafka -
컨슈머 클라이언트 실행합니다.
bin/kafka-console-consumer.sh --topic ${TOPIC_NAME} --bootstrap-server ${HOST:PORT}환경변수 설명 TOPIC_NAME🖌︎ 컨슈머가 데이터를 수신할 토픽 이름 / 예시: tutorial-topic HOST:PORT🖌︎ Advanced Managed Kafka > `tutorial-amk-cluster` 상세 페이지에서 부트스트랩 서버 정보 복사 가능
Step 6. 프로듀서와 컨슈머 간 메시지 송수신
-
프로듀서 클라이언트를 실행한 터미널에서
>뒤에 아래의 JSON 형식 메시지를 입력하고 실행합니다.hello world! -
컨슈머 클라이언트를 실행한 터미널에서
hello world!메시지가 수신된 것을 확인합니다.
마무리 및 다음 단계
이제 Kafka 클러스터를 생성하고, 토픽을 통해 메시지를 송수신하는 기본 환경을 완성했습니다. 다음 튜토리얼에서는 Kafka로 수집한 데이터를 Object Storage에 적재하여, 이후 메타데이터 관리와 분석으로 확장할 수 있는 기반을 마련합니다.
👉 Kafka 데이터의 Object Storage 적재 튜토리얼을 이어서 확인하세요.