Launch chat web service with KakaoCloud MemStore
This document introduces how to deploy a chat application in the cloud based on a 3-tier architecture.
- Estimated time: 60 minutes
- Recommended OS: MacOS, Ubuntu
- Prerequisites:
About this scenario
For use cases like chat or online gaming, where multiple users need to exchange messages simultaneously, persistent connections and real-time communication between the server and clients are essential. The HTTP protocol, commonly used for communication between browsers and servers, is stateless and allows the server to send data only upon a client request. To overcome this limitation, developers use Server-Sent Events (SSE) or WebSocket for direct communication from the server to the client. SSE is typically used for unidirectional messaging from the server to the client, whereas WebSocket is better suited for bidirectional communication. However, achieving real-time communication becomes challenging when clients are distributed across different servers.
To address this issue, the Pub/Sub pattern can be employed. Pub/Sub decouples message publishers from subscribers, enabling independent message delivery. By leveraging the Pub/Sub feature of KakaoCloud MemStore, multiple servers and clients can exchange messages in real time.
 Scenario architecture
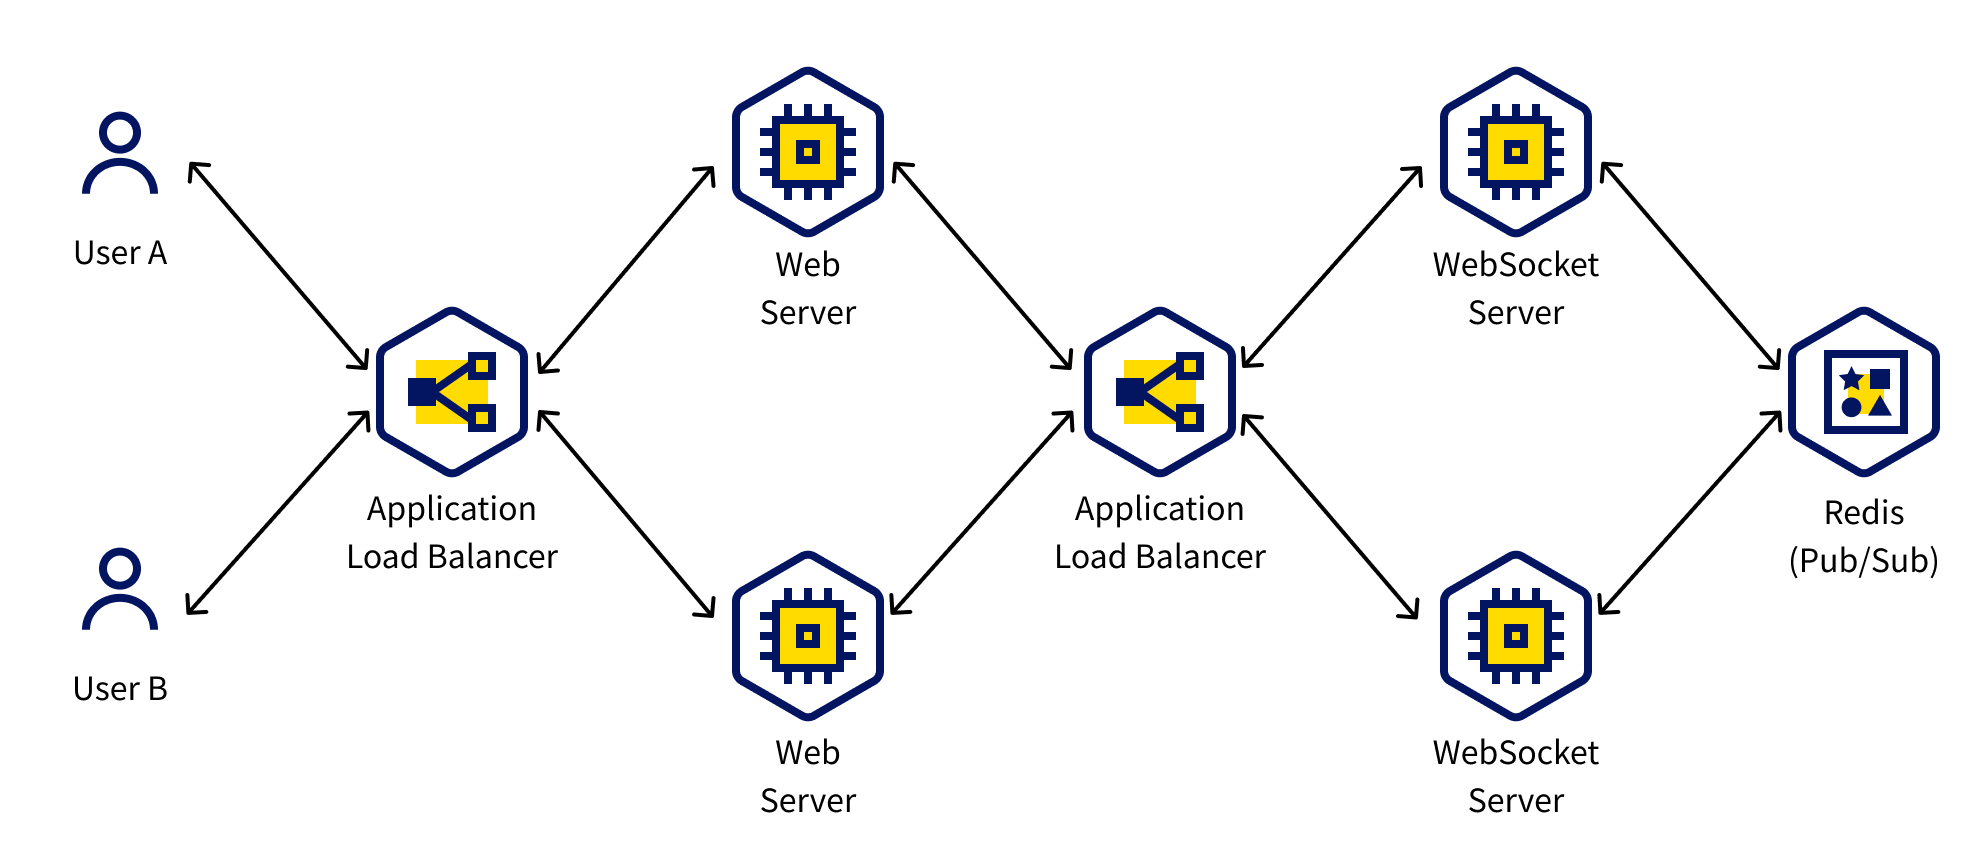
Operation scenario
- User A composes a message and sends it to the server through the application.
- The message is transmitted to the web server via the application load balancer.
- The load balancer uses the sticky session feature to route requests from the same client to the same web server.
- The web server forwards the message to the WebSocket server through the load balancer.
- The load balancer uses the sticky session feature to route requests from the same client to the same WebSocket server.
- The WebSocket server receives the message and publishes it to a specific channel in the MemStore Pub/Sub system.
- MemStore distributes the published message to all WebSocket servers subscribed to the channel.
- The WebSocket server that subscribed to the message sends it to User B, who receives the message in real time.
Before you start
In the prework stage, resources needed to configure the chat web service are created. First, a KakaoCloud network environment is set up to deploy the architecture. Next, we will configure the Web server instance and App server instance on the VM, along with a Bastion server instance—a middle server used to access servers located in a private network that cannot be accessed directly from outside for security reasons.
Set up network environment
Refer to the document Building network using NAT instances in multi-availability zones to build a network environment for the chat web service based on a 3-tier architecture. This document explains how to create a NAT instance to safely connect to the internet even in a private subnet.
Please follow the instructions in this document to configure the network environment required for practice.
1. Configure VPC and subnets
Before establishing a computing environment in KakaoCloud, it is necessary to configure the VPC and subnets. To do this, please refer to the document Building network using NAT instances in multi-availability zones to set up the network environment so that resources in the private subnet can communicate externally. The network settings required for the practice in this tutorial are based on the values specified in that document.
2. Configure security group
-
Go to KakaoCloud console > VPC > Security Group.
-
Select the [Create security group] button on the right to create a new security group. Refer to the details below to create the security group.
Security group: tutorial-bastion-sg
-
Enter the security group name and description as follows.
Name Description (Optional) tutorial-bastion-sg Security policy for Bastion host -
Select the [Add] button at the bottom, set the inbound rules as follows, and select the [Apply] button.
Check my public IPSelect the following button to check your current public IP.
Inbound policy to add Field Configuration value Bastion inbound policy 1 Protocol TCP Source {User Public IP}/32Port number 10000-10010 Policy Description (Optional) bastion inbound policy 1 Bastion inbound policy 2 Protocol TCP Source {User Public IP}/32Port number 81 Policy Description (Optional) bastion inbound policy 2 Bastion inbound policy 3 Protocol TCP Source {User Public IP}/32Port number 22 Policy Description (Optional) bastion inbound policy 3
Security group: tutorial-web-sg
-
Enter the security group name and description as follows.
Name Description (Optional) tutorial-web-sg Security policy for web server -
Select the [Add] button at the bottom, set the inbound rules as follows, and select the [Apply] button.
Inbound policy to add Field Configuration value web inbound policy Protocol TCP Source 10.0.0.0/20Port number 80 Policy Description (Optional) web inbound
Security group: tutorial-app-sg
-
Enter the security group name and description as follows.
Name Description (Optional) tutorial-app-sg Security policy for application server -
Select the [Add] button at the bottom, set the inbound rules as follows, and select the [Apply] button.
Inbound policy to add Field Configuration value App inbound policy Protocol TCP Source 10.0.32.0/20 Port number 8080 Policy description (Optional) app inbound
Security group: tutorial-redis-sg
-
Enter the security group name and description as follows.
Name Description (Optional) tutorial-redis-sg Security policy for Redis node -
Select the [Add] button at the bottom, set the inbound rules as follows, and select the [Apply] button.
Inbound policy to add Field Configuration value Redis inbound policy Protocol TCP Source 10.0.0.0/16 Port number 6379 Policy description (Optional) Redis inbound
-
3. Create Bastion instance
A bastion host acts as a gateway to cloud instances, enhancing security by blocking direct access. This facilitates efficient remote access and management of cloud instances while enabling seamless coordination of inter-tier communication.
The following explains how to create a bastion instance in a VM.
-
Go to KakaoCloud console > Beyond Compute Service > Virtual Machine.
-
In the Instance menu, select the [Create instance] button and create a VM instance as follows:
Category Field Configuration/Value Remarks Basic info Name tutorial-bastion Number 1 Image Ubuntu 20.04 Instance type m2a.large Volume Root Volume 20 Key pair {USER_KEYPAIR}⚠️ The key pair must be securely stored during initial creation.
Lost keys cannot be recovered and must be reissued.Network VPC tutorial Subnet main (10.0.0.0/20) Security Group tutorial-bastion-sg
4. Create Web instance
-
Go to the KakaoCloud console > Beyond Compute Service > Virtual Machine menu.
-
In the Instance menu, select the [Create instance] button and create a VM instance as follows:
caution- Key pair must be created once and stored safely. Lost keys cannot be recovered.
- Security group should be created with the default settings and later modified according to detailed requirements.
Category Field Configuration/Value Remarks Basic information Name tutorial-web Number 2 Image Ubuntu 20.04 Instance type m2a.large Volume Root Volume 20 Key pair {USER_KEYPAIR}Select the key pair created or used above Network VPC tutorial Subnet {VPC_ID}_sn_2 (10.0.16.0/20)Security Group tutorial-web-sg
5. Create App server instance
-
Go to the KakaoCloud console > Beyond Compute Service > Virtual Machine menu.
-
In the Instance menu, select the [Create instance] button and create a VM server instance as follows:
Category Field Configuration/Value Remarks Basic information Name tutorial-app Number 2 Image Ubuntu 20.04 Instance type m2a.large Volume Root Volume 20 Key pair {USER_KEYPAIR}Select the key pair created or used above Network VPC tutorial Subnet {VPC_ID}_sn_4 (10.0.48.0/20)Security Group tutorial-app-sg
Getting started
The detailed tasks for configuring the web service are as follows:
Step 1. Configure the Bastion host
The Bastion server acts as a gateway for accessing the Web and App servers, and it must be associated with a public IP for external access.
If a bad permissions error occurs due to key pair file permissions, you can resolve it by adding the sudo command.
-
In the Virtual Machine > Instance menu, select the previously created
Bastioninstance and select the [Associate public IP] button on the right.- The associated public IP can be confirmed in the Network tab.
-
Launch a terminal and use the
cdcommand to Go to the folder where the key pair file was downloaded.- If you created and used the key file initially, it will typically be saved in the Downloads folder. (
cd ~/Downloads)
- If you created and used the key file initially, it will typically be saved in the Downloads folder. (
-
Execute the following command to access the instance via SSH.
chmod 400 ${PRIVATE_KEY}.pem # Grant read permissions
ssh -i ${PRIVATE_KEY}.pem ubuntu@${BASTION_PUBLIC_IP}
Environment Variable Description PRIVATE_KEY🖌︎ key file name BASTION_PUBLIC_IP🖌︎ Virtual Machine > Instance menu > select the created `Bastion` instance > check Network tab -
To run Nginx Proxy Manager, first configure the Bastion host. Perform provisioning with the following command.
sudo curl -o /tmp/install-bastion.sh https://raw.githubusercontent.com/kakaoenterprise/kakaocloud-tutorials/bastion-host/install-bastion.sh
bash /tmp/install-bastion.sh
What is Nginx Proxy Manager (NPM)?Nginx Proxy Manager (NPM) is an open-source project that helps you easily set up and manage web servers based on Nginx. This tool allows users to effectively configure web servers and manage multiple domains.
-
Open a browser on your local environment and access the management page by entering the following address:
http://${BASTION_PUBLIC_IP}:81/login
- Username:
admin@example.com - Password:
changeme
Field Description {BASTION_PUBLIC_IP}Select the Bastioninstance created in the Virtual Machine > Instance menu, then check the Network tab for the public IP -
Go to Dashboard > Streams.
-
Enter the following information for each Web and App host:
Name Field Value tutorial-web-1 Incoming Port 10000 Forward Host The private IP of the tutorial-web-1instance
- In Virtual Machine > Instance > Network, selecttutorial-web-1to check the private IP.Forward Port 22 tutorial-web-2 Incoming Port 10001 Forward Host The private IP of the tutorial-web-2instance
- In Virtual Machine > Instance > Network, selecttutorial-web-2to check the private IP.Forward Port 22 tutorial-app-1 Incoming Port 10002 Forward Host The private IP of the tutorial-app-1instance
- In Virtual Machine > Instance > Network, selecttutorial-app-1to check the private IP.Forward Port 22 tutorial-app-2 Incoming Port 10003 Forward Host The private IP of the tutorial-app-2instance
- In Virtual Machine > Instance > Network, selecttutorial-app-2to check the private IP.Forward Port 22 -
Traffic to internal hosts is routed through the Bastion. To allow the Web and App hosts to receive traffic forwarded by the Bastion, configure the security groups as follows:
Web instance
-
Go to the Virtual Machine > Instance menu and select on the
Webinstance you created. -
In the Security tab, select on the hyperlink tutorial-web-sg↗️ and select Manage inbound policies.
-
Select the [Add] button and configure the inbound policy as follows, then select the [Apply] button.
cautionMake sure to select the [Apply] button to save the changes.
Category Field Value Web Protocol TCP Source {BASTION_PRIVATE_IP}/32
- Check the Network tab after selecting theBastioninstance in the Virtual Machine > Instance menuPort Number 22 Policy Description (Optional) Web inbound policy
App instance
-
Go to the Virtual Machine > Instance menu and select on the
Appinstance you created. -
In the Security tab, select on the hyperlink tutorial-app-sg↗️ and select Manage inbound rule.
-
Select the [Add] button and configure the inbound policy as follows, then select the [Apply] button.
cautionMake sure to select the [Apply] button; otherwise, the changes will not be saved.
Category Field Value App Protocol TCP Source {BASTION_PRIVATE_IP}/32
- Check the Network tab after selecting theBastioninstance in the Virtual Machine > Instance menuPort Number 22 Policy Description (Optional) App inbound policy
-
-
To verify access to each host from your local environment, connect to each host using the appropriate port based on the previously configured forwarding information. Navigate to the folder containing the key pair file, and run the following command:
# tutorial-web-1
ssh -i ${PRIVATE_KEY}.pem ubuntu@${BASTION_PUBLIC_IP} -p 10000

# tutorial-web-2
ssh -i ${PRIVATE_KEY}.pem ubuntu@${BASTION_PUBLIC_IP} -p 10001

# tutorial-app-1
ssh -i ${PRIVATE_KEY}.pem ubuntu@${BASTION_PUBLIC_IP} -p 10002

# tutorial-app-2
ssh -i ${PRIVATE_KEY}.pem ubuntu@${BASTION_PUBLIC_IP} -p 10003
Environment Variable Description PRIVATE_KEY🖌︎ key_file_name BASTION_PUBLIC_IP🖌︎ bastion_public_ip
Step 2. Create managed MySQL database
KakaoCloud's MySQL is a fully managed database service offered within a VPC environment. This service allows you to easily provision a MySQL instance through the console without a complex installation process and use it securely within a logically isolated network.
-
Go to KakaoCloud console > Data Store > MySQL.
-
In the Instance Group menu, select the [Create instance group] button and create an instance group using the following settings as a reference:
Category Field Configuration/Input Basic settings Instance Group Name tutorial-mysql Description Optional MySQL settings Engine Version Use the specified version MySQL Username (e.g.) admin MySQL Password (e.g.) root1234 Instance availability/number Single (Primary Instance) Instance type m2a.large Storage type/size 100 Log storage type/size 100 Network settings VPC tutorial Subnet {VPC_ID}_sn_5 (10.0.64.0/20)Automated backups Backup Options Disabled
Step 3. Create cluster
KakaoCloud's MemStore is an in-memory data store service offered within a VPC environment. This service automates all processes required for Redis node provisioning, such as creating operational servers or configuring networks, and is designed to allow easy management of the database through various management functions.
-
Go to KakaoCloud console > Data Store > MemStore.
-
In the Cluster tab, select the [Create cluster] button and create a cluster using the following settings as a reference:
Category Field Configuration/Input Configuration options Create a new cluster Cluster mode settings Disabled Basic settings Cluster name tutorial-redis Description (Optional) Tutorial Redis Redis compatibility settings Engine Version Redis 6.2.5 Port 6379 Node count 2 (Check High Availability) Node type m2a.large Network settings VPC tutorial Subnet {VPC_ID}_sn_5 (10.0.64.0/20)Security Group tutorial-redis-sgNode placement Primary (Node) {VPC_ID}_sn_5 (10.0.64.0/20)Node placement Replica (Node) {VPC_ID}_sn_5 (10.0.64.0/20)Automated backups Backup Options Disabled
Step 4. Create Application server
The Web Application Server (WAS) connects to the database and can provide complex services such as user registration, login, and commenting.
-
Access the VM mapped to the ports configured in the nginx-proxy-manager.
# tutorial-app-1
ssh -i ${PRIVATE_KEY}.pem ubuntu@${BASTION_PUBLIC_IP} -p 10002

# tutorial-app-2
ssh -i ${PRIVATE_KEY}.pem ubuntu@${BASTION_PUBLIC_IP} -p 10003
Environment Variable Description PRIVATE_KEY🖌︎ Key file name BASTION_PUBLIC_IP🖌︎ Go to the Virtual Machine > Instance menu, select on the `Bastion` instance, and check the Network tab for details -
Install the example project.
git clone -b kakaocloud-library https://github.com/kakaoenterprise/kakaocloud-tutorials -
Go to the folder where the example project is located.
cd kakaocloud-tutorials -
Install the packages required to build and run the example project.
bash install-requirements.sh -
Enter the environment variables and run the example application.
sudo docker run -it \
-e MYSQL_HOST=${MYSQL_HOST} \
-e DB_USERNAME=${DB_USERNAME} \
-e DB_PASSWORD=${DB_PASSWORD} \
-e REDIS_HOST=${REDIS_HOST} \
-p 8080:8080 \
--name kakaocloud-library-server -d \
$(sudo docker build -q -f ./server/deploy/Dockerfile ./server)
Environment Variable Value Description MYSQL_HOST🖌︎ MYSQL_ENDPOINT MySQL host address
- Check by selecting the `tutorial-mysql` instance group in the MySQL > Instance Group tab and checking the endpoint at the topDB_USERNAME🖌︎ ex. admin Database username DB_PASSWORD🖌︎ ex. root1234 Database password REDIS_HOST🖌︎ REDIS_PRIMARY_ENDPOINT Redis Primary endpoint
Step 5. Create load balancer for Application server
-
Go to KakaoCloud console > Networking > Load Balancing, then select the [Create load balancer] button.
-
Enter the name and description for the load balancer, and set the VPC and subnet. Refer to the following information for the listener settings, then select the [Create] button.
Category Field Configuration/Input Type Application Load Balancer (L7) Basic information Load balancer name tutorial-app-lb Network VPC tutorial Subnet {VPC_ID}_sn_3(10.0.32.0/20)Listener Protocol HTTPPort 8080 -
Wait for the Provisioning status of the created load balancer to become
Active.- This may take 1-3 minutes.
-
Select Target Group in the left sidebar, then select the [Create target group] button.
-
Set the information as follows, then select the [Next] button.
Category Field Configuration/Input Load Balancer Available Zone kr-central-2-a Load balancer tutorial-app-lb Listener HTTP:8080 Basic info Target group name tutorial-app-target-group Protocol HTTP Algorithm Round Robin Sticky Session Enabled Type HTTP Cookie Stickiness Duration 3600 Health check Enabled Type HTTPHTTP method GETHTTP version 1.1HTTP status code 200Check path /api/v1.0/status/chatCheck interval 10Timeout 5Transition criteria (success) 3Transition criteria (failure) 3 -
From the list, select the App instances to be added to the target group.
-
Enter the port information as follows, select the [Add target] button, then select the [Next] button.
Target instance Port tutorial-app-1 8080 tutorial-app-2 8080 -
Review the information, then select the [Create] button.
-
The load balancer and health checks must be able to access the target Application servers. To ensure this, add the following inbound policies to the security group
tutorial-app-sgof the Application servers.-
Go to VPC > Security Group, and select
tutorial-app-sg. -
Select the [Manage inbound rules] button and add the following policies. Two Health Check IPs need to be added.
Inbound Policy Description Protocol Source Port App inbound policy 1 Access from Load Balancer TCP {app-lb-private-ip}/32
- Can be found in Load Balancer > Details after selecting the created App server load balancer from the Load Balancer list8080 App inbound policy 2 Access from Health Check Host 1 TCP {healthcheck-ip1}/32
- Can be found in Load Balancer > Target Group menu > Target tab > Health Check IP by Subnet8080 App inbound policy 3 Access from Health Check Host 2 TCP {healthcheck-ip2}/32
- Can be found in Load Balancer > Target Group menu > Target tab > Health Check IP by Subnet8080
-
Step 6. Create Web server
A web server transmits static content such as HTML, CSS, and JavaScript to web browsers over the internet using the HTTP protocol. To serve static data, you'll install the Nginx web server application and configure it to serve a React example project as static content. Additionally, requests to paths under /api will be forwarded to the app server.
-
Access the VM mapped to the ports configured in the Nginx Proxy Manager. Go to the folder containing your key pair file and run the following commands.
# tutorial-web-1
ssh -i ${PRIVATE_KEY}.pem ubuntu@${BASTION_PUBLIC_IP} -p 10000

# tutorial-web-2
ssh -i ${PRIVATE_KEY}.pem ubuntu@${BASTION_PUBLIC_IP} -p 10001
Environment Variable Description PRIVATE_KEY🖌︎ Key file name BASTION_PUBLIC_IP🖌︎ Virtual Machine > Instance menu > select the created `Bastion` instance > check Network tab -
Install the example project.
git clone -b kakaocloud-library https://github.com/kakaoenterprise/kakaocloud-tutorials -
Go to the folder where the example project is located.
cd kakaocloud-tutorials -
Install the packages required to build and run the example project.
bash install-requirements.sh -
Enter the environment variables and start the web server.
sudo docker run -it \
-e SERVER_ENDPOINT=http://${SERVER_ENDPOINT}:8080 \
-p 80:80 -p 443:443 \
--name kakaocloud-library-client -d \
$(sudo docker build -q -f ./client/deploy/Dockerfile ./client)
Environment Variable Description SERVER_ENDPOINT🖌︎ Enter the private IP of the Application Load Balancer you created in `{APP_LB_PRIVATE_IP}`.
Step 7. Create load balancer for Web server
Set up a load balancer to distribute client requests to multiple servers on the web server.
-
Go to the KakaoCloud console > Networking > Load Balancing, and select the [Create load balancer] button.
-
Refer to the following to enter the required information for creating the load balancer, and select the [Create] button.
Category Field Configuration/Input Type Application Load BalancerBasic information Load Balancer Name tutorial-web-lb Network VPC tutorial Subnet main Listener Protocol HTTP Port 80 -
Wait for the Provisioning status of the created load balancer to become
Active.- This may take 1-3 minutes.
-
In the left sidebar, select Target Group and select the [Create target group] button.
-
Configure the settings as follows, then select the [Next] button.
Category Field Configuration/Input Load Balancer Available Zone kr-central-2-a Load Balancer tutorial-web-lb Listener HTTP:80 Basic info Target Group Name tutorial-web-target-group Protocol HTTP Algorithm Round Robin Sticky Session Enabled Type HTTP Cookie Stickiness Duration 3600 Health Check Enabled Type HTTPHTTP Method GETHTTP Version 1.1HTTP Status Code 200Check Path /Check Interval 10Timeout 5Healthy Threshold 3Unhealthy Threshold 3 -
Select the instances to be added to the target group from the list.
-
Enter the following port information, select the [Add target] button, then select the [Next] button.
Target Instance Port tutorial-web-1 80 tutorial-web-2 80 -
Review the information, then select the [Create] button.
-
The load balancer and health checks must be able to access the target Web servers. To ensure this, add the following inbound policies to the
tutorial-web-sgsecurity group of the Web servers.-
Go to VPC > Security Groups and select
tutorial-web-sg. -
Select the [Manage inbound policies] button and add the following policies. You need to add two Health Check IPs.
Inbound policy Description Protocol Source Port web inbound policy 1 Access from Load Balancer TCP {web-lb-private-ip}/32
- Found in Load Balancer > Details after selecting the created Web server load balancer from the Load Balancer list80 web inbound policy 2 Access from Health Check Host 1 TCP {healthcheck-ip1}/32
- Found in Load Balancer > Target Group menu > Target tab > Health check IP by subnet80 web inbound policy 3 Access from Health Check Host 2 TCP {healthcheck-ip2}/32
- Found in Load Balancer > Target Group menu > Target tab > Health check IP by subnet80
-
Step 8. Associate public IP with Web server load balancer
- Go to the Load Balancing > Load Balancer tab and select the Web load balancer you created.
- Select [Associate public IP].
- In the Details tab, confirm the public IP address.
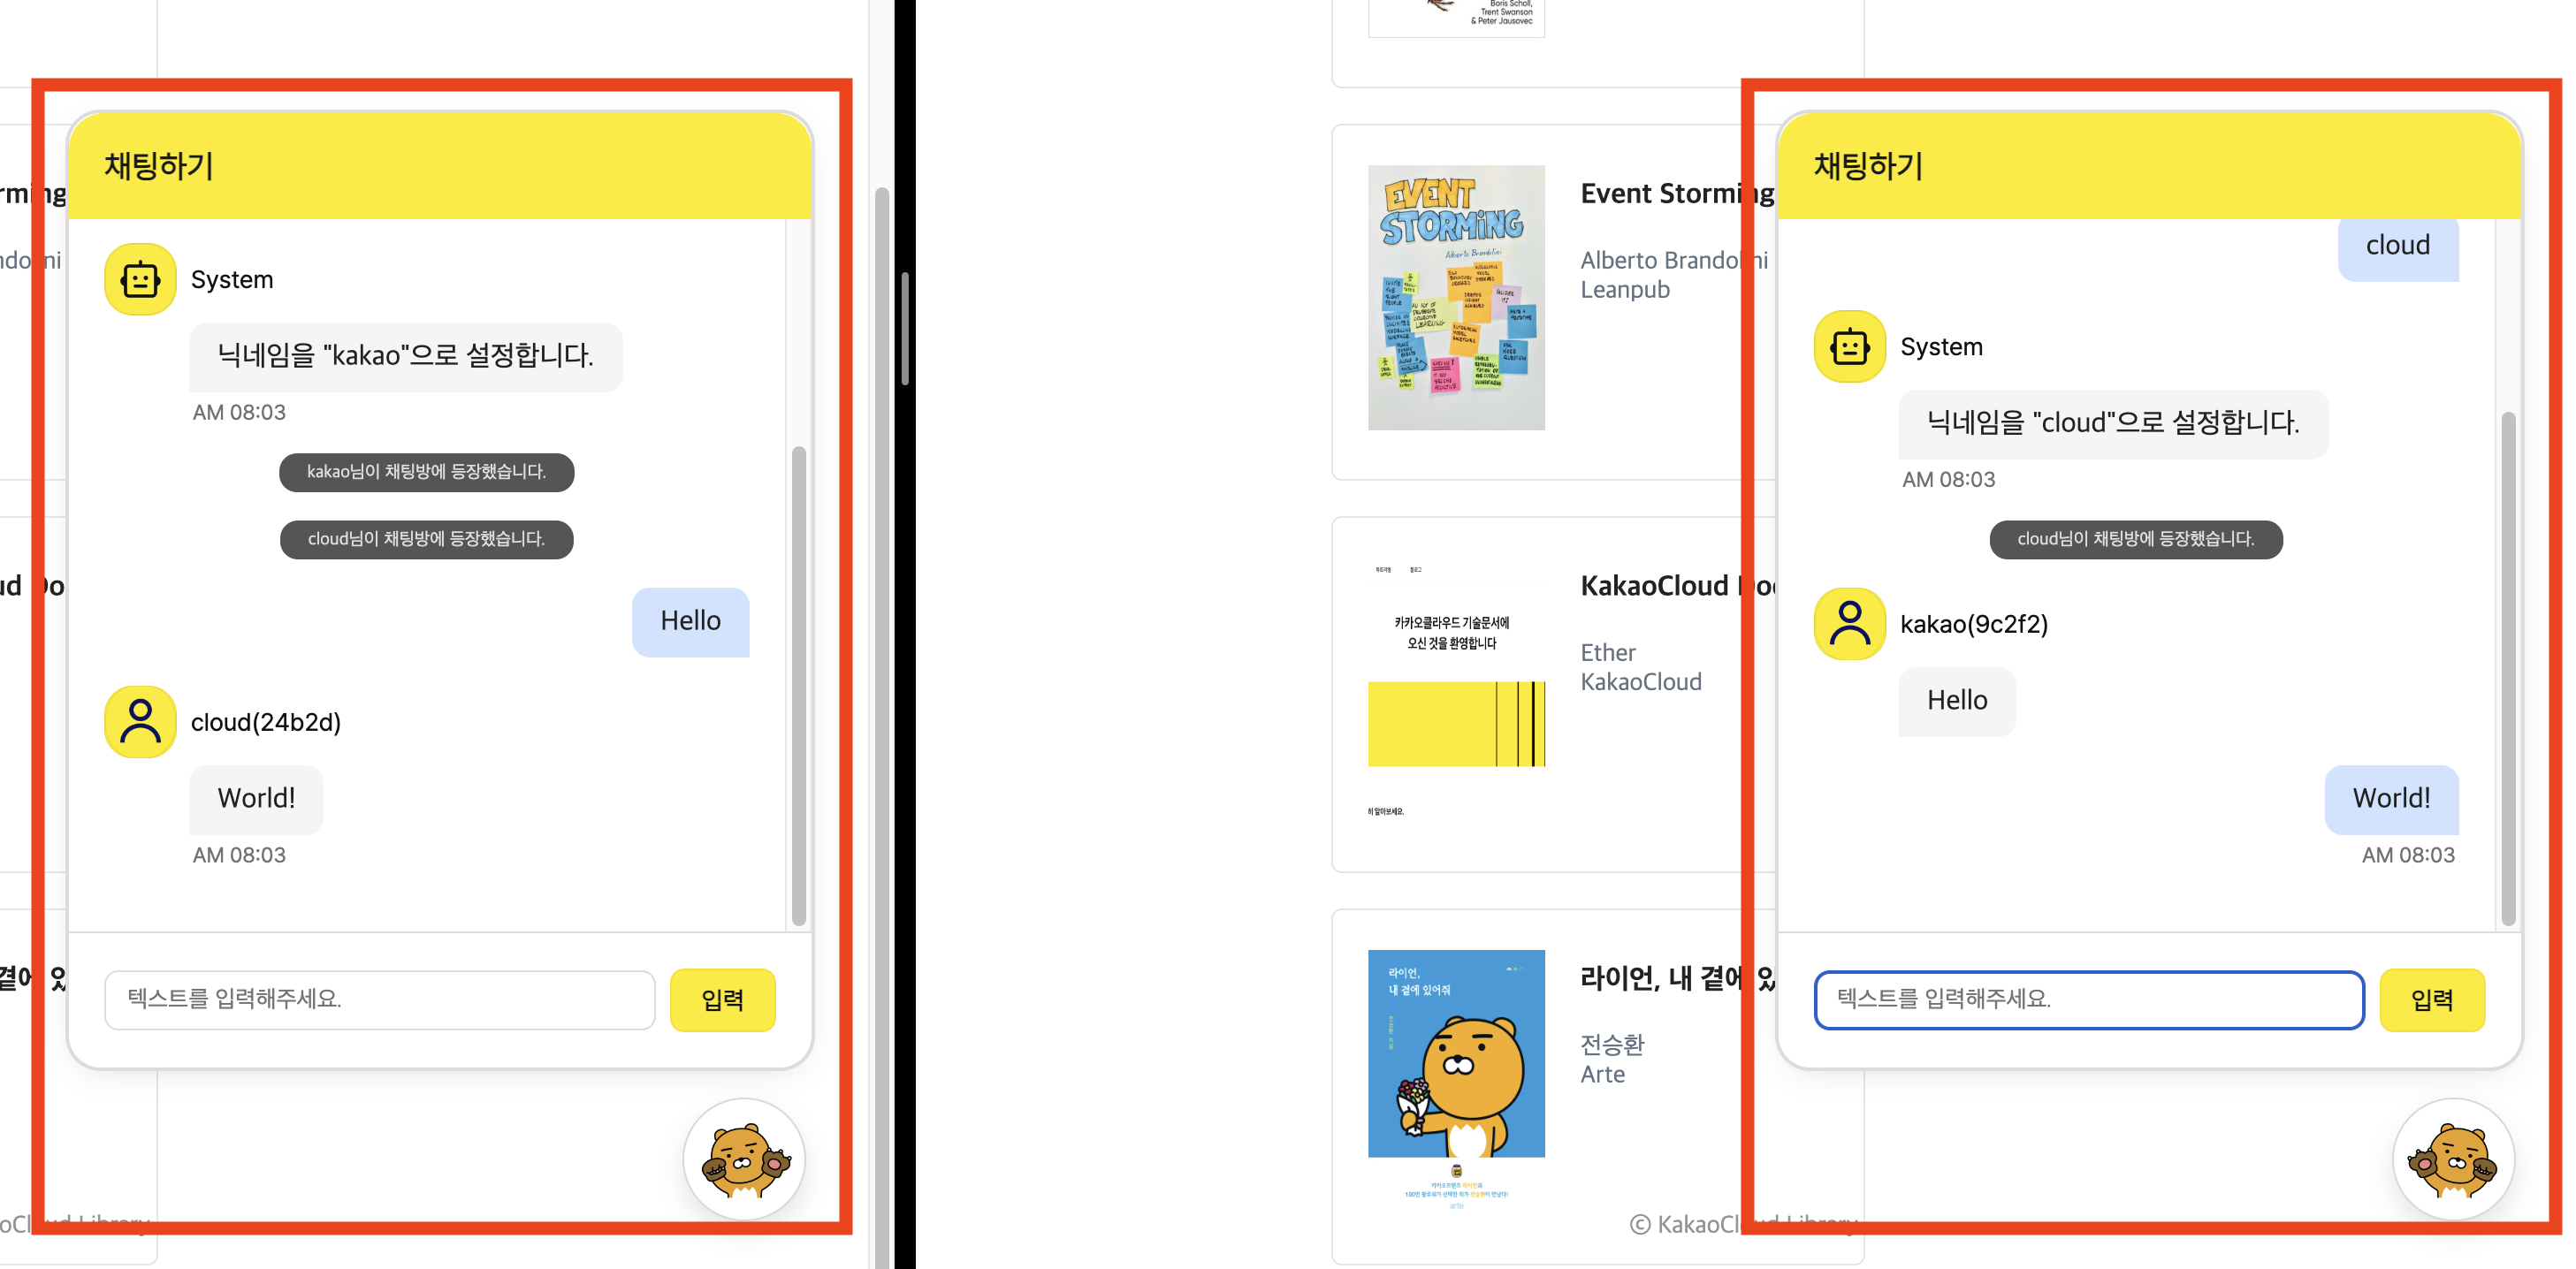
Step 9. Verify chat functionality
Access the service by entering the registered public IP address in your browser. If everything is connected correctly, you should be able to verify the chat functionality by clicking the chat button at the bottom right of the 'KakaoCloud Library' service interface.