Manage instances
This guide covers GPU and NPU instances.
Video transcoding instances are provided through Virtual Machine. For more information, refer to Virtual Machine > Manage instances.
Here is how to manage instances in the GPU service.
View instance list
You can view, search, and manage the list of running instances and their details.
-
Go to the KakaoCloud console > Beyond Compute Service > GPU.
-
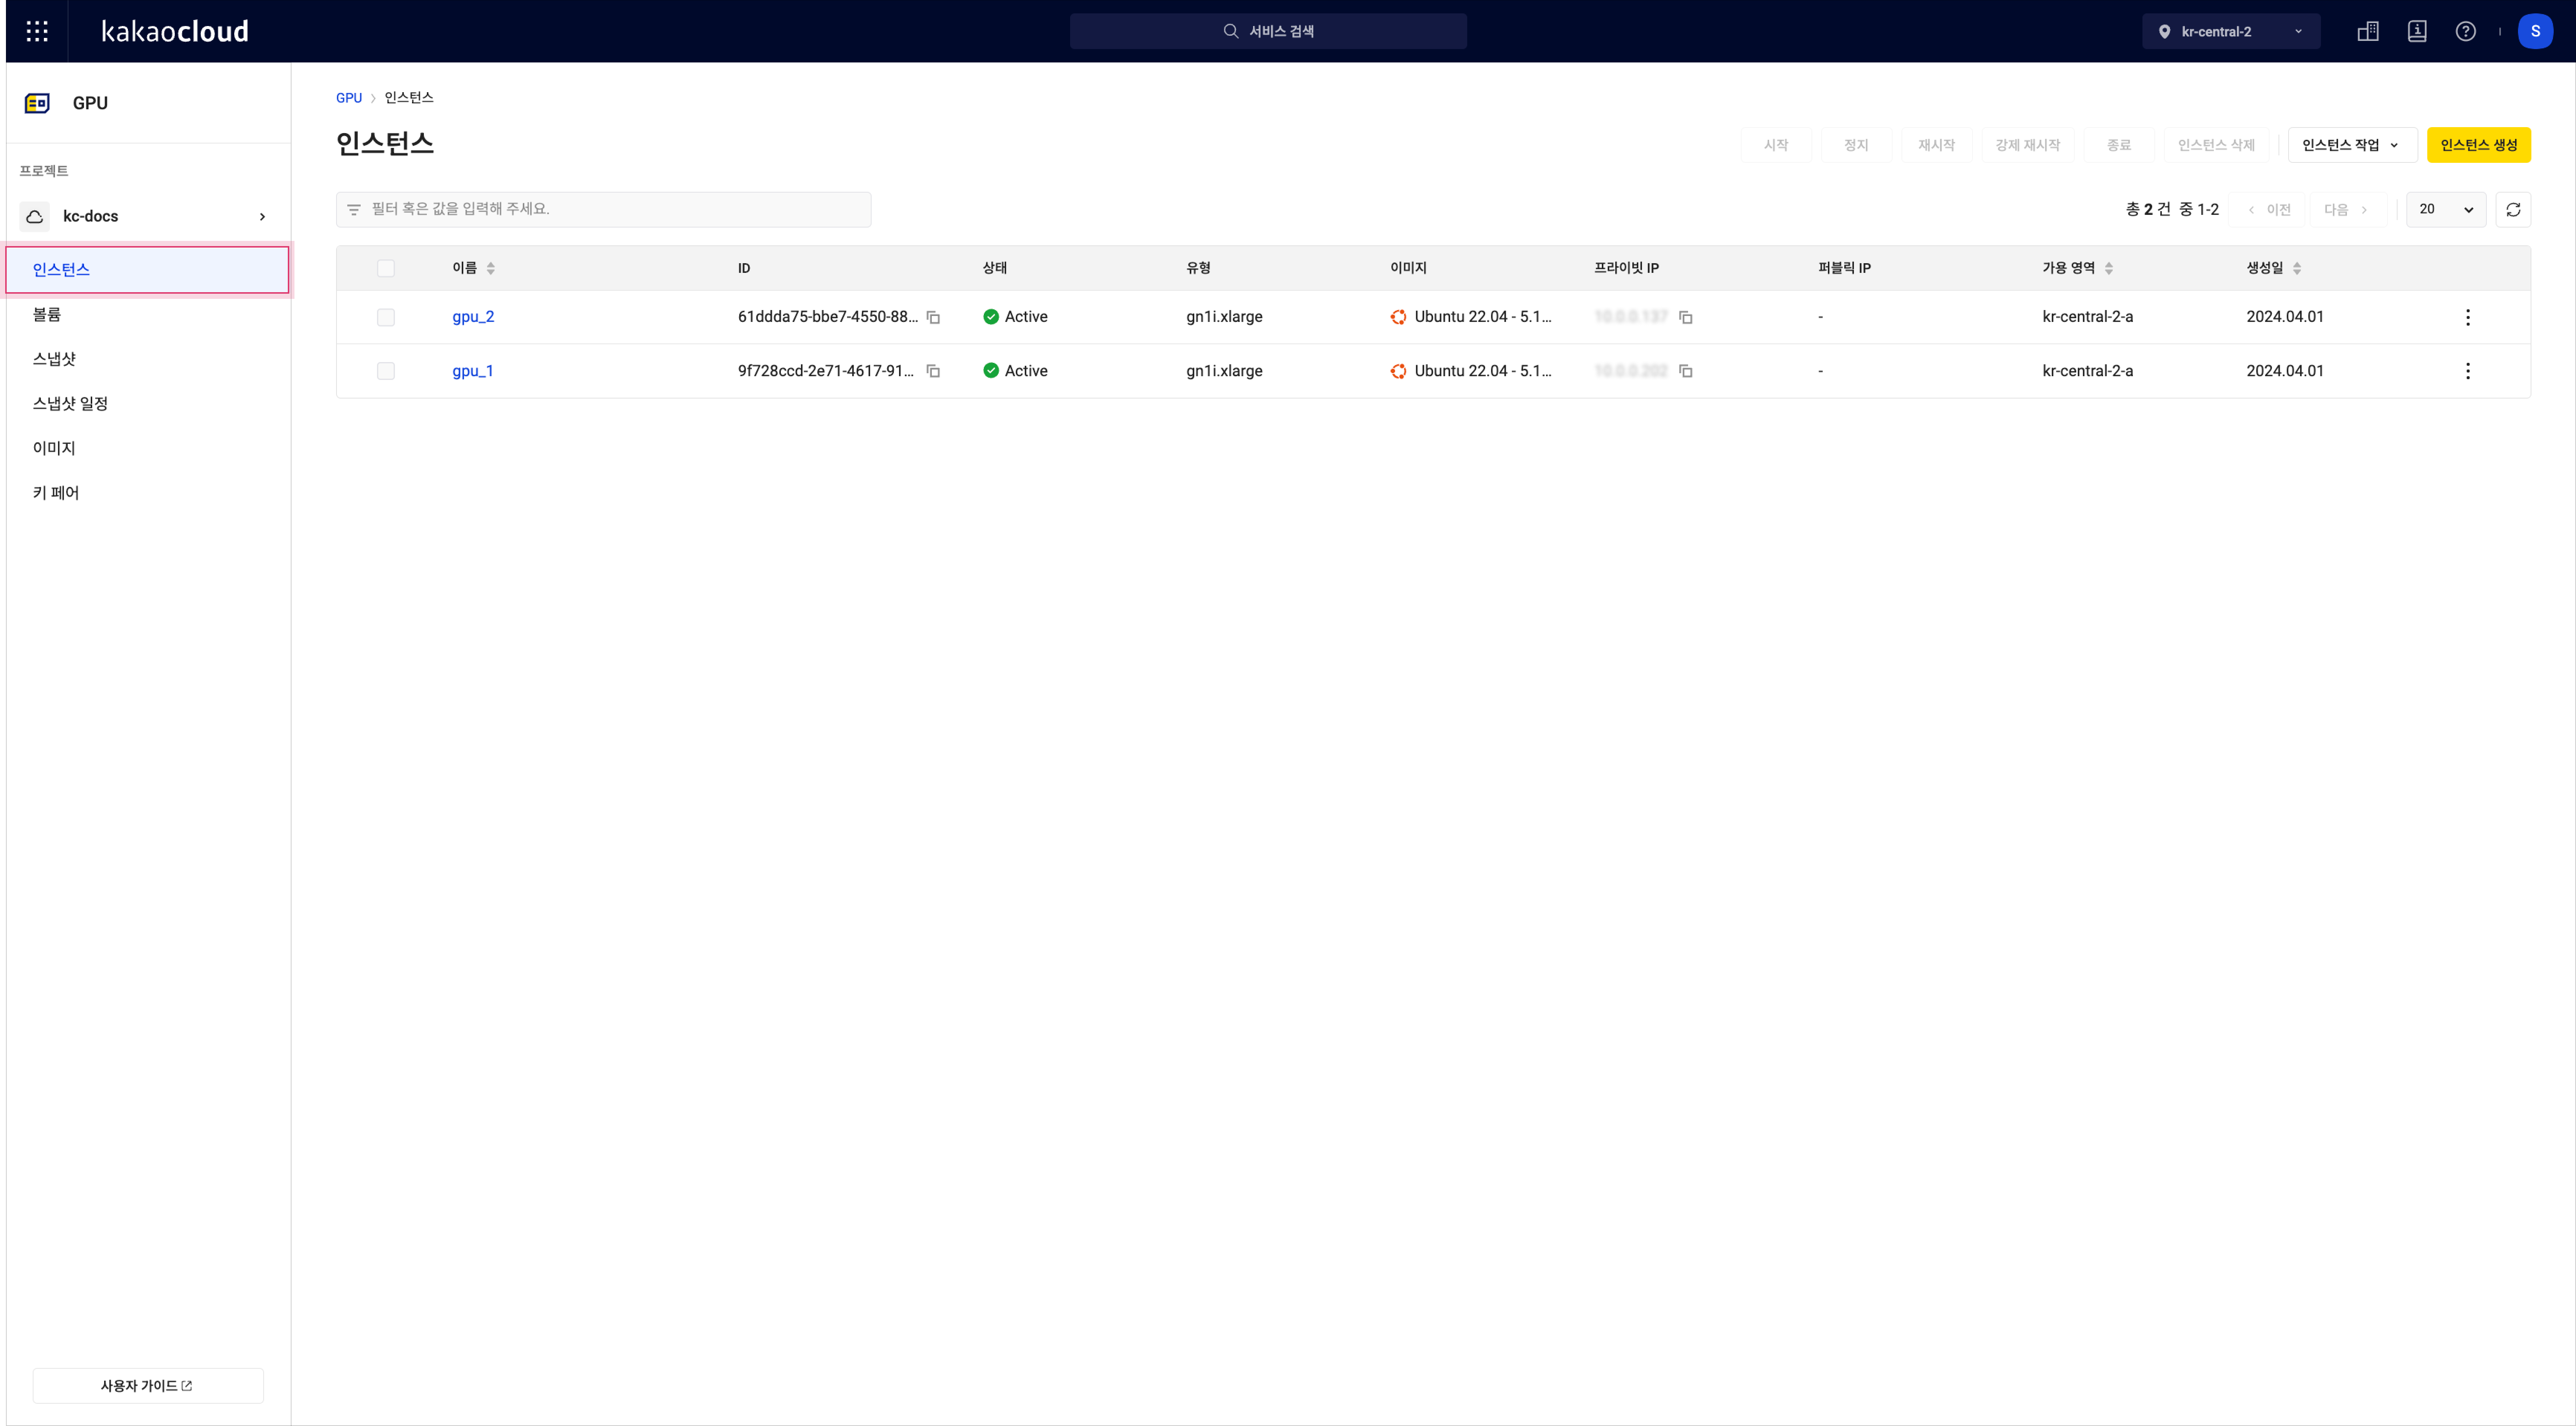
In the Instance menu, view the list of currently running instances. You can select the instance filter to sort and filter by specific attributes.
 Instance list
Category Description Name Name of the instance set by the user ID Unique ID of the instance Status Check the instance status
- For more details, see Instance lifecycleType Server type of the instance
- Hover to view specs (vCPU, memory)Image Image installed on the instance Default private IP Private IP address assigned to the default network interface of the instance Default public IP Public IP address connected to the default network interface of the instance Availability zone Availability zone where the instance was created Created Date the instance was created
- Hover to see detailed timestampMore options Execute additional features by category
- See More instance options for details
More features
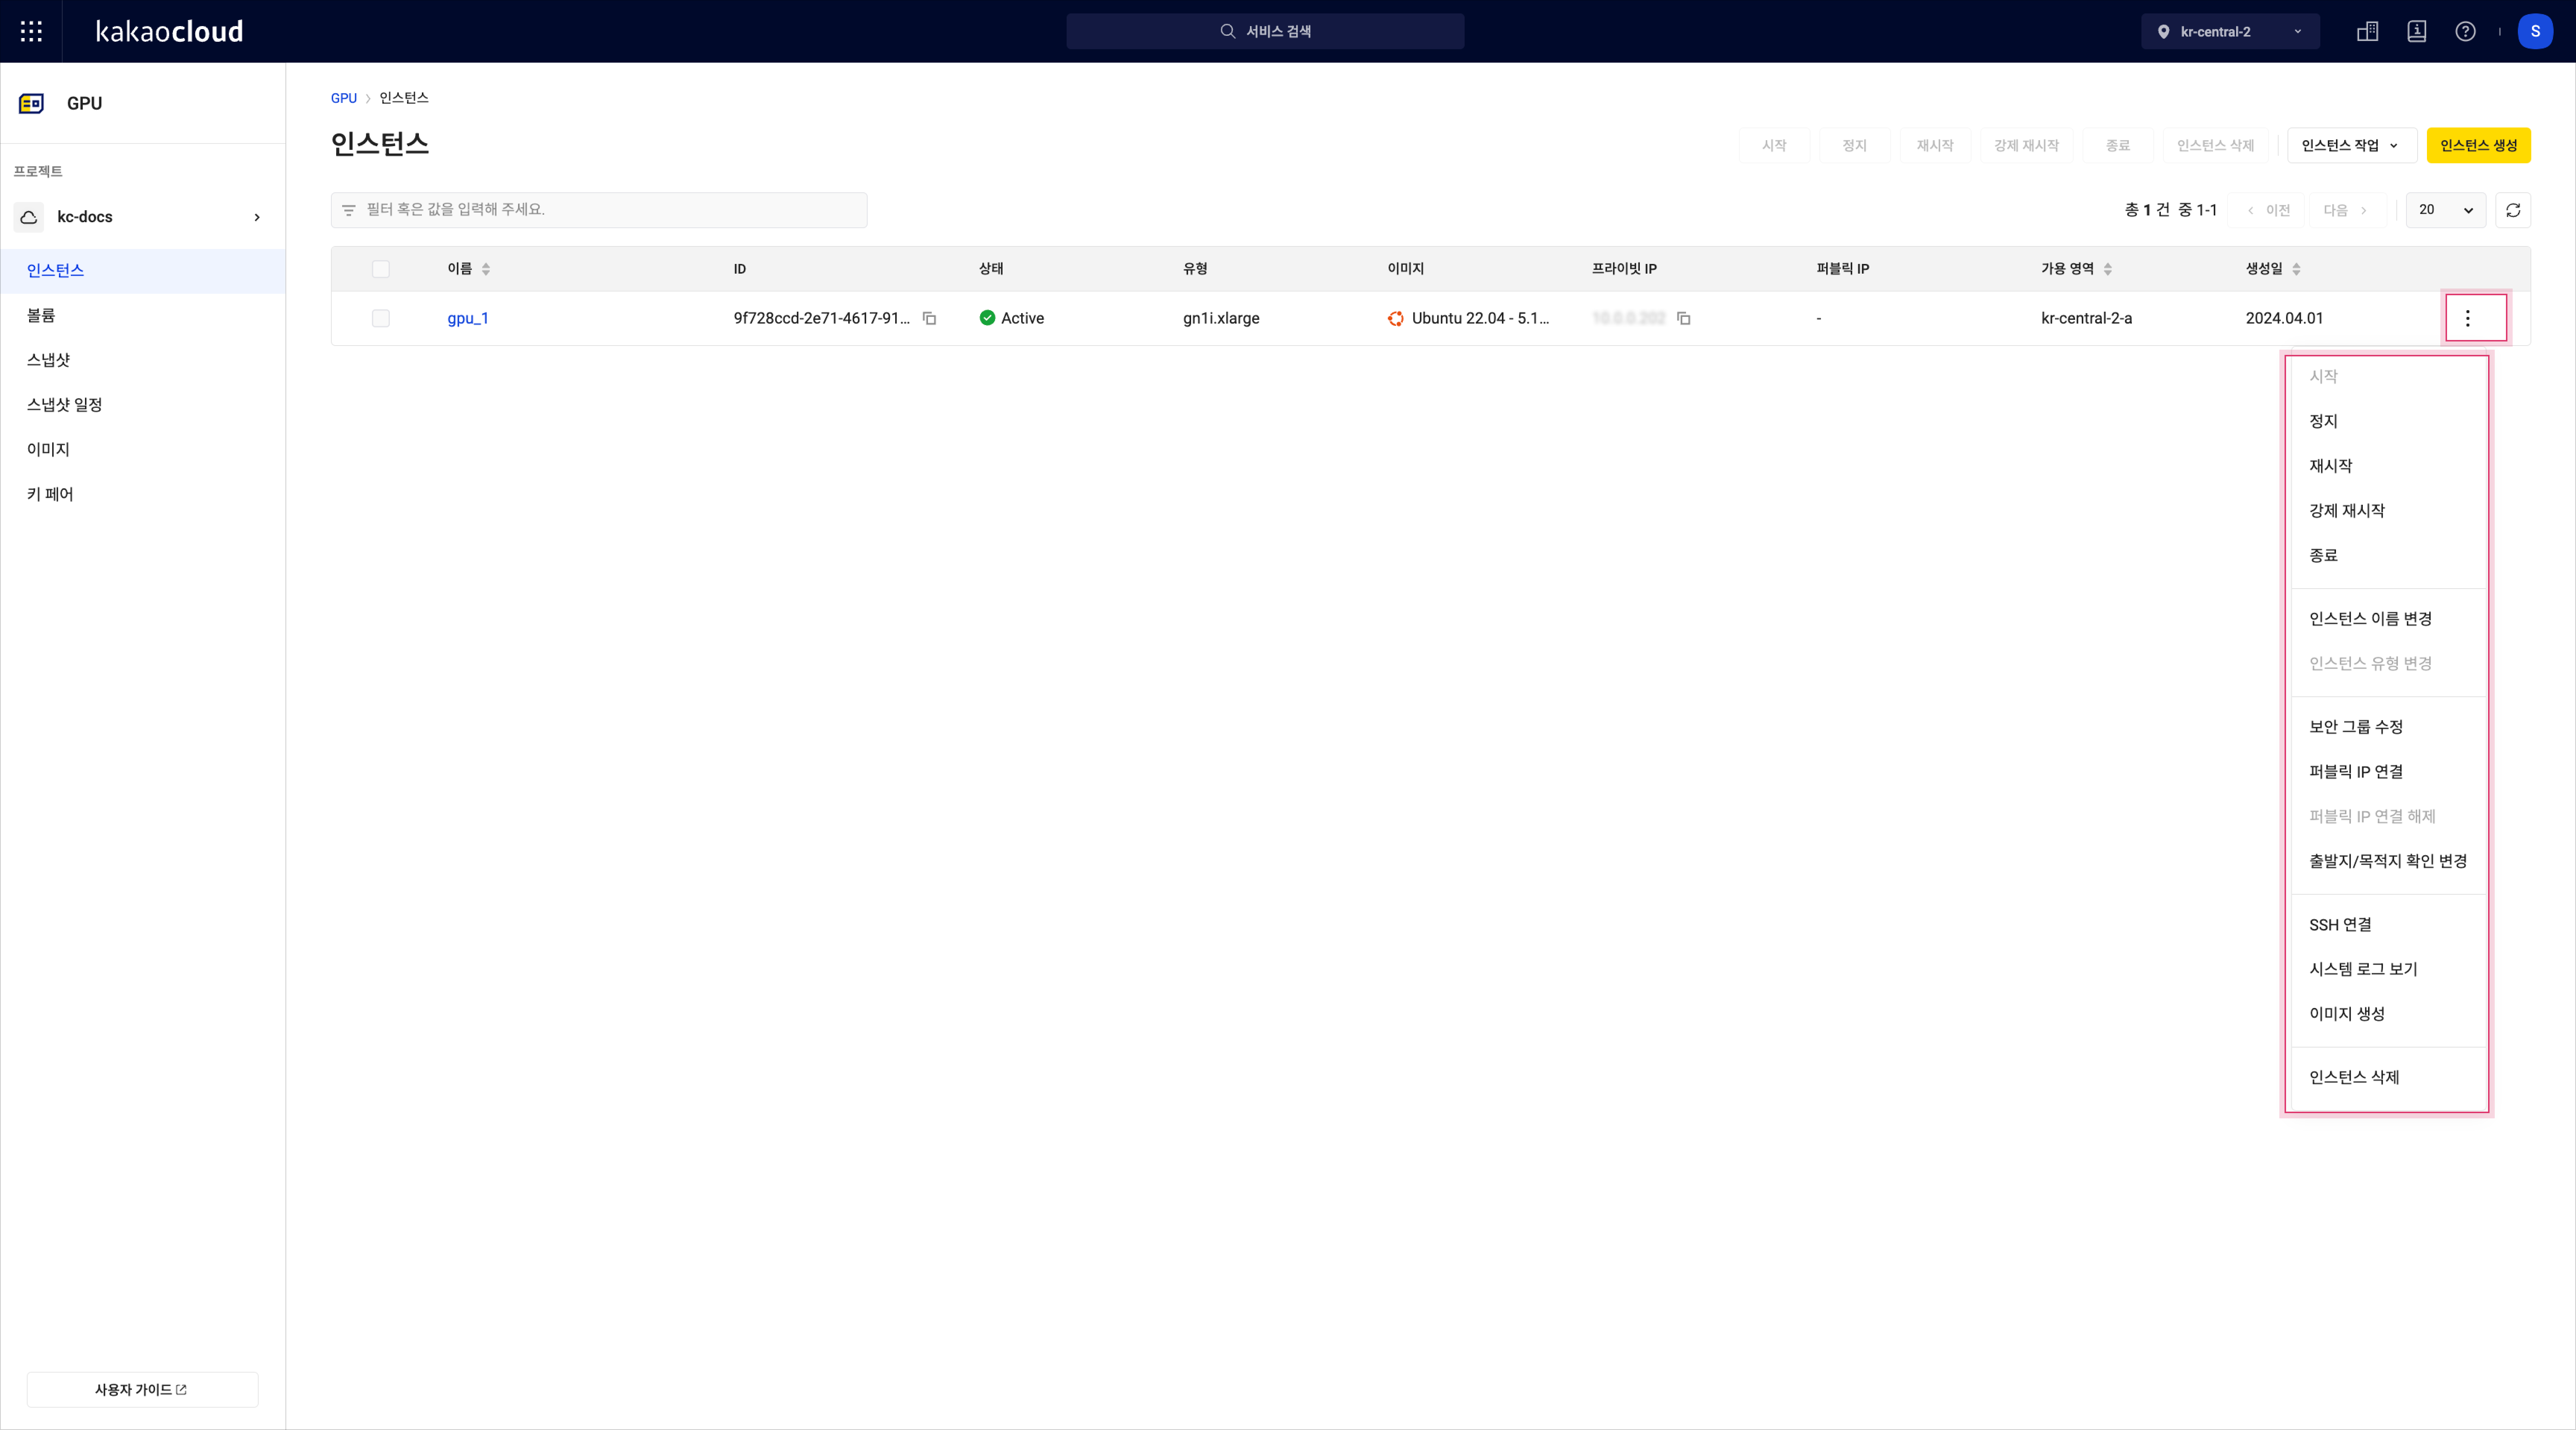
Select the [More options] icon on the instance to execute various features.
-
Go to the KakaoCloud console > Beyond Compute Service > GPU.
-
In the Instance menu, select the [More options] icon for an instance, then select the desired feature.
 More options icon
Feature Description Instance state after execution Start Start the instance (start)
- Transitions stopped or shelved instances toActiveActiveStop Stop the instance (stop) StoppedRestart Soft reboot the instance (soft reboot) ActiveHard reboot Forcefully restart the instance (hard reboot) ActiveShelve Stop the instance (shelve) Shelved_offloadedDelete instance Fully terminate and return the instance - Rename instance Launch popup to edit name and description - Change instance type Launch popup to resize the instance - Attach network interface Connect an additional network interface to the instance - Detach network interface Disconnect an additional network interface from the instance - Set security group Launch popup to set the security group for the instance - Associate public IP Launch popup to associate a public IP with the instance
- Only available for Project Admins- Disassociate public IP Launch popup to disassociate the public IP
- Only available for Project Admins- Edit allowed outbound IPs Add or remove allowed outbound IP addresses or CIDRs for the connected network interface
- Up to 10 entries can be added- SSH connect Launch popup to guide how to connect via SSH
- Available for instances with Linux OS installed- RDP connect Launch popup to guide how to connect via RDP
- Viewable username and password
- Available for instances with Windows OS- View system log Launch popup to view stored system logs
- Logs contain event records for auditing purposes
- Not supported for Windows OS- Create image Launch popup to create an image of the root volume
- Can be used to launch new instances from backup
- Available when instance is inStoppedorActivestate-
- You can create an image even when the instance is
Active. However, it is recommended to do so when the instance isStoppedto ensure data consistency. - If you add specific IPs or CIDRs through Edit allowed outbound IPs, the network interface only allows outbound packets with IPs in the specified range.
View instance details
You can view and manage instance details, including connected network settings, security, volumes, activity logs, and monitoring information.
-
Go to the KakaoCloud console > Beyond Compute Service > GPU.
-
In the Instance menu, select the instance you want to view in detail.
-
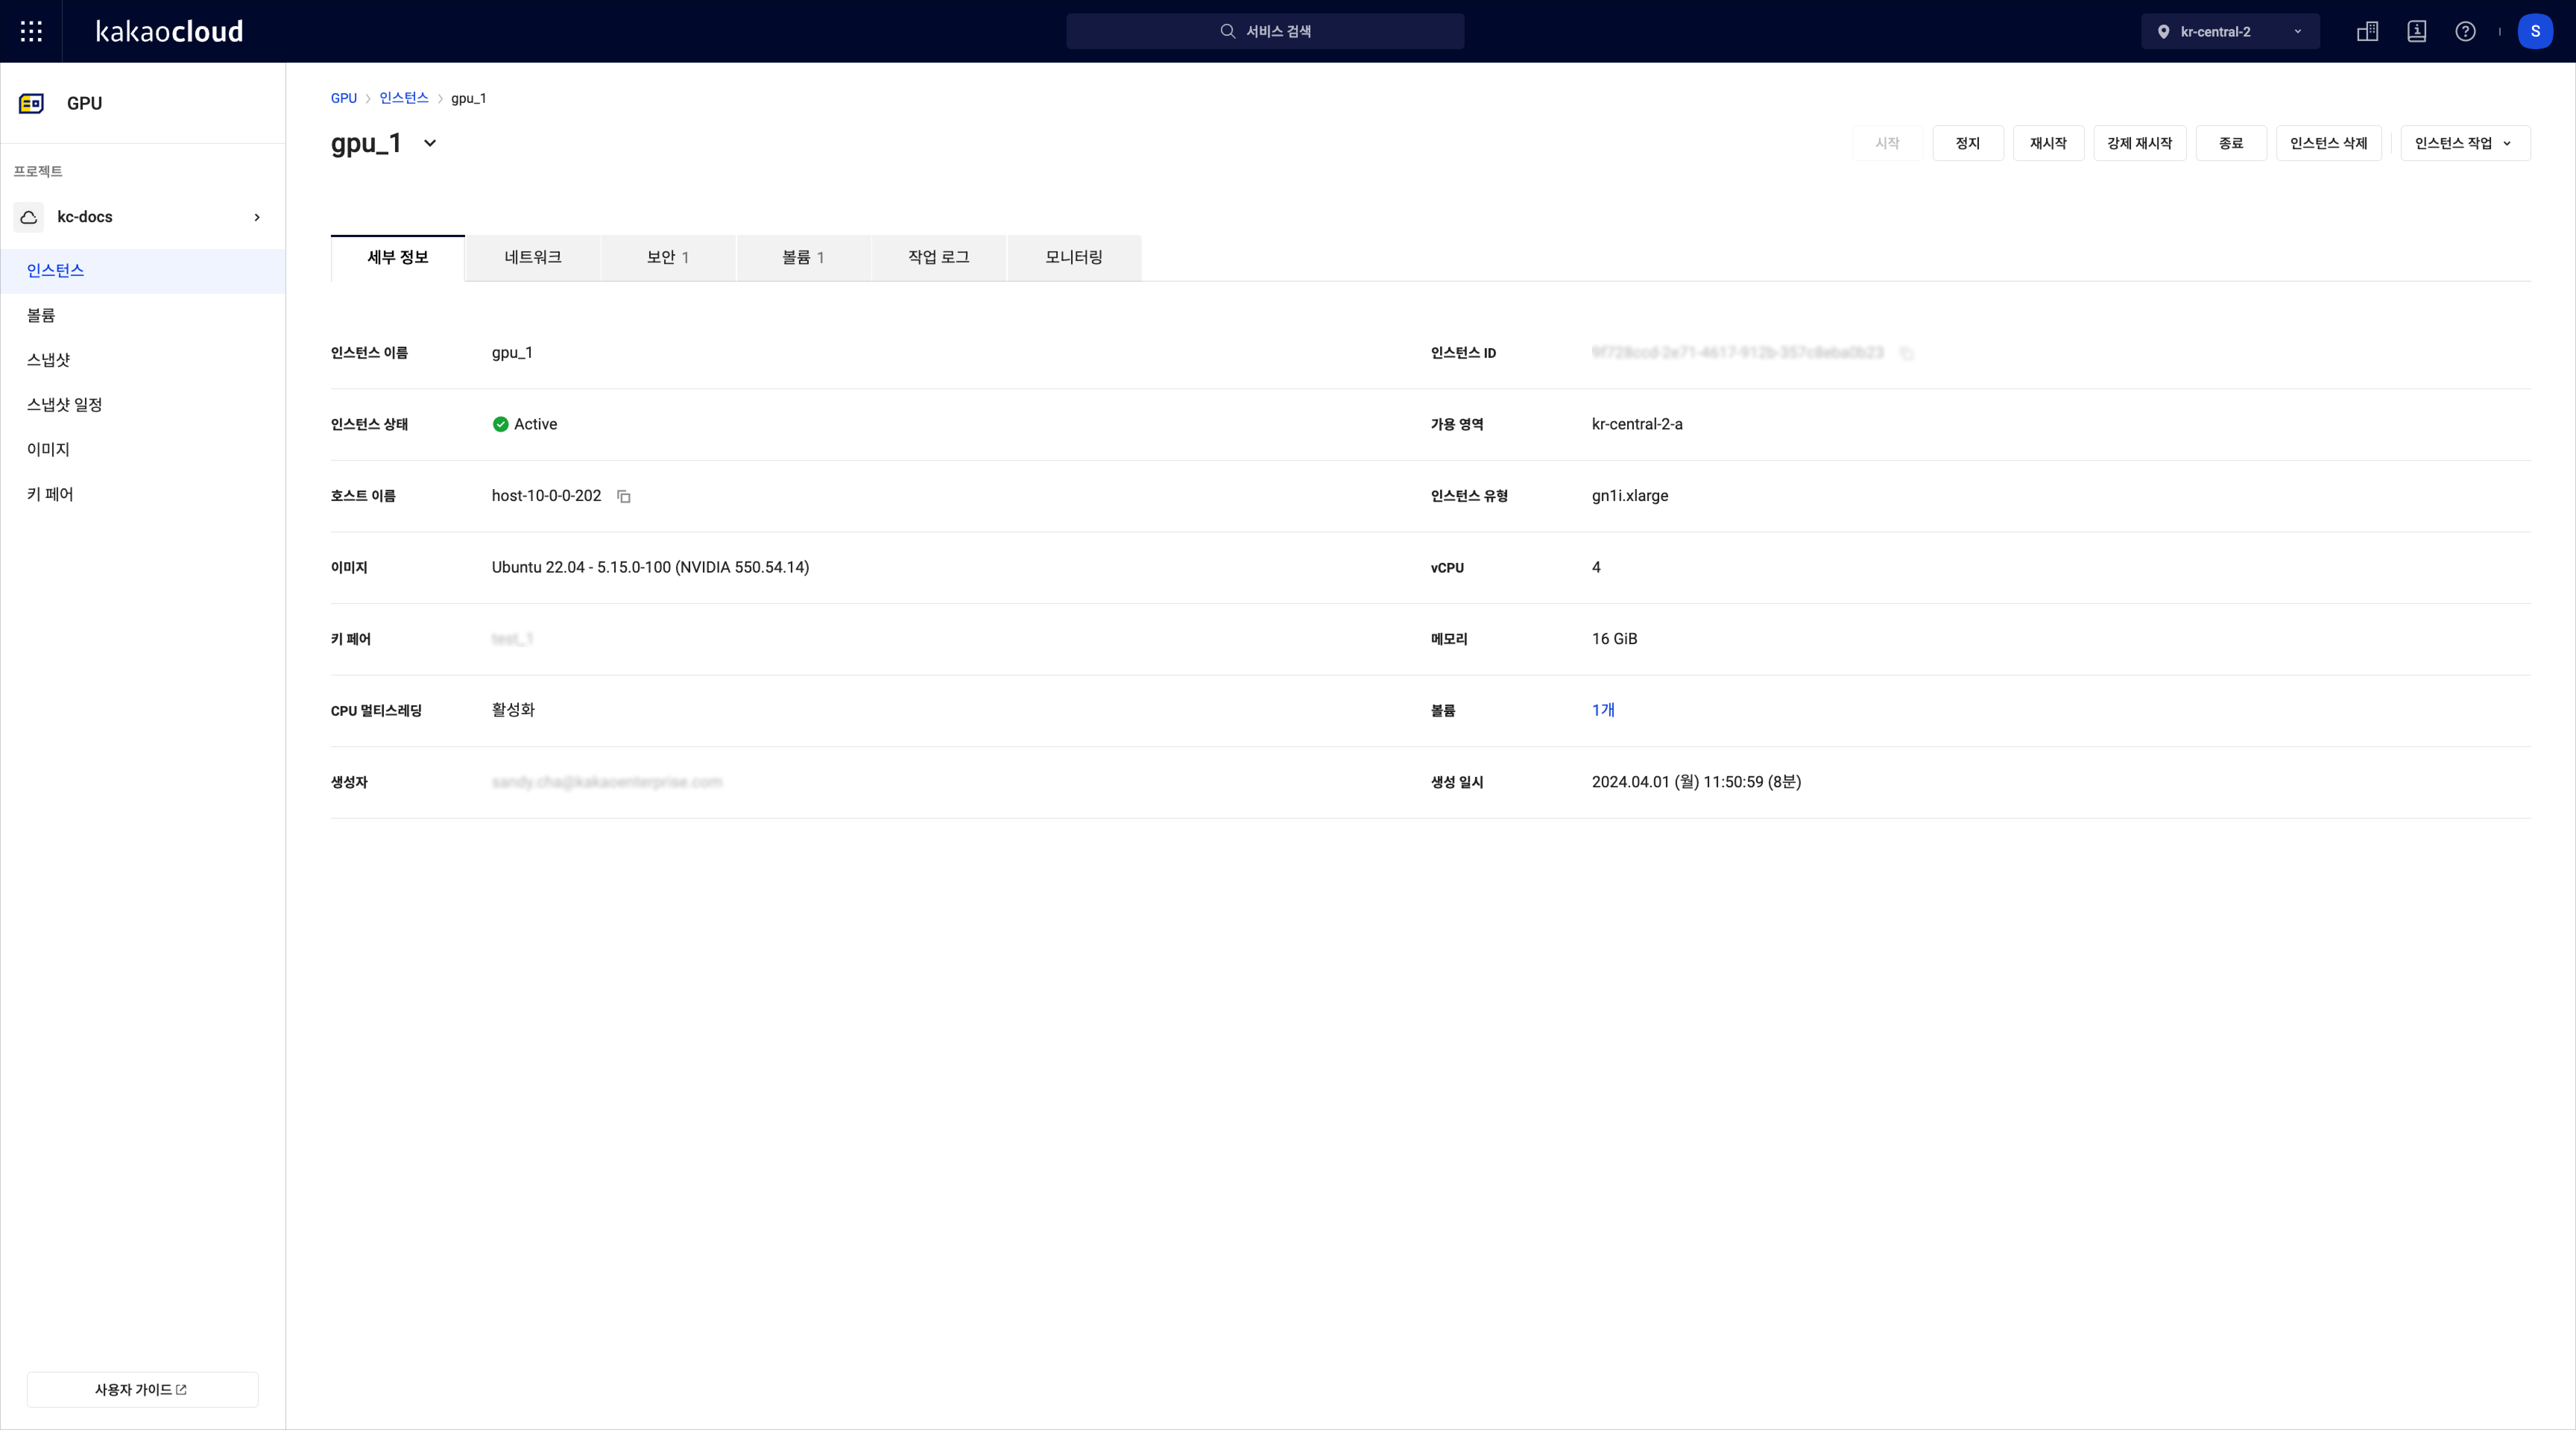
On the instance detail page, review the relevant information.
 Instance detail page
- Details
- Network
- Security
- Volume
- Activity log
- Monitoring
Review detailed information about the selected instance.
| Category | Description |
|---|---|
| Instance name | Name set by the user |
| Instance ID | Unique ID (UUID) of the instance |
| Instance status | Current status of the instance |
| Availability zone | Zone where the instance is located |
| Hostname | Hostname automatically generated in private IP format - Given in the format host-{PRIVATE_IP} |
| Instance type | Type selected when creating the instance |
| Image | Name of the image applied to the instance |
| vCPU | Number of vCPUs according to the instance type |
| Key pair | Key pair assigned to the instance |
| Memory | Memory size according to the instance type |
| CPU multithreading | Whether CPU multithreading is enabled |
| Volume | Number of volumes attached to the instance |
| Creator | User who created the instance |
| Disk size | Total disk capacity attached to the instance |
| Created | Date and time the instance was created (including elapsed time) |
Check the network configuration and interface details of the instance.
All GPU instances are provided in a VPC environment. VPC enables networking and security features, and allows logical service isolation based on network requirements. For more details, refer to the VPC documentation.
| Category | Description |
|---|---|
| Interface name | Name assigned to the network interface |
| Interface ID | Unique UUID of the network interface |
| Connection status | Connection status of the interface - In Use: Connected to a resource - Available: Not connected to any resource |
| Private IP | Private IP address assigned to the network interface |
| Public IP | Public IP address connected to the network interface |
| Availability zone | Availability zone where the interface was created |
| VPC name | Name of the VPC the interface belongs to |
| VPC ID | Unique UUID of the VPC |
| Subnet name | Name of the subnet where the interface was created |
| Subnet ID | Unique UUID of the subnet |
| Allowed outbound IPs | List of IP addresses or CIDRs allowed for outbound packets |
| More | - Edit allowed outbound IPs: Add or remove IP addresses or CIDRs - Detach interface: Disconnect the interface from the instance |
View the security groups and rules applied to the instance. For more details, refer to Modify security group.
| Category | Description |
|---|---|
| Security group | List of security groups applied to each interface |
| Rules | Details of the rules in the security groups - Inbound tab: Inbound rules - Outbound tab: Outbound rules |
View the volumes attached to the instance. For more details, refer to Manage volumes.
Check who executed what action on the instance.
| Category | Action | Description |
|---|---|---|
| Request ID | - | Unique request log ID |
| Type | create | Instance creation |
| delete | Instance deletion | |
| stop | Instance stop | |
| shelve | Instance shelve | |
| start | Instance start | |
| reboot | Instance reboot | |
| revertResize | Revert instance type change | |
| confirmResize | Confirm instance type change | |
| resize | Change instance type | |
| attach_interface | Attach network interface | |
| detach_interface | Detach network interface | |
| attach_volume | Attach volume | |
| detach_volume | Detach volume | |
| detach_interface | Detach volume from instance | |
| createImage | Create image from instance | |
| Username | - | Account ID that performed the action |
| Request time | - | Timestamp of the action |
Use monitoring to manage resources efficiently and reduce overhead.
Instance monitoring is divided into basic monitoring and detailed monitoring.
Delete instance
You can delete instances that are no longer in use.
Deleted instance resources are permanently returned and cannot be recovered.
If the Delete with instance option was selected during instance creation, the associated volume will also be deleted.
- Go to the KakaoCloud console > Beyond Compute Service > GPU.
- In the Instance menu, select the [More options] icon of the instance you want to delete, and select Delete instance.
- In the Delete instance popup, enter the instance name and select [Delete].
- When deleting an instance, the connected network interfaces are handled as follows:
- If the interface was created as a
new interfaceduring instance creation, it is deleted together. - If an
existing interfacewas selected and connected during instance creation, the interface remains after the instance is deleted and must be deleted separately.
- If the interface was created as a
Monitoring
Basic monitoring
You can view the results of basic monitoring.
- Go to the KakaoCloud console > Beyond Compute Service > GPU.
- In the Instance menu, select the instance whose logs you want to view.
- In the instance detail page > Monitoring tab, select the Basic monitoring tab to review the data.
| Category | Description |
|---|---|
| ➀ Tab selection | Choose between basic and detailed monitoring |
| ➁ Data range | Set the time range for monitoring graph data |
| ➂ Refresh | Set auto-refresh interval or select to manually refresh |
Metrics provided in basic monitoring
| Metric | Description |
|---|---|
| vCPU usage (Core) | Total vCPU usage over time |
| Disk read/write bytes | Disk (volume) read/write usage over time |
| Network RX | Network receive traffic over time |
| Network TX | Network transmit traffic over time |
For instances connected to multiple network interfaces, the Network RX/TX values for each network interface are displayed.
Detailed monitoring
After installing the monitoring agent in advance, you can access detailed monitoring information. Follow the steps below to install the monitoring agent for GPU instance services.
-
Go to the KakaoCloud console > Beyond Compute Service > GPU.
-
In the Instance menu, select the instance for agent installation.
-
In the Monitoring tab on the instance detail page, select [View installation guide].
-
After installing the agent as guided, configure each item in the Management > Monitoring > Explorer menu under the Metric Explorer tab. For details, refer to Monitoring > How-to Guides > Use explorer.
-
To check logs, use the Log Explorer tab in the same menu. For more information, refer to Use explorer > Search logs.
-
A basic dashboard is provided by default. You can also configure a custom dashboard according to your monitoring needs. See Use explorer > Dashboard for guidance.
Public IP
Associate public IP
You can associate a public IP with an instance.
Only users with Project Admin privileges can associate a public IP.
- Go to the KakaoCloud console > Beyond Compute Service > GPU.
- In the Instance menu, select the [More options] icon of the desired instance and select Associate public IP.
- In the Associate public IP popup, select the network interface and private IP address, then select [OK].
Disassociate public IP
You can disassociate a connected public IP.
Only users with Project Admin privileges can disassociate a public IP.
- Go to the KakaoCloud console > Beyond Compute Service > GPU.
- In the Instance menu, select the [More options] icon of the desired instance and select Disassociate public IP.
- In the Disassociate public IP popup, select the network interface and public IP to remove, then check the box for "Automatically delete the disassociated public IP."
- Select [Disassociate].
If you disassociate a public IP without deleting the resource, the IP is not returned and will continue to incur charges even if not in use.
Modify security group
You can modify the security group attached to the instance's network interface. By default, at least one security group is applied to the primary interface.
- Go to the KakaoCloud console > Beyond Compute Service > GPU.
- In the Instance menu, select the [More options] icon of the instance you want to modify and select Modify security group.
- In the Modify security group popup, select the security groups to apply to the instance.
- If multiple groups are selected, all rules from each group are applied.
- Applied rules can be reviewed under the Inbound/Outbound tabs.
- Select [Save].
Network interface
Attach network interface
You can attach a network interface to an instance.
- Go to the KakaoCloud console > Beyond Compute Service > GPU.
- In the Instance menu, select the [More options] icon for the instance, then select Attach network interface.
- In the Attach network interface popup, review the information and select the interface to attach.
- Select [OK].
Detach network interface
You can detach an additional network interface from an instance.
- The primary network interface cannot be detached.
- Go to the KakaoCloud console > Beyond Compute Service > GPU.
- In the Instance menu, select the [More options] icon for the instance, then select Detach network interface.
- In the Detach network interface popup, review the information and select the interface to detach.
- Select [OK].
Set time reference
Accurate and consistent time synchronization is essential for managing multiple server processes. KakaoCloud-provided images include built-in time synchronization services such as Network Time Protocol (NTP), Chrony, and systemd-timesyncd. These services allow multiple servers to operate on a unified time reference. However, these external services require internet access.
For local environments without internet access, KakaoCloud provides an internal NTP service. In Linux-based operating systems, you can use the Chrony client to synchronize the instance time using KakaoCloud’s internal NTP server.
- KakaoCloud’s time synchronization service is available via IPv4 address
169.254.169.123.
- RHEL-based
- Debian-based
-
Install the Chrony package.
sudo yum install chrony -
Open the
/etc/chrony.conffile and add the following line.server 169.254.169.123 prefer iburst minpoll 4 maxpoll 4 -
Restart the chronyd daemon to apply changes.
sudo service chronyd restart -
Enable chronyd to start at boot time.
sudo chkconfig chronyd on -
Verify that Chrony is using
169.254.169.123for time synchronization. Look for a^*mark next to the IP.Check time sourcechronyc sourcesOutputMS Name/IP address Stratum Poll Reach LastRx Last sample
===============================================================================
^- 193.123.243.2 2 6 17 9 -8932us[-8909us] +/- 4550us
^- ec2-13-209-84-50.ap-nort> 2 6 17 9 -8534us[-8512us] +/- 5038us
^* 169.254.169.123 2 4 17 9 +11us[ +34us] +/- 39ms -
Check the time sync status.
Check time sync statuschronyc trackingOutputReference ID : A9FEA97B (169.254.169.123)
Stratum : 3
Ref time (UTC) : Wed Jun 28 08:14:40 2023
System time : 0.000019450 seconds fast of NTP time
Last offset : +0.000022669 seconds
RMS offset : 0.000022669 seconds
Frequency : 1.352 ppm slow
Residual freq : +2.810 ppm
Skew : 0.061 ppm
Root delay : 0.076084495 seconds
Root dispersion : 0.000831026 seconds
Update interval : 2.0 seconds
Leap status : Normal
-
Install the Chrony package.
sudo apt install chrony -
Open the
/etc/chrony/chrony.conffile and add the following line.server 169.254.169.123 prefer iburst minpoll 4 maxpoll 4 -
Restart the chronyd daemon to apply changes.
sudo /etc/init.d/chrony restart -
Verify that Chrony is using
169.254.169.123as the time source. Look for the^*mark.Check time sourcechronyc sourcesOutputMS Name/IP address Stratum Poll Reach LastRx Last sample
===============================================================================
^* 169.254.169.123 2 4 37 4 +41us[ +189us] +/- 39ms
^- pugot.canonical.com 2 6 17 18 -8895us[-8864us] +/- 162ms
^- prod-ntp-3.ntp1.ps5.cano> 2 6 17 18 -3232us[-3203us] +/- 125ms
^- prod-ntp-5.ntp1.ps5.cano> 2 6 17 19 -1723us[-1707us] +/- 123ms
^- alphyn.canonical.com 2 6 17 18 -2344us[-2321us] +/- 140ms
^- 121.174.142.82 3 6 17 19 -9870us[-9853us] +/- 28ms
^- ntp-seoul.gombadi.com 2 6 17 20 -8532us[-8519us] +/- 52ms
^- send.mx.cdnetworks.com 2 6 17 18 -8997us[-8971us] +/- 29ms
^- 193.123.243.2 2 6 17 19 -9014us[-8994us] +/- 4132us -
Check the time sync status.
Check time sync statuschronyc trackingOutputReference ID : A9FEA97B (169.254.169.123)
Stratum : 3
Ref time (UTC) : Wed Jun 28 08:25:52 2023
System time : 0.000156159 seconds slow of NTP time
Last offset : -0.000184961 seconds
RMS offset : 0.000184961 seconds
Frequency : 5.999 ppm fast
Residual freq : -0.600 ppm
Skew : 35.807 ppm
Root delay : 0.076914668 seconds
Root dispersion : 0.000669460 seconds
Update interval : 16.2 seconds
Leap status : Normal