Create and manage volume
The following describes how to manage volumes and snapshots attached to VM instances in the Virtual Machine service.
Create volume
You can create a new volume.
-
Go to Compute > Beyond Compute Service > Virtual Machine in the KakaoCloud console.
-
Select the Volumes menu, then click the [Create volume] button.
-
In the pop-up window, enter the information, then click the [Create] button.
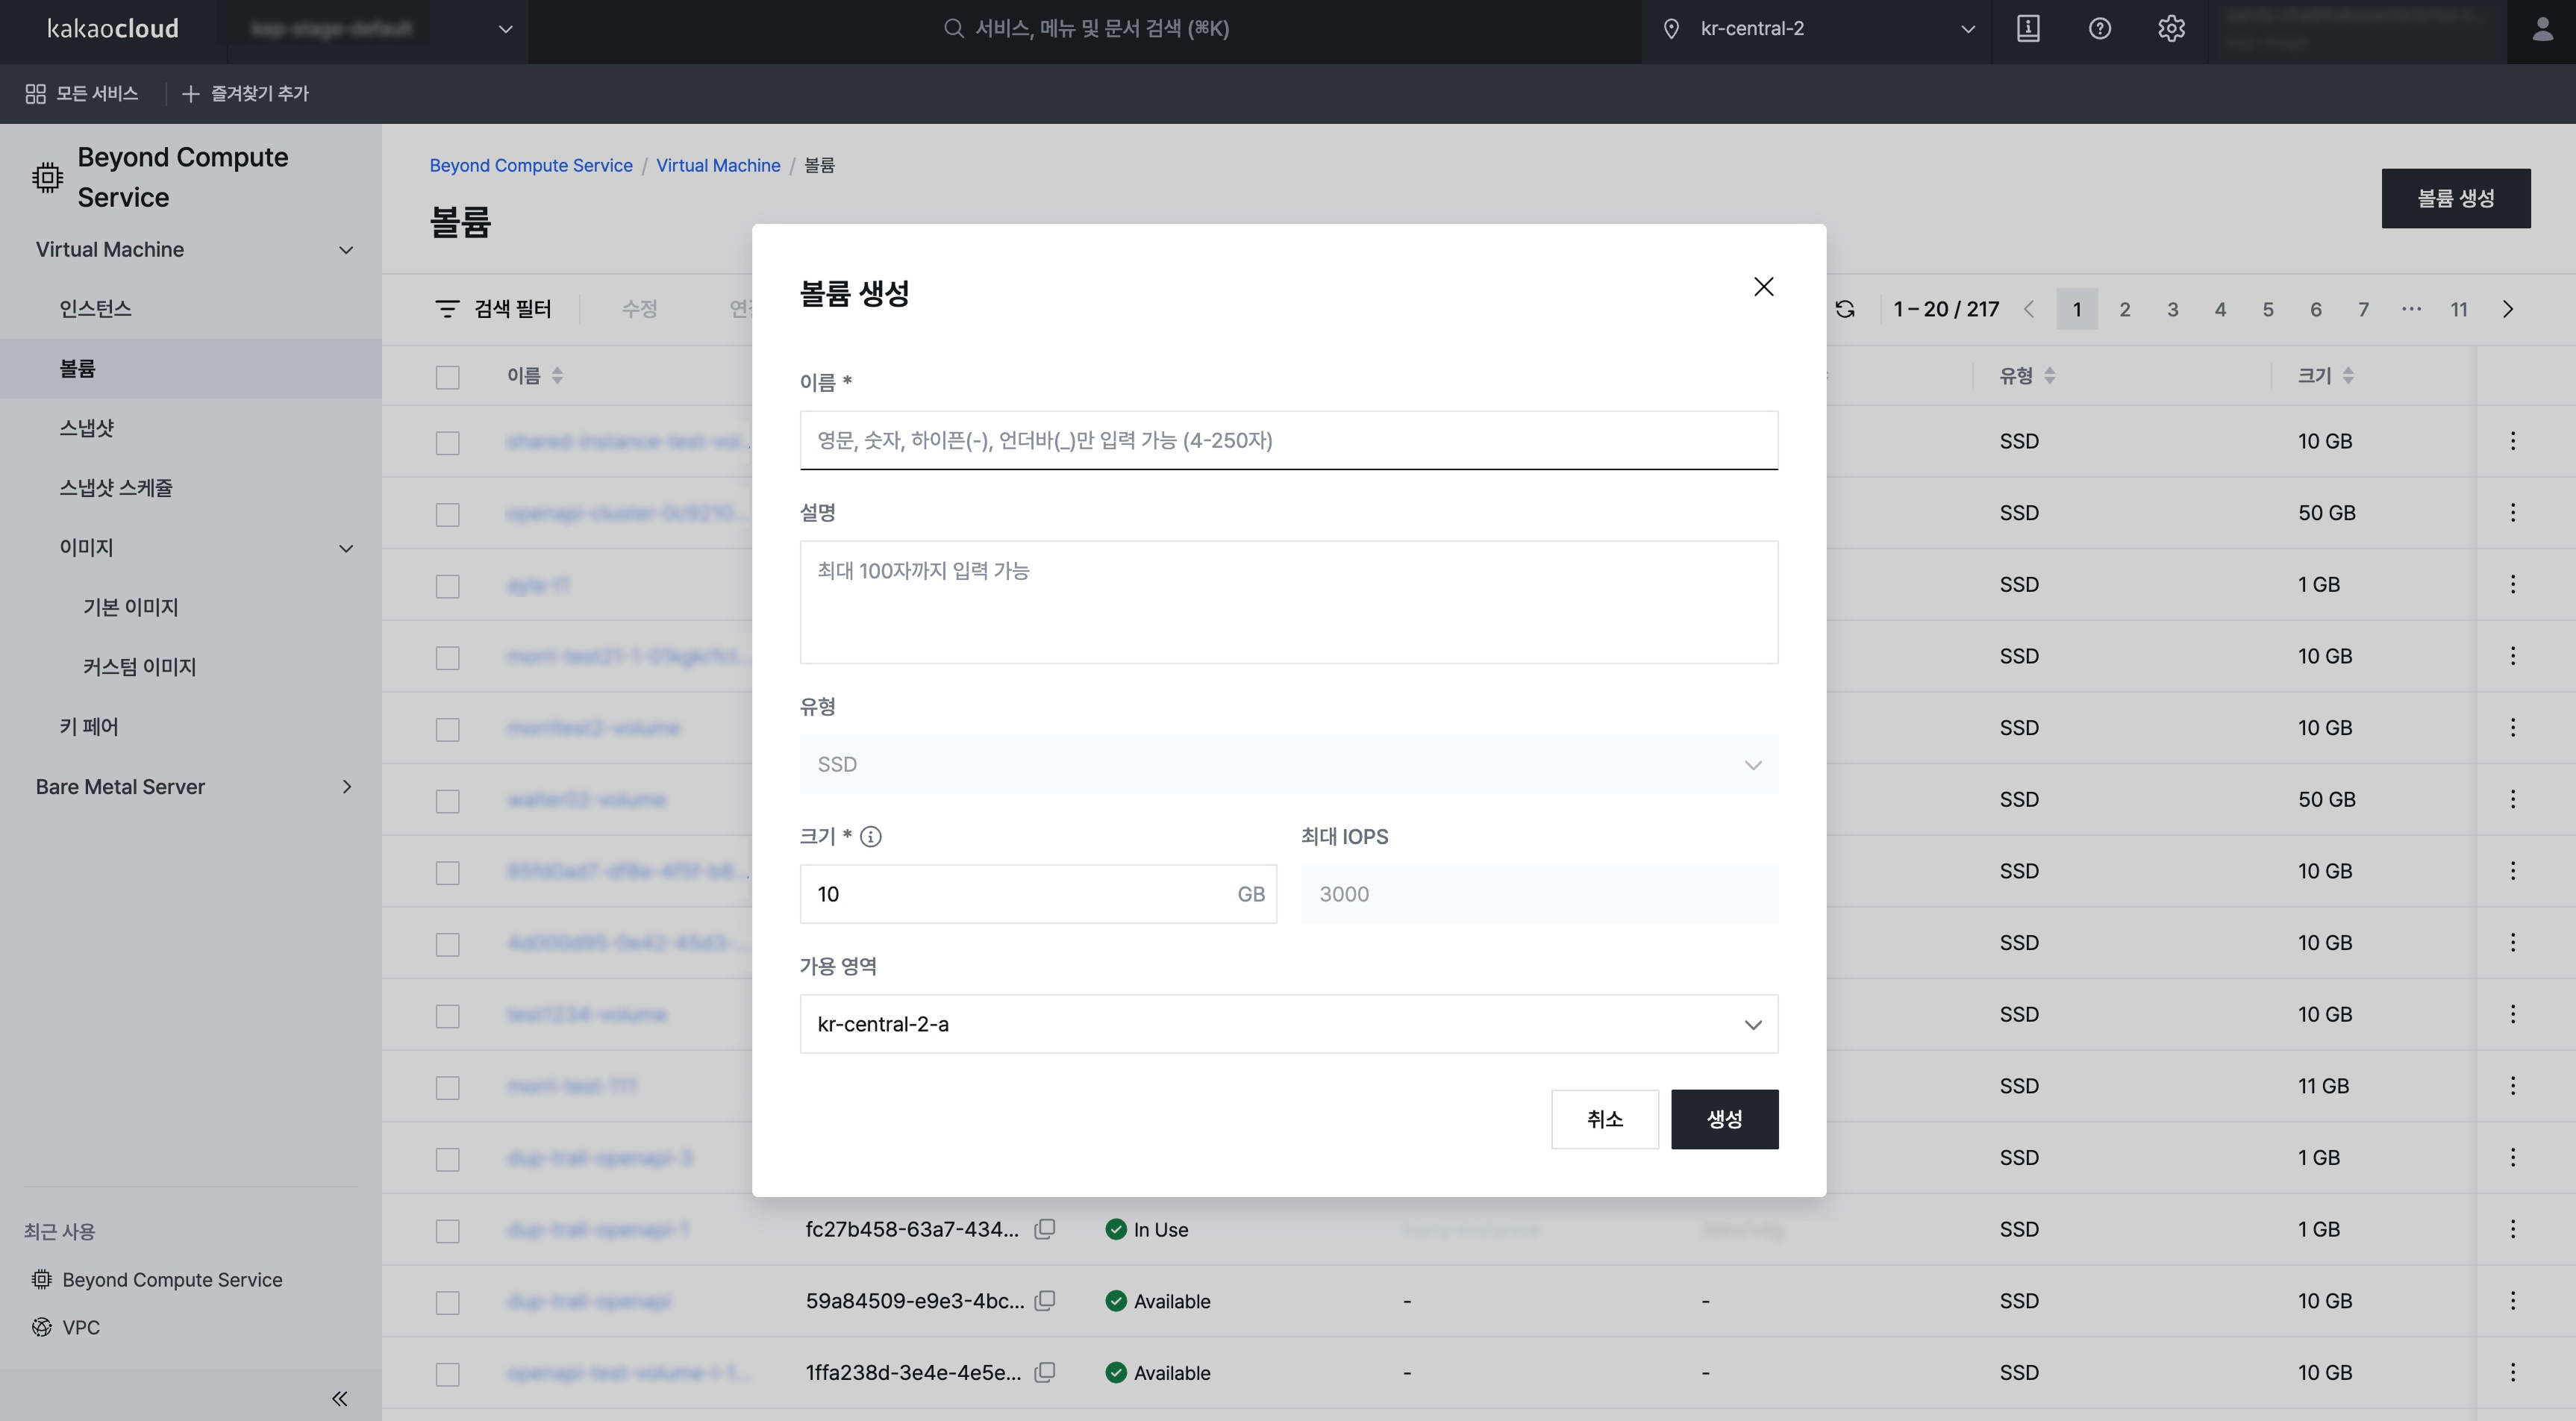 Create volume
Category Description Name Enter the name of the volume Description Description of the volume Type Type of the volume
- Only theSSDtype is supportedSize Size of the volume
- Linux family: Can be created with a size from 1 to 16,384 GB
- Windows family: Can be created with a size from 1 to 2,048 GBMaximum IOPS Maximum IOPS based on the configured volume size
- 3,000 IOPS to 16,000 IOPSAvailability Zone Availability Zone where the volume will be created
View volume list and basic information
You can view the list of running volumes and the basic information of each volume.
-
Go to Compute > Beyond Compute Service > Virtual Machine in the KakaoCloud console.
-
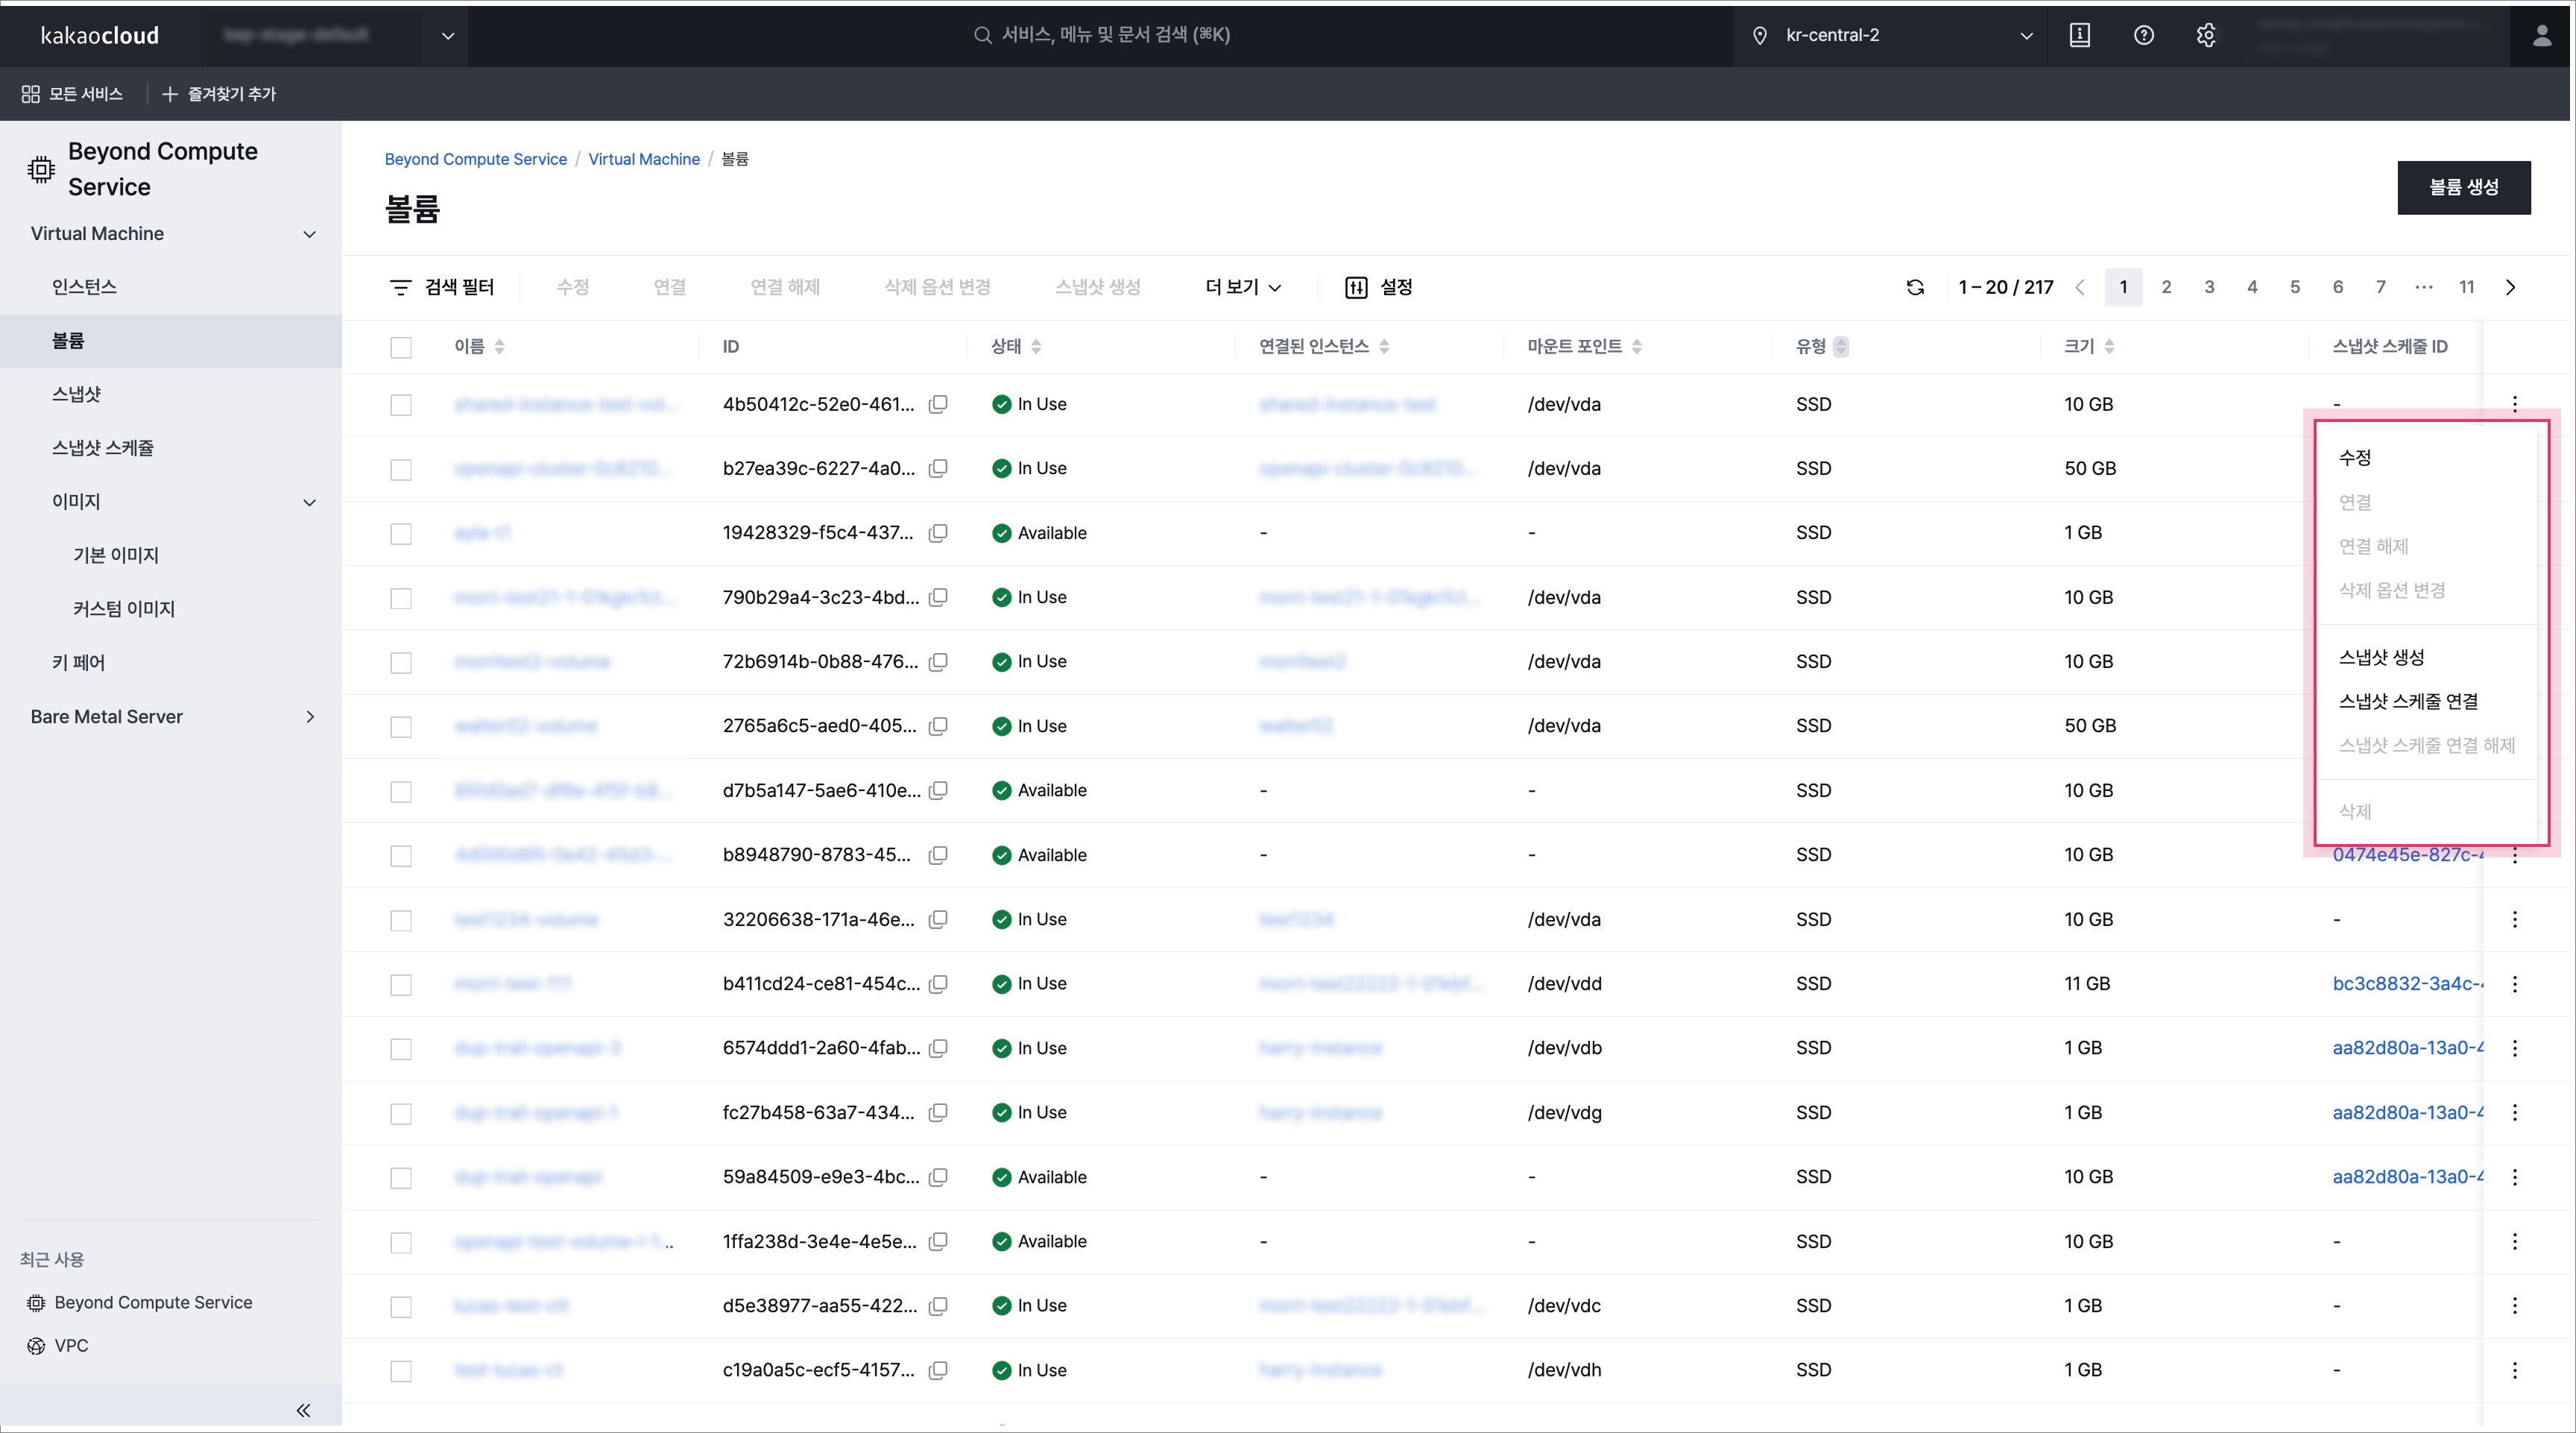
In the Volumes menu, check the list of currently running volumes.
 Volume list
Category Description Name Name of the volume ID Unique ID of the volume Status Status of the volume
- For more information about volume status, see Volume statesConnected instance Connected instance
- Click the instance name to go to the detail page of that instanceMount point Connected mount point Type Type of the volume Size Size of the volume Snapshot schedule ID Snapshot schedule ID connected to the volume Availability Zone Availability Zone where the volume was created Created Date and time when the volume was created
View volume details
You can check and manage detailed information of the volume and snapshot information created from the selected volume.
- Go to Compute > Beyond Compute Service > Virtual Machine in the KakaoCloud console.
- In the Volumes menu, select the volume for which you want to view detailed information.
- Check the information on the volume detail page.
View volume by instance
You can check the volume information connected to an instance.
- Go to Compute > Beyond Compute Service > Virtual Machine in the KakaoCloud console.
- In the Instances menu, select the instance for which you want to check volume information.
- In the Volumes tab of the instance detail page, check the volume information of that instance.
Modify volume
You can modify the settings of a volume.
- Go to Compute > Beyond Compute Service > Virtual Machine in the KakaoCloud console.
- In the Volumes menu, select [⋮] button > Modify for the volume you want to modify.
- When modifying the volume size, only a value larger than the existing volume size can be entered in 1GB units. After expanding the volume size, refer to Extend file system to update the size of the file system.
- Configure the volume in the pop-up window, then click the [Modify] button.
Attach volume
A newly created volume is in the Available state and is not connected to an instance. To use the volume properly, you must attach the volume to the instance in the console and then connect the volume as a device according to the guide for each operating system.
Attach from console
The following describes how to attach a volume to an instance.
- Go to Compute > Beyond Compute Service > Virtual Machine in the KakaoCloud console.
- In the Volumes menu, select [⋮] button > Attach for the volume to attach to the instance.
- In the pop-up window, enter the information, then click the [Save] button.
- The number of resources that can be attached to a single instance, such as network interfaces, volumes, and GPUs, is limited and cannot exceed that number. The total number of attachable resources differs by instance family. If attaching an additional network interface or volume fails, reduce the number of attached resources and try again.
When attaching a volume to an instance, if you enable the Delete with instance option, the connected volume can also be deleted when the instance is deleted.
Attach volume on linux
In a Linux environment, access the instance through SSH and configure the file system and mount point.
-
You can use the
lsblkcommand to check whether the volume attached in the console is correctly connected as a device.- Example: Run the
lsblkcommand and check that the newly created 8G volume is connected as/dev/vdb.
lsblk command (check device attachment)ubuntu@volume-attach-1:~$ lsblk
NAME MAJ:MIN RM SIZE RO TYPE MOUNTPOINT
vda 252:0 0 20G 0 disk /boot
vdb 252:16 0 8G 0 disk - Example: Run the
-
Use the
file -scommand to check the file system type. Ifdatais output, the device does not have a file system.file -s command (check file system type)ubuntu@volume-attach-1:~$ sudo file -s /dev/vdb
/dev/vdb: data -
If there is no file system, use the
mkfs -tcommand to create a file system.mkfs -t command (when there is no file system)ubuntu@volume-attach-1:~$ sudo mkfs -t xfs /dev/vdb
meta-data=/dev/vdb isize=512 agcount=4, agsize=65536 blks
= sectsz=512 attr=2, projid32bit=1
= crc=1 finobt=1, sparse=1, rmapbt=0
= reflink=1
data = bsize=4096 blocks=262144, imaxpct=25
= sunit=0 swidth=0 blks
naming =version 2 bsize=4096 ascii-ci=0, ftype=1
log =internal log bsize=4096 blocks=2560, version=2
= sectsz=512 sunit=0 blks, lazy-count=1
realtime =none extsz=4096 blocks=0, rtextents=0 -
Check that the file system was created successfully.
file -s command (check file system creation)ubuntu@volume-attach-1:~$ sudo file -s /dev/vdb
/dev/vdb: SGI XFS filesystem data (blksz 4096, inosz 512, v2 dirs) -
Use the
mkdircommand to create a mount point directory for the volume.- The mount point is the location where files are read and written after the volume is mounted.
mkdir command (create mount point directory)ubuntu@volume-attach-1:~$ sudo mkdir -p /data/vdb -
Use the
mountcommand to connect the directory created in the previous step and the volume.mount command (connect directory and volume)ubuntu@volume-attach-1:~$ sudo mount /dev/vdb /data/vdb -
Use the
lsblkcommand to check whether the file system and mount point have been applied correctly.lsblk command (check file system and mount point application)ubuntu@volume-attach-1:~$ sudo lsblk
NAME MAJ:MIN RM SIZE RO TYPE MOUNTPOINT
vda 252:0 0 20G 0 disk /boot
vdb 252:16 0 8G 0 disk /data/vdb -
To keep the connected volume after a system reboot, first check the UUID of the device.
lsblk command (check UUID of device)ubuntu@volume-attach-1:~$ lsblk -o +UUID
NAME MAJ:MIN RM SIZE RO TYPE MOUNTPOINT UUID
vda 252:0 0 20G 0 disk /boot 876da551-d737-4350-9cd9-bb3fc9069bff
vdb 252:16 0 1G 0 disk /data/vdb 2d332f0b-1771-4b83-bd5c-7e9d1cc91ed2 -
Use the checked UUID to add the following content to the
/etc/fstabfile.Keep connected volume after system rebootUUID=2d332f0b-1771-4b83-bd5c-7e9d1cc91ed2 /data/vdb xfs defaults,nofail 0 2
Attach volume on linux(xfs)
For instances created with OS images that use the xfs file system, such as CentOS Stream 8 and Rocky Linux 8, after creating and restoring a snapshot of the root volume, a problem may occur where the restored snapshot cannot be attached to the same instance because of duplicate UUIDs. To use the volume normally, proceed with the following steps.
-
First mount the file system by using the nouuid option.
- If you use it temporarily, this procedure alone can resolve the issue.
mount command (mount and nouuid option)[centos@centos-stream-8 test]$ sudo mount -t xfs -o nouuid /dev/vdb1 /home/centos/test -
Unmount it.
umount command (unmount)[centos@centos-stream-8 test]$ sudo umount /dev/vdb1 -
Regenerate the UUID.
- For a permanent solution, you must proceed to this step.
xfs_admin command (regenerate uuid)[centos@centos-stream-8 test]$ sudo xfs_admin -U generate /dev/vdb1
Clearing log and setting UUID
writing all SBs
new UUID = ff714d9b-8c90-40e2-9e2f-12623220e1cf -
Set the newly generated UUID on the restored snapshot volume.
xfs_admin command (update UUID)[centos@centos-stream-8 test]$ sudo xfs_admin -U ff714d9b-8c90-40e2-9e2f-12623220e1cf /dev/vdb1
Clearing log and setting UUID
writing all SBs
new UUID = ff714d9b-8c90-40e2-9e2f-12623220e1cf -
Mount the restored snapshot again to the instance mount point.
mount command (remount)[centos@centos-stream-8 test]$ sudo mount /dev/vdb1 /home/centos/test
Attach on windows
In a Windows environment, connect to the instance through Remote Desktop, then initialize the disk and assign the volume.
-
Enter Start > Run or press the
WIN+Rshortcut. -
In the Run window, enter
diskmgmt.msc, then click the [OK] button or press Enter. -
In Disk Management, select the newly added disk, then right-click it and select Online to switch it online.
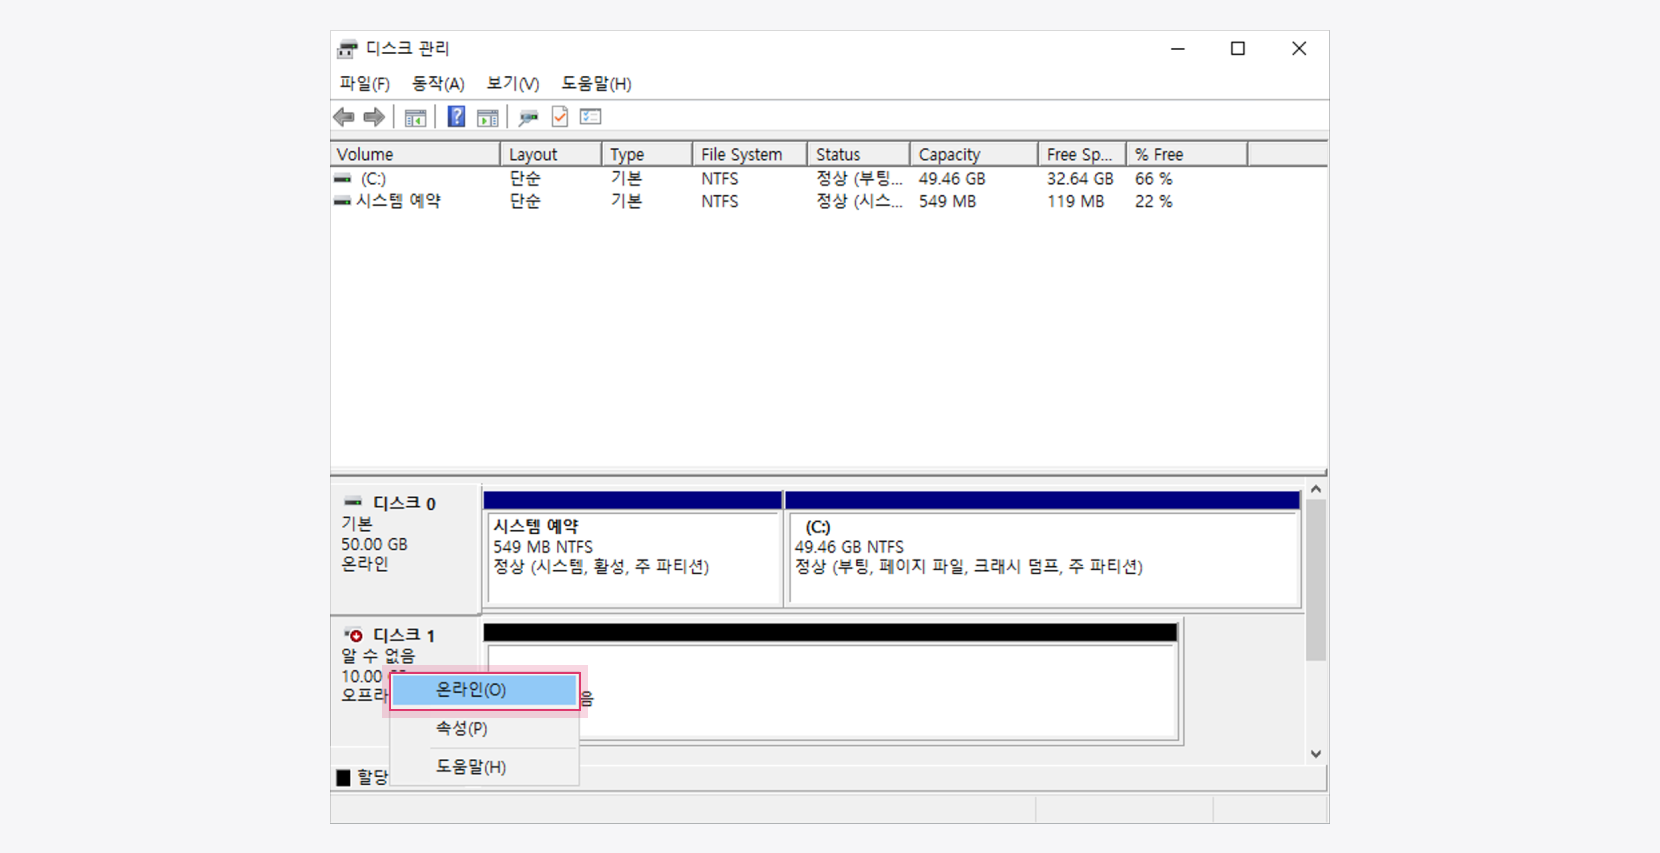 Switch to online
 -
Select the newly added disk, right-click it, then select Initialize disk. When selected, the Initialize disk pop-up window appears.
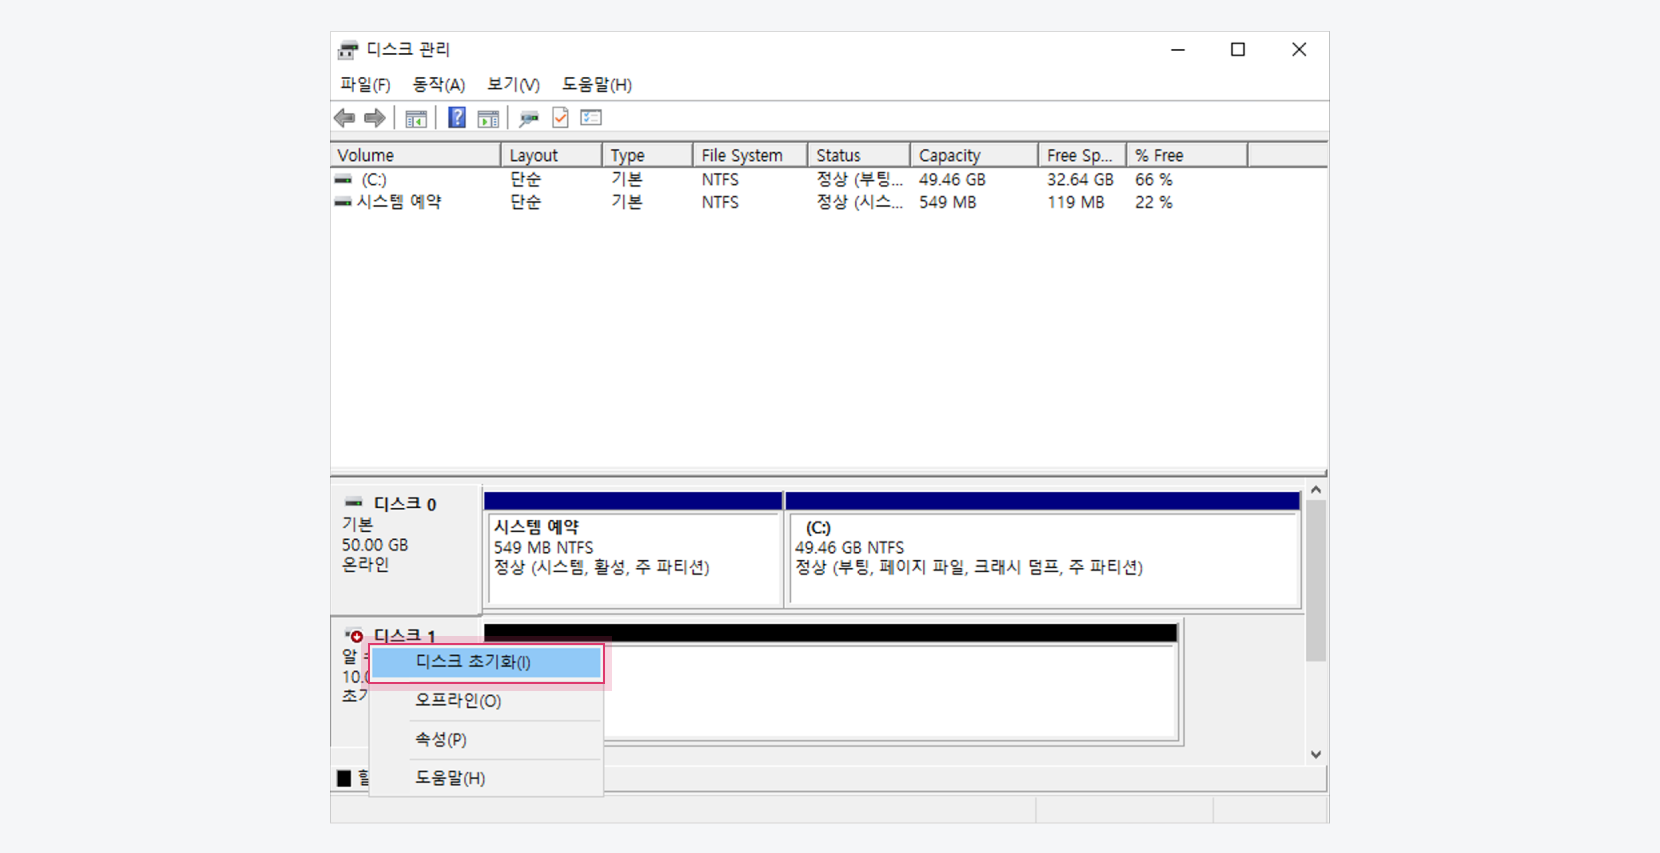 Initialize disk
 -
Check the newly added disk, select the GPT partition table, then click the [OK] button.
- To connect a disk larger than 2TB, you must select the GPT partition table.
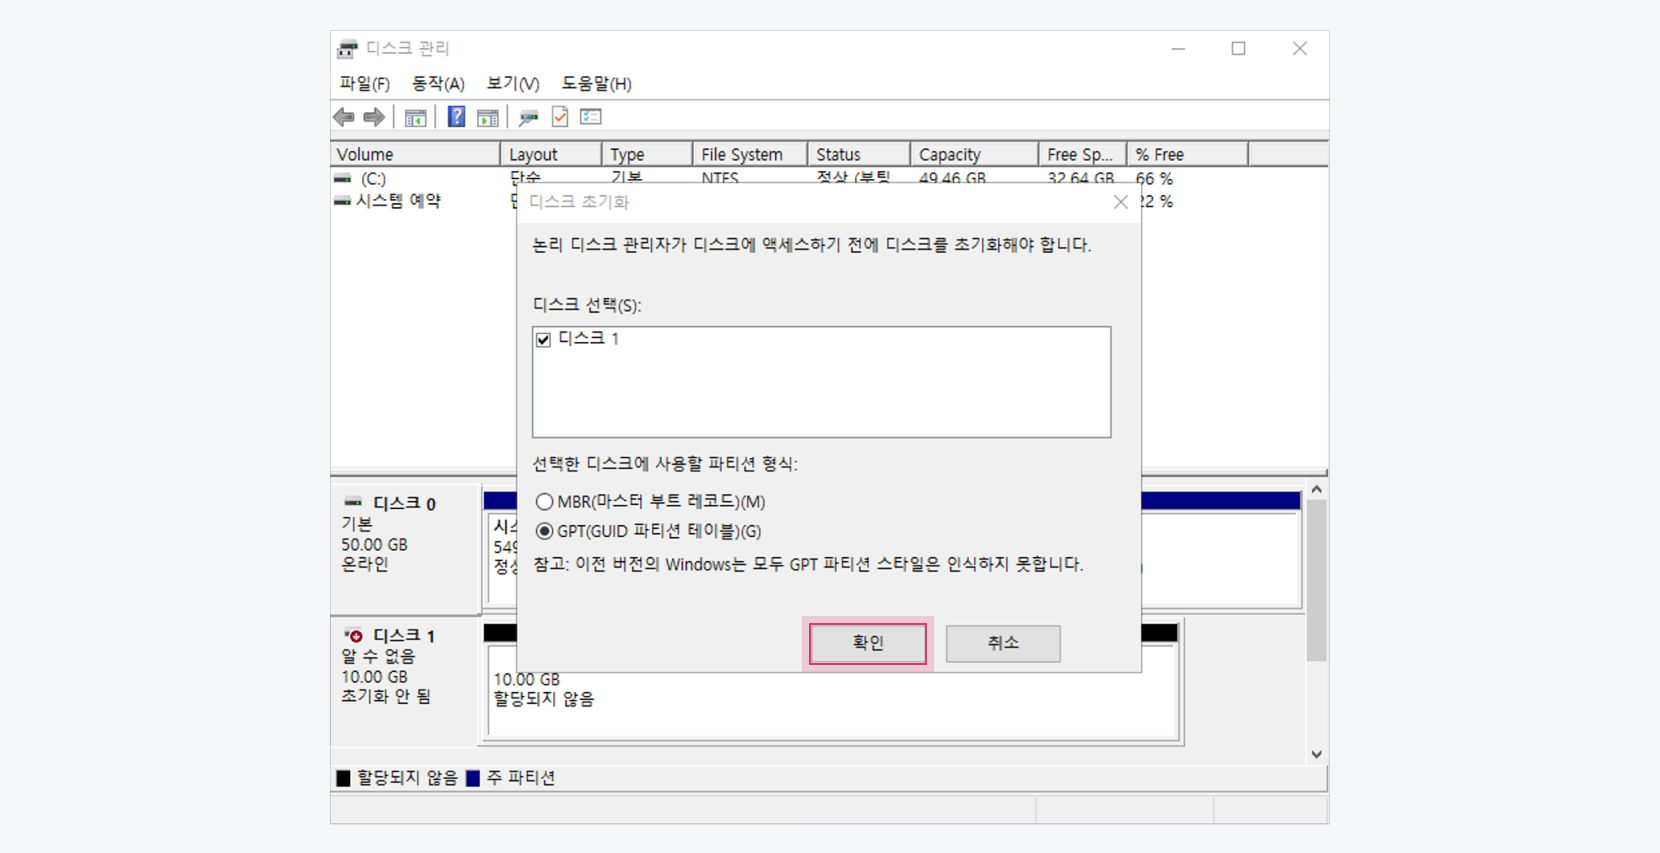 Select GPT partition table
 -
Select the initialized disk, right-click it, then select New simple volume. When selected, the New simple volume wizard pop-up window appears.
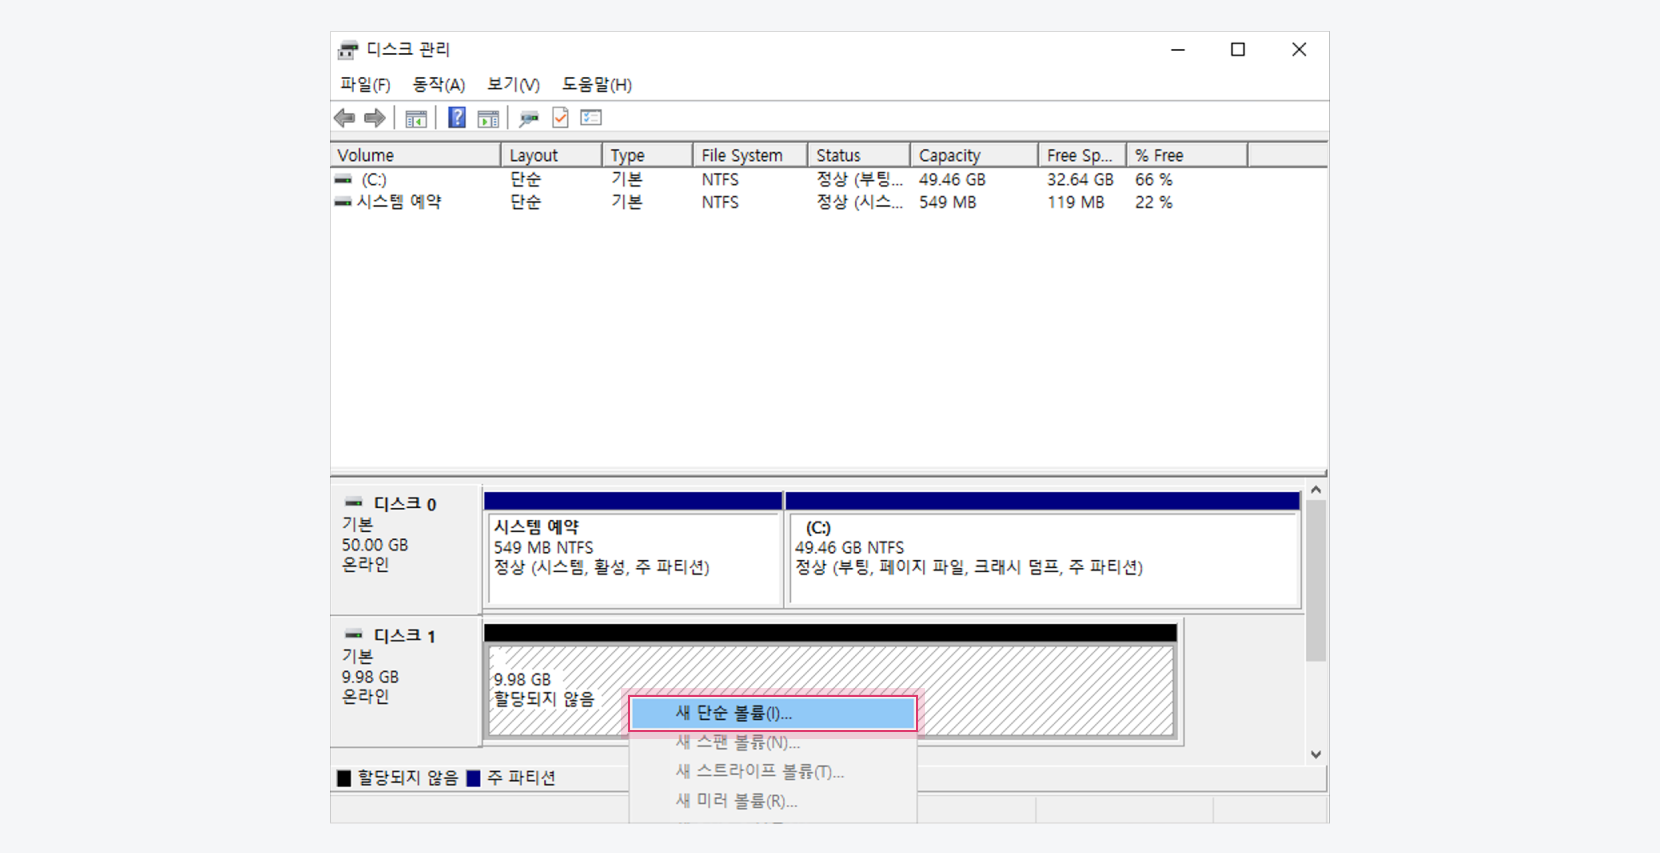 New simple volume
 -
Run the New simple volume wizard.
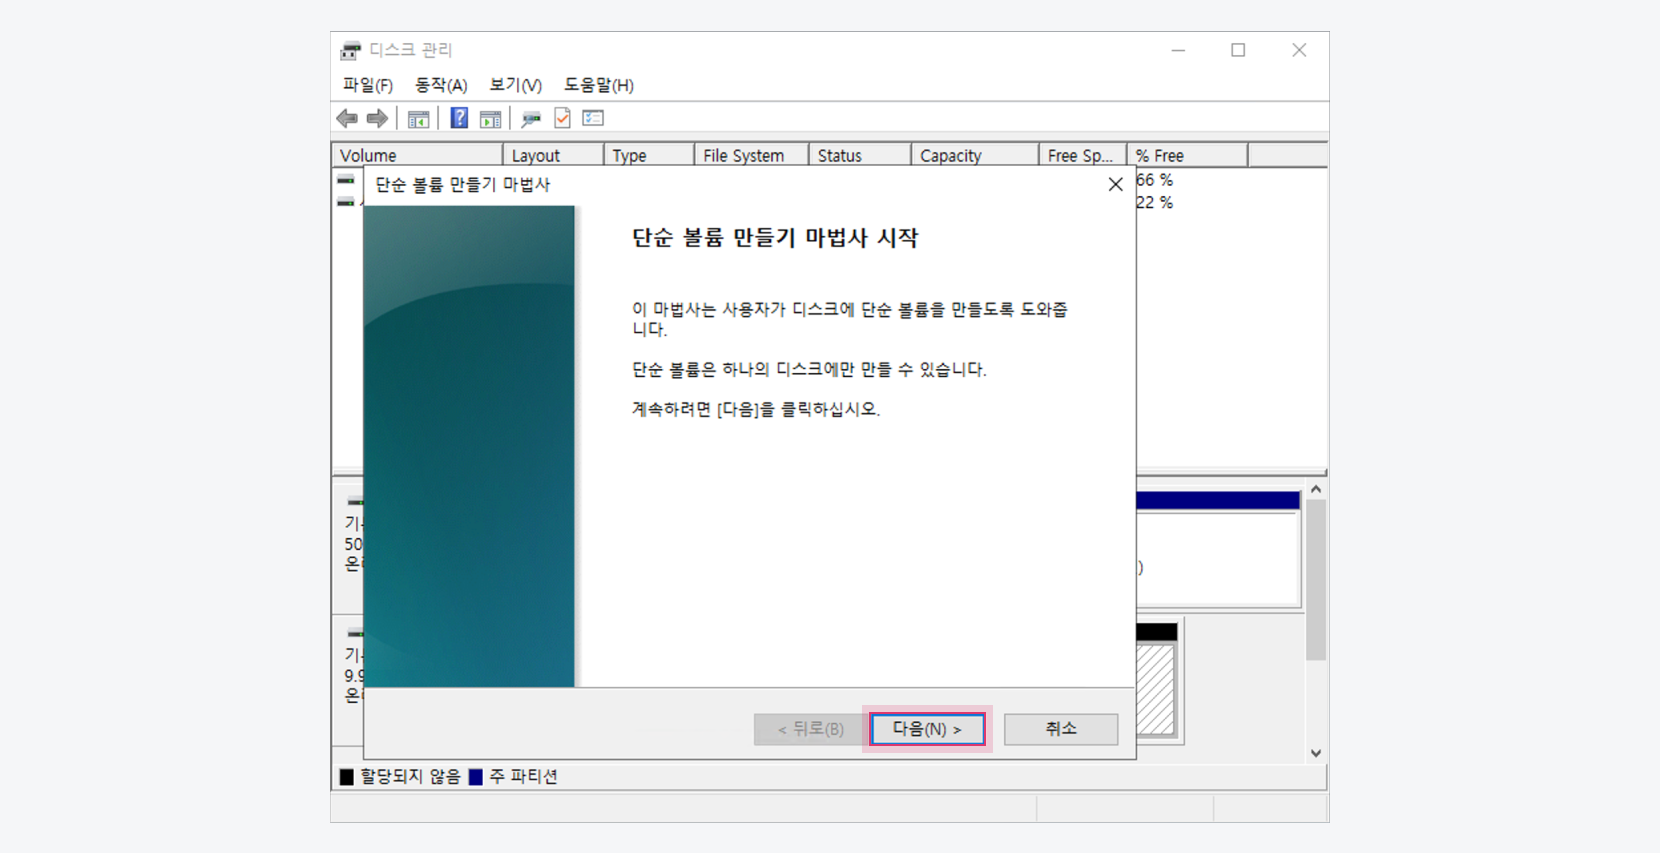 New simple volume wizard
 -
In the New simple volume wizard, follow the instructions to select volume size, drive letter assignment, and format options, then finish to complete the volume attachment.
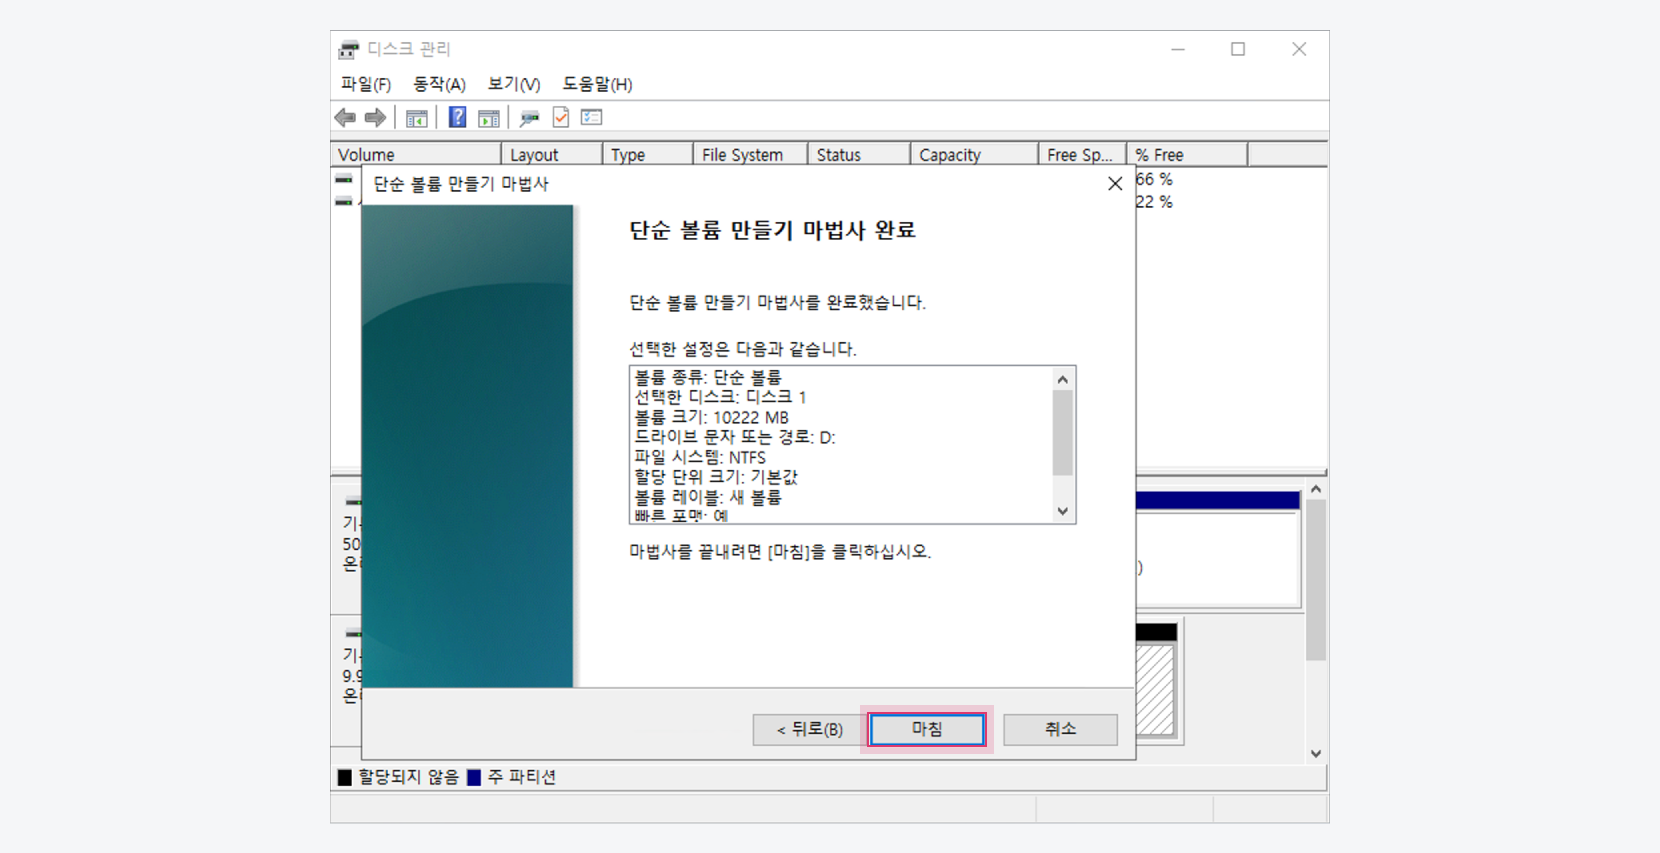 Complete new simple volume wizard
Detach volume
You can detach a volume that is no longer in use.
- The root volume used as the OS area in an instance cannot be detached.
- If you attempt to detach a volume while the instance is in the running (
Active) state, you must first unmount that volume from the instance before proceeding. For safe volume detachment, it is recommended to stop the instance and then detach the volume.
- Go to Compute > Beyond Compute Service > Virtual Machine in the KakaoCloud console.
- In Volume tab > Volume list, select [⋮] button > Detach for the volume to detach.
- In the pop-up window, check the volume and instance to detach, then click the [Detach] button.
Expand volume
You can expand the size of a volume.
- After expanding the volume size, you must also expand the file system size by using file system-related commands.
ㄴ You can start file system expansion after the volume status changes to Extending. - To apply the new volume QoS after expanding the volume size, the following actions are required depending on the volume type.
ㄴ For a root volume, perform instance Shut down and then instance Start (unshelve).
ㄴ For an additional volume, perform volume Detach and then volume Attach.
- Go to Compute > Beyond Compute Service > Virtual Machine in the KakaoCloud console.
- Click the Volumes menu, then select [⋮] button > Modify volume for the volume to expand.
- In the pop-up window, enter the size to expand in Size, then click the [Save] button.
Extend file system
To store data in the additional disk space after expanding the volume size, the user must directly access the instance and update the size of the file system and partition. After the user expands the size of the volume, the process of expanding the file system size by using file system and partition-related commands in the instance is as follows. However, the required procedure may differ depending on the file system and partition configuration of the user instance.
The partition table format and file system type by OS provided by KakaoCloud are as follows.
| OS name | Version | Root volume partition table format | File system |
|---|---|---|---|
| Ubuntu | 20.04 | GPT | ext4 |
| Ubuntu | 22.04 | GPT | ext4 |
| Ubuntu | 24.04 | GPT | ext4 |
| CentOS Stream | 9 | MBR | xfs |
| Rocky Linux | 8.10 | MBR | xfs |
| Rocky Linux | 9.4 | MBR | xfs |
| Alma Linux | 8.10 | GPT | xfs |
| Alma Linux | 9.4 | GPT | xfs |
| Windows | 2019 | MBR | ntfs |
| Windows | 2022 | MBR | ntfs |
Even if you change the file system or partition, the data in the volume is not modified or deleted. However, before changing the file system and partition, it is recommended to back up volumes storing important data so that changes can be reverted if necessary.
- Linux
- Windows
The following is the system expansion procedure that can be applied to ext4 and xfs, the most widely used Linux file systems. In the following Linux example, if there is an instance with a 50GB root volume created in advance by the user, it explains how to expand the volume, increase the root volume of the instance to 80GB, and then expand the partition and file system.
Step 1. Connect instance
In the terminal, run instance connection by using the ssh command. For more information about the connection process, see Create and connect instance.
Step 2. Check partition and file system information
-
Use the
lsblkanddfcommands to check the partition and file system information to expand.- Example: Looking at the partition information before expanding the volume, you can check that the 50G root volume is connected with the device name /dev/vda, and the 30G non-root volume is connected as /dev/vdb. The root volume device /dev/vda has a 50G partition named vda1.
lsblk command (before volume expansion)ubuntu@volume-test:~$ sudo lsblk
NAME MAJ:MIN RM SIZE RO TYPE MOUNTPOINT
vda 252:0 0 50G 0 disk
├─vda1 252:1 0 49.9G 0 part /
├─vda14 252:14 0 4M 0 part
└─vda15 252:15 0 106M 0 part /boot/efi
vdb 252:16 0 30G 0 disk /data -
After expanding the size of the root volume, run the
lsblkcommand to check the expanded root volume.- Example: After expanding the size of the root volume to 80G and running the lsblk command, you can check that the size of the /dev/vda device has expanded to 80G, but the size of the vda1 partition remains unchanged at 50G.
lsblk command (after volume expansion)ubuntu@volume-test:~$ sudo lsblk
NAME MAJ:MIN RM SIZE RO TYPE MOUNTPOINT
vda 252:0 0 80G 0 disk
├─vda1 252:1 0 49.9G 0 part /
├─vda14 252:14 0 4M 0 part
└─vda15 252:15 0 106M 0 part /boot/efi
vdb 252:16 0 30G 0 disk /data -
If you run the
dfcommand, you can check the file system type of the volumes connected to the instance.- Example: You can check that the size of the /dev/vda1 partition is still 50G and that it uses ext4.
df commandubuntu@volume-test:~$ sudo df -Th
Filesystem Type Size Used Avail Use% Mounted on
...
/dev/vda1 ext4 49G 1.5G 47G 3% /
...
/dev/vdb ext4 30G 45M 28G 1% /data
Step 3. Expand partition
- Use the
growpartcommand to expand the partition size to the maximum size.- Example: Run the growpart command to expand the vda1 partition size.
Expand partition sizeubuntu@volume-test:~$ sudo growpart /dev/vda 1 - After expansion, run the
lsblkcommand to check the size of the expanded partition.- Example: After expansion, run the lsblk command and check that the vda1 partition size has been expanded to 80G.
Check after partition expansionubuntu@volume-test:~$ lsblk
NAME MAJ:MIN RM SIZE RO TYPE MOUNTPOINT
vda 252:0 0 80G 0 disk
├─vda1 252:1 0 79.9G 0 part /
Step 4. Extend file system
You can store data in the expanded space by extending the file system.
The command differs depending on the file system type.
-
If you use ext4, use the
resize2fscommand. If you use xfs, use thexfs_growfscommand.- ext4
- xfs
sudo resize2fs /dev/vda1sudo xfs_growfs -d / -
Check the expanded file system with the
dfcommand. After completing file system expansion, you can store data in the additional disk space without restarting the instance.- Run the df command and check that the /dev/vda1 file system has been expanded to 80G.
df command (after file system expansion)ubuntu@volume-test:~$ df -Th
Filesystem Type Size Used Avail Use% Mounted on
/dev/vda1 ext4 78G 1.6G 76G 2% /
...
/dev/vdb ext4 30G 45M 28G 1% /data
...
The following describes how to extend the file system in a Windows environment. In the following example, assume there is an instance with a 50GB root volume created in advance by the user, and it explains how to expand the file system after increasing the root volume of the instance to 70GB by using the volume expansion feature.
Step 1. Extend file system with disk management tool
The following describes how to extend the file system by using the Disk Management tool in a Windows environment.
-
Go to Compute > Beyond Compute Service > Virtual Machine in the KakaoCloud console.
-
In the Instances menu, select [⋮] button > Connect to instance.
-
Check the password in the pop-up window, then log in to the Windows instance.
-
Right-click the [Windows] icon, then select Disk Management.
-
In Disk Management, select Action > Refresh.
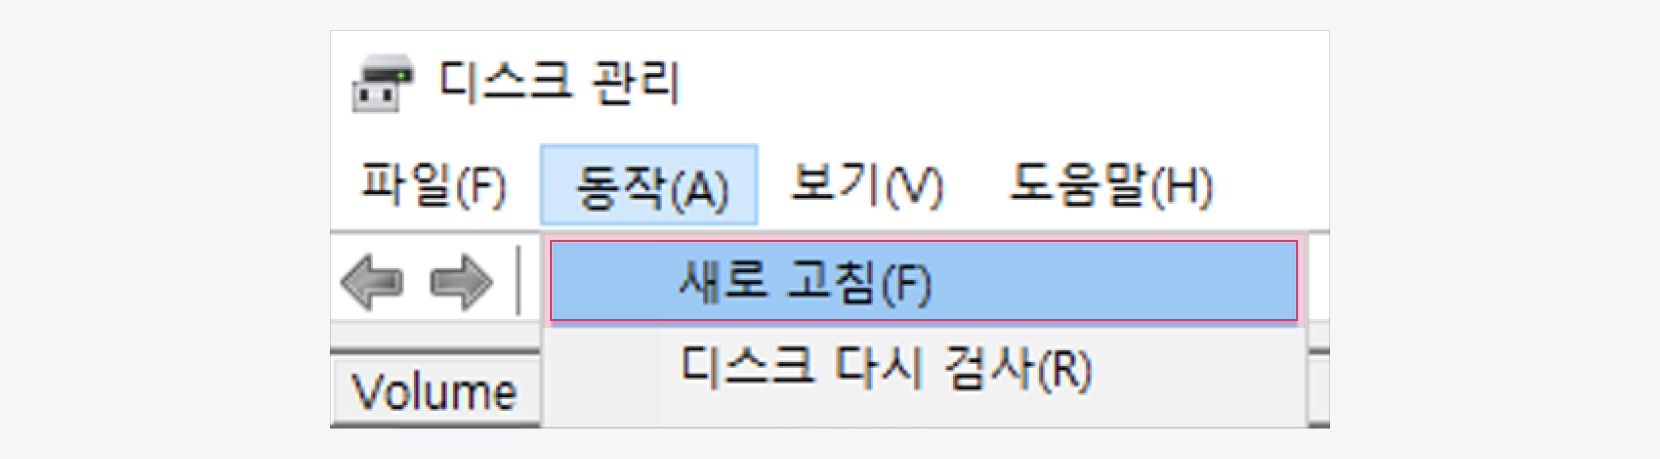 Action refresh
 -
Right-click the formatted partition on the disk whose size you want to expand, then select Extend volume.
- The partition must be adjacent to the right side of the partition to be expanded. If it is not adjacent to the drive, Extend volume may be disabled. Also, the volume uses the MBR (Master Boot Record) partition format and cannot exceed 2TB.
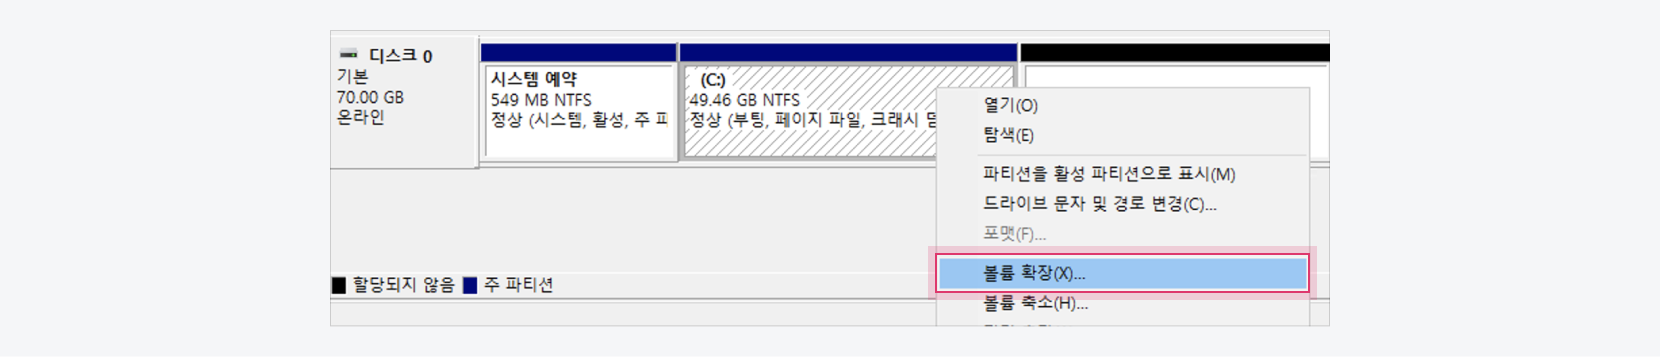 Extend partition volume
 -
In the Extend volume wizard, click the [Next] button.
-
In Select the amount of space in MB, enter the megabytes to expand, then click the [Next] button.
- Normally, specify the maximum available space.
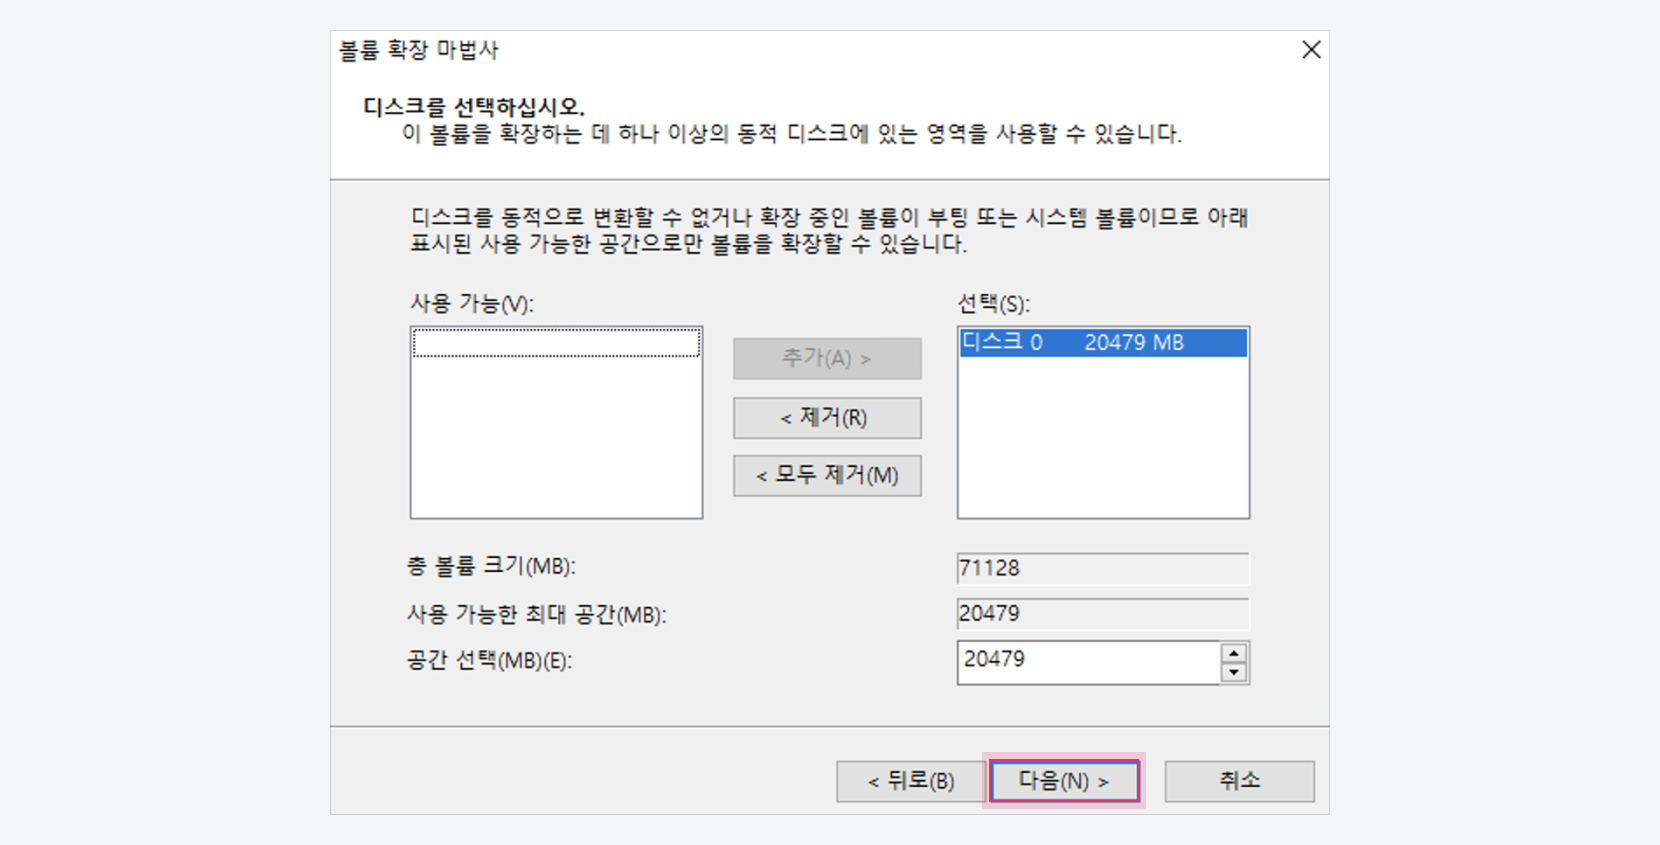 Extend volume wizard - Select disk
 -
Click the [Finish] button, then check the expanded file system.
Step 2. Expand partition with powershell
The following describes how to extend the file system through PowerShell in a Windows environment.
-
Go to Compute > Beyond Compute Service > Virtual Machine in the KakaoCloud console.
-
In the Instances menu, select [⋮] button > Connect to instance.
-
In the RDP connection pop-up window, check the password, then log in to the Windows instance.
-
Right-click the [Windows] icon, then select Windows PowerShell(Admin).
-
Check the drive letter of the partition to expand.
drive letterGet-Partition -
Rescan the disk.
Rescan disk"rescan" | diskpart -
Use the drive letter to check the allowed minimum and maximum size in bytes of the partition.
Rescan diskGet-PartitionSupportedSize -DriveLetter <drive-letter> -
Extend the partition to the maximum available size.
Command to extend partition to maximum sizeResize-Partition -DriveLetter <drive-letter> -Size $(Get-PartitionSupportedSize -DriveLetter <drive-letter>).SizeMax- To extend the partition to a specified size, enter the size in GB format in
<size>.
Command to extend partition to specified sizeResize-Partition -DriveLetter <drive-letter> -Size <size> - To extend the partition to a specified size, enter the size in GB format in
Delete volume
You can delete a volume that is no longer in use.
- Go to KakaoCloud console > Compute > Beyond Compute Service > Virtual Machine.
- Select the Volumes menu, then click the [Delete volume] button located at the top right.
- In the pop-up window, enter the information, then click the [Delete] button.
- Deleted volumes cannot be recovered.
- If you enable the Delete with instance option when attaching a volume to an instance, the connected volume is also deleted when the instance is deleted.