Create and connect instance
Create instance
An instance is a virtualized hardware resource used to configure servers with various instance types. Here's how to create an instance in the Virtual Machine service:
-
Go to the KakaoCloud console > Beyond Compute Service > Virtual Machine menu.
-
In the Instance menu, select the [Create instance] button.
-
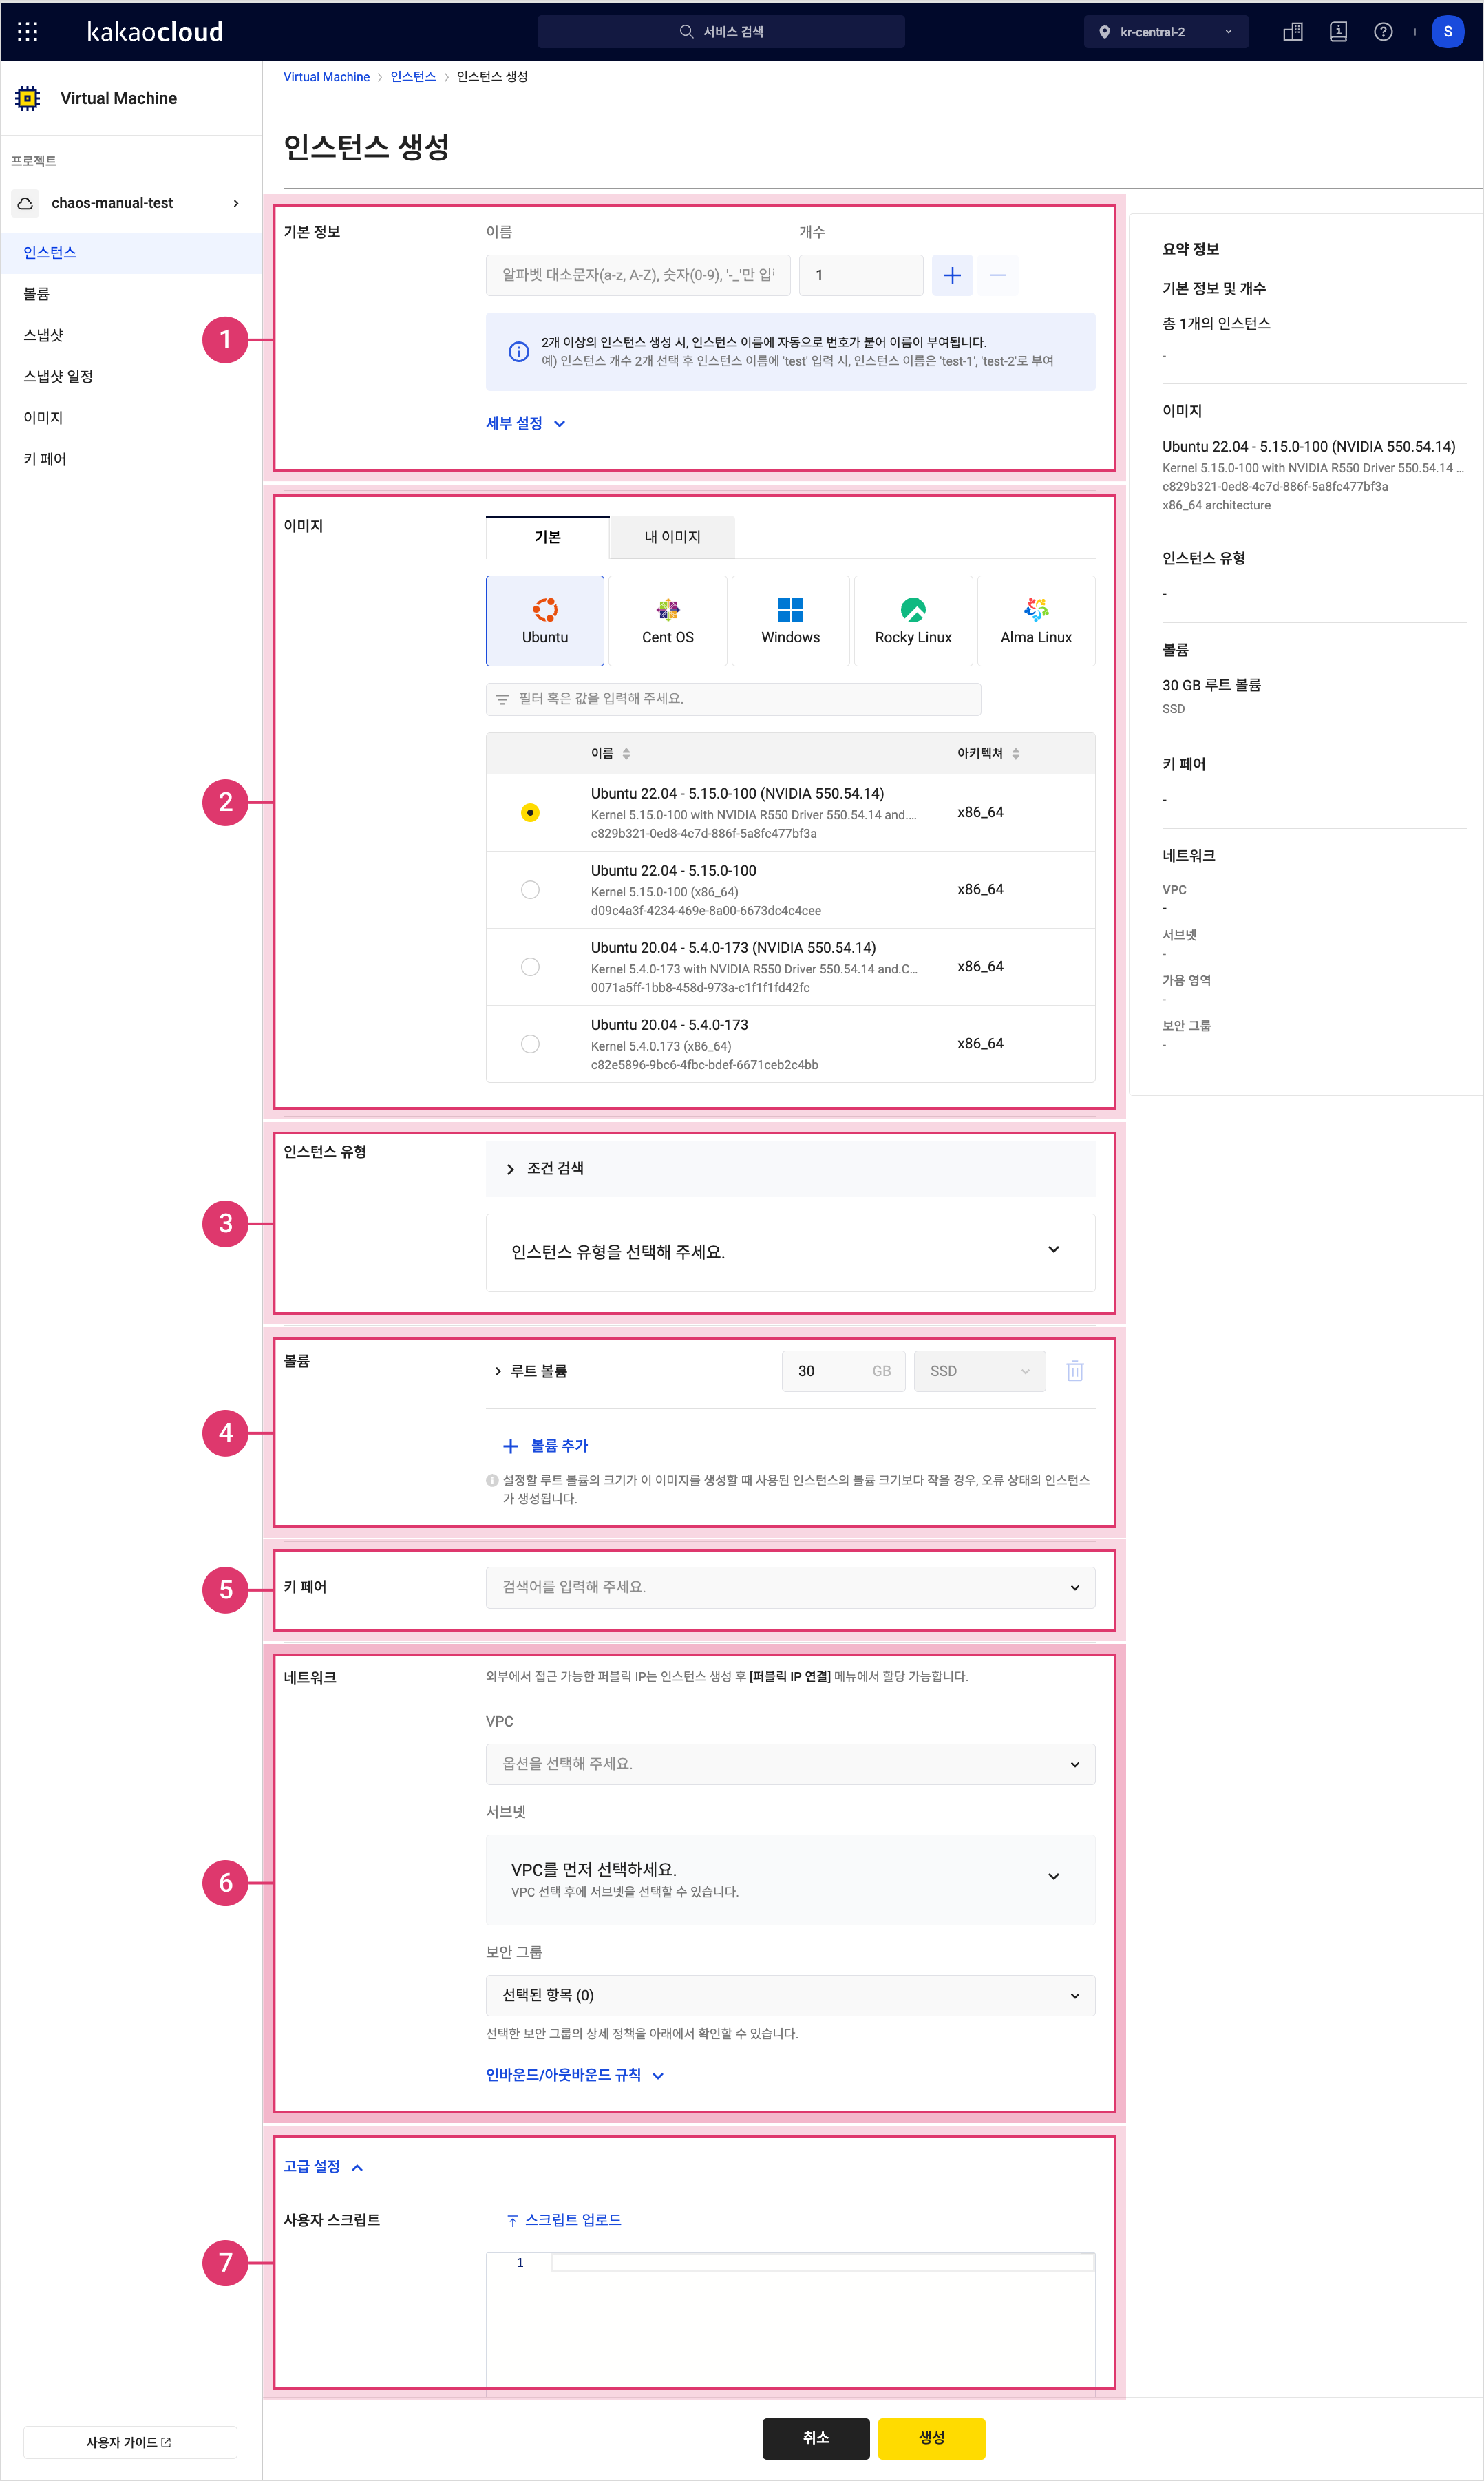
In the Create instance screen, enter the required information and select [Create]. Network access configuration may take up to 10 minutes, during which the server may be temporarily inaccessible.

Item Description ① Basic info Name: Name of the instance
- Duplicate names allowed within the same project
- When creating multiple instances, names are auto-filled based on the first instance② Image Image to use
- Default tab: Official images provided by Kakao Enterprise
- My images tab: Custom images created by the user (see Manage image)③ Instance type Conditions for the instance
- See Instance type specifications④ Volume Volume attached to the instance. The root volume is shown by default, and up to 9 additional volumes can be added.
- Size: 1–16,384 GB
- Type:SSDonly
- Max IOPS: Predefined by volume size (modification to be supported)
Delete with instance: Option to delete the volume when the instance is deleted
⚠️ If not selected, the volume remains and incurs charges. To avoid charges, delete it from the volume list.⑤ Key pair Key pair to apply to the instance
- Select [Create key pair] to create and assign one (see Manage key pair)
⚠️ Private key files cannot be downloaded again. Store them securely.
⚠️ You cannot connect to the instance without a key pair.⑥ Network VPC: The network for the instance
Subnet: Choose a subnet within the network
- If needed, create a new VPC and subnet via KakaoCloud console > VPC
- Public IPs can be assigned after creation. For details, see Associate public IP.
Network interface: The primary network interface for the instance
- Type: Choose new or existing
- IP assignment: Ifnew, auto-assigns an available IP from the subnet CIDR
Security group: Security group to apply
Inbound/Outbound rules
- Inbound: Apply required ports based on image:
ㄴ Linux: TCP 22
ㄴ Windows: TCP 3389
ㄴ Windows + MSSQL: TCP 3389, 1433
- Outbound: Allow all protocols and ports by default⑦ Advanced settings User script: A script that runs during first boot to configure the environment automatically
- Provide a cloud-init script (max 16 KB) or upload a file
- Stored in/var/lib/cloud/instances
- View logs with:
ㄴ Ubuntu:sudo cat /var/log/syslogorsudo journalctl -u cloud-final.service
ㄴ CentOS:sudo cat /var/log/messagesorsudo journalctl -u cloud-final.service
⚠️ Incorrect or incomplete scripts may cause boot failure.
CPU multithreading: Optimize performance by limiting to one thread per core
- Disable for workloads like HPC
- From January 16, 2023, hostnames are auto-assigned using the primary network interface's private IP (e.g.,
host-100-100-17-22). - After instance creation, the hostname updates to the
host-IPformat during the networking phase.
Connect to instance
To connect to an instance, metadata must be accessible. If the instance's security group does not include the "default security group," you must define outbound rules for metadata retrieval in a custom group. For details, see Custom security group.
Connect to Linux instance
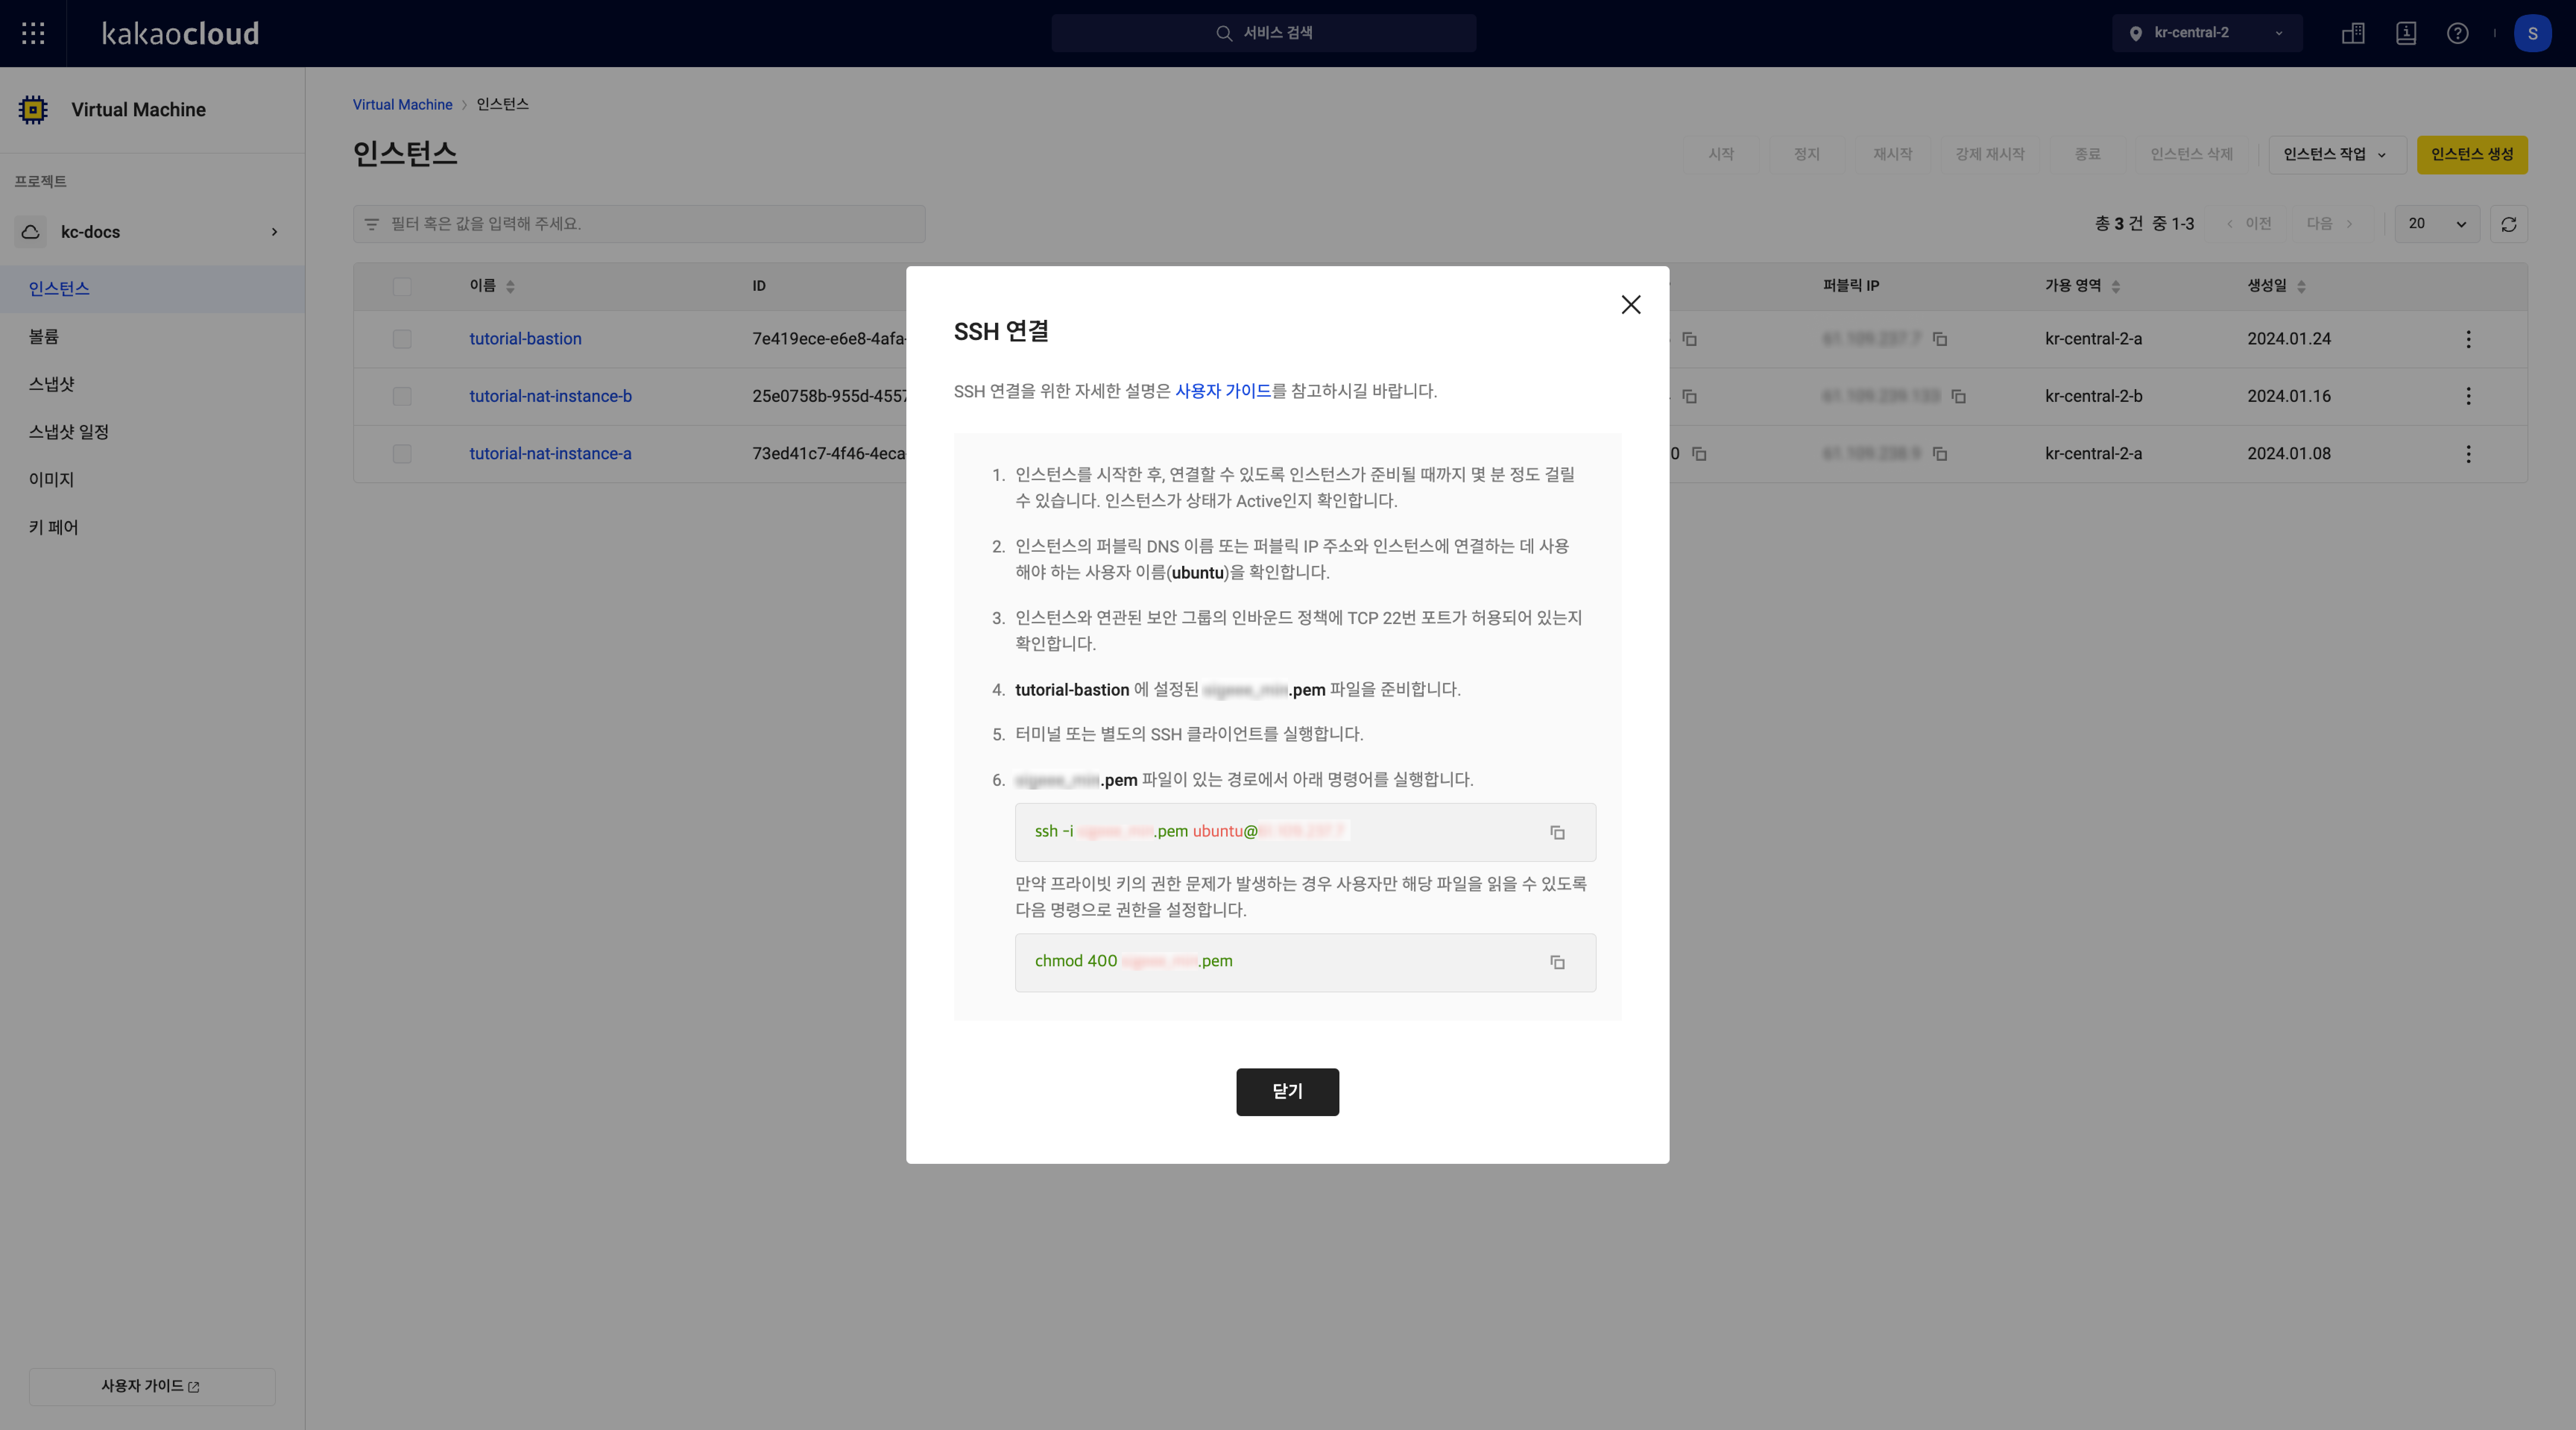
Connect to Linux instances using SSH. You can also find this via Virtual Machine > Instance > [More] > SSH connect. Ensure security groups allow access and that a public or private IP is assigned.
| OS | Security group rule | Allowed port |
|---|---|---|
| Linux | Inbound | TCP 22 (default) |
 SSH connection
Step 1. Prepare SSH client
Install an SSH client in advance. Requirements vary by OS:
| OS | Requirements |
|---|---|
| Linux/macOS | Use terminal after installing SSH client |
| Windows | Install OpenSSH client (via cmd) or use PuTTY |
Step 2. Connect via SSH
Connect using the SSH command with the private key, username, and instance IP:
ssh -i {PATH_TO_PRIVATE_KEY} {USERNAME}@{INSTANCE_IP}
| Item | Description |
|---|---|
{PATH_TO_PRIVATE_KEY} | Path to your SSH private key file |
{USERNAME} | Default username depending on image |
{INSTANCE_IP} | Public or private IP assigned to the instance |
Connect to Windows instance
To connect to a Windows instance, install the Windows App and allow TCP/3389 in the security group from the source IP of your PC.
Step 1. Prepare RDP client
Install the Windows App. On macOS, download it from the App Store.
| Operating system | Preparation |
|---|---|
| Windows | Use the built-in Remote Desktop Connection program or run the mstsc command |
| macOS | Install Windows App from the App Store |
Step.2 Connect via RDP
After checking the account information for RDP connection from the KakaoCloud console, register the target Windows instance using that information.
Depending on your operating system (Windows or macOS), follow the appropriate instructions below to set up the remote connection.
- Windows
- macOS
-
Go to the KakaoCloud console > Beyond Compute Service > Virtual Machine menu.
-
In the Instances menu, click the [More] icon for the instance and select RDP Connection. Check the detailed connection information in the RDP connection popup.
Item Description Public IP A public IP is required to connect to the Windows instance from your PC.
- Assign a public IP via [More] icon > Assign Public IP.
- Allow TCP/3389 in the security group's inbound rules.Username Fixed as administratorPassword Click [Register Key Pair] and upload the key pair file used during instance creation to retrieve the password. If connecting via internal networkYou can connect using a private IP via a Bastion server within the same VPC. First connect to the Bastion server, then run Windows App or
mstscfrom there to connect to the instance's private IP. -
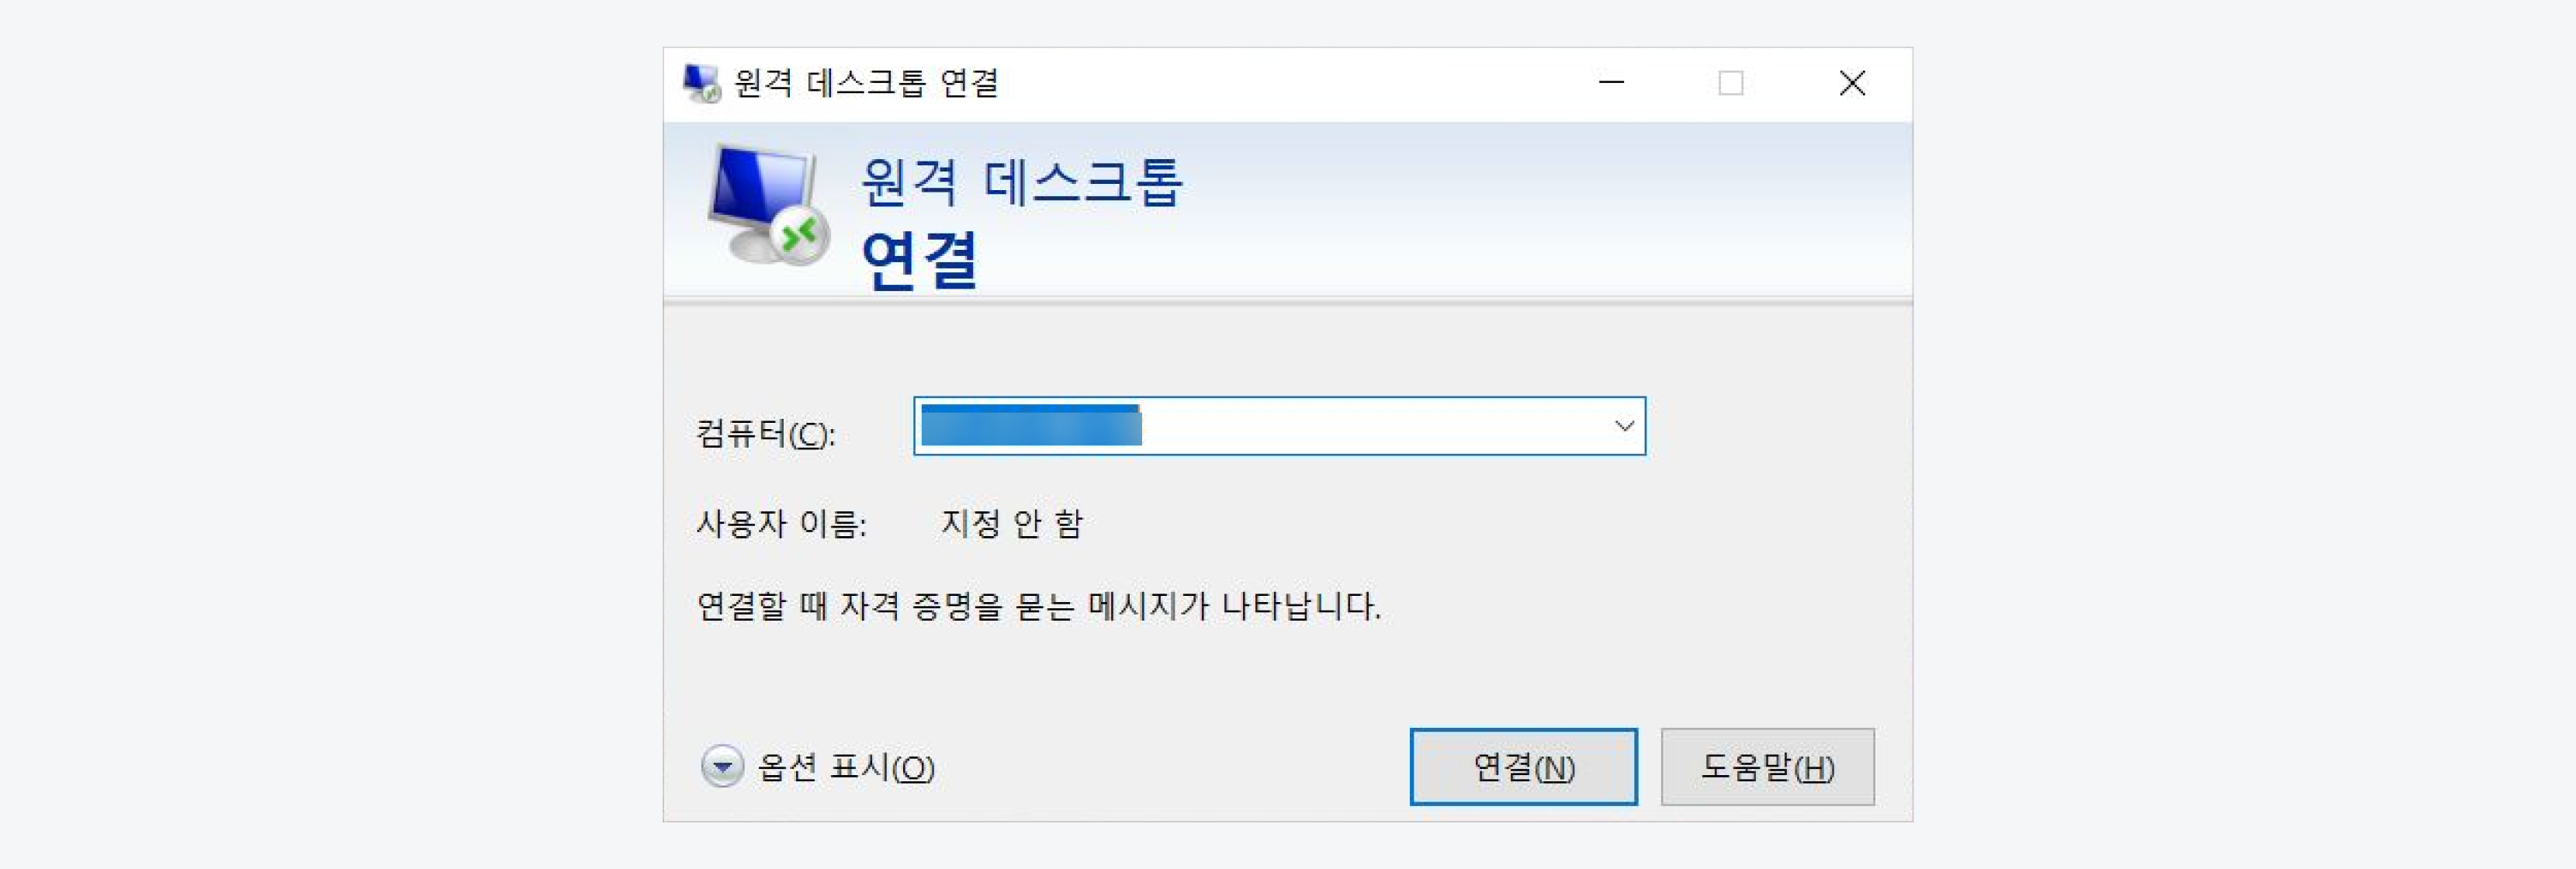
Go to Start > Settings > System > Remote Desktop, or search for "Remote Desktop Connection" to open the tool.
-
In the Remote Desktop Connection popup, enter the public or private IP address of the instance and click [Connect].
- If the instance uses a custom port, append it to the IP (e.g.,
10.0.0.0:1234).
- If the instance uses a custom port, append it to the IP (e.g.,
-
Enter the username and password in the Enter your credentials window and click [OK] to connect to the Windows instance.
-
Go to the KakaoCloud console > Beyond Compute Service > Virtual Machine menu.
-
In the Instances menu, click the [More] icon for the instance and select RDP Connection. Check the detailed connection information in the RDP connection popup.
Item Description Public IP A public IP is required to connect to the Windows instance from your PC.
- Assign a public IP via [More] icon > Assign Public IP.
- Allow TCP/3389 in the security group's inbound rules.Username Fixed as administratorPassword Click [Register Key Pair] and upload the key pair file used during instance creation to retrieve the password. If connecting via internal networkYou can connect using a private IP via a Bastion server within the same VPC. First connect to the Bastion server, then run Windows App or
mstscfrom there to connect to the instance's private IP. -
Launch Windows App. In the left menu, select Devices, then click the [+] icon at the top right and choose Add PC. Based on the previously checked instance information, fill in the fields as follows. Other options can remain at their defaults.
Item Description PC name The public IP address assigned to the Windows instance Credentials Click Add Credentials, then enter the Username and Password from step 2 -
In the Devices menu, check the Saved PCs in the main screen. The added instance will be listed, and you can double-click to connect to it.
- It may take a few minutes after instance creation for the initial password to become available.
- You can only connect using the password retrieved via the original key pair. If you change the password later, you must manage it directly within the OS. The KakaoCloud console only shows the initial password.
- KakaoCloud Windows instances support WSL 1.
If there is another instance in the same VPC with the same hostname, certain network features may not work properly. Be cautious when renaming an instance or manually changing the hostname.
