Monitoring Virtual Machines through API
This document provides step-by-step instructions on how to monitor virtual machines using KakaoCloud Monitoring Flow.
Prerequisites
Prepare the Monitoring Flow environment
To use Monitoring Flow, you must first create a VPC and subnets.
Before creating a flow connection in Monitoring Flow, you must add the IP address of the VPC you intend to use to the inbound rules of the security group.
-
Go to the Beyond Networking Service > VPC > VPC menu on the KakaoCloud console.
-
Refer to the Create VPC guide to create a VPC.
-
Refer to the Create subnet guide to create subnets.
-
To register the IP of the VPC in the inbound rules of the security group, enter the VPC's IP CIDR block and port number in the source field.
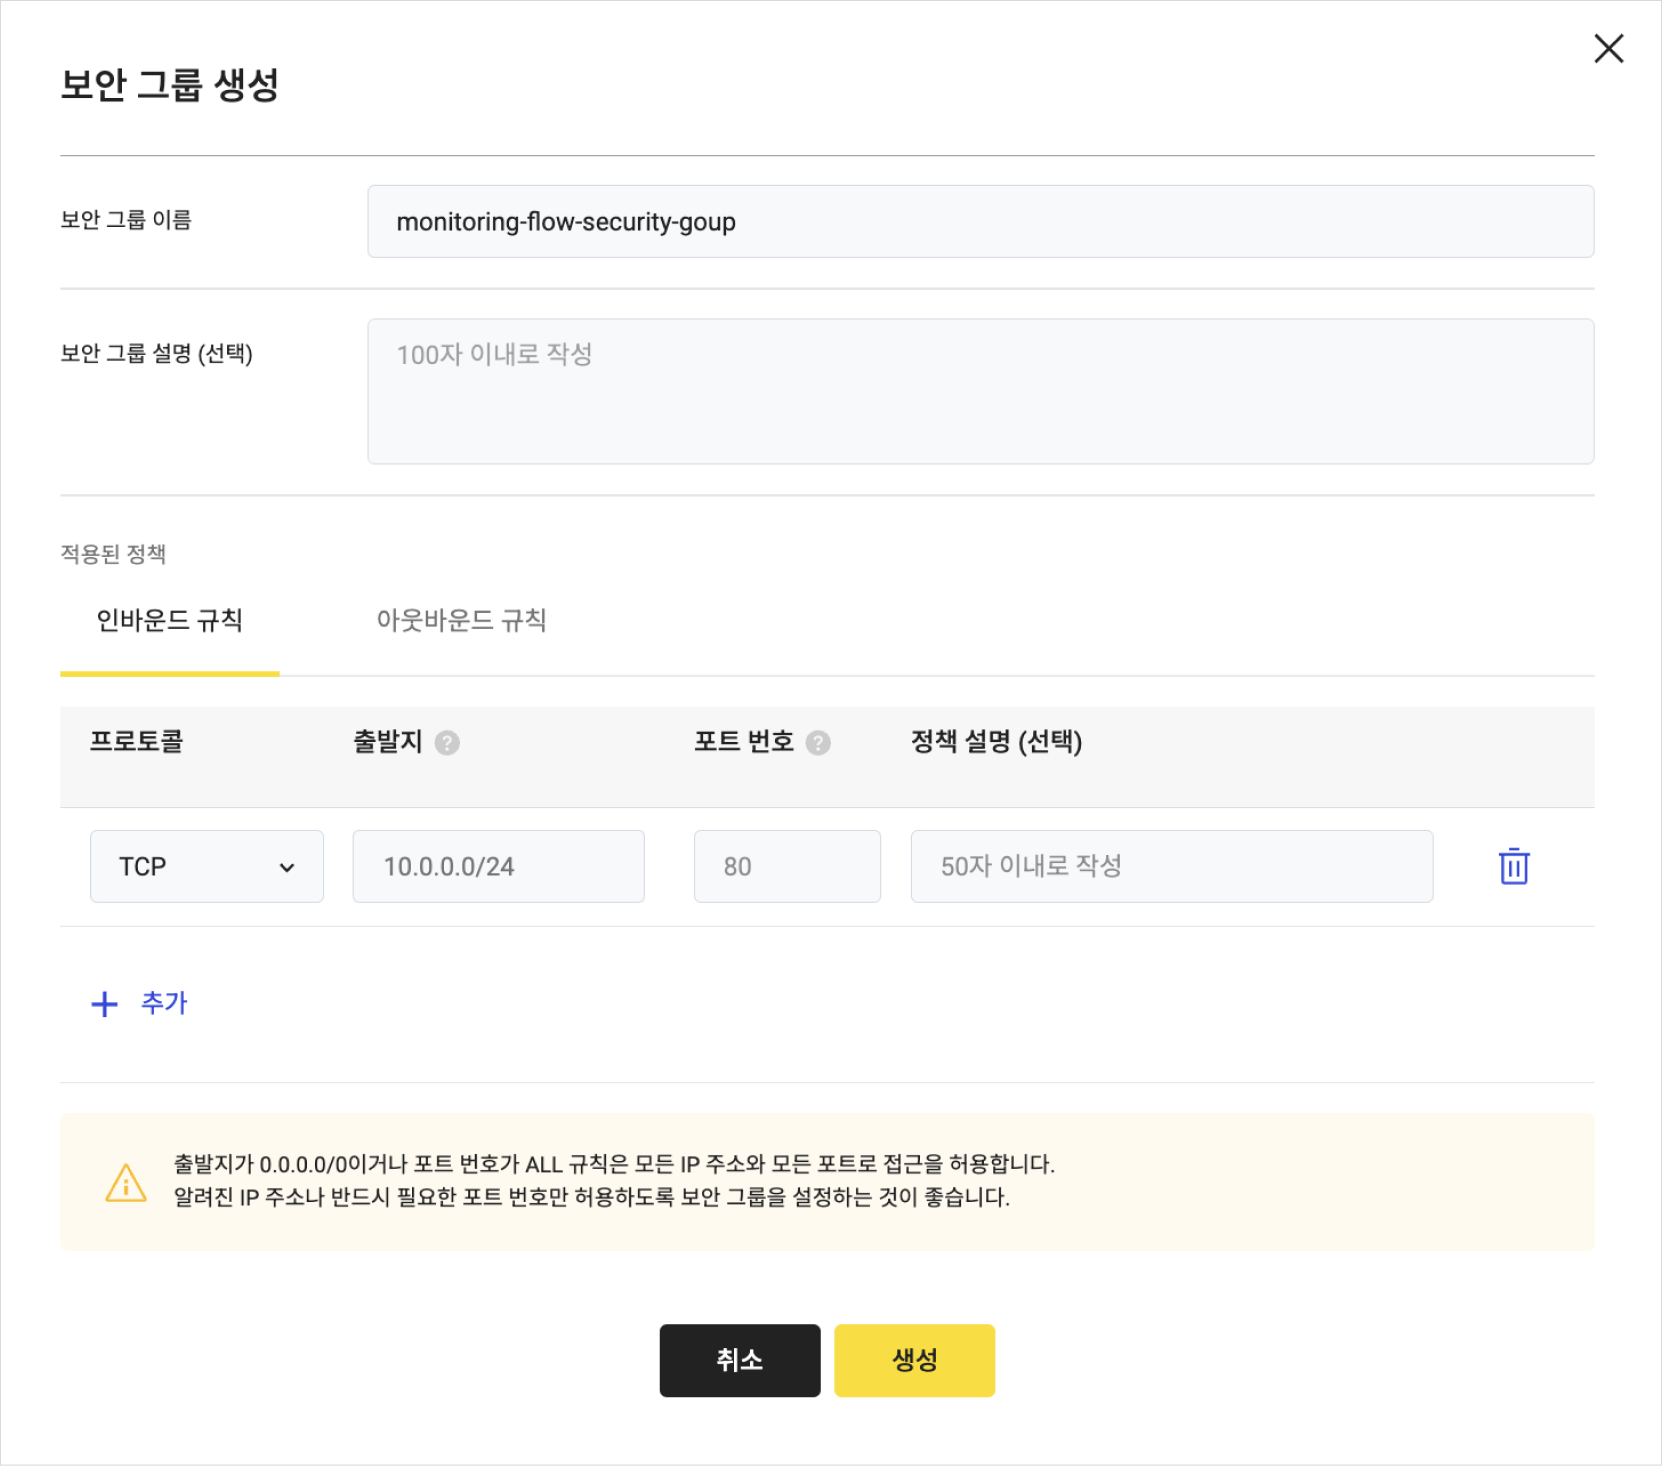 Creating security group
Monitoring Flow scenario example
You can monitor API servers using Virtual Machines.
Scenario overview
In this scenario, the API step is used to cover the following main aspects:
- Use KakaoCloud Virtual Machine to create an API server.
- Create a flow connection to link the subnet channel for the API server.
- Create a Monitoring Flow scenario for continuous monitoring of the API server.
- Use Alert Center to check responses to scenario results.
- Estimated time: 20 minutes
- Recommended operating system: Ubuntu
- Region: kr-central-2
- Prerequisites
- Reference documents
1. Create Virtual Machine instance
This exercise uses Virtual Machine, and the instance must be in an active state.
If you do not have a Virtual Machine instance, refer to the Create instance guide to create an instance.
-
Go to the Beyond Compute Service > Virtual Machine > Instance menu on the KakaoCloud console.
-
Refer to the Create instance guide to create an instance.
-
Enter the necessary information on the instance creation screen.
-
In the Network section, select the VPC and subnet to be connected to the flow connection.
- Be sure to select the VPC registered in the security group. -
Click Advanced Settings and enter the following script:
#!/bin/bash

sudo apt install -y nginx
sudo service start nginx -
Verify the instance information.
- This information is required when configuring Monitoring Flow steps in this example.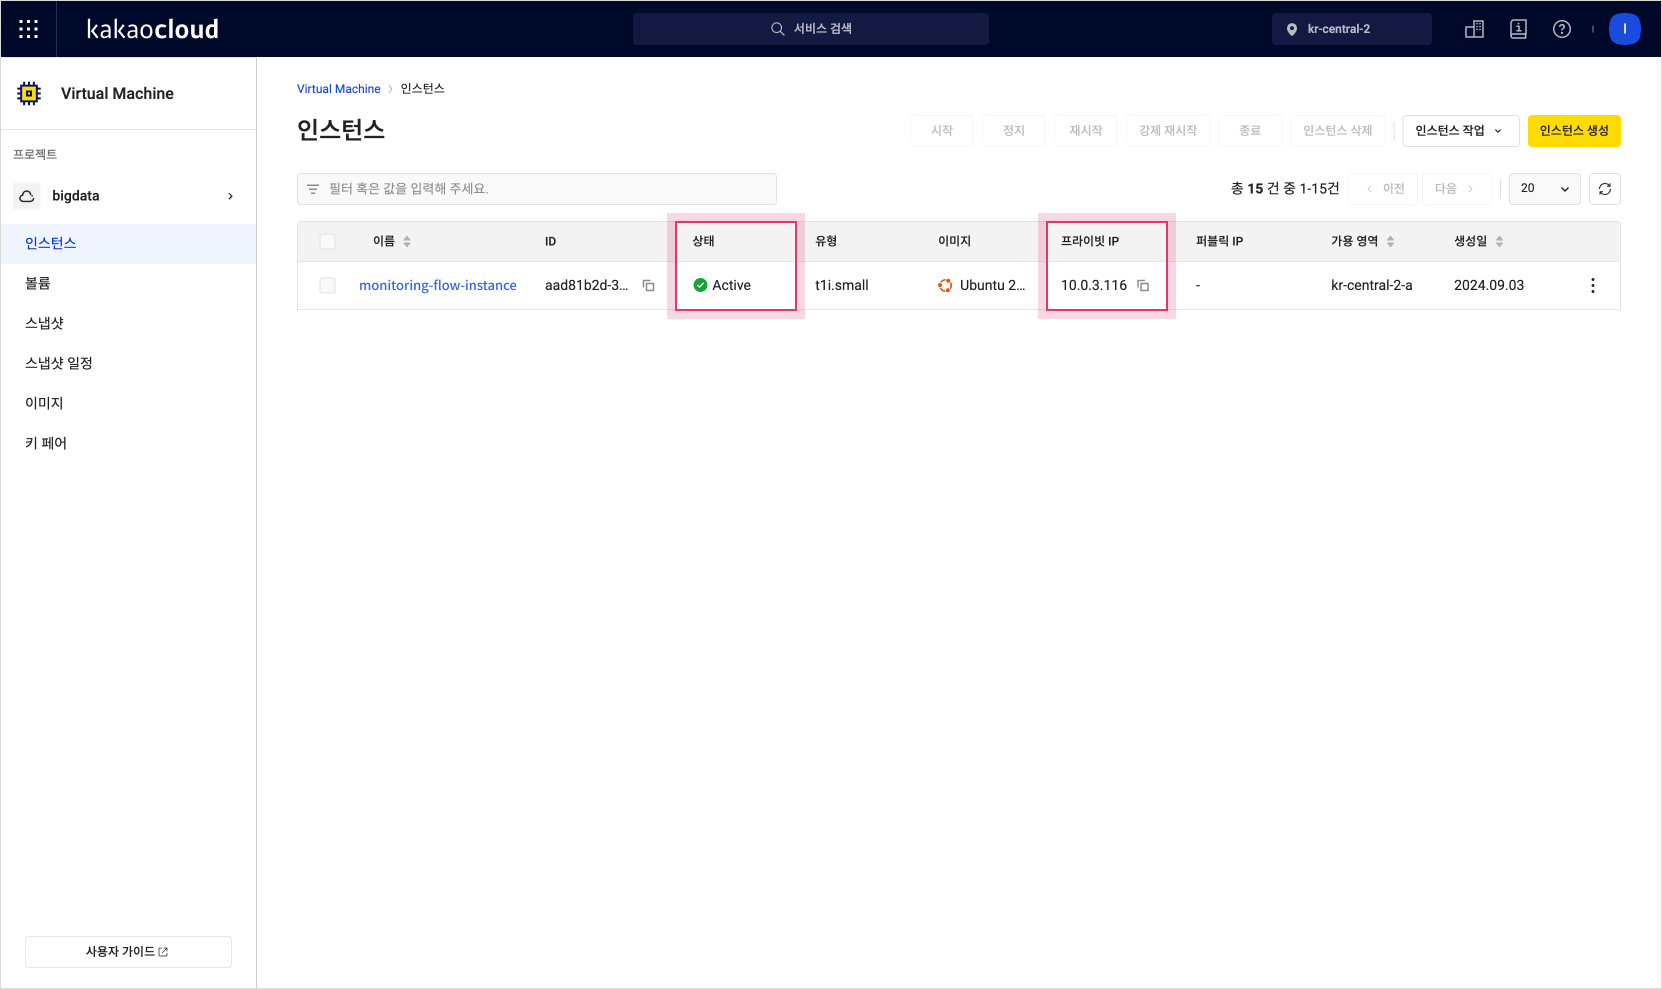 Instance list
2. Create flow connection
To access KakaoCloud's internal resources, create a flow connection. Connect the subnet channel where the Virtual Machine was created to the flow connection.
-
Go to the Management > Monitoring Flow > Flow Connection menu on the KakaoCloud console.
-
Click the [Create flow connection] button to navigate to the flow connection creation screen.
-
Select the VPC registered in the security group.
- Only active VPCs can be selected. -
Choose a subnet connected to the VPC to be linked to the flow connection.
- Only active subnets connected to the selected VPC can be chosen.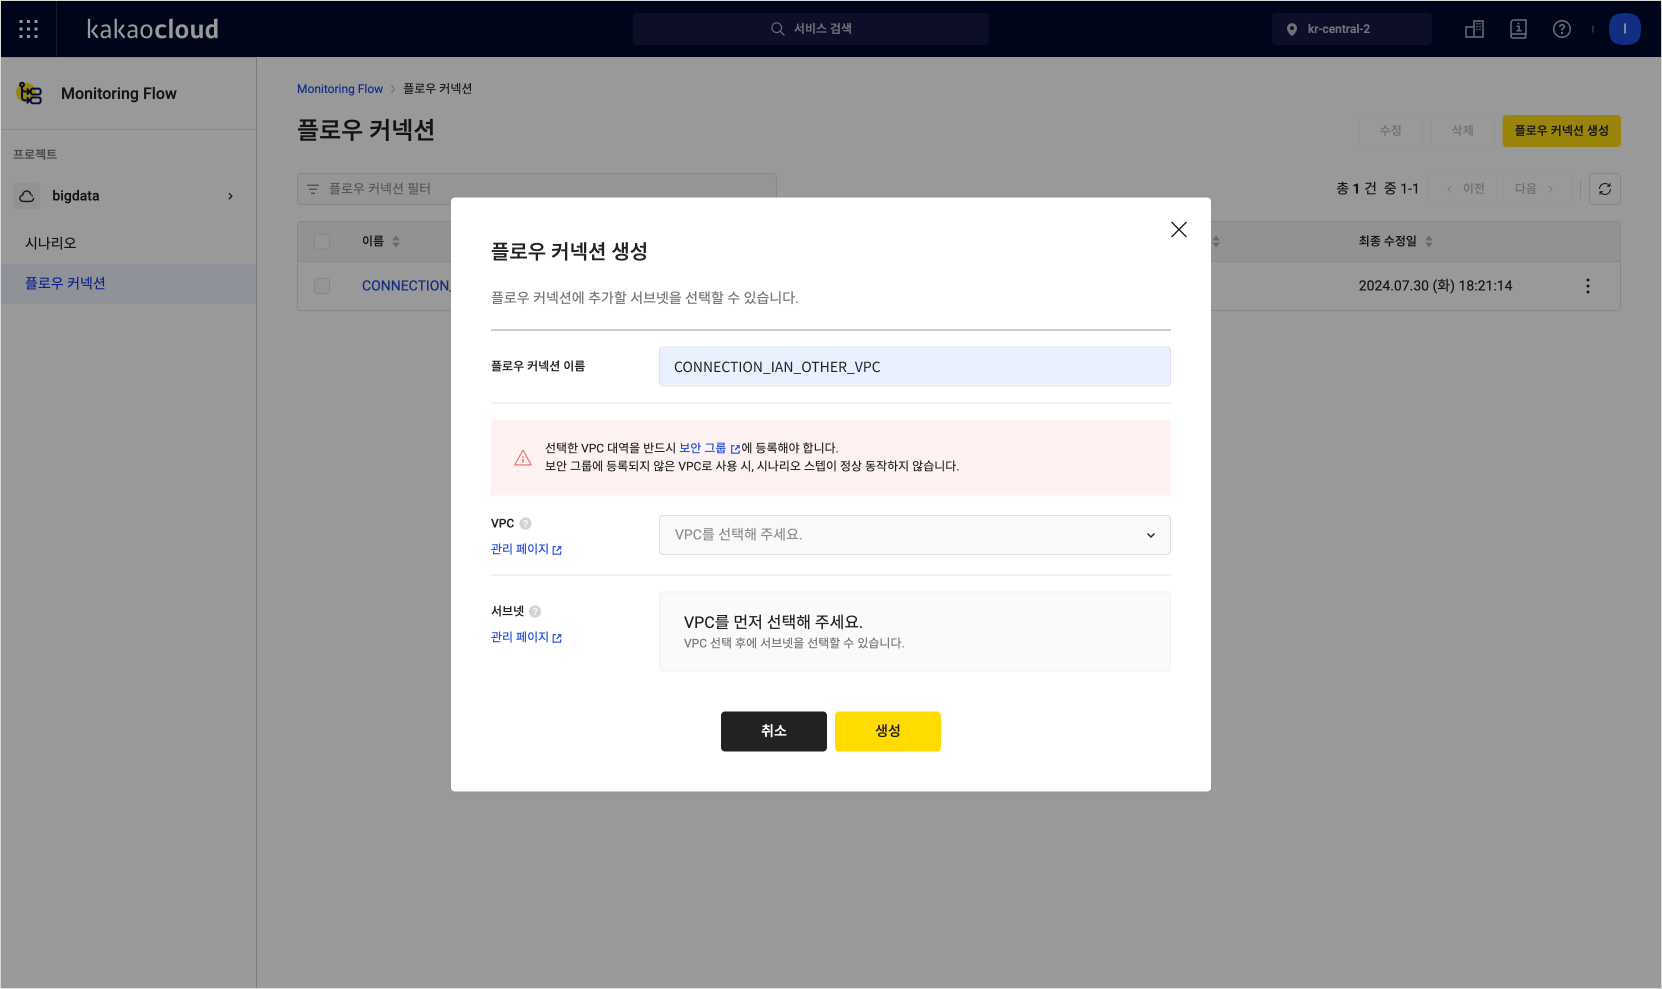 Create flow connection
3. Create scenario
Create a scenario and configure its schedule and steps.
-
Go to the Management > Monitoring Flow > Scenario menu on the KakaoCloud console.
-
Click the [Create scenario] button to navigate to the scenario creation screen.
-
Check the Use KakaoCloud VPC option to access KakaoCloud internal resources.
-
Select one of the registered flow connections.
-
Set the schedule.
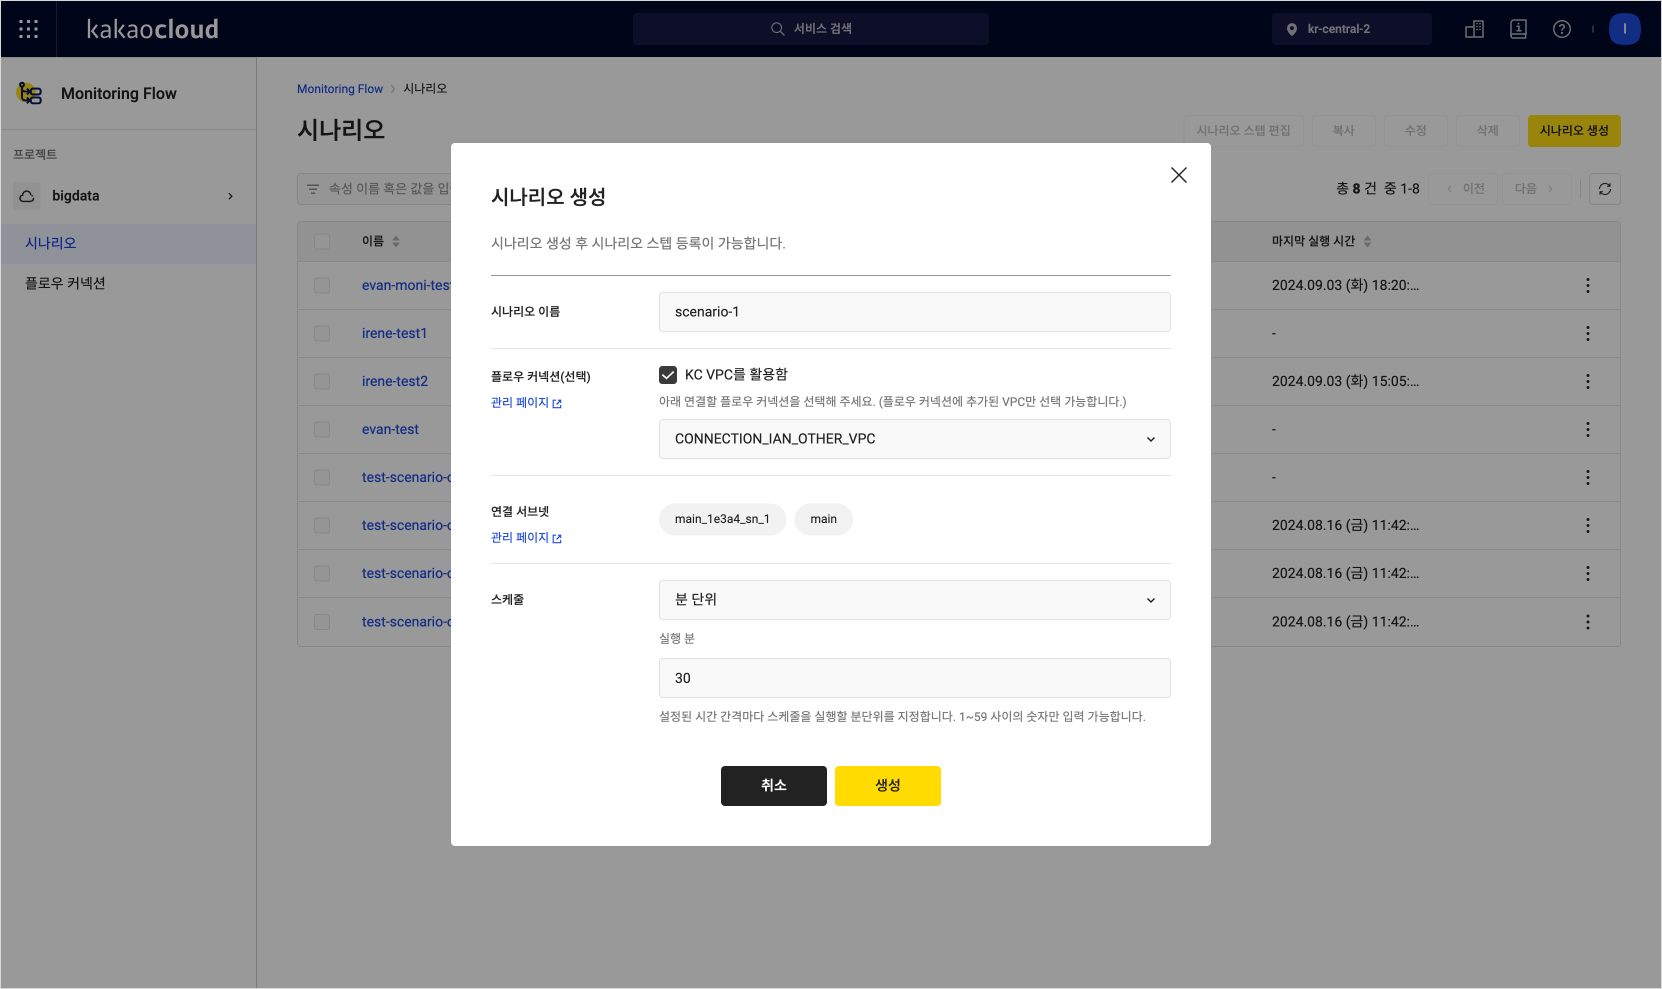 Create scenario
4. Add scenario steps
Combine the steps to complete a scenario. Follow the example below and enter the necessary values.
-
Go to the Management > Monitoring Flow > Scenario menu on the KakaoCloud console.
-
Click the name in the Scenario menu.
-
In the Details tab, click the [Add scenario step] button.
-
In the right panel, select
APIas the step type. -
Set the required fields.
Field Example Description Type API Select API Step name API-1 Name of the step Expected code Enter the expected Status Code for the URL
- If not entered,200is set by defaultMethod GET Select API request method URL http:// {Private-IP}Enter the API's URL
- Copy and enter the private IP of the instance from the Beyond Compute Service > Virtual Machine > Instance list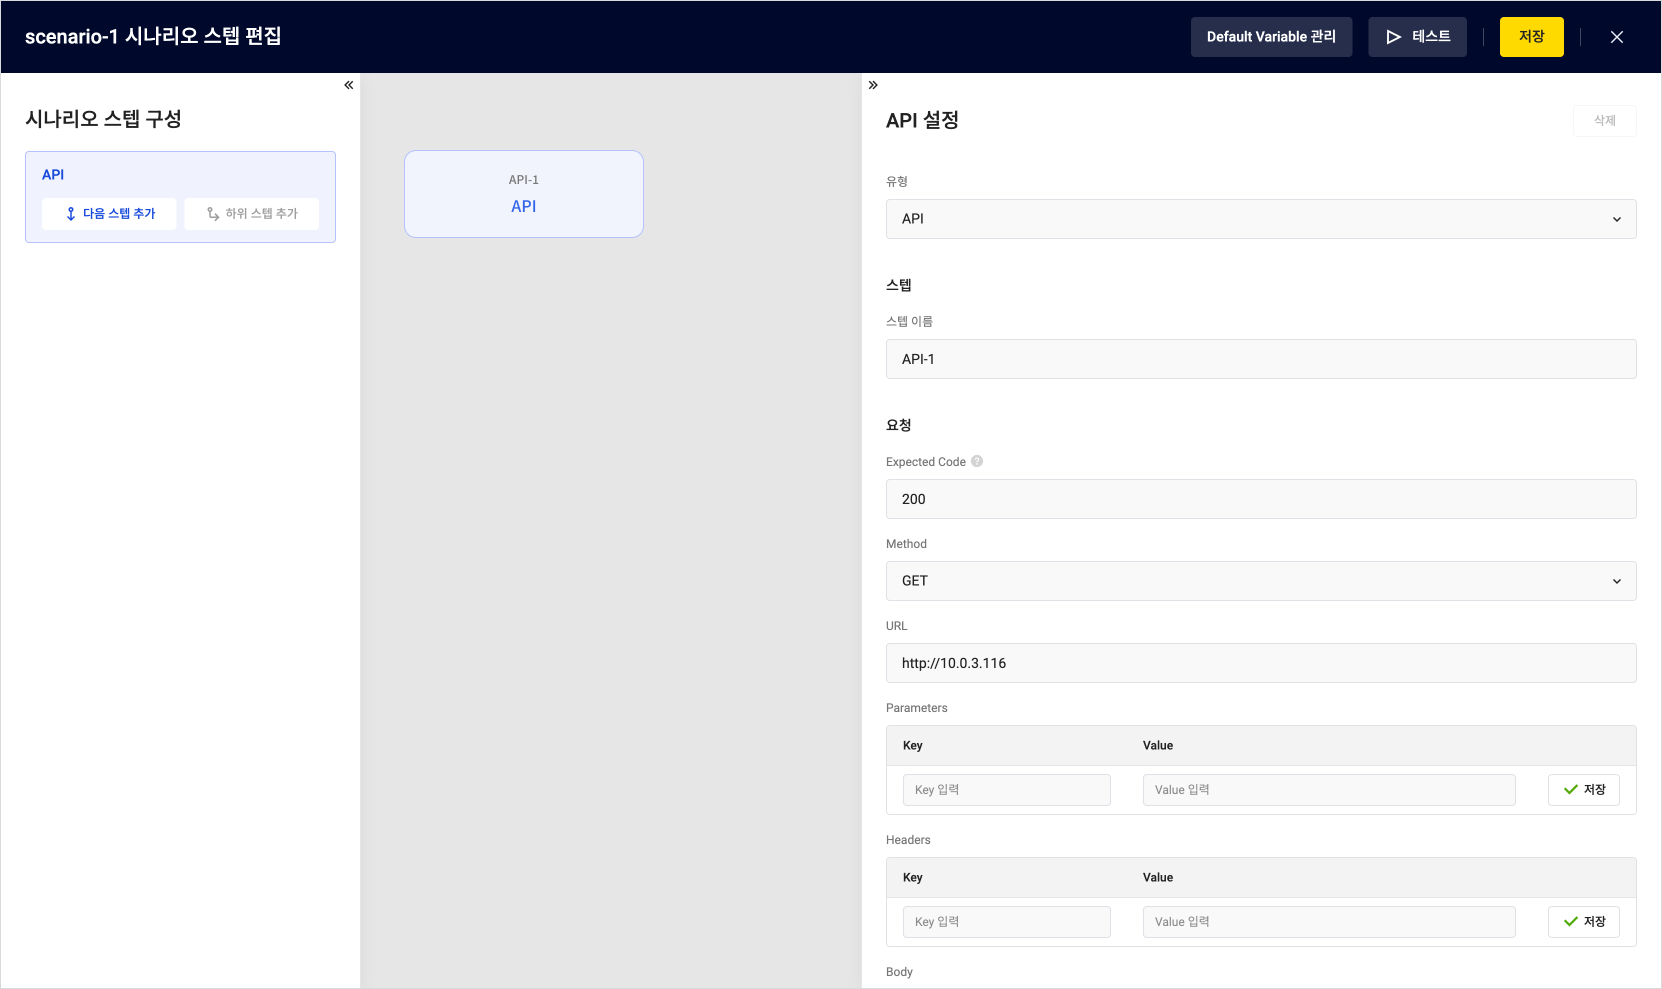 Add API step
 -
After filling in all the required fields, click the [Test] button in the upper-right corner to proceed with testing.
- See the 5. Test the scenario section below.
5. Test the scenario
After adding the scenario steps, you can test to ensure they work correctly.
-
Once all the required scenario step fields are completed, click the [Test] button in the upper-right corner.
-
Verify the test results.
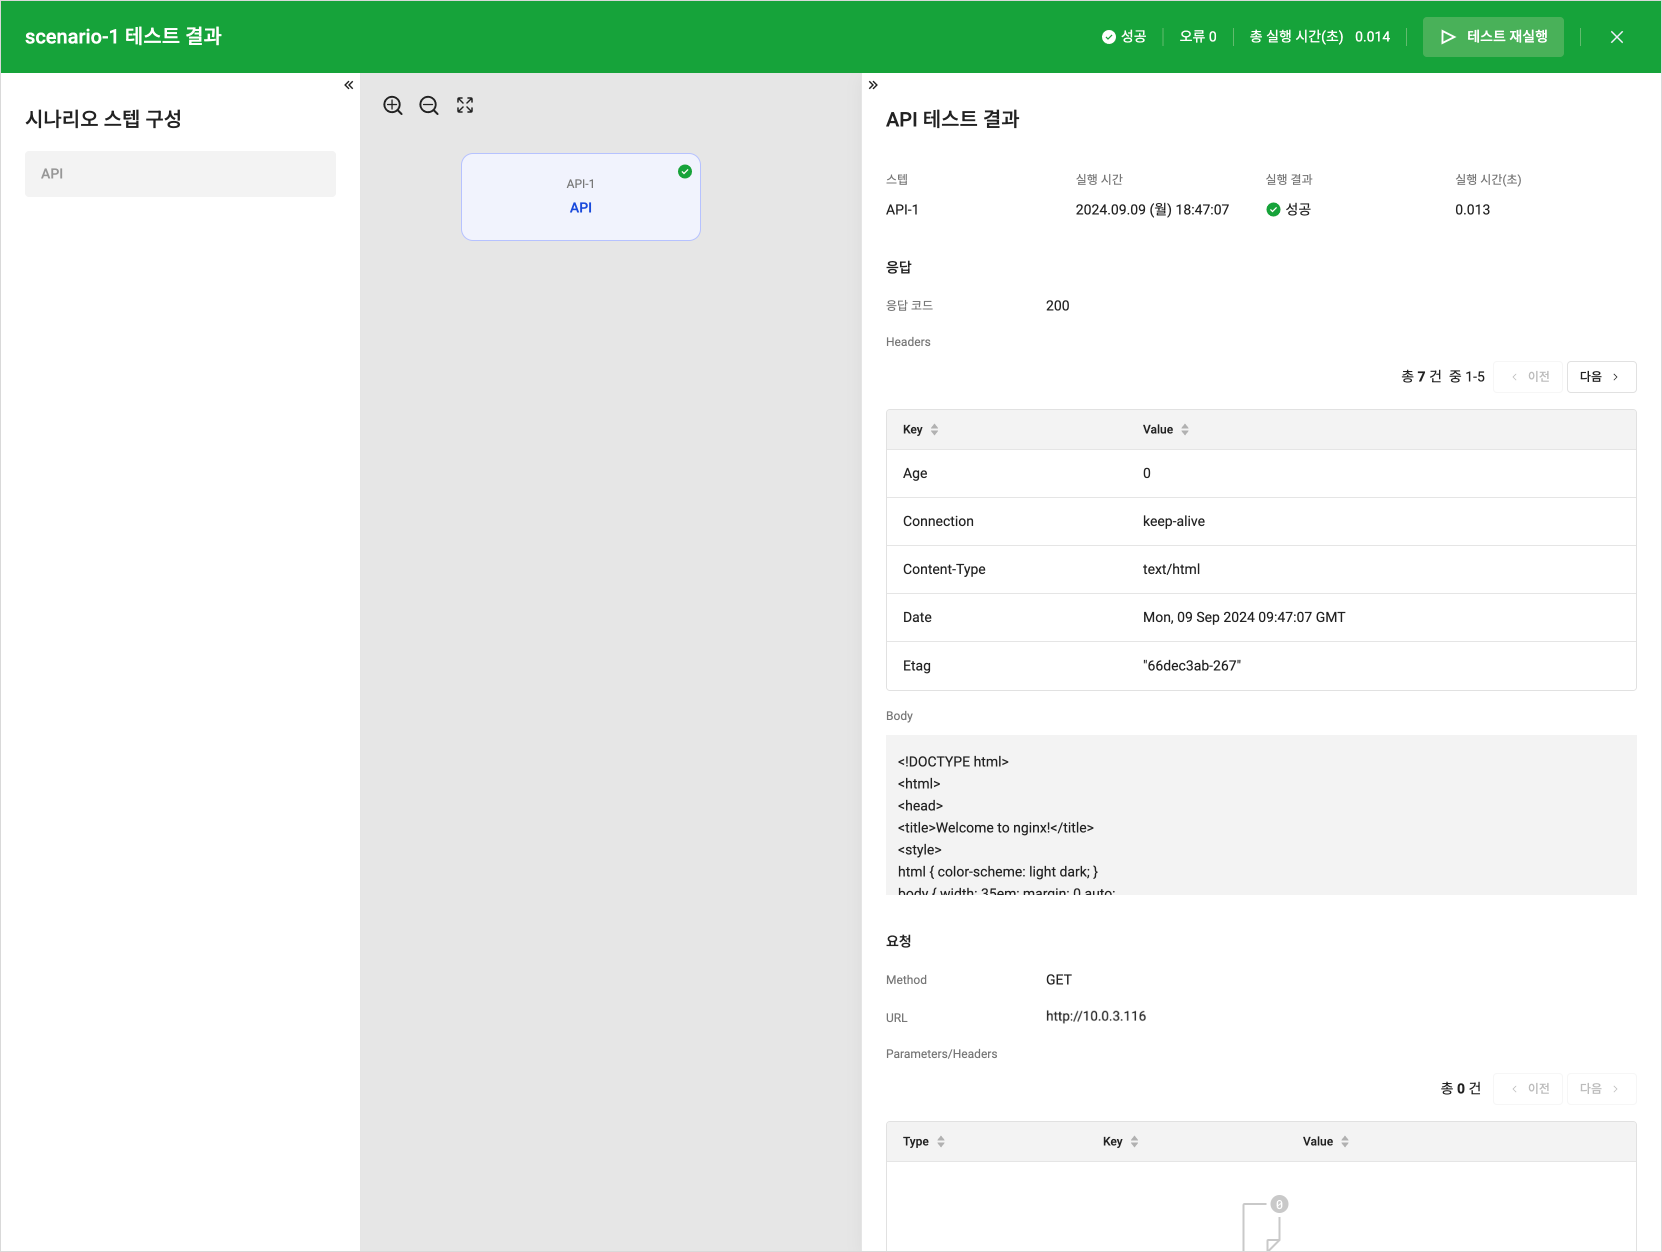 Test success result
 -
If there are errors, check the detailed error logs in the lower right panel.
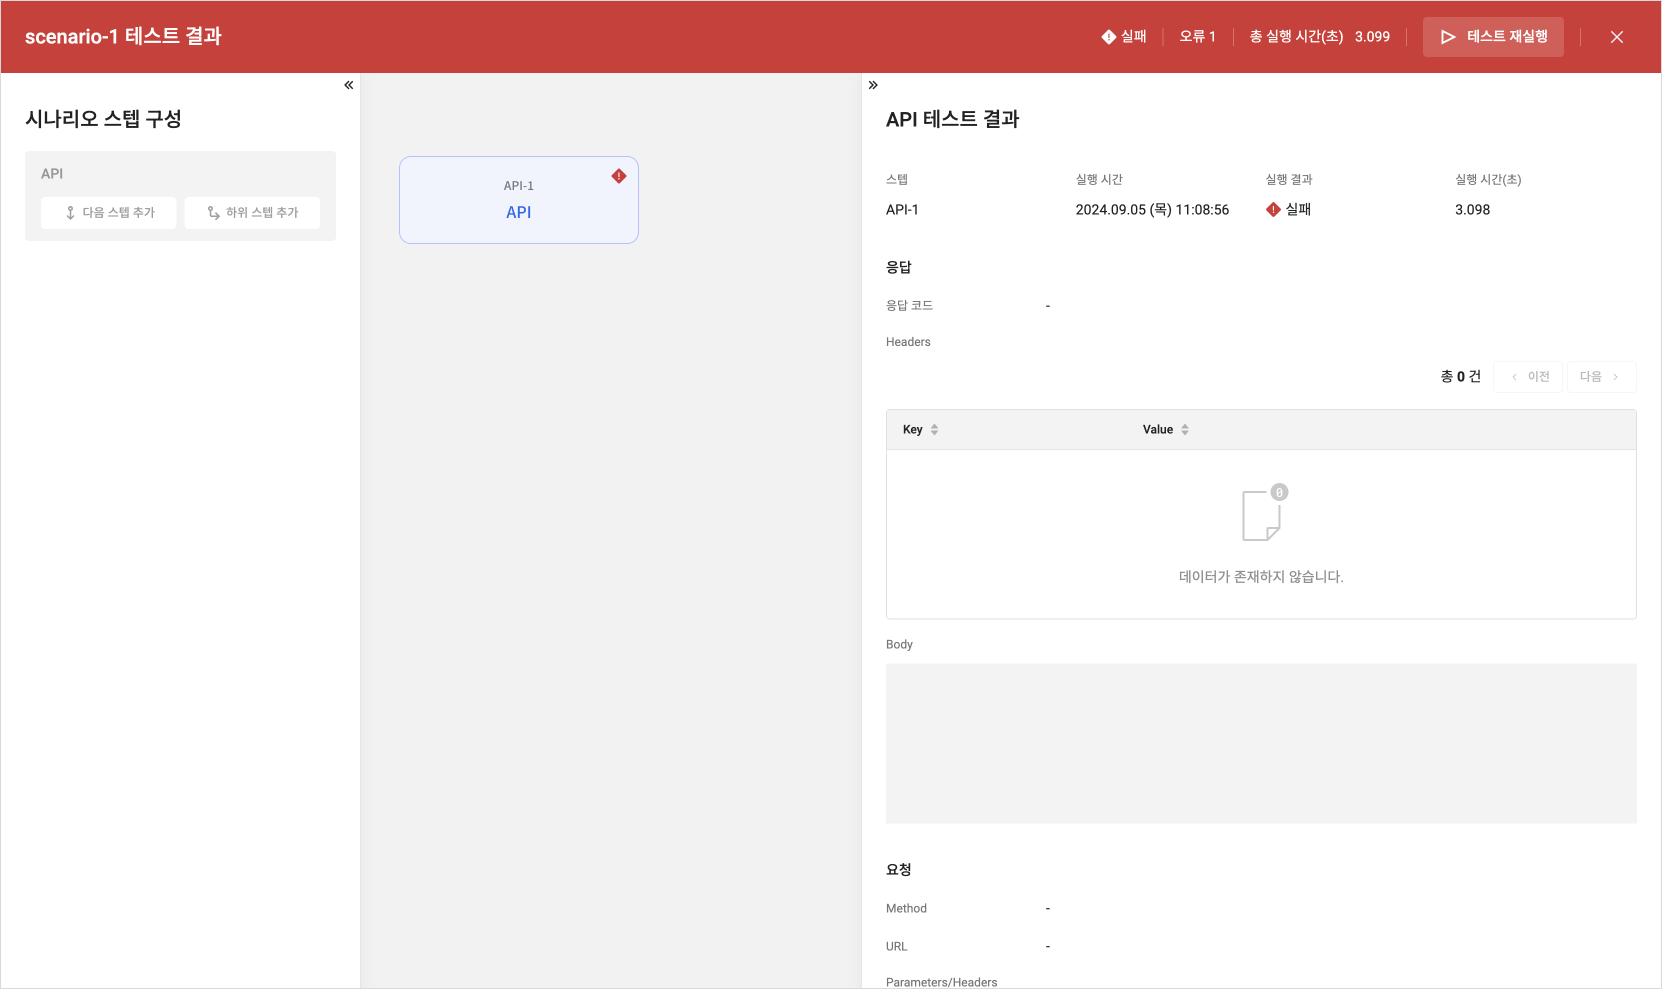 Test failure resultinfo
- If the instance is inactive, you will encounter a failure when accessing the server. Ensure the correct IP address is entered.
-
After confirming the test results, click the [Save] button in the upper-right corner of the scenario step editing screen to save the scenario. The saved scenario will run according to the set schedule.
-
See 6. Verify the results below for how to check the execution results.
6. Verify the results
You can check the execution results and time of a completed scenario.
-
Go to the Management > Monitoring Flow > Scenario menu on the KakaoCloud console.
-
Select the scenario to view the results.
-
In the scenario details screen, click the Execution results tab.
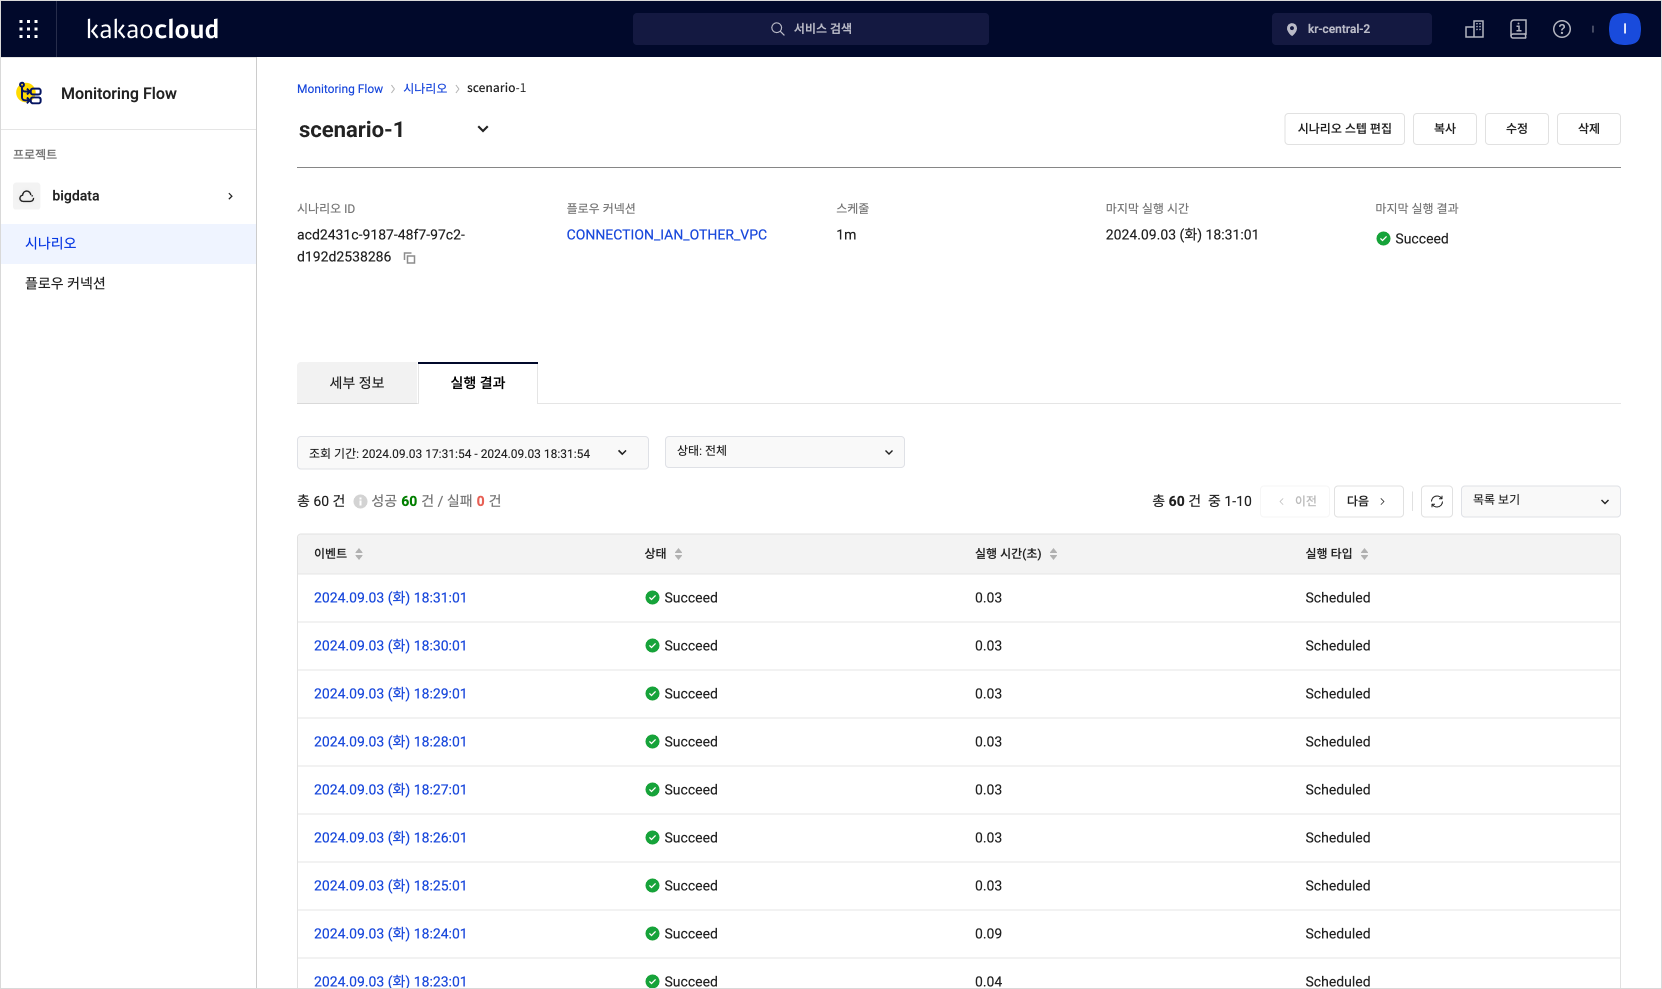 Scenario execution result list
 -
Click an event in the result list to check the detailed results.
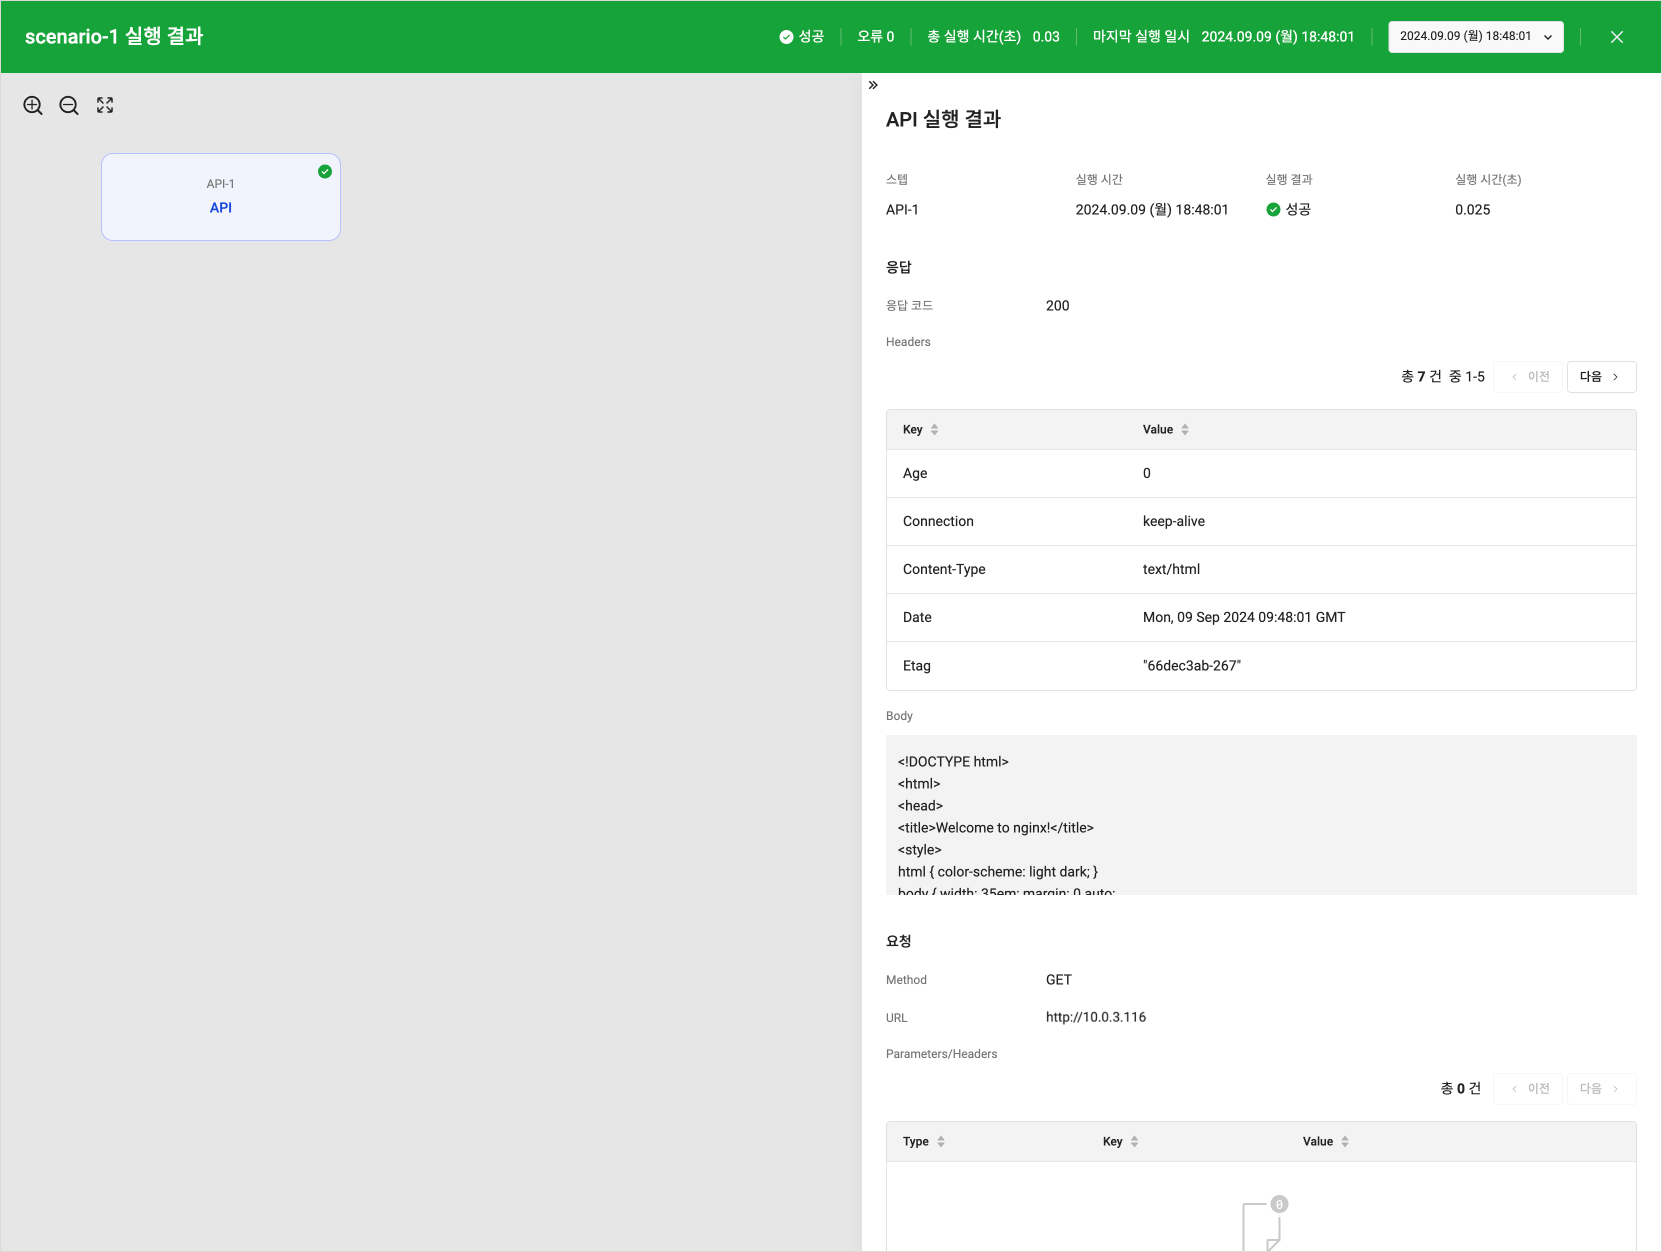 Scenario detailed execution result
7. Create Alert Center notification policy
Set up Alert Center notification policies to receive responses for Monitoring Flow's execution results (success/failure).
-
Go to the Management > Alert Center > Notification Policies menu on the KakaoCloud console. For details, refer to the Create alarm policy guide.
-
Refer to the table below for the necessary settings.
Field Configuration details Condition type Metric Service Monitoring Flow Condition settings You can receive success/failure alarms based on metrics.
- Set both Scenario Success Count and Scenario Fail Count to receive all metric alarms.
- To receive alarms only for failures, set only Scenario Fail Count.Resource Select the scenario to receive alarms Threshold 1 count or more Duration 1 minute -
Click [Next] at the bottom to complete creating the notification policy.
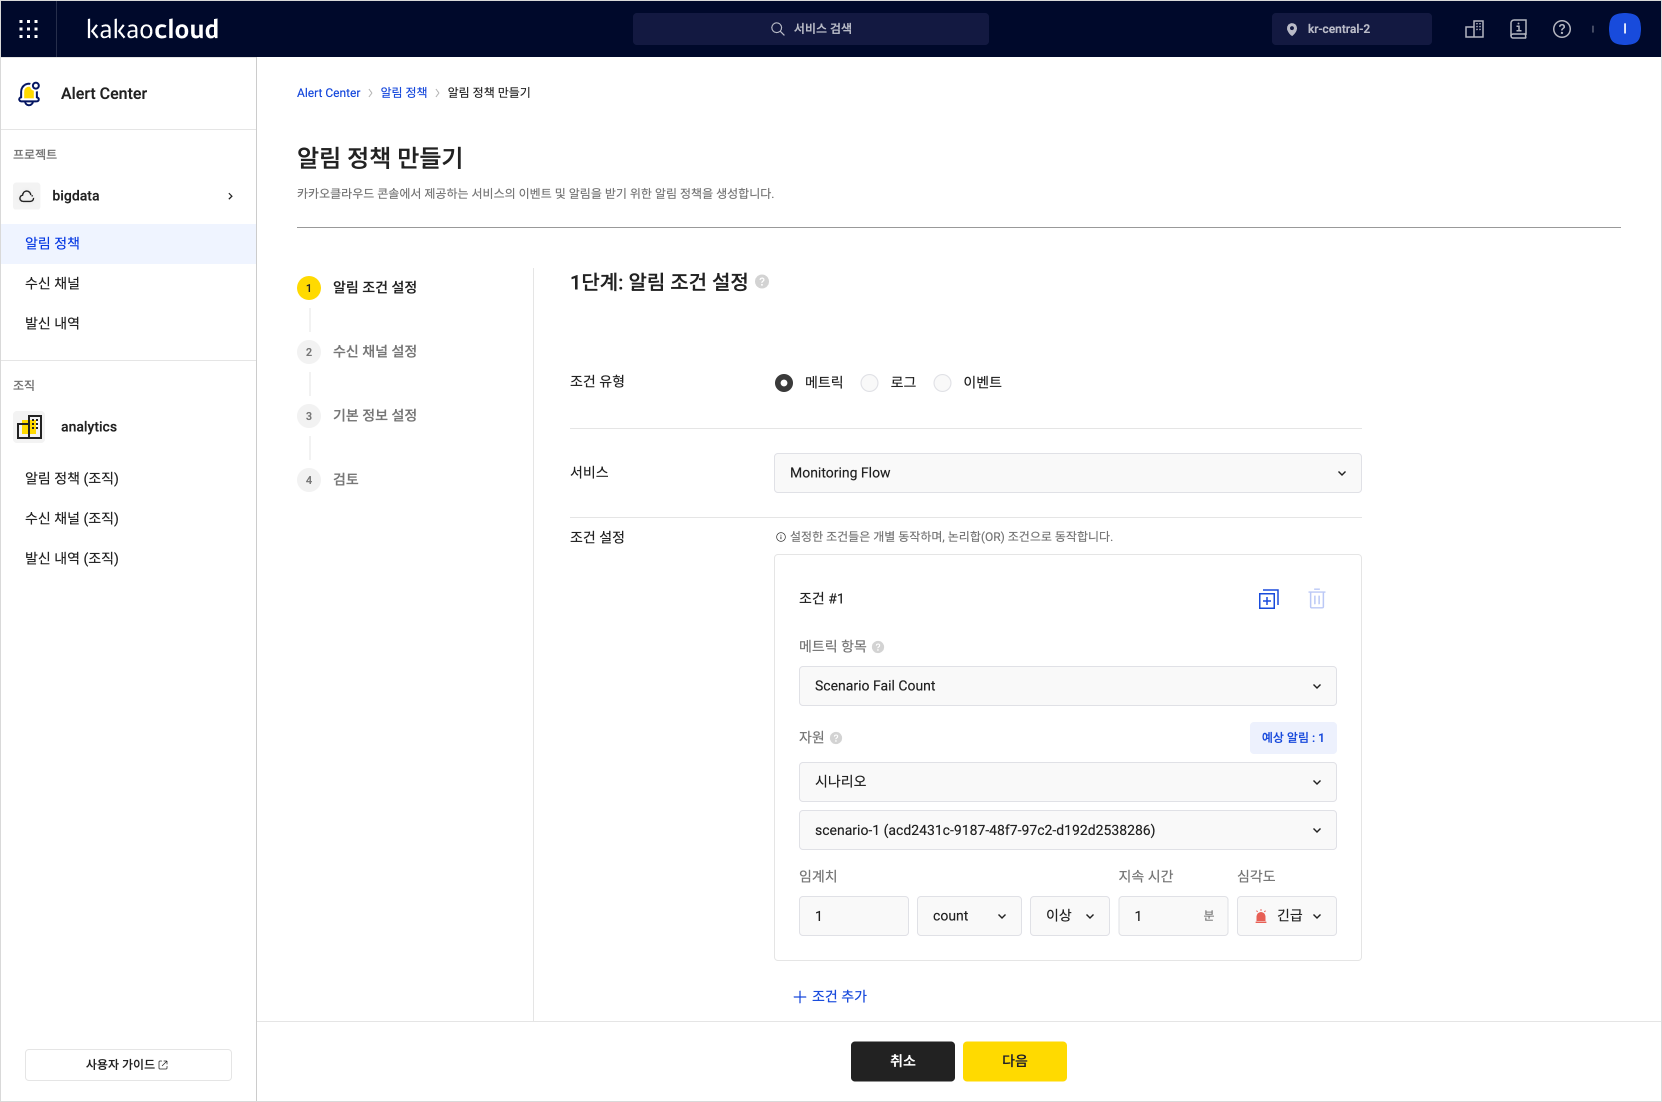 Create notification policy
 -
Confirm that Monitoring Flow scenario execution alarms (success or failure) are received according to the notification policy.