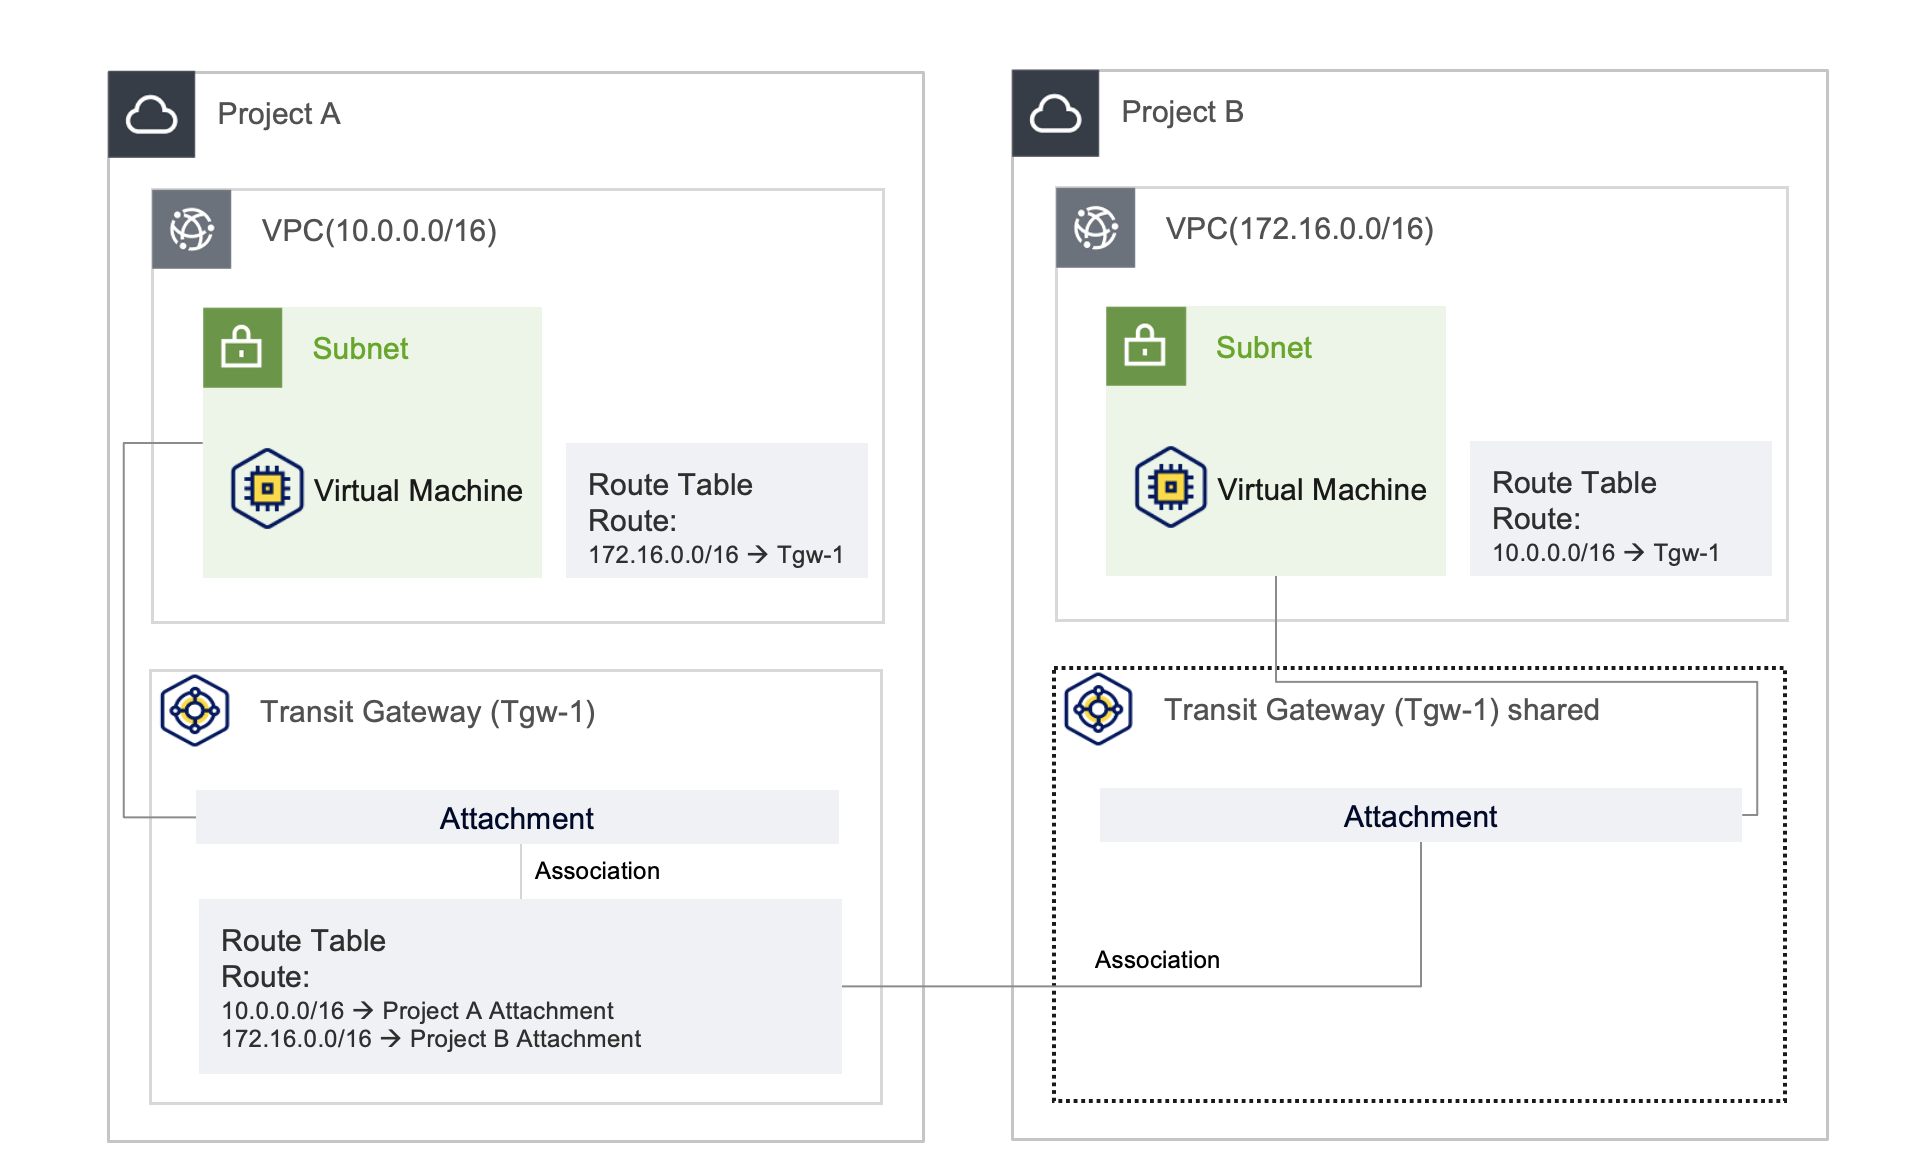
transit gateway sharing configuration
This document explains how to use the Transit Gateway sharing feature to enable communication between VPCs in two different projects.
 Transit Gateway sharing configuration
Step 1. Preparation
The sharing configuration for the Transit Gateway described in this document assumes that VPCs and Virtual Machines have already been created in two different projects. Please refer to the service documents for VPC and Virtual Machine creation and the information below to create VPCs and Virtual Machines for this scenario.
Example of VPC / Virtual Machine creation
| Field | Project A | Project B |
|---|---|---|
| Project | Shared project | Project receiving share |
| VPC IP | 10.0.0.0/16 | 172.16.0.0/16 |
| Virtual Machine IP | 10.0.1.167 | 172.16.3.124 |
Step 2. Create and share Transit Gateway
Here’s how to create a Transit Gateway in Project A and share it with Project B:
-
Follow Create Transit Gateway to create a Transit Gateway in Project A.
- The Transit Gateway created in Project A will be referred to as
Tgw-1.
- The Transit Gateway created in Project A will be referred to as
-
Follow Share Transit Gateway to share the Transit Gateway (
Tgw-1) created in Project A with Project B. -
In Project B's Transit Gateway list, verify that the Transit Gateway (
Tgw-1) has been shared correctly.
Step 3. Create Attachments and configure routes
To configure the resources and traffic that connect to the Transit Gateway, create Attachments in each project and set up routes.
-
Project A: Follow Create Attachment to create an Attachment for
Tgw-1. When creating the Attachment, select the VPC (10.0.0.0/16) and the subnet (the subnet where the Virtual Machine is located) for communication. -
Project B: Follow Create Attachment to create an Attachment for
Tgw-1. Select the VPC (172.16.0.0/16) and the subnet (the subnet where the Virtual Machine is located) for communication.GuideIf the Sharing acceptance setting was set to
Automaticwhen creating the Transit Gateway in Project A, the Attachment created in Project B will be created immediately. However, if set to [Manual], the Transit Gateway will be in thePending Approvestatus, and approval from Project A will be required. For more details on approval, refer to Approve Attachment. -
Follow Add association and Add route to connect the created Attachments to the route table and configure routing.
Destination Target Attachment of Project A 10.0.0.0/16 Attachment of Project B 172.16.0.0/16
Step 4. Set the route table of the VPC
To route the traffic received from the Transit Gateway, configure the route table in each project's VPC.
-
Project A: Follow Add route to add a route to the VPC's route table for the Transit Gateway.
Destination Target Type Target 172.16.0.0/16 Transit Gateway Tgw-1(Transit Gateway created in Project A) -
Project B: Follow Add route to add a route to the VPC's route table for the Transit Gateway.
Destination Target Type Target 10.0.0.0/16 Transit Gateway Tgw-1(Transit Gateway created in Project A)
Step 5. Verify the results
-
In Project A, perform a ping test from the Virtual Machine (10.0.1.167) to the Virtual Machine in Project B (172.16.3.124) to verify that the Transit Gateway has been shared correctly.
Verificationping 172.16.3.124 -
In Project B, perform a ping test from the Virtual Machine (172.16.3.124) to the Virtual Machine in Project A (10.0.1.167) to verify that the connection works in both directions.
Check resultsping 10.0.1.167